A Linux Development Desktop with VMware Horizon - Part I: Horizon

The Universal Workbench
I often thought about writing down my experiences on the topics of Jumphosts, Shell-modifications and useful tools in a series of blog posts, but I hadn´t found the right moment, until I saw the following Tweet, where Alex asked his followers how they get access to a Linux system if they aren´t running Linux on their workstation (locally).
Ubuntu 18.04 VDI desktop
— Mark Brookfield (@virtualhobbit) December 28, 2019
Similar to Mark´s answer, I´m also using a VDI (Virtual-Desktop-Infrastructure) desktop for my purposes and I began writing this series…back in January…time passed by and due to other projects I worked on and which demanded a lot of my attention (VEBA 😁), it took a little bit longer to publish them.
Having a suitable Jumphost, Remotehost, Development-workstation or however you like to call the system that you connect to, to have access to the appropriate tools and applications available, comes in very handy when you reach the limits or get stuck with your local machine.
Examples:
- [Ops] Deploying an OVA (Open virtualization Appliance) which is located locally on your workstation into your remote Datacenter via VPN isn´t really a good idea.
- [Dev] I recently had to repeatedly create new versions of an OVA for testing purposes as changes were made to the code. Building the OVA takes time.
And another very important aspect of having a “Developer-friendly” environment quickly available comes into play! Let´s consider the rise of Kubernetes for example. Organizations today will perhaps reach a point, where it will be necessary to employ external developers and engineers (e.g. SRE´s, PRE´s) and provide a environment to them, that is on the one hand organization compliant and on the other hand offers sufficient flexibility and appropriate tools to these developers and engineers.
With this series of posts, I´d like to demonstrate how you can build such an environment for the described use-cases on your own and what´s necessary to offer it as a VDI desktop to your team or external employers. This will include the setup of a VMware Horizon Connection Server (broker for client connections), the installation, configuration and preperation of the Linux distributions Ubuntu and CentOS and how you can turn them into a universal workbench for development and operations.
Please give 3 minutes of your precious time for the following recording to get an idea of what you can expect at the end of these three articles.
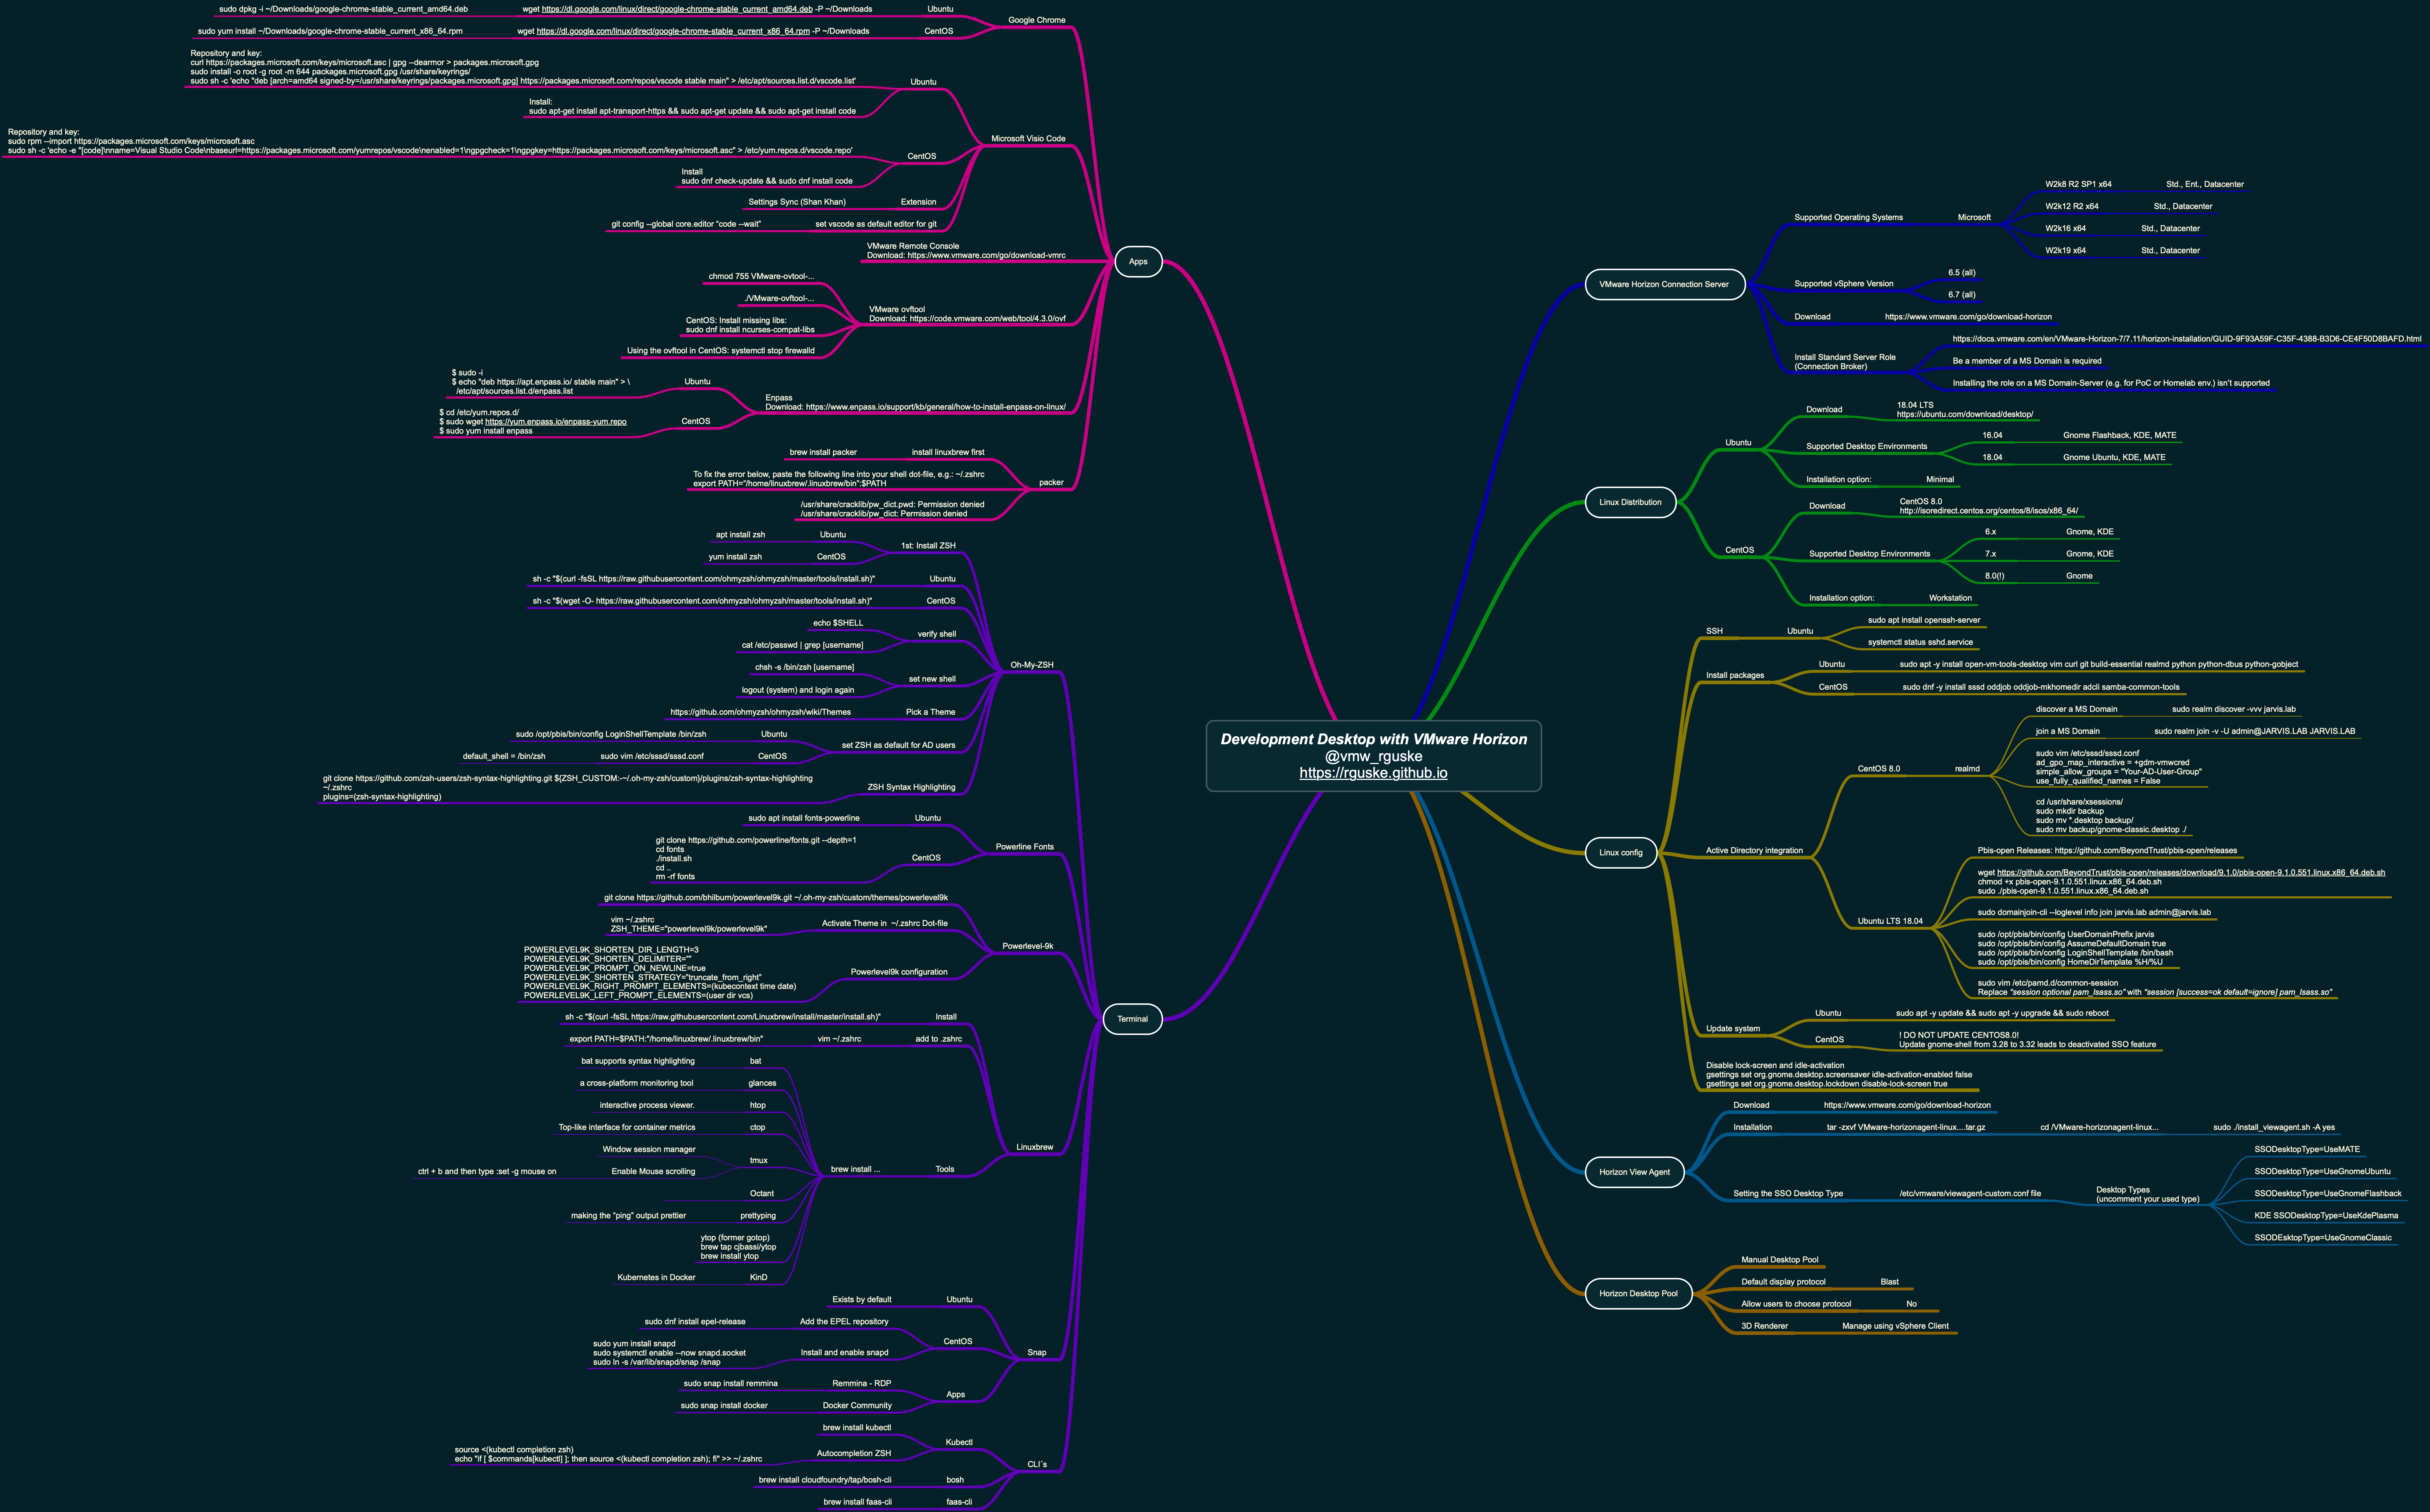
My Mindnode
1. Setup VMware Horizon Connection Server (v.7.11)
The VMware Horizon Connection Server is the broker for your client connections which authenticates users through Windows Active Directory and directs the request to the appropriate virtual machine (Figure II).
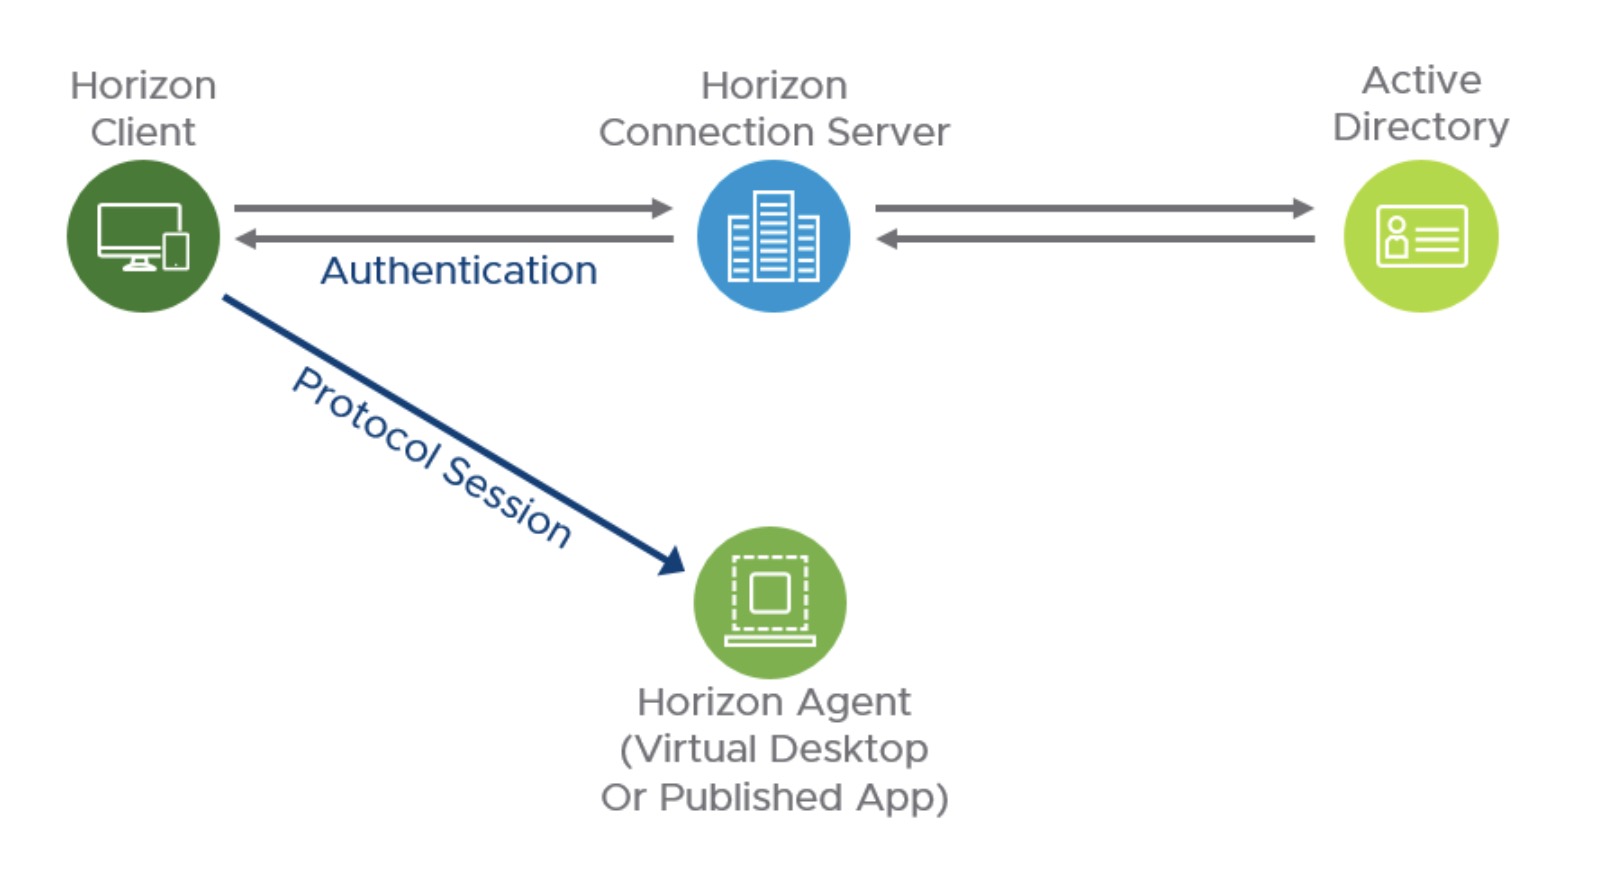
Source: Digital Workspace Tech Zone - VMware Workspace ONE and VMware Horizon Reference Architecture
If all PREREQUISITES are given (Figure I: Mindnode Development Desktop), the installation itself is really quick and simple.
Short overview
- Windows Server VM (W2k8R2 - W2k19) which is part of a MS Domain
- The Connection Server cannot be installed on a Domain Controller (e.g. for a PoC or a Homelab)
- Download and install the Connection Server v.7.11 installer (VMware-Horizon-Connection-Server-x86_64-7.11.0.exe / ~250 MB)
- Select the View Standard Server role
- Choose a User or a Group (local or AD) to authorize them for Horizon 7 administration
That´s it roughly! Therefore, it´s not necessary for me to go into the details here and instead, I´d like to refer you to the following sources:
VMware Docs
- Install Horizon Connection Server with a New Configuration - https://docs.vmware.com/en/VMware-Horizon-7/7.11/horizon-installation/GUID-9F93A59F-C35F-4388-B3D6-CE4F50D8BAFD.html
Post by Carl Stalhood
- Install Horizon 7 Standard Connection Server by - https://www.carlstalhood.com/vmware-horizon-7-connection-server/
2. Install a Linux-VM
2.1 Select a Linux Distribution
In this post, I´ll concentrate just on Ubuntu 18.04 LTS and CentOS 8.0 but in case that this is not your pick, you´ll find all Linux distributions that are supported for Horizon Agent on page 14 of the official installation guide here: “Setting Up Horizon 7 for Linux Desktops”.
2.2 Download Linux installation iso
- Ubuntu 18.04 LTS: https://ubuntu.com/download/desktop/
- CentOS 8.0 (at this time only 8.0 is supported!): http://isoredirect.centos.org/centos/8/isos/x86_64/
2.3 Create a new Virtual Machine
Now that your iso is ready to be mounted let´s create a new Virtual Machine. Choose your distro from the list and configure your vHardware. I followed the official recommendation for “Improved video playback in a 2D desktop (page 23).
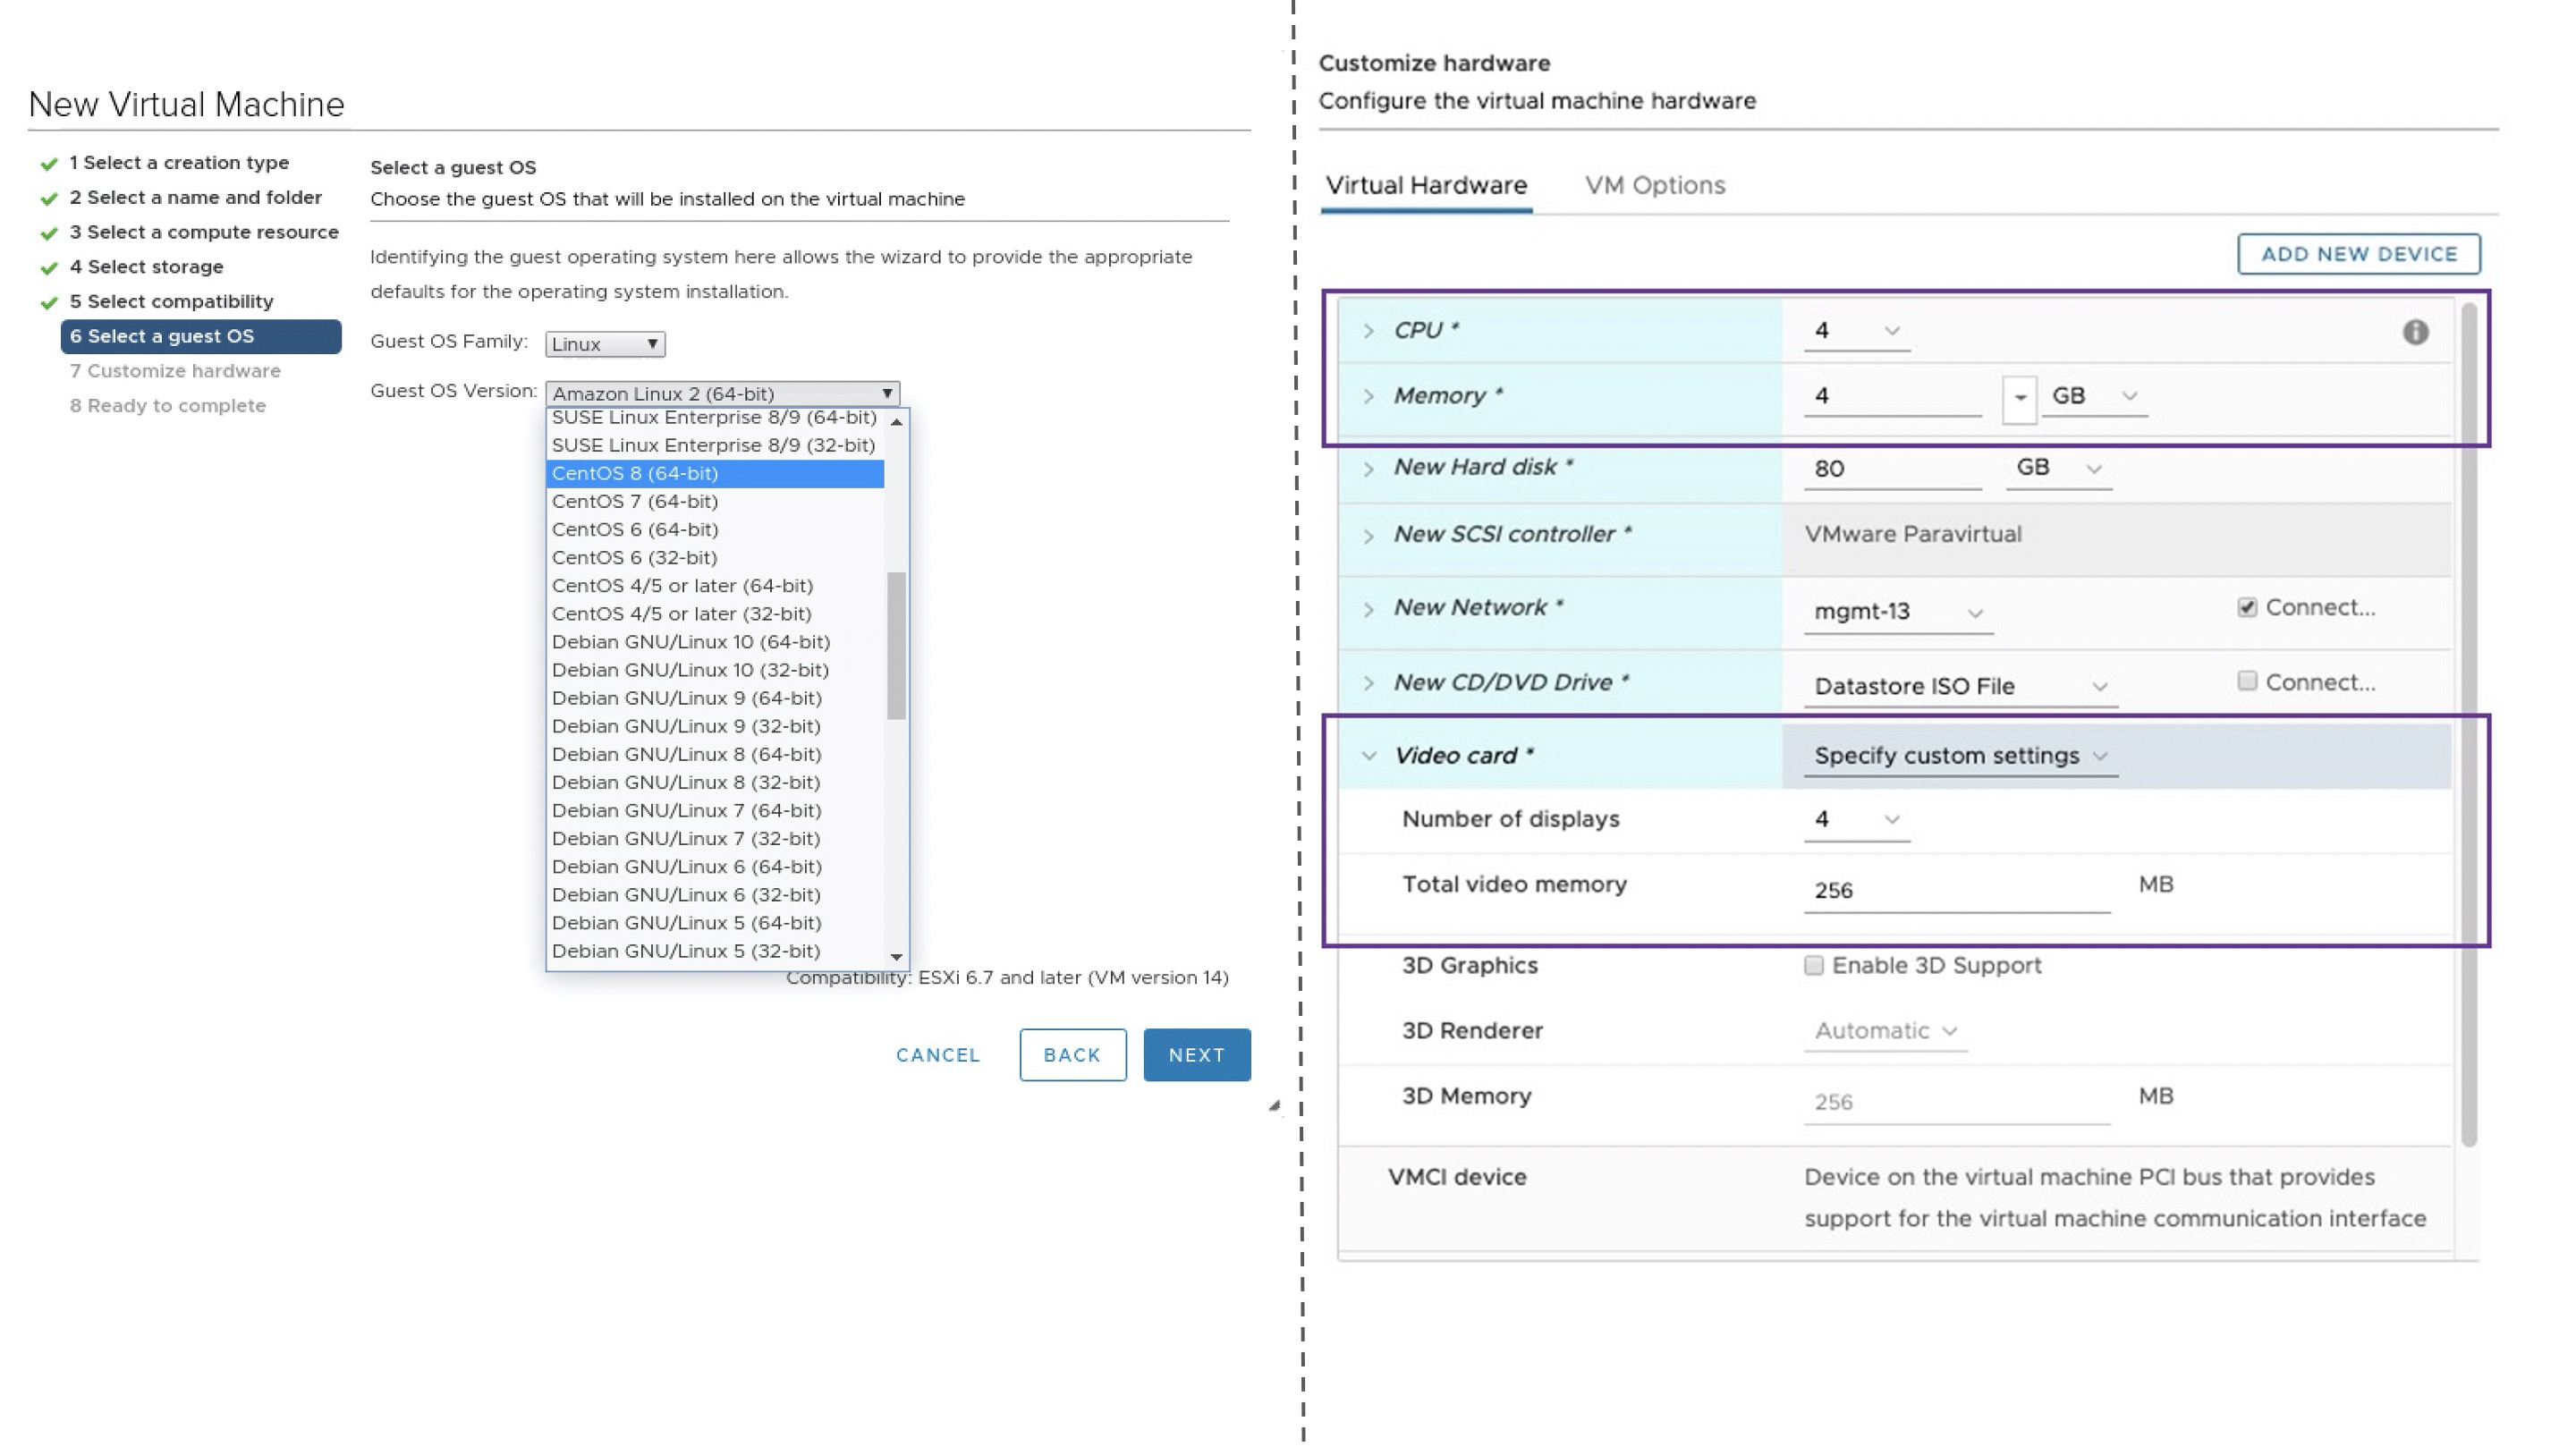
For CentOS I chose the “Workstation” option. Minimal installation is sufficient for Ubuntu.
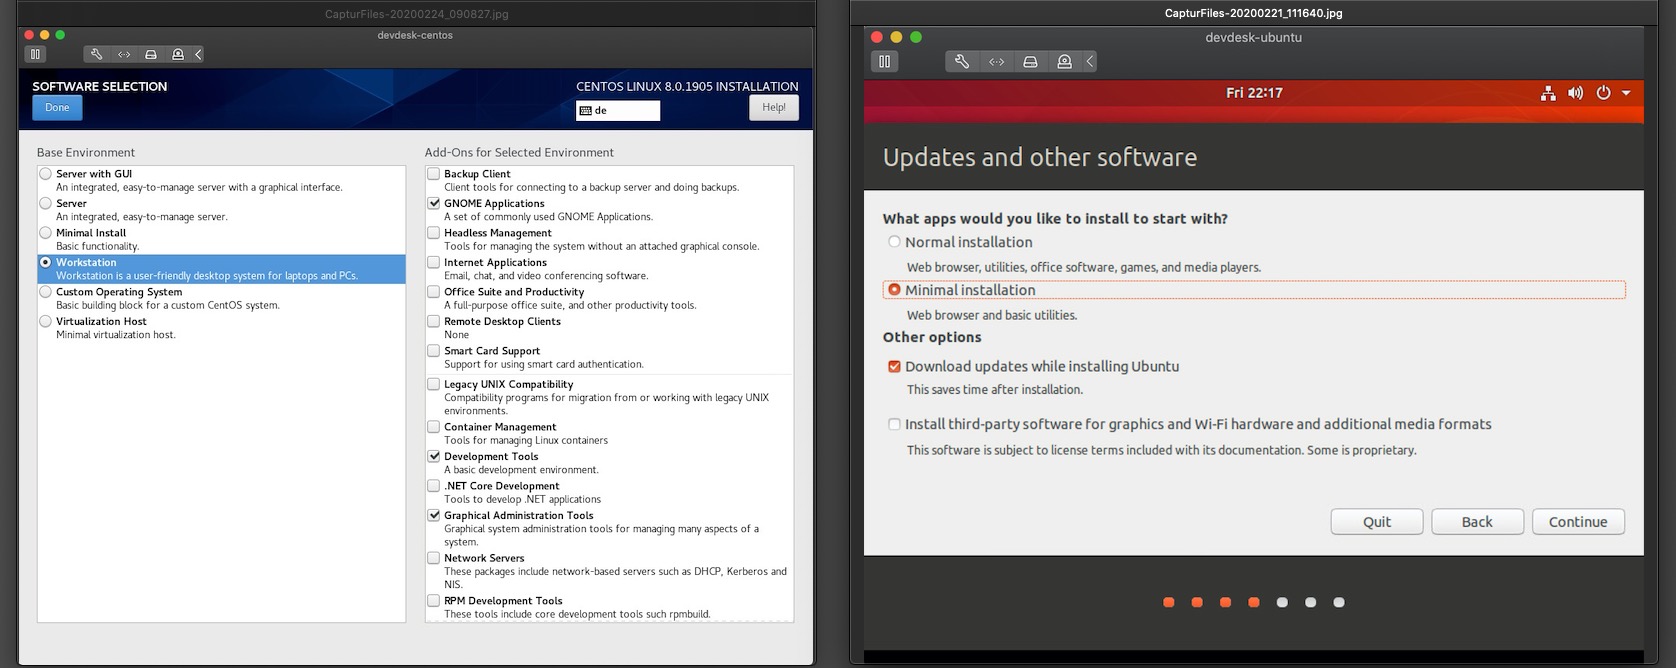
Compared to CentOS, it´s not possible under Ubuntu to make the system settings like e.g. the Network-settings or NTP during the initial phase of the installation. So make sure that you configure everything after Ubuntu is booted for the first time.
2.4 NTP (Ubuntu)
Proper network time synchronization is an essential part of monitoring a network and resolving issues within it!
|
|
Set your NTP server in the /etc/ntp.conf file. Chose an server pool closest to your location (https://www.ntppool.org/zone) and restart the ntp.service (systemctl restart ntp) after you´ve finished your configuration.
2.5 SSH (Ubuntu)
Activating SSH makes all the configurations, which will follow, a lot easier (copy & paste) in comparison to using the VMware Remote Console. OpenSSH has to be installed on Ubuntu:
Ubuntu:
|
|
CentOS: OpenSSH server is installed and enabled by default.
Check that the service is Active and running:
|
|
2.6 Packages and module dependencies
We´re planning to join our system into a Active Directory Domain and also want to install the VMware Horizon View Agent, which is necessary for adding our machine to a Desktop-Pool later on. Before we can continue, it´s necessary to eliminate some dependencies by installing some packages upfront.
yum update!Normally, the first step I do after setting up a fresh Linux system, is the update of every currently installed package of it (apt update / yum update). You can run the update and upgrade “safely” for Ubuntu but NOT for CentOS 8.0. The VMware Horizon View Agent v.7.11 does not support gnome-shell version 3.3x. If you run the sudo yum update command, the gnome-shell will be updated and this leads to the following error:
|
|
“Disable SSO” isn´t what we want!
I also tried to exclude the package update for the GNOME Shell by excluding it as well as Mutter from the yum.conf file…
|
|
…but this will cause the system to boot with a black-screen. I got the internal feedback, that we´ll support CentOS 8.1 (gnome-shell 3.3x) with Horizon v.7.12.
As already mentioned earlier, normally I update my freshly installed system immediately after the first boot. Let´s do this now!
Ubuntu:
|
|
CentOS:
|
|
Now that our system has a current state, we will install the needed packages which are necessary to proceed further.
Ubuntu:
|
|
CentOS:
|
|
3 Single Sign-On
Source: VMware Horizon 7: Setting Up Single Sign-On
The Horizon Single Sign-On feature gives us the great ability to connect to our Linux system via the Horizon View Client (Video I & Figure II) with an, on the Desktop-Pool level, entitled Active Directory user. This also includes the creation of users home directory if the user logs in for the first time. We have to integrate our Desktop with an Active Directory first to make use of SSO.
3.1 Integrating Ubuntu with Active Directory
Source: VMware Horizon 7: PowerBroker Identity Services Open (PBISO)
Ubuntu:
Pbis-open Releases: https://github.com/BeyondTrust/pbis-open/releases
Download and installation:
|
|
Domain join:
|
|
If you get the following error during the domain join…
…then the following applies: “It’s not DNS”…“There’s no way it’s DNS”…It was DNS!. Make sure DNS is set up properly.
Default configuration for domain users:
|
|
Edit the /etc/pam.d/common-session file and replace the line session optional pam_lsass.so with session [success=ok default=ignore] pam_lsass.so, save and quite (wq) and reboot the system.
Note: Updating the Horizon Agent will require that this setting must be performed again.
3.2 Integrating CentOS 8 with Active Directory
Source: VMware Horizon 7: Use the Realmd Join Solution for RHEL/CentOS 8.0
To have the ability to connect with an AD user to our desktop, we have to join an Active Directory domain. realmd will be the tool of our choice to join an Active Directory domain. It´s installed on CentOS by default.
CentOS:
|
|
|
|
That looks g00d! So the next step is joining the discovered realm. Execute sudo realm join -v -U admin@JARVIS.LAB JARVIS.LAB and wait until your terminal shows you the result. The -v option will give you a verbose output.
|
|
Last to-do at this point is to edit the /etc/sssd/sssd.conf. Add ad_gpo_map_interactive = +gdm-vmwcred, simple_allow_groups = "Your-AD-User-Group" under the [domain/domain name] section and set the value for use_fully_qualified_names to = False.
Example:
|
|
We are going to use Gnome Classic for the SSO login for CentOS 8.0. Remove all the desktop startup files from the /usr/share/xsessions directory, except the one for Gnome Classic.
|
|
Note: Updating the Horizon Agent will require that this setting must be performed again.
Reboot the system.
4 Install Horizon View Agent
As a next step we´re going to install the VMware View Agent which must be installed on virtual machines that are managed by vCenter Server so that View Connection Server can communicate with them.
Download: https://www.vmware.com/go/download-horizon
scp into my VM(s).
|
|
Unpack the tarball, go into the unpacked directory and execute the install_viewagent.sh script.
|
|
- Regarding the used command options and arguments - https://docs.vmware.com/en/VMware-Horizon-7/7.11/linux-desktops-setup/GUID-09A3F97C-47FE-4ABF-B68C-E42AE26632CC.html#GUID-09A3F97C-47FE-4ABF-B68C-E42AE26632CC
Now set the correct SSO Desktop Type for the View Agent (see page 18 and 107). Run sudo vim /etc/vmware/viewagent-custom.conf and uncomment the necessary line for your desktop environment.
- Ubuntu 18.04 = SSODesktopType=UseGnomeUbuntu
- CentOS = SSODesktopType=UseGnomeClassic
On the way down through the viewagent-custom.conf you came by a point where you can define a subnet for the View-Agent. If you like to install Docker on your desktop, as I would assume, you have to uncomment the example and replace the CIDR with yours.
In my case: Subnet=10.10.13.0/26
Otherwise you won´t be able to connect to your desktop anymore after installing Docker. Save and exit the file with :wq.
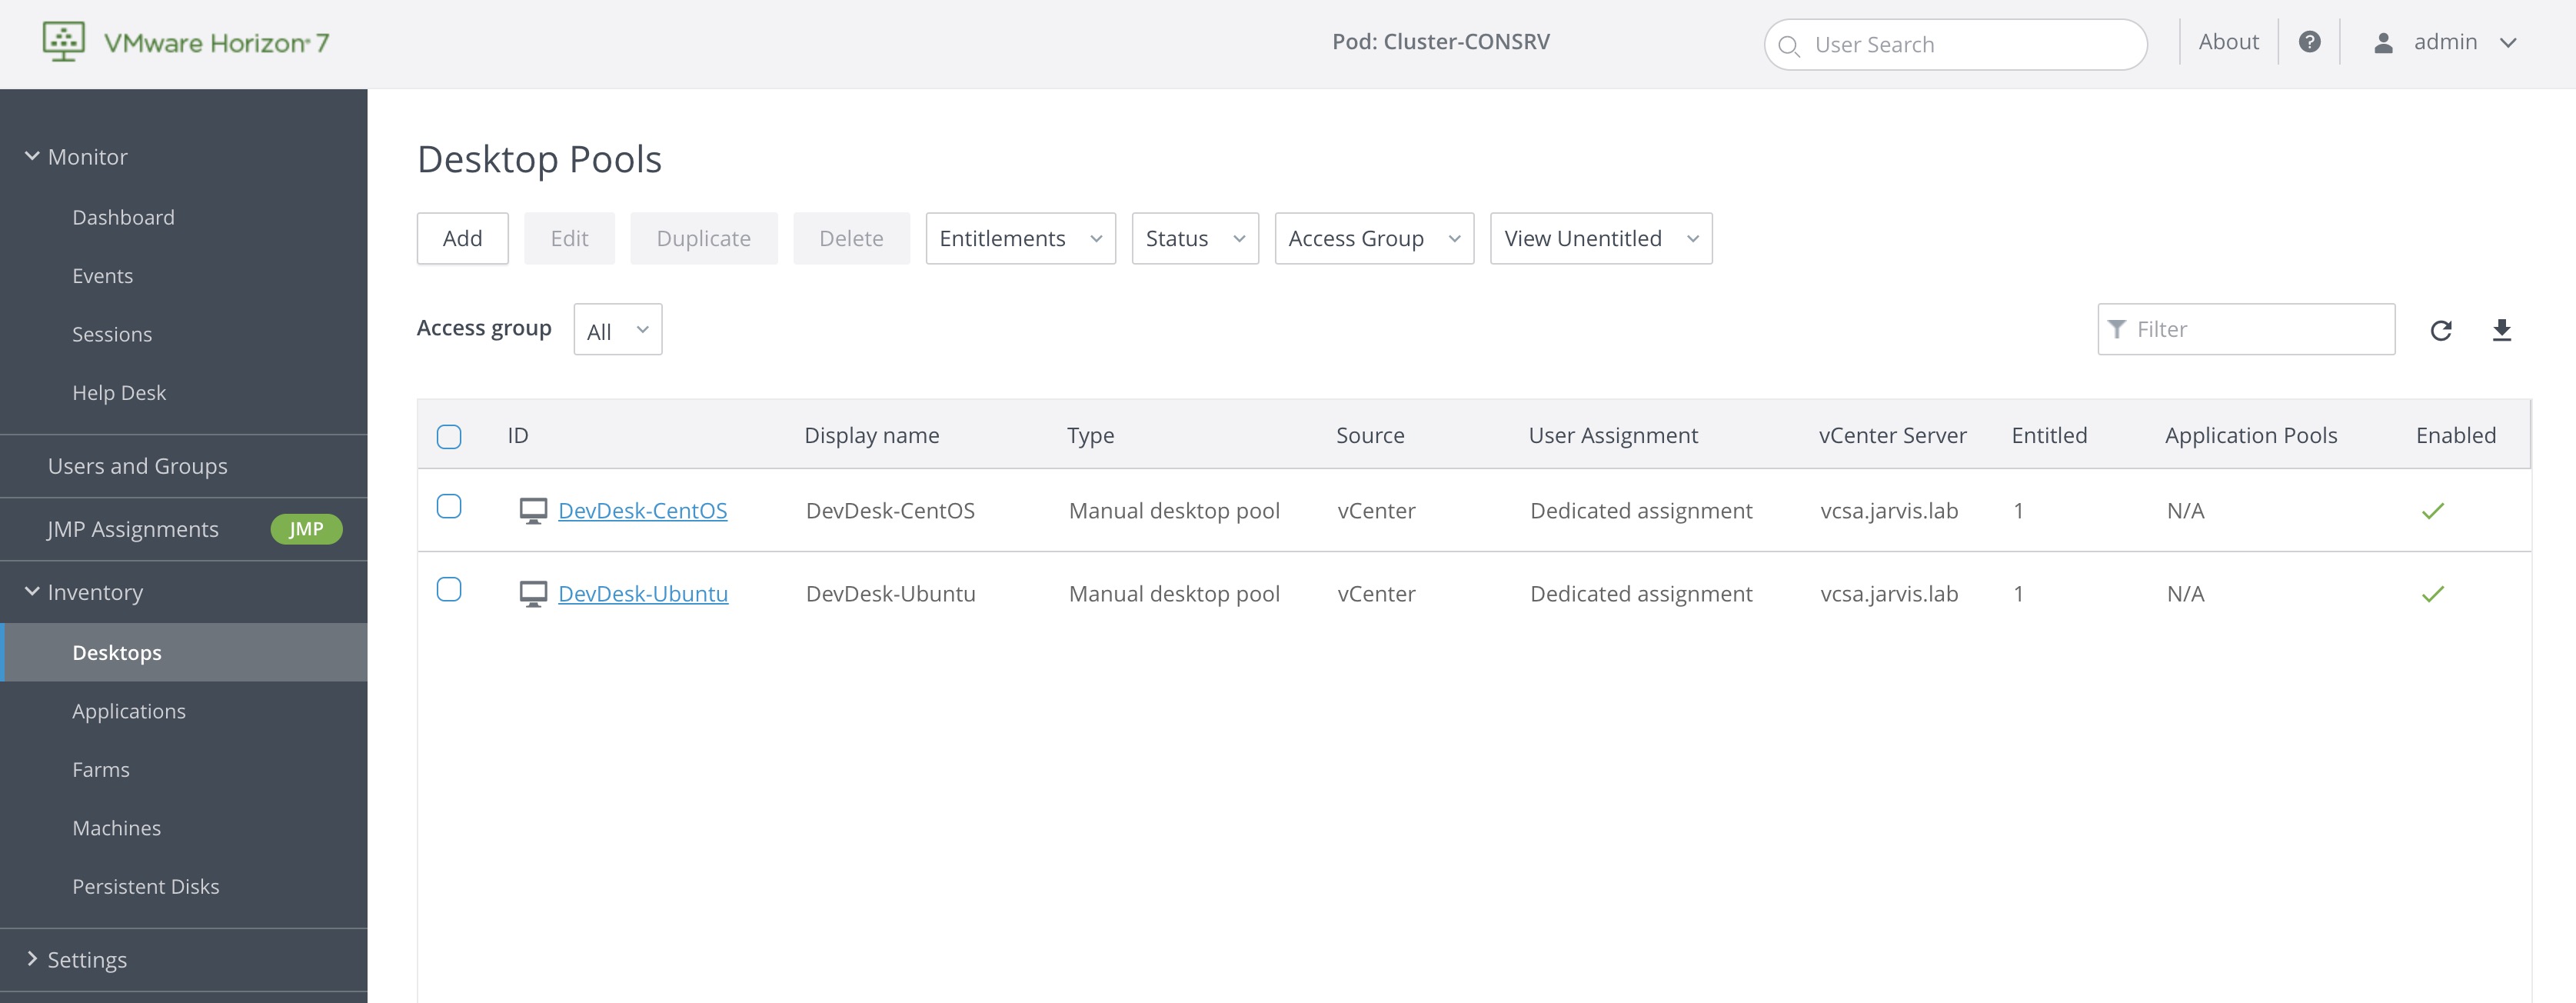
5 Create a Manual Desktop Pool
Now that the work on the prerequisites for adding a VM to a Horizon Pool is complete, it´s time to setup a “Manual Desktop Pool” for our Desktop. Creating a Manual Desktop Pool is pretty straight forward and well described in VMware´s official documentation.
Source: Create a Manual Desktop Pool for Linux
Mandatory settings are:
- Default display protocol: VMware Blast
- Allow users to choose protocol: No
- 3D Renderer: Manage using vSphere Client for 2D or vDGA desktop and NVIDIA GRID vGPU for vGPU desktop
By the end, it should look similar to what you can see on Figure V.
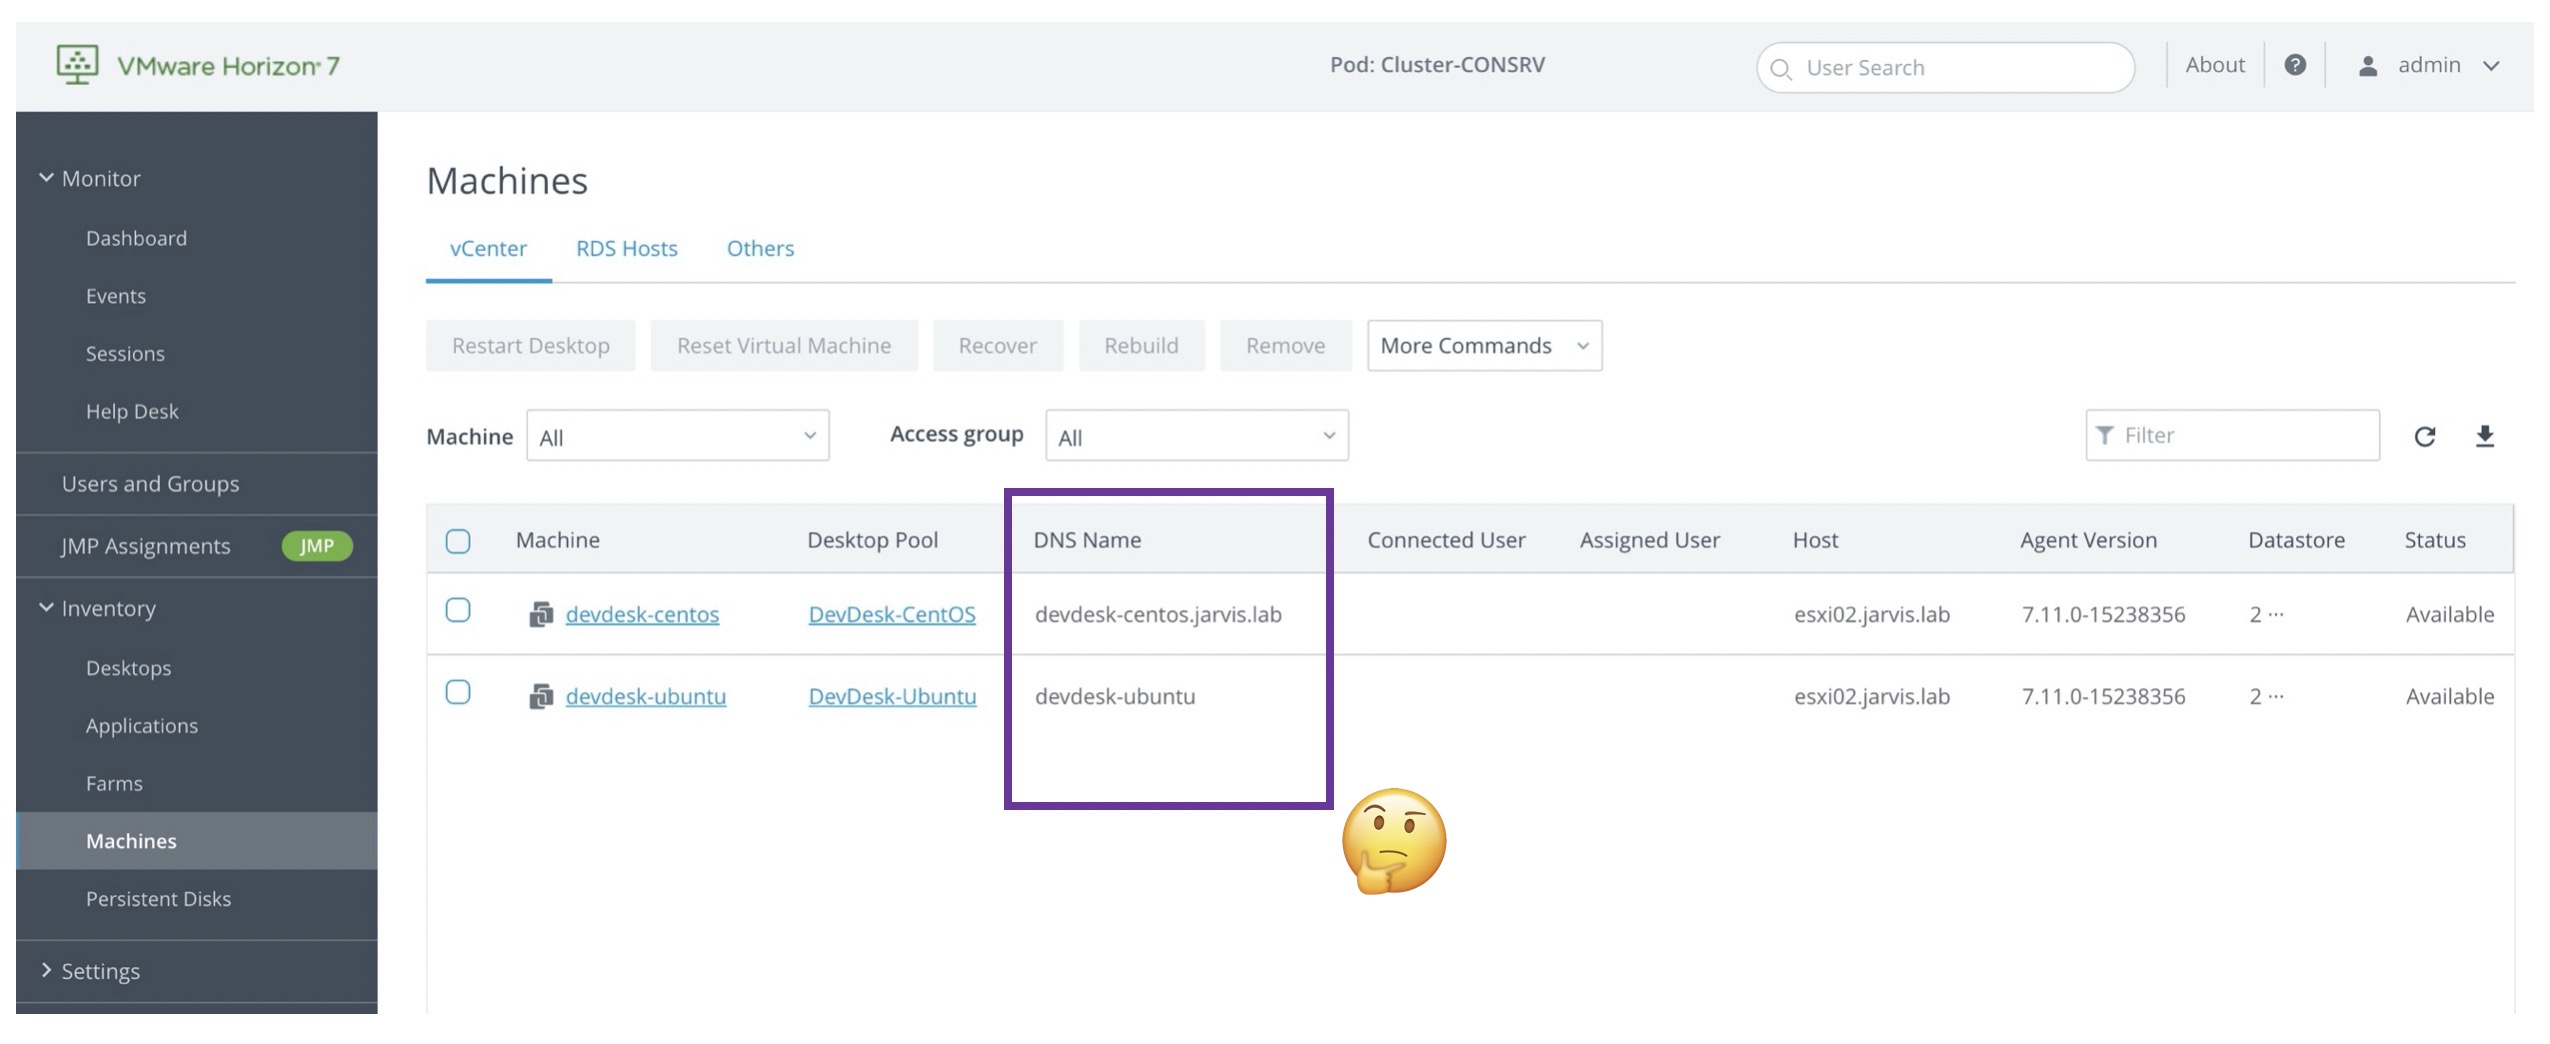
Since you´ve added the Linux-VM to your new desktop pool, it´ll appear under Machines on the left site. This section will give you a quick overview with some helpful details, like the status and version of the View Agent as well as the DNS name of your system for example. BTW! Regarding DNS…avoid mistakes like the ones I did…😐…Figure VI.
Let´s bring this into the correct form:
|
|
Doublecheck if the changes got applied:
|
|
Way better! 👇

You should now be able to connect to your Desktop-Pool via the Horizon Client.
Change Log:
- [2020-03-18]: Added VMware Horizon 7.12 announcement (CentOS 8.1 support)
- [2020-03-18]: Updated CentOS 8.0 & Horizon Agent 7.11 section; Updated Mindmap