docker run vic-machine

Introduction
The deployment of a Virtual Container Host (VCH) can be done in various ways. One easy way is to use the vSphere-Client (H5) plugin which gives you the ability to configure all necessary parameters e.g. for network, storage or deployment target through a step-by-step deployment wizard.
The far more efficient variant in my opinion is making use of the vic-machine utility, a Command Line Interface which is part of the vSphere Integrated Containers Engine bundle. Why do I think it is way better? Because it´s reproducible, independent from a browser, automatable as well as better documentable.
You can find some of my vic-machine action examples in my Github repo here: https://github.com/rguske/vic-machine
I had a lot of VMware-internal and public facing presentations as well as many demos on VIC over the past months and all based, more or less, on the following vic-machine arguments:
rguske@rguske-a01> ./vic-machine-darwin create \          ### vic-machine binary + action
--name vch-example \                                      ### Name of the Virtual Conatiner Host
--syslog-address udp://10.10.10.10:514 \                  ### Syslog server
--target vcenter.example.org/Datacenter \                 ### vSphere Datacenter
--user administrator@vsphere.local \                      ### User with appropriate privileges
--compute-resource /Datacenter/host/Cluster \             ### vSphere Cluster or single ESXi Host
--image-store vsanDatastore \                             ### Datastore to deposite the images
--volume-store vsanDatastore/volumes:default \            ### Datastore for the Docker Volumes (VMDKs)
--bridge-network ls-vic-bridge \                          ### vDS dPort Group for the Container Bridge Network
--bridge-network-range 172.16.0.0/12 \                    ### Network range for the Bridge Network
--public-network ls-vic-public \                          ### vDS dPort Group for the Public Network
--dns-server 10.10.10.254 \                               ### DNS Server address for the Public Network
--public-network-ip=10.10.10.11/24 \                      ### Static IP address for the Virtual Container Host
--public-network-gateway 10.10.10.254 \                   ### Gateway for the Public network
--tls-cname=vch-example.example.org \                     ### Certificate Common Name (CN) for the VCH
--certificate-key-size 3072 \                             ### Key size for the auto-generated certificates
--organization example.org \                              ### Certificate Organization (O) field
--registry-ca=/folder path/ca.crt \                       ### Path to the VIC (Harbor) ca.crt file
--thumbprint 4C:92:D7:FC:F8:8D:5A:9F:.... \               ### vCenter Server Thumbprint
--affinity-vm-group \                                     ### Automatically creates a VM/Host Group (cVM/ VCH Group)
--ops-user vic-devops-admin@example.org \                 ### Defines the user which is used by the VCH to interact with vSphere
--ops-grant-perms                                         ### Automatically grants the necessary vSphere permissions
Constantly recurring executions should be automated or at least easier to handle
…and thus, I was looking for a way how to apply this for vic-machine.
Credits goes out to Ben
Ben Corrie - the father of project vSphere Integrated Containers Engine - developed a hack back in 2017 which was born out of his own frustrations with vic-machine, because it takes a lot of arguments for each action like create, configure or debug for example. He mentioned this in his video from VMworld 2017 👇
With this post I´d like to guide you through the various steps to consume vic-machine and every specific action of it in a simplified fashion AND have it running in a container pulled out of Harbor or from another repository of your choice.
To have Harbor as a cloud native registry deeply coupled and running inside of VIC is simply great. If you haven´t heard of Harbor yet, check it out: https://goharbor.io/
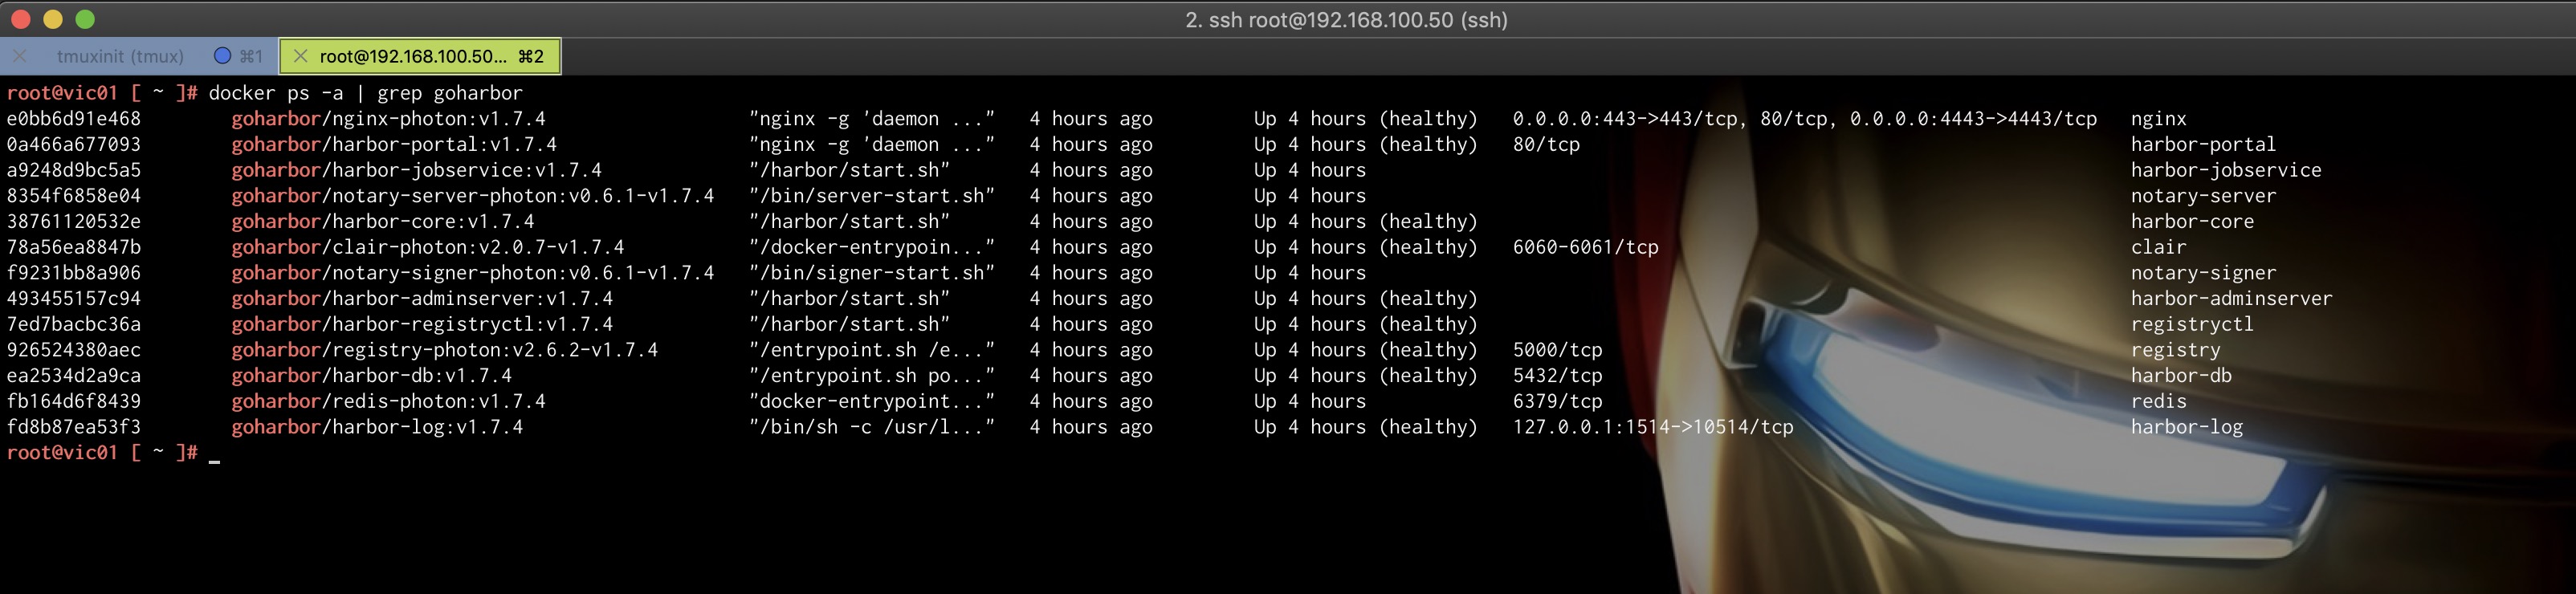
A short look into the innards of the VIC appliance shows us that all components of Harbor, including Clair for vulnerability scanning as well as Notary for image signing, are running as a container inside of Harbor:
docker ps -a | grep goharbor
1. The Hack
The prerequisites for this hack are that you have Git as well as Docker installed on your local machine or on a Jumphost.
1.1 Download or Clone Bens Github repository called bensdoings
git clone https://github.com/corrieb/bensdoings.git (into a folder of your choice)
1.2 Create a new folder in which we´ll subsequently copy all necessary files into
mkdir ~/vic-dev
1.3 Copy the files highlighted in green and folder (1) out of the downloaded/-cloned repo
- /bensdoings/vic-machine/example-complete-empty.json, example-complete.json as well as example-simple.json
- /bensdoings/vic-machine/build/1.3.1/build.sh and push.sh
- /bensdoings/vic-machine/vic-machine-base/OVA/Dockerfile
- /bensdoings/vic-machine/actions
…and paste them into the newly created folder vic-dev. It should look like the following:
rguske@rguske-a01> ~/_DEV/Lab/vic-dev> tree -L 2
.
├── Dockerfile
├── actions
│   ├── 1.1
│   ├── 1.2
│   ├── Dockerfile.create
│   ├── Dockerfile.debug
│   ├── Dockerfile.delete
│   ├── Dockerfile.direct
│   ├── Dockerfile.dumpargs
│   ├── Dockerfile.firewall-allow
│   ├── Dockerfile.firewall-deny
│   ├── Dockerfile.inspect
│   ├── Dockerfile.ls
│   ├── Dockerfile.rollback
│   ├── Dockerfile.thumbprint
│   ├── Dockerfile.upgrade
│   └── README.md
├── build.sh
├── example-complete-empty.json
├── example-complete.json
├── example-simple.json
├── push.sh
└── vic-machine
2. Create a new project in Harbor
The target is to have all vic-machine actions available as a container-image and to pull as well as to run it from our own registry. Open the VIC Management-Portal via port 8282 (https://vic01.jarvis.lab:8282) and enter your login credentials in case you weren´t automatically forwarded via Single Sign-on from an existing vSphere Web-Client session.
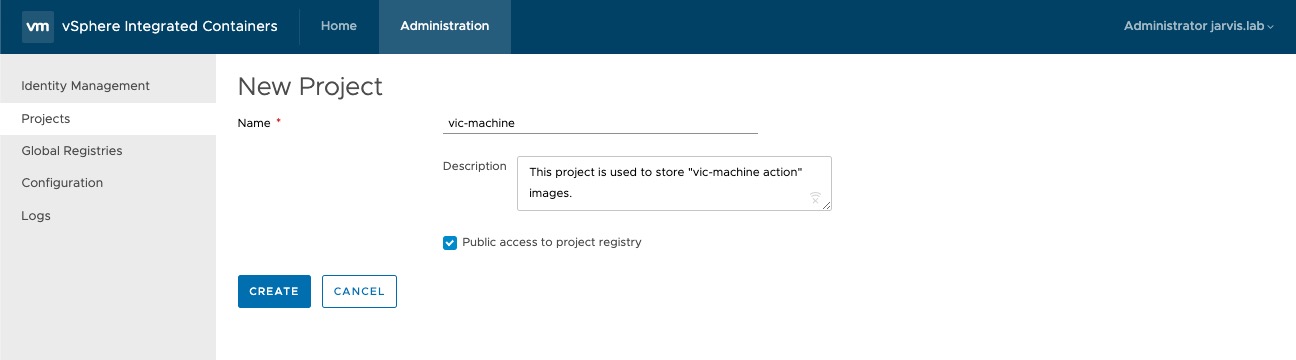
Now let´s create a project in Harbor called e.g. vic-machine in which we will later push our images to.
Administration –> Projects –> + PROJECT
If you want to make all repositories (images) of that project public, select the Public check box like I did.
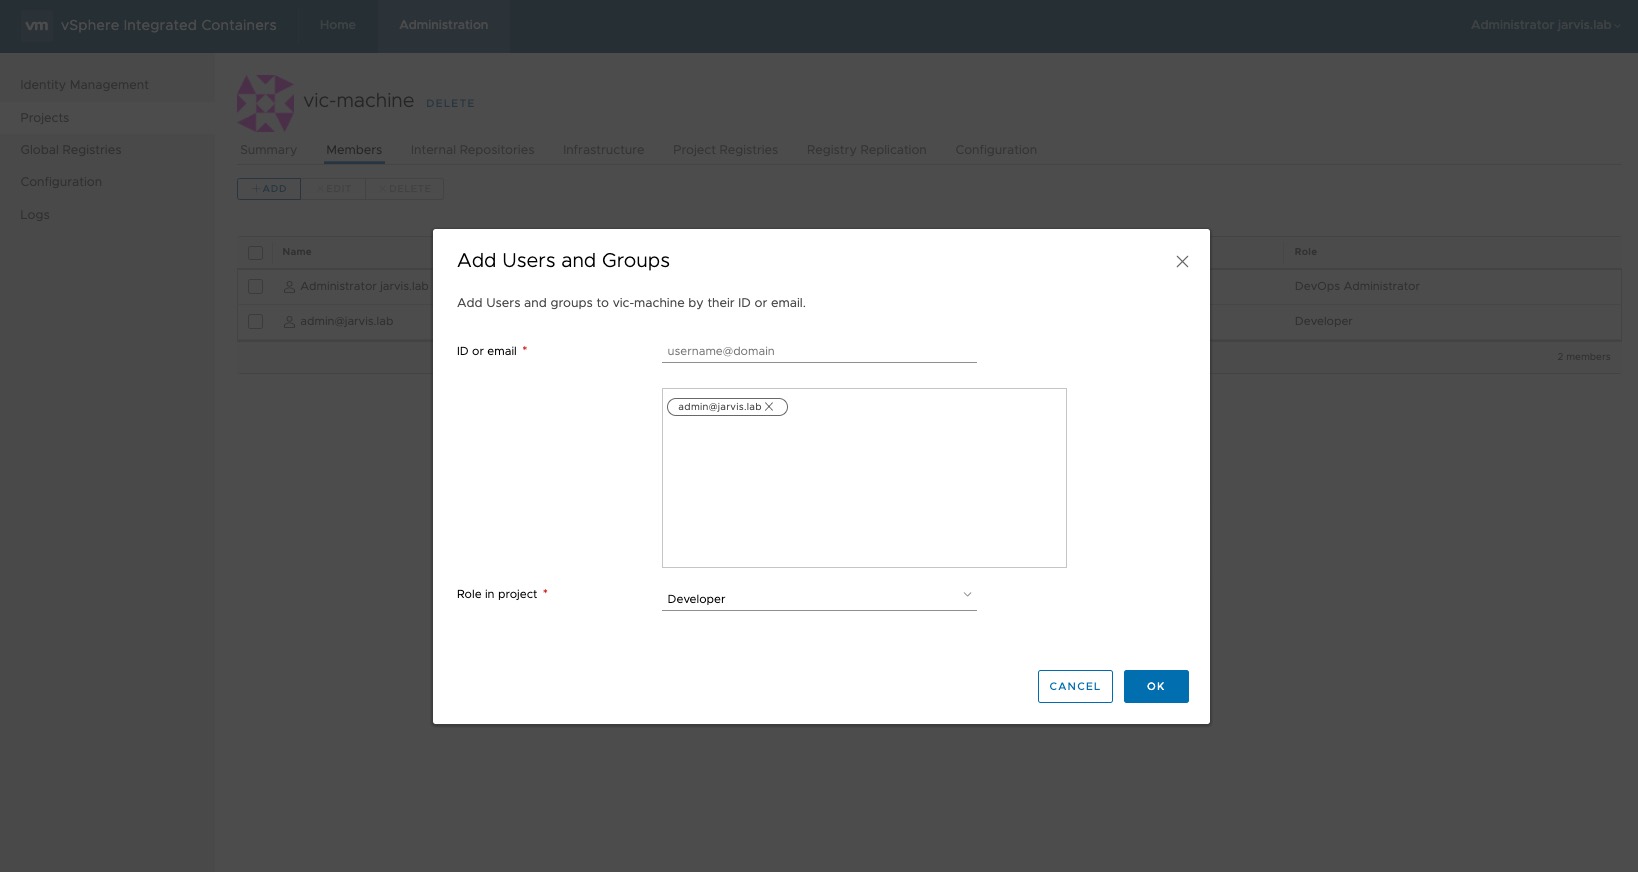
As a next step we will assign a new user to our project.
Administration –> Projects –> vic-machine –> Members –> + ADD
I´ve added my local user admin@jarvis.lab to the project and assigned the role Developer to it. In addition to the view access rights, the “Developer” role has the permissions to:
- Provision containers
- Push images into registries
- Create and import templates
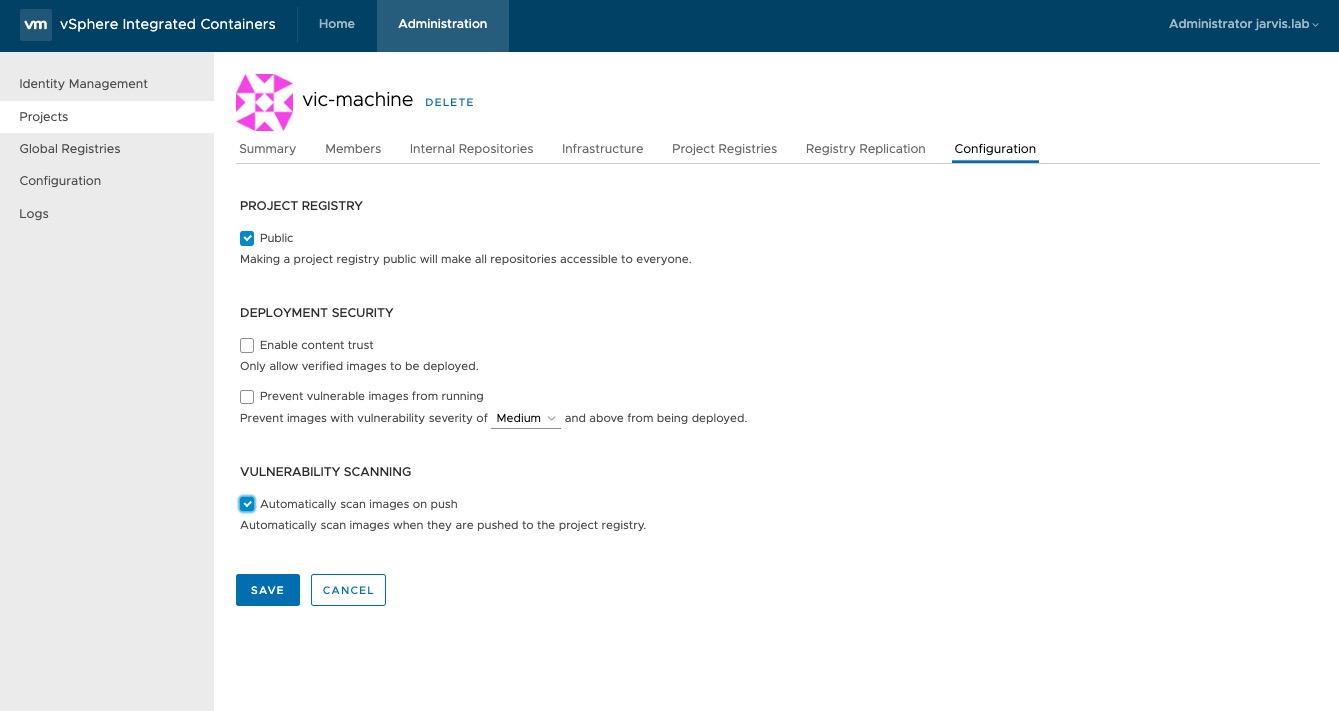
Under Administration –> Projects –> vic-machine –> Configuration I´ve checked the box “Automatically scan images on push” to enable the automatically scanning for vulnerabilities of images while pushing them to the project.
3. The vic-machine utility running inside a container
The basis of a docker image is the Dockerfile. Open the copied Dockerfile and replace the URL in the Dockerfile with the appropriate version of the VIC instance you´re running, to curl the VIC Engine bundle tarball from the appliance into the docker image during the building process.
To avoid typos with the URL you can simply browse to the VIC appliance page (port 9443), right click the DOWNLOAD button which can be found under the section Deploy a VCH and choose Copy Link Address.
Modify the section like below:
3.1 Dockerfile
FROM debian:jessie

RUN apt-get update && apt-get install -y jq ca-certificates curl tar bc

RUN mkdir /vic \
    && curl -k -L https://vic01.jarvis.lab:9443/files/vic_v1.5.2.tar.gz | tar xz -C /vic \
    && cp /vic/vic/vic-machine-linux /vic \
    && cp /vic/vic/*.iso /vic \
    && rm -fr /vic/vic

CMD ["/bin/bash"]
Save and close the Dockerfile.
3.2 Every vic-machine action as a docker image
The build.sh script will build all docker images for each vic-machine action for us.
IMPORTANT: It´s necessary to have the Dockerfile prepared before executing the build script! Because “docker build -t vic-machine-base .” will start the build process, which creates the docker image as well as tag (-t) the image as vic-machine-base.
The image includes the vic-machine binary (for Linux), the bootstrap.iso as well the appliance.iso.
See also:
rguske@rguske-a01> ~/_DEV> docker run -it --rm vic-machine-base:latest /bin/bash
root@5d76a7b7973f:/# cd /vic
root@5d76a7b7973f:/vic# ls -rtl
-rwxr-xr-x 1 root root 19623264 Jul 16 20:51 vic-machine-linux
-rw-r--r-- 1 root root 41091072 Jul 16 20:51 bootstrap.iso
-rw-r--r-- 1 root root 91029504 Jul 16 20:51 appliance.iso
Now moving forward to the build script itself. I´ve modified the script from the original one just a little bit for my own needs.
I´d like to thank Alexander Dess at this point who reminded me that I should simply stick to the K.I.S.S. principle. Stop making things more complicated 😉.
3.3 build.sh
#!/bin/bash
set -e

### Harbor FQDN and project
REPO_NAME="vic01.jarvis.lab:443/vic-machine"
### Folder (with version) were the JSON keys for each vic-machine action are deposited. You can define your own JSON schema by simply modifying those files.
MAP_VERSION="1.2"
### Define your own version for the docker images
VERSION="1.0"

actions=( "create" "debug" "delete" "inspect" "ls" "rollback" "upgrade" "thumbprint" "firewall-allow" "firewall-deny" "dumpargs" "direct" )

### Docker command to build a docker image (from Dockerfile above) and to tag it with the given name.
docker build -t vic-machine-base .
### Will change the directory to actions/1.2
cd actions/$MAP_VERSION
### Will copy the new created Dockerfiles
cp ../Dockerfile* .

for i in "${actions[@]}"
do
### Build a docker image out of every newly created Dockerfile and tag it with the repo-name as well as version number
  docker build -f Dockerfile.$i -t $REPO_NAME/vic-machine-$i:$VERSION .
done
### Remove all Dockerfiles
rm Dockerfile*
Execute sh ./build.sh and validate that everything went well by executing the command docker images | grep vic. You should see the newly created images listed:
rguske@rguske-a01> ~/_DEV> docker images | grep vic
vic01.jarvis.lab:443/vic-machine/vic-machine-direct           1.0                 6434b9f67b34        About an hour ago   305MB
vic01.jarvis.lab:443/vic-machine/vic-machine-dumpargs         1.0                 65a84b73ea6d        About an hour ago   305MB
vic01.jarvis.lab:443/vic-machine/vic-machine-firewall-deny    1.0                 4280647bb27f        About an hour ago   305MB
vic01.jarvis.lab:443/vic-machine/vic-machine-firewall-allow   1.0                 ef69a80ff285        About an hour ago   305MB
vic01.jarvis.lab:443/vic-machine/vic-machine-thumbprint       1.0                 cba88f5aeec8        About an hour ago   305MB
vic01.jarvis.lab:443/vic-machine/vic-machine-upgrade          1.0                 6eca536b5221        About an hour ago   305MB
vic01.jarvis.lab:443/vic-machine/vic-machine-rollback         1.0                 85b65b17df10        About an hour ago   305MB
vic01.jarvis.lab:443/vic-machine/vic-machine-ls               1.0                 57496ec4fdd9        About an hour ago   305MB
vic01.jarvis.lab:443/vic-machine/vic-machine-inspect          1.0                 47eaedc40980        About an hour ago   305MB
vic01.jarvis.lab:443/vic-machine/vic-machine-delete           1.0                 e24ee592ab15        About an hour ago   305MB
vic01.jarvis.lab:443/vic-machine/vic-machine-debug            1.0                 306ba819b1d4        About an hour ago   305MB
vic01.jarvis.lab:443/vic-machine/vic-machine-create           1.0                 e567f6eff231        About an hour ago   305MB
vic-machine-base                                              latest              9434fc83969b        About an hour ago   305MB
3.4 Pushing the docker images to Harbor
The next step after creating a lot of new docker images is to have them available and well guarded in Harbor. We´ll make use of the push.sh script from our folder which will save us the work of handling each image separately. Let´s have a look into it as well.
### !/bin/bash
set -e

### Push to our Harbor instance
REPO_NAME="vic01.jarvis.lab:443/vic-machine"
### Docker images version
VERSION="1.0"

actions=( "create" "debug" "delete" "inspect" "ls" "rollback" "upgrade" "thumbprint" "firewall-allow" "firewall-deny" "dumpargs" "direct" )

for i in "${actions[@]}"
do
### Tagging the images with the give version as well as with "latest"
### Pushing them with both versions into Harbor
   docker tag $REPO_NAME/vic-machine-$i:$VERSION $REPO_NAME/vic-machine-$i:latest
   docker push $REPO_NAME/vic-machine-$i:$VERSION
   docker push $REPO_NAME/vic-machine-$i:latest
done
Just replace the repository URL like we already did in the build script. Before you execute the script, you have to login into Harbor with the user which we´ve added to the project in step 4.
Execute:
docker login vic01.jarvis.lab:443 -u admin@jarvis.lab
Password: ********
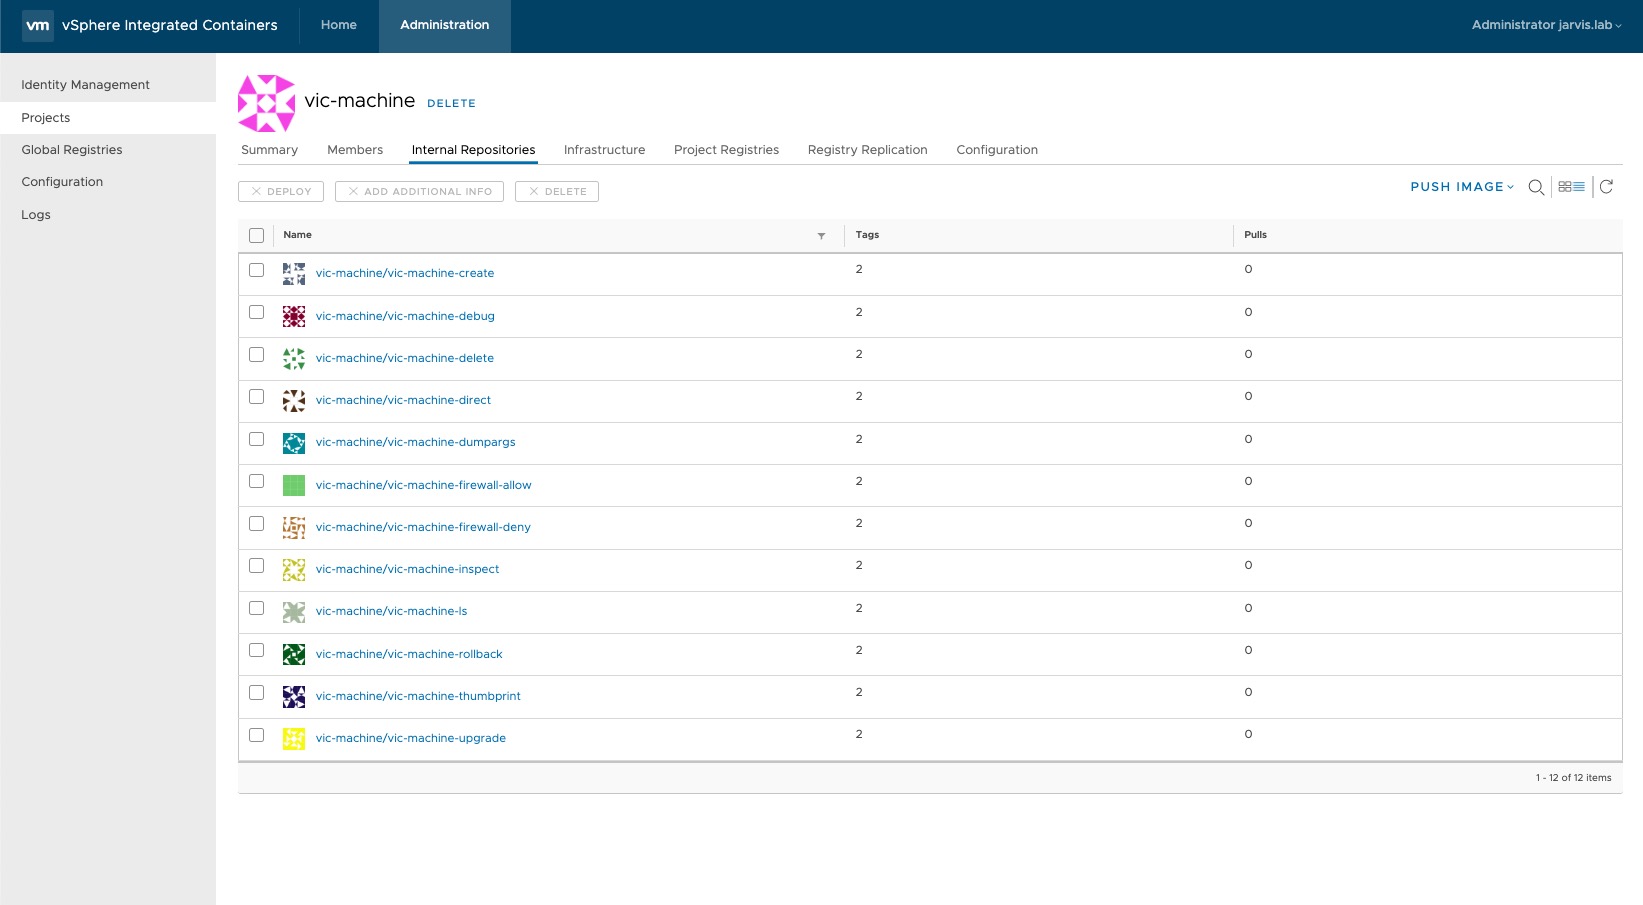
Login Succeeded“Login succeeded” is always pleasing to see and since we´re done with that run sh ./push.sh from your shell. If you have the membership and role correctly configured, you should see under Internal Repositories all vic-machine-(action) images.
4. Configure the config.json file for the VCH deployment
Everything seems to be well prepared so far and we´re approaching the end of our efforts to deploy a VCH in a “simplified fashion”. The intention is to make use of the vic-machine script, which in turn needs a JSON manifest as input to all commands lying in a subdirectory of our vic-dev folder. Before turning to the config.json file I don’t want to embezzle this impressive piece of work.
The vic-machine script:
#!/bin/bash

# This script is designed to simplify vic-machine usage, but using a single JSON manifest as input to all commands
# The expected layout is that a particular vic-machine configuration will be in a subdirectory of the current dir
# In that subdirectory should be a config.json file which conforms to the format in example.json
# That subdirectory is then both the input and working directory of vic-machine
# As such, generated certificates and log files will be written to that sub directory as root user
# Note that if you don't specify an admin password in the JSON, you will be prompted each time - this is why the script needs -it

# consume images from dockerhub
# REPO_NAME="bensdoings"

# consume images from a local registry
REPO_NAME="vic01.jarvis.lab:443/vic-machine"

usage()
{
   echo "Usage: vic-machine.sh <version> <config-dir> <action>"
   echo "  Where version is \"latest\" or <version number>-<optional rc> eg. 1.0.0-rc5"
   echo "  Where action is one of: create | delete | inspect | ls | debug | upgrade | rollback | thumbprint | firewall-allow | firewall-deny | dumpargs"
   echo "  Use dumpargs action to show the args the script generates for vic-machine-create"
   exit 1
}

if [ $# -le 2 ]; then usage; fi

case "$3" in
  create|delete|inspect|ls|debug|upgrade|rollback|thumbprint|firewall-allow|firewall-deny|dumpargs)
    ;;
  *)
    usage
    ;;
esac

host_config_path=$(pwd)/$2

if [ ! -f "$host_config_path/config.json" ]; then
  echo "Config file not found at $host_config_path/config.json"
  exit 1
fi

docker_volume_path=/config

# Check to see whether the combination of version and action actually exist
docker pull $REPO_NAME/vic-machine-$3:$1 > /dev/null 2>&1
if [ $? != 0 ]; then
  echo "Action \"$3\" or version \"$1\" not found"
  exit 1
fi

sudo docker run -it --rm -v $host_config_path:$docker_volume_path $REPO_NAME/vic-machine-$3:$1 | sed "s|$docker_volume_path/|$host_config_path/|"
4.1. Preparing the config.json file
Create a new folder in your main folder (vic-dev), give it the name of your VCH for example and also create the config.json file.
mkdir vch1 && cd vch1 && touch config.jsonHere is an example of my deployment.
vch1/config.json:
{
   "version": "1.2",
   "vch": {
      "name": "vch1",
      "compute": {
         "vsphere_resource": "Stark",
         "memory": {
            "limit_mb": "8192",
            "reservation_mb": "512",
            "shares": "normal"
         }
      },
      "network": {
         "bridge": {
            "port_group": "ls-vic-bridge",
            "ip_range": "172.16.0.0/12"
         },
         "public": {
            "port_group": "ls-vic-public",
            "vch_static_ip": "192.168.2.192/24",
            "vch_gateway": "192.168.2.254"
         },
         "container": [
            {
               "port_group": "ls-vic-container",
               "firewall": "Open"
            },
            {
               "port_group": "ls-vic-container",
               "alias": "container-net",
               "ip_range": "192.168.3.100/24",
               "gateway": "192.168.3.254/24",
               "dns": "192.168.100.254",
               "firewall": "Published"
            }
         ],
         "dns_server": "192.168.100.250",
         "asymmetric_routes": false
         },
      "storage": {
         "image_store": "nfs_ds",
         "volume_stores": ["vsanDatastore/volumes:default"],
         "base_image_size": "8GB",
         "volumes_rm_on_delete": true
      },
      "auth": {
         "cert_path": "vch1",
         "keygen": {
            "cert_size": "2048",
            "tls_cname": "*.jarvis.lab",
            "organization": ["Jarvis Lab"]
         }
      },
         "endpoint_vm": {
            "vcpus": "1",
            "memory_mb": "2048",
            "syslog_address": "tcp://192.168.100.6:514"
         },
         "container": {
            "name_convention": "{name}-{id}"
         },
      "debug": {
         "enable_ssh": true,
         "root_password": "*********"
      }
   },
   "vcenter": {
      "address_datacenter": "192.168.100.1/Malibu",
      "credentials": {
         "thumbprint": "4C:92:D7:FC:F8:8D:5A:....",
         "admin_user": "administrator@jarvis.lab",
         "admin_password": "*******"
       }
   },
   "registry": {
      "insecure_registries": ["192.168.100.50"]
   },
   "vic_machine": {
      "debug": "0",
      "timeout": "60s"
   }
}rguske@rguske-a01> ~/_DEV/Lab/vic-dev/actions> tree -L 2
.
├── 1.1
│ ├── map-create.json
│ ├── map-debug.json
│ ├── map-delete.json
│ ├── map-firewall.json
│ ├── map-inspect.json
│ ├── map-ls.json
│ ├── map-thumbprint.json
│ ├── map-upgrade.json
│ ├── parse.sh
│ └── validate.sh
├── 1.2
│ ├── map-create.json
│ ├── map-debug.json
│ ├── map-delete.json
│ ├── map-firewall.json
│ ├── map-inspect.json
│ ├── map-ls.json
│ ├── map-thumbprint.json
│ ├── map-upgrade.json
│ ├── parse.sh
│ └── validate.shPick two identical files e.g. map-create.json from the folder 1.1 and 1.2 and compare them against each other to see the differences and how important it is to set the right version. The cool thing is that this also means that you can define your own JSON schema by simply modifying those files.
Depending on your requirements (VCH Networking, Log aggregation, Debug-Level and so on), you can build your own config.json from the examples (example-simple.json, example-complete.json & example-complete-empty.json) which we´ve copied in step 3.
If you now execute “sh ./vic-machine 1.0 (or latest) vch1 create” and run a watch perhaps on container instances spinning up locally and also a watch on the folder vch1 itself, you´ll see that the newly created image vic-machine-create:1.0 will be used for having the vic-machine utility on board which will then receive the parsed arguments from the config.json and starts deploying the Virtual Container Host to your target.
By using e.g my deployment-example, you´ll see that a new folder with the given name of the VCH will be created, containing the VCH certificates, which can be used to add the VCH to a project for example as well as a vic-machine and vpxd logfile, which is really nice to have.

5 (addition): Adding a VCH to your project
As mentioned a few lines above, we can use the created certificates during the deployment, to add a Virtual Container Host to our project(s).
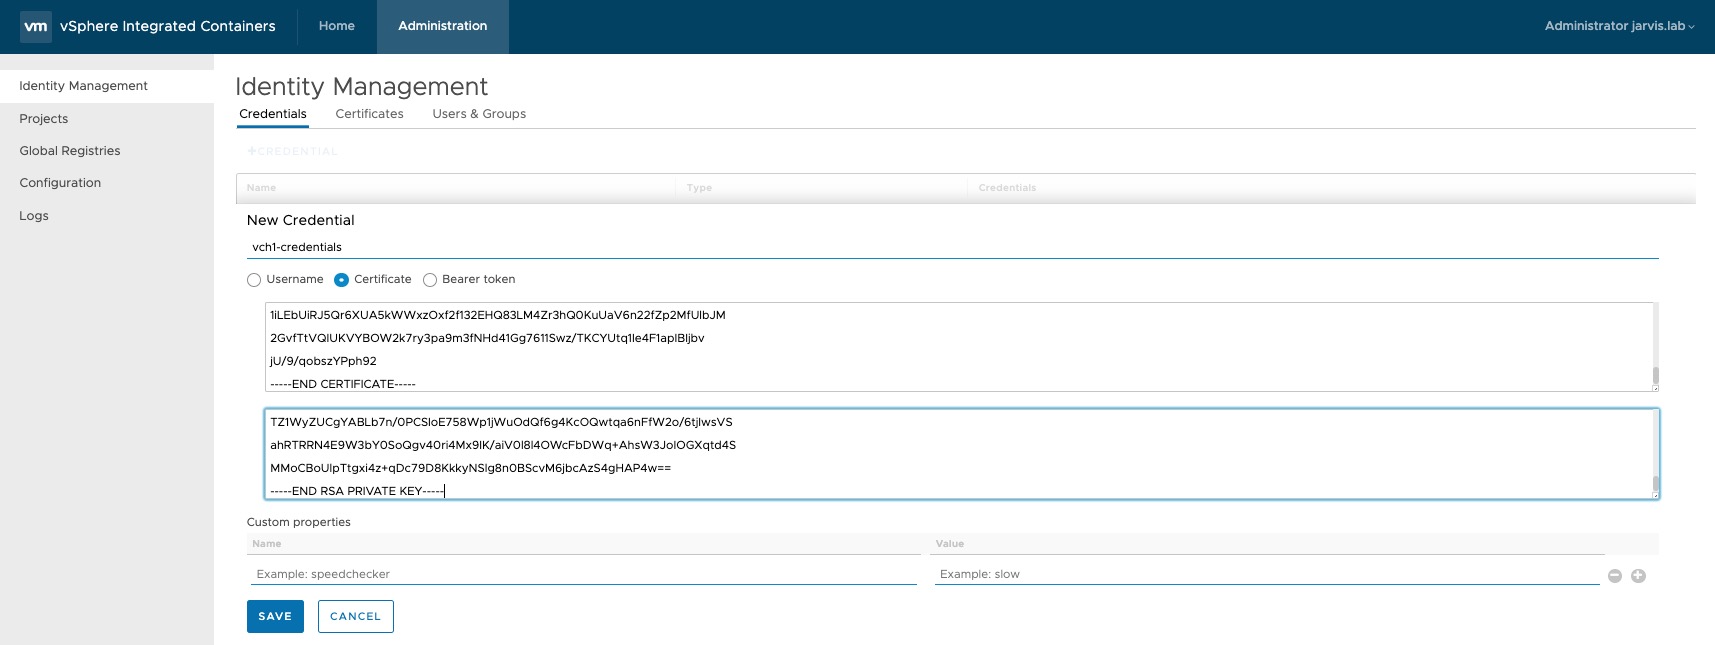
Just go to: Administration –> Identity Management –> Credentials –> + CREDENTIAL
Choose Certificate, enter a name and use the cert.pem for the Public certificate and the key.pem for the Private certificate. SAVE
The VCH can be added to your project under:
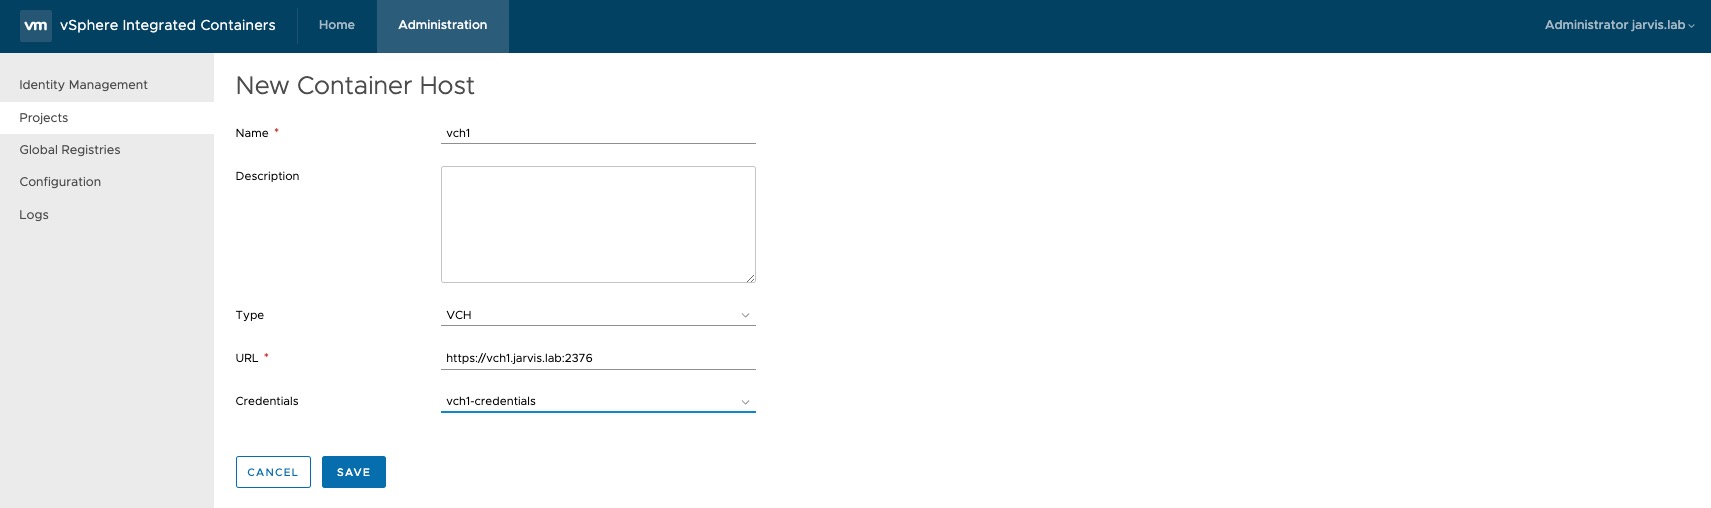
Administration –> Projects –> Your Project (vic-machine) –> Infrastructure –> + CONTAINER HOST
Fill out the required fields and select under Credentials your previously created credentials and press SAVE.
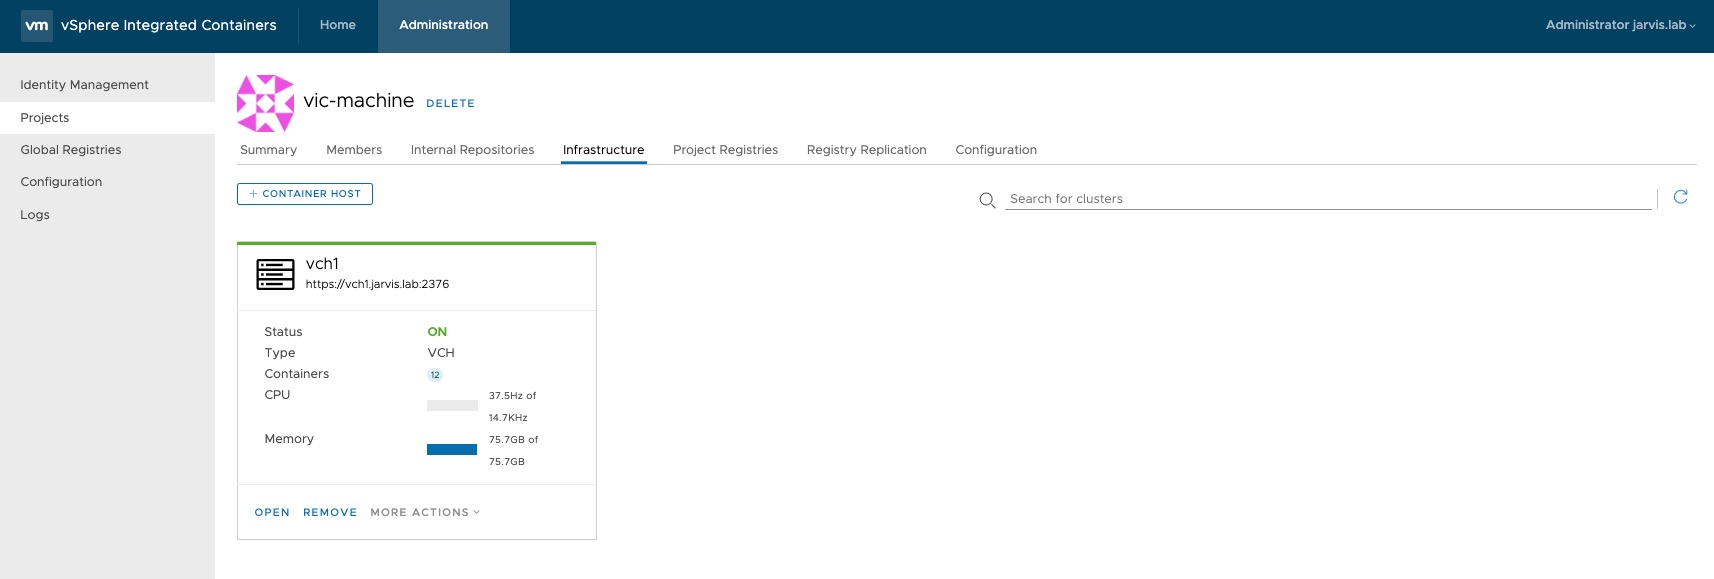
The result should look like this if everything went well.
Resources
| Article | Link |
|---|---|
| [@github/corrieb] Bens Github repo vic-machine | https://github.com/corrieb/bensdoings/tree/master/vic-machine |
| [@youtube] VMworld 2017 CNA2547BU - VIC Deep Dive | https://youtu.be/AD7CD8Haqdc |
| [@github/rguske] Roberts Github repo vic-machine action examples | https://github.com/rguske/vic-machine |
| [@harbor] Harbor Official Website | https://goharbor.io/ |
| [@github/coreos] Clair Github repo | https://github.com/coreos/clair |
| [@github/theupdateframework] Notary Github repo | https://github.com/theupdateframework/notary |
| [@docker] Dockerfile reference | https://docs.docker.com/engine/reference/builder/ |