VMware Enterprise PKS Management Console (EPMC) - Day 1
 and additionally providing a rich set of features around Visibility, User Management and Upgrades/Patches (Day-2).")
VMware Enterprise PKS got rebranded VMware Tanzu Kubernetes Grid Integrated Edition
See: https://rguske.github.io/post/tanzu-kubernetes-grid-integrated-edition-management-console-1-7/
Version 1.5.0 of VMware´s turnkey solution VMware Enterprise PKS, which brings production-grade Kubernetes to enterprises, was released back in August this year. This release introduced the beta (v.0.9) of the VMware Enterprise PKS Management Console (EPMC) which offers an opinionated installation of Enterprise PKS. With the PKS minor release v.1.5.1, the EPMC went GA in version 1.0.0.
Further improvements and enhancements were made in version 1.6 (*1), which went GA on the 26th of November, a few days after the release of Enterprise PKS v.1.6 and after testing it, I´d like to share my impressions with you through this post.
Thanks Keith Lee for reviewing both articles.
Let´s start with my conclusion first
The Enterprise PKS Management Console makes the adjective TURNKEY, which VMware uses when introducing Enterprise PKS, really well-rounded. It really improves the overall Day-1 and Day-2 experience by greatly simplifying the deployment process of Enterprise PKS (Day-1) and additionally providing a rich set of features around Visibility, User Management and Upgrades/Patches (Day-2).
It´s an appliance
EPMC will run as a Virtual Appliance in your Datacenter and can be downloaded through the provided link at the end of this post. It´s a 10,6 GB download and it´s that heavy because it´s all packaged together in one OVA, which in turn has the advantage, that you don´t have to work out the interoperability matrix.
Included bits are:
When you think about Dark Site installations, it brings the benefit, that it´s just one download and you don´t have to care about the different pieces with the right version anymore.
Version Details:
| Element | Details |
|---|---|
| EPMC version | v1.6.0 |
| Release date | November 26, 2019 |
| Installed Enterprise PKS version | v1.6.0 |
| Installed Ops Manager version | v2.7.3 |
| Installed Kubernetes version | v1.15.5 |
| Installed Harbor Registry version | v1.9.3 |
| Supported NSX-T versions | v2.4.1, v2.4.2, 2.5.0 |
Source: Release Notes Enterprise PKS 1.6
Let´s have a look at the artifacts.yaml file to see the different component versions.
ssh root@epmc.jarvis.lab
root@epmc [ /storage/data/artifacts ]# ls
artifacts.yaml  harbor-container-registry  ops-manager  pivotal-container-service  stemcells-ubuntu-xenial
root@pksmgmt [ /storage/data/artifacts ]# cat artifacts.yaml
opsman:
  name: ops-manager
  version: 2.7.3
  path: /storage/data/artifacts/ops-manager/2.7.3/ops-manager-vsphere-2.7.3-build.208.ova
harbor:
  name: harbor-container-registry
  version: 1.9.3-build.2
  path: /storage/data/artifacts/harbor-container-registry/1.9.3-build.2/harbor-container-registry-1.9.3-build.2.pivotal
pks:
  name: pivotal-container-service
  version: 1.6.0-build.17
  path: /storage/data/artifacts/pivotal-container-service/1.6.0-build.17/pivotal-container-service-1.6.0-build.17.pivotal
pks-stemcell:
  name: pks-stemcell
  version: "456.51"
  path: /storage/data/artifacts/stemcells-ubuntu-xenial/456.51/bosh-stemcell-456.51-vsphere-esxi-ubuntu-xenial-go_agent.tgz
harbor-stemcell:
  name: harbor-stemcell
  version: "456.51"
  path: /storage/data/artifacts/stemcells-ubuntu-xenial/456.51/bosh-stemcell-456.51-vsphere-esxi-ubuntu-xenial-go_agent.tgz
bosh:
  name: bosh
  version: NA
  path: NA
root@epmc [ /storage/data/artifacts ]#Prerequisites
As always, before we come to the exciting part, we have to deal with the requirements as well as the prerequisuits in advance. The requirements for the Appliance are 2 vCPUs, 8 GB of vRAM and 40 GB of Diskspace. Since the Appliance must reach the vCenter Server as well as the NSX Manager, it should be assigned to a network with connectivity to the same. Furthermore, we have to define two Availability-Zones. From a vSphere point of view, an AZ can be a Cluster, a Host-Group or a Resource Pool. One AZ is for the PKS Management Plane components and the other one (at least) for the Kubernetes cluster Nodes. I´m running just one vSphere-Cluster in my Homelab and I´m using Resource-Pools to provide the two AZ´s.
IMPORTANT: The Resource-Pools should exist before starting with the PKS Configuration through the EPMC! Otherwise they will not show up if you configure them on-the-fly. Means, you have to restart from the beginning. Avoid this, trust me 😉.
When it comes to Networking, EPMC offers three kinds of flavors:
- Bring-Your-Own-Topology (BYOT): Assumes that NSX-T is already preconfigured for the use of Ent. PKS.
- Flannel: EPMC will provision a Flannel container networking interface during the Ent. PKS deployment.
and now my favorite…
- the Automated NAT Deployment to NSX-T Data Center: This option will deploy Ent. PKS fully automated and ready-for-use configured in NAT mode, which includes the creation and configuration of the T0, T1 routers as well as the necessary IP Blocks for the Kubernetes Nodes and PODs. End-to-End!
As always, I recommend reading the Prerequisite-sections in the documentation:
Prereq for vSphere
Prereq for an Automated NAT Deployment
Nine simple steps
After having finished the OVA deployment and the Appliance is successfully booted, you can reach the Login-page by entering the FQDN or the IP address into your Browser.
BTW: If you want to re-ensure that the appliance configuration has been correctly submitted during OVA provisioning, simply connect via ssh to the appliance and check the environment file.
root@epmc [ /etc/vmware ]# cat environment
APPLIANCE_SERVICE_UID=10000
HOSTNAME=epmc.jarvis.lab
IP_ADDRESS=10.10.14.3
FILESERVER_PORT=443
APPLIANCE_ID=2tsKp8PbqZeR6ON5G5IhNZJnknET4fA+JGXvl6xyHJE=
APPLIANCE_TLS_CERT=
APPLIANCE_TLS_PRIVATE_KEY=
APPLIANCE_TLS_CA_CERT=
APPLIANCE_PERMIT_ROOT_LOGIN=True
NETWORK_FQDN=epmc.jarvis.lab
NETWORK_IP0=10.10.14.3
NETWORK_NETMASK0=255.255.255.192
NETWORK_GATEWAY=10.10.14.62
NETWORK_DNS=10.10.13.10 10.10.13.62
NETWORK_SEARCHPATH=jarvis.lab
LOGINSIGHT_HOST=10.10.13.5
LOGINSIGHT_PORT=9000
LOGINSIGHT_ID=039daa6c-3d83-46a8-8b44-db273e9d11a5Login with the assigned credentials.
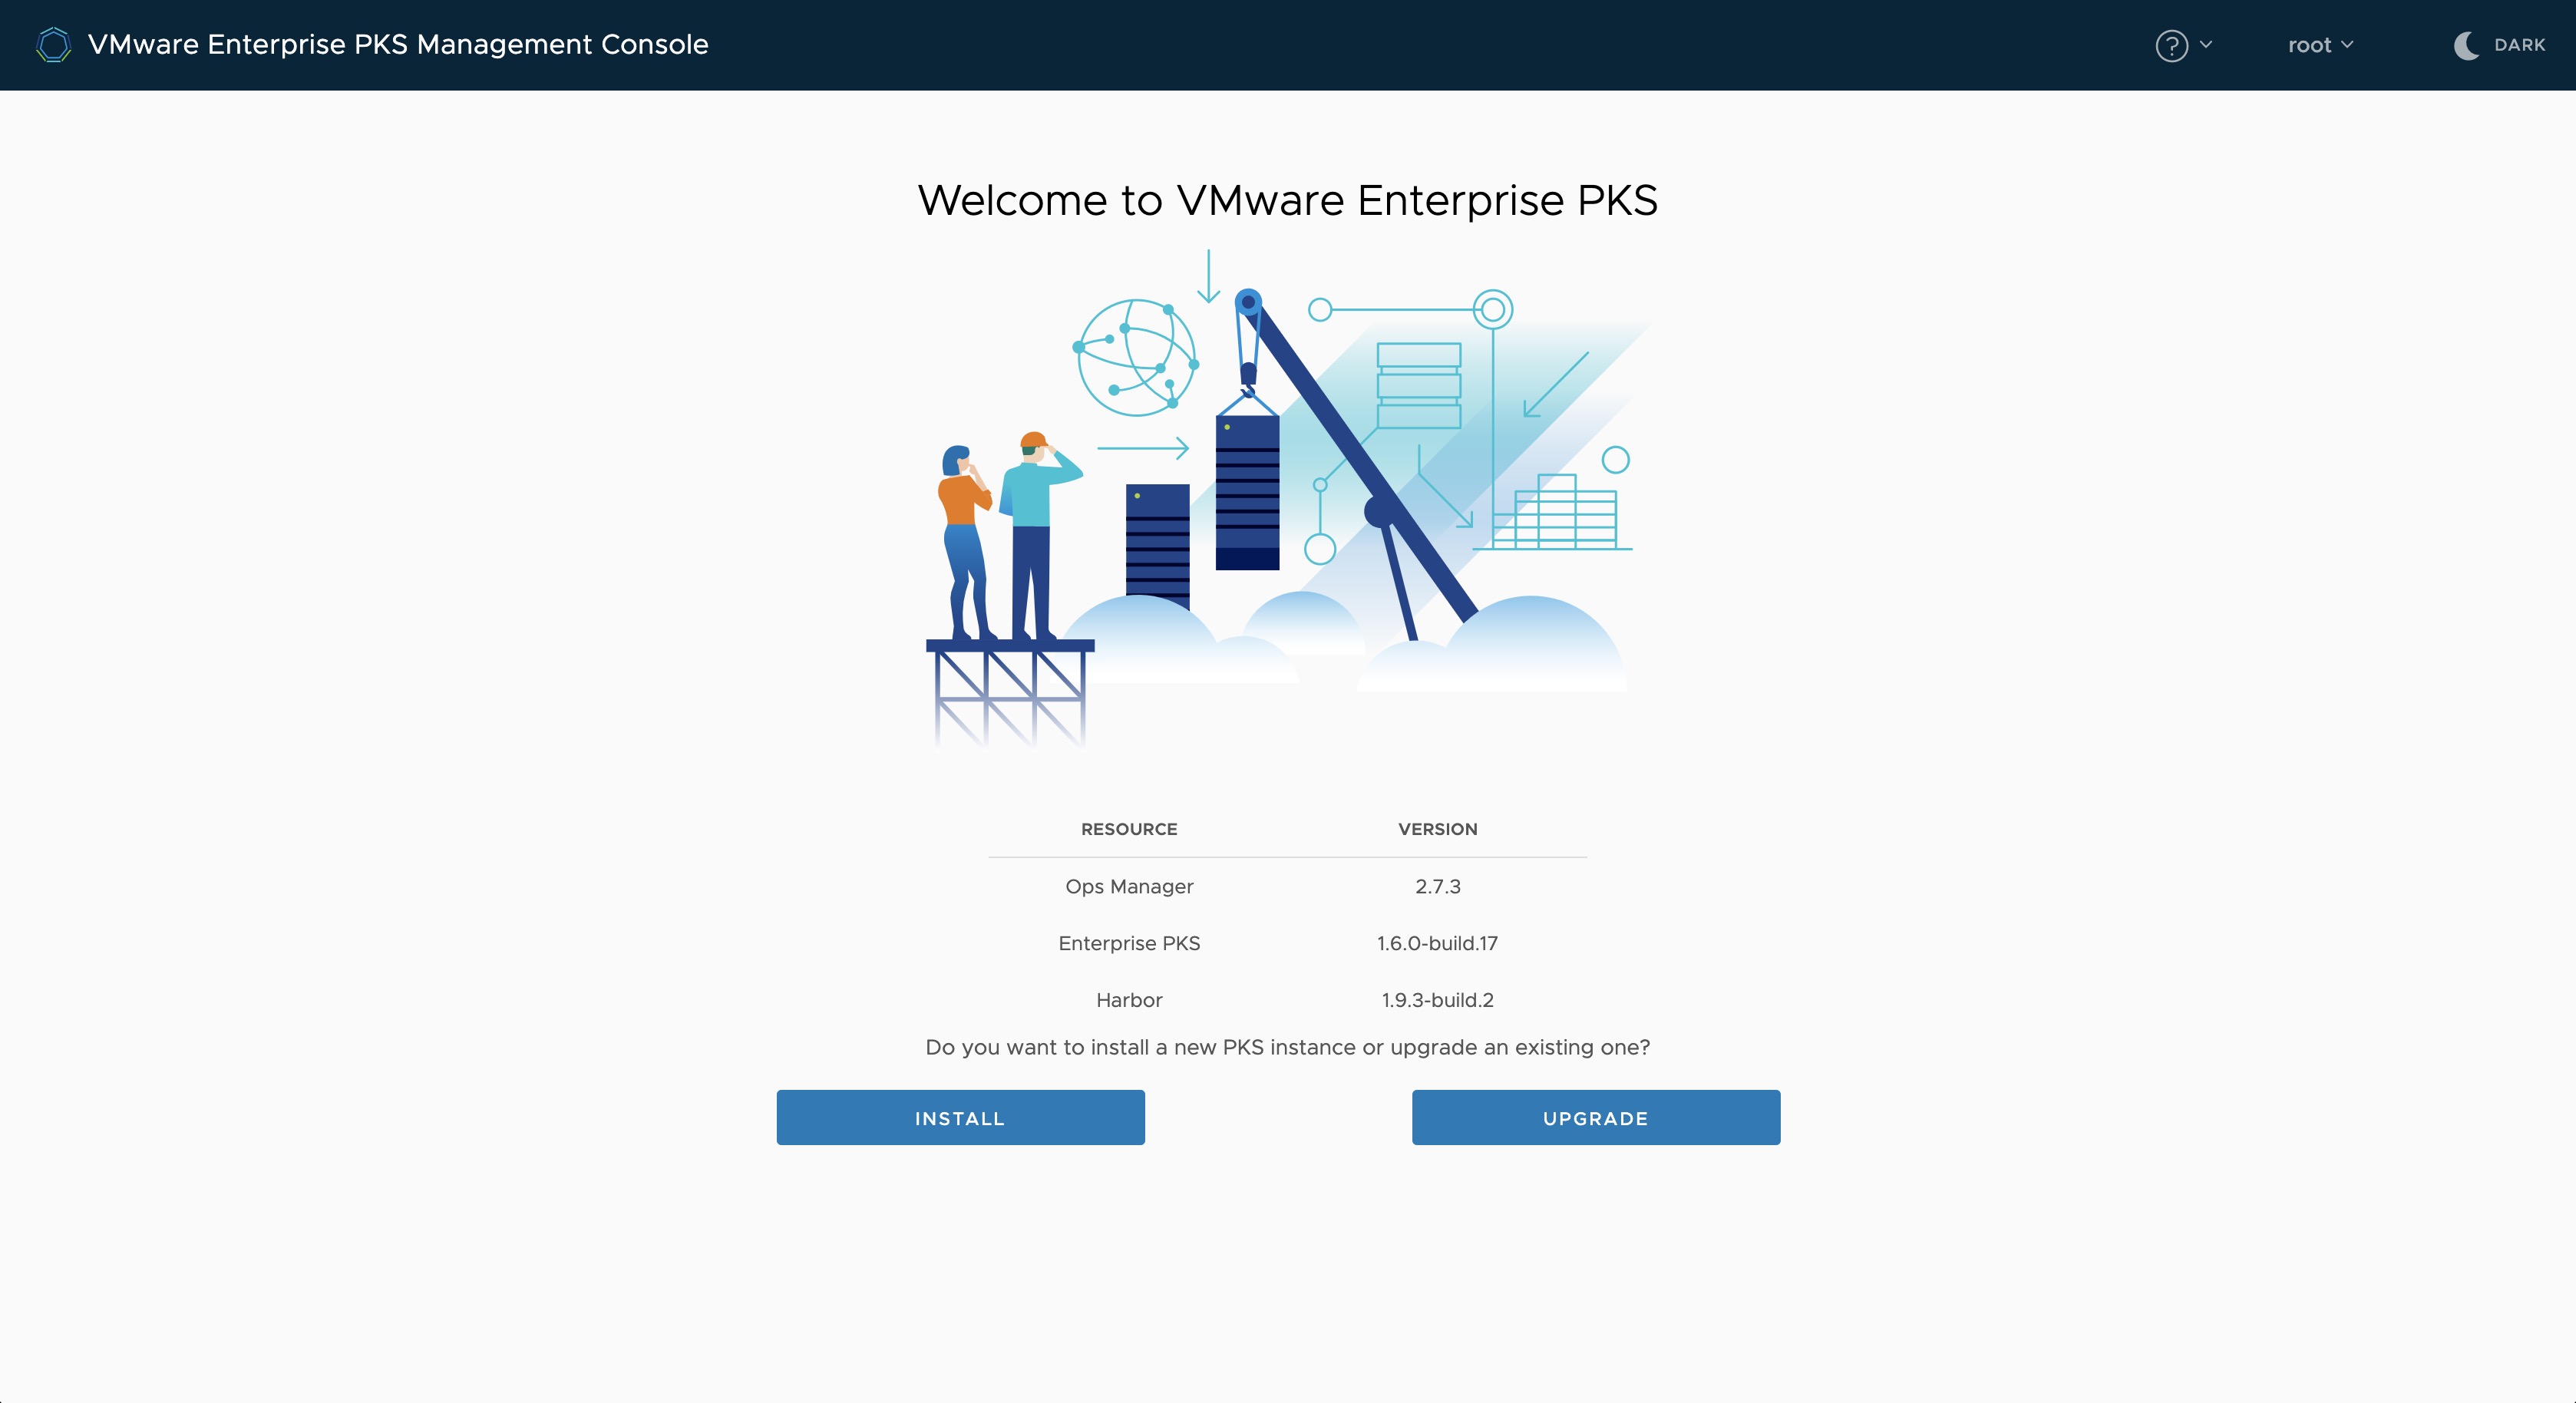
On the next page click on Install to continue with the wizard-driven installation or on Upgrade to perform an upgrade of the EPMC (including all the new Enterprise PKS bits).
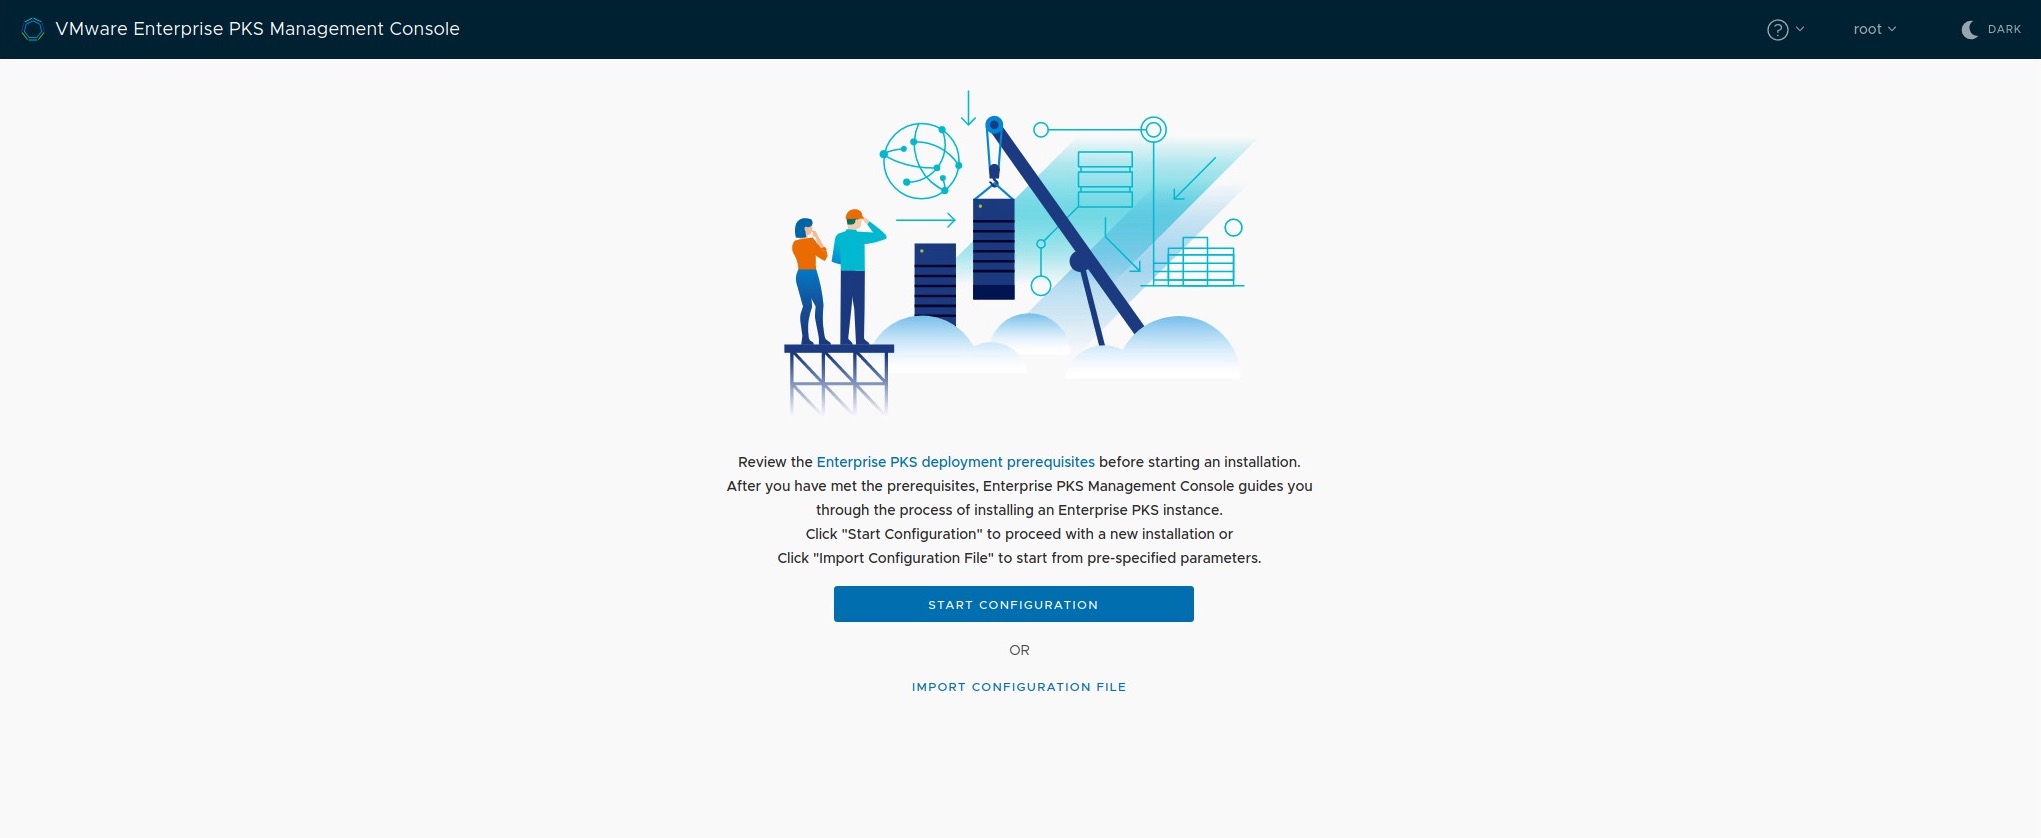
The first cool capability already comes on the next page, because you can choose between Start Configuration, which lets the Deployment-Wizard followed by, or Import Configuration File were we can upload an existing YAML configuration file from a previous deployment.
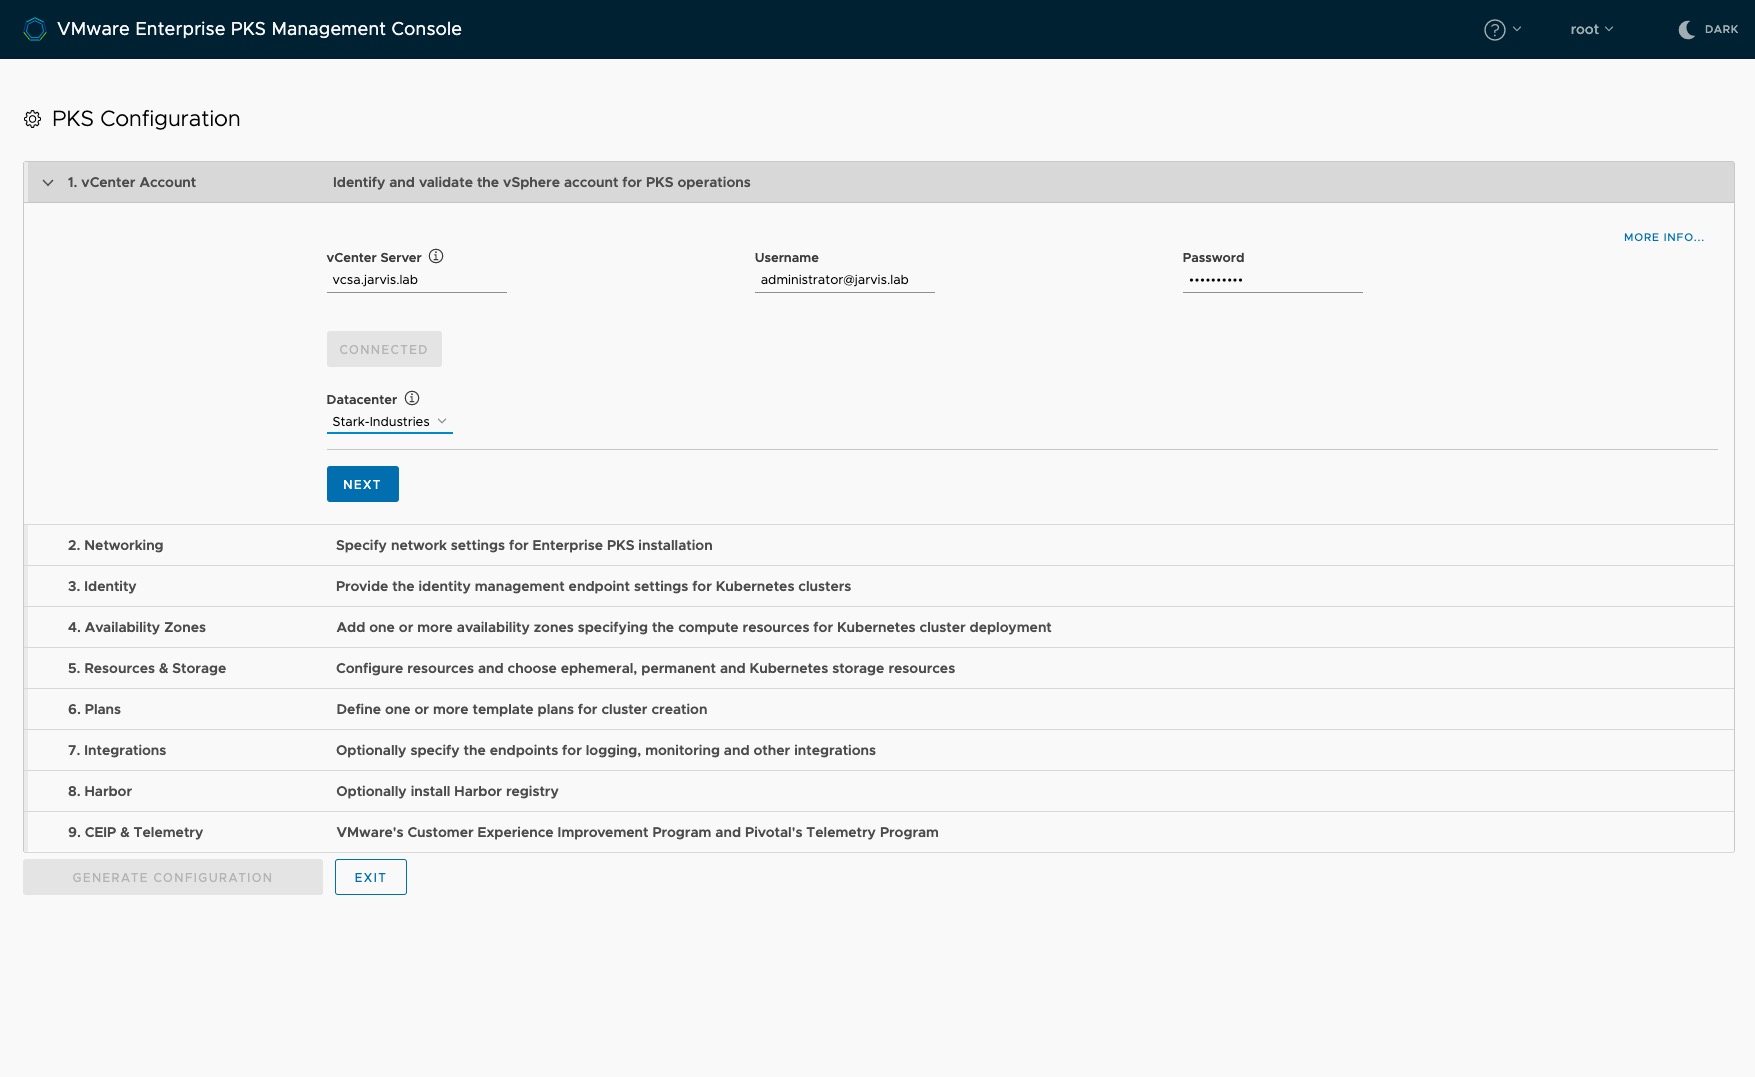
Step 1: vCenter Account
Step One is the connection establishment to our vCenter Server which will be our deployment target. Just enter the FQDN/ IP, provide valid credentials of a user with the appropriate vSphere administrator permissions, wait for the validation and you will recognize that the Datacenter field will be auto-populated.
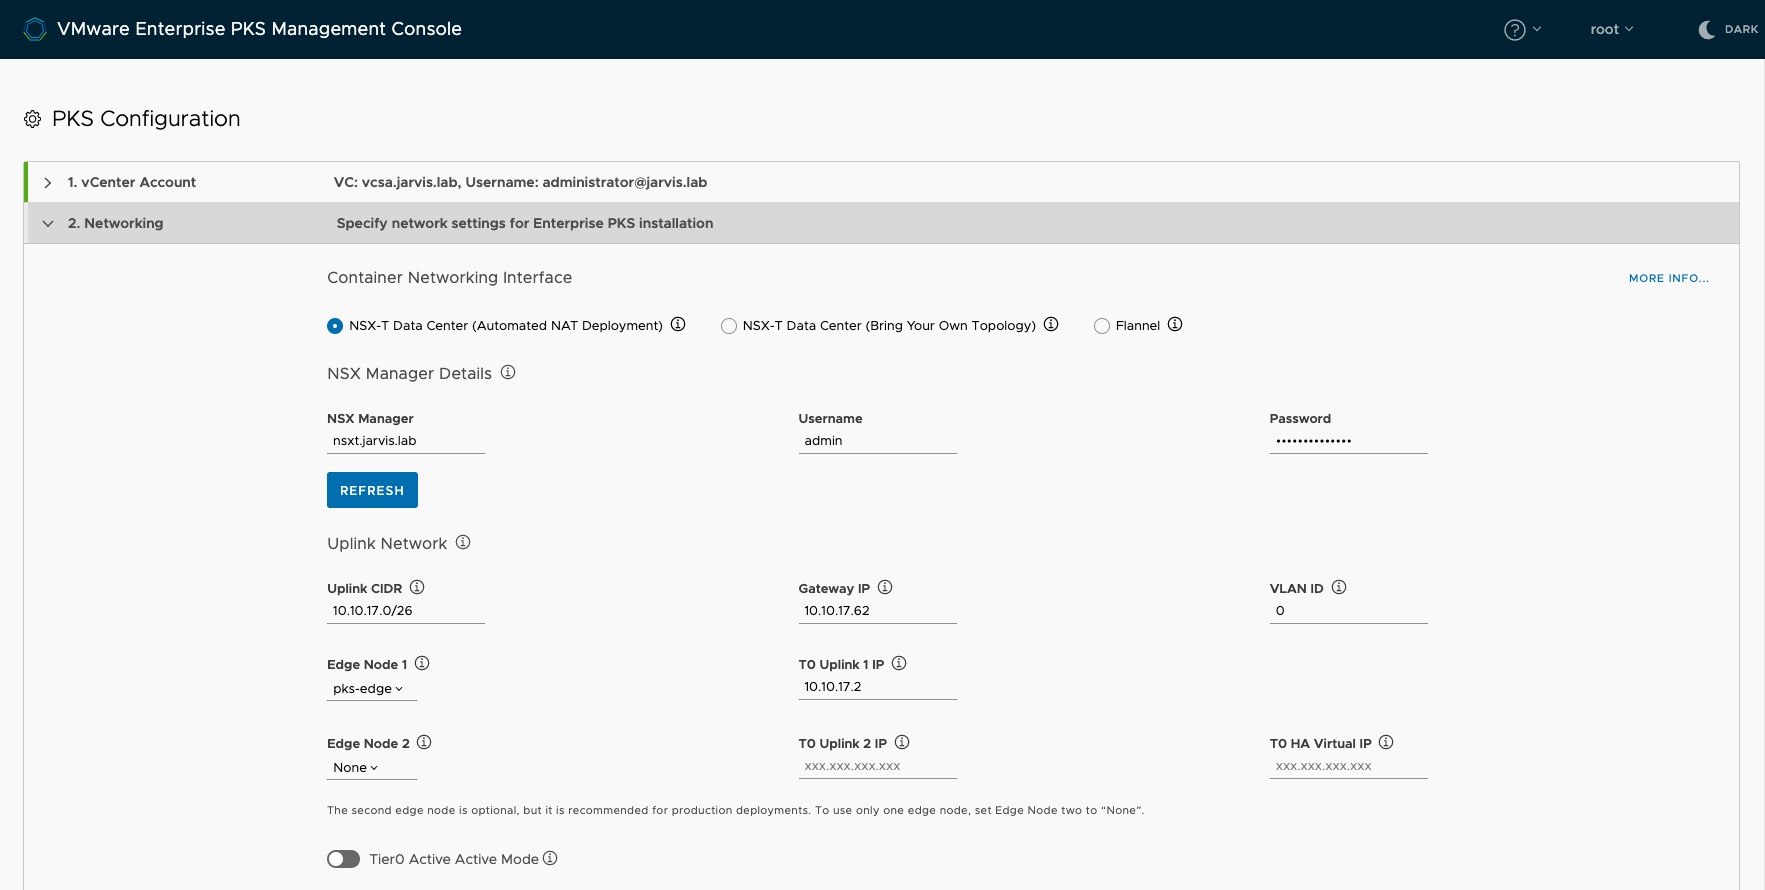
Step 2: Networking
I´m not going to explain all three options in detail here. What I am very curious and excited about was the Automated NAT deployment option, which is an End-to-End PKS deployment in NAT mode (T0, T1, IP blocks) including NSX Certificates generation.
If you choose this deployment-method too and in case you have configured an NSX-T Edge for the use of Enterprise PKS with NAT rules before, make sure you clean them out to prevent any conflicts, because EPMC will automatically create all NAT rules for you.
Proof-of-Concept Deployments:
The well documented prereqs for NSX-T describing how VMware recommends an Enterprise-ready NSX-T deployment with the necessary pieces deployed in High-Availability mode. Luckily, these prereqs are not “hard coded” and thus it doesn´t apply for Proof-of-Concept deployments. With regard to, one NSX Manager node and one Edge Node is sufficient.
Uplink Network
Like you´ve already done in the previous step for the vCenter Server before, just do the same here and provide the credentials for the administrative user. The fields for the NSX-T Edges will be auto-populated too. Select the one you intend to use and specify the appropriate Uplink Network specifications.
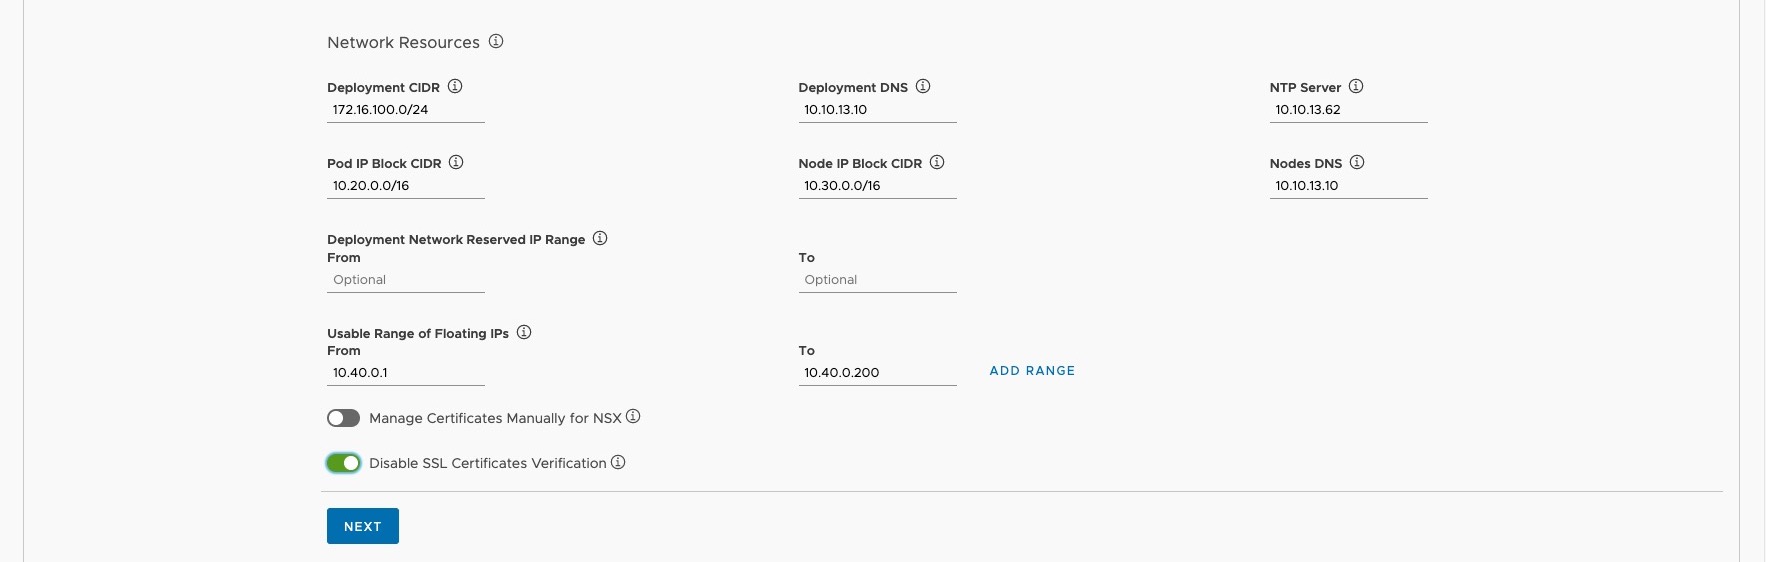
Network Resources
In the Network Resources section, specify the different subnets as well as network services like DNS and NTP for the following resources:
- Deployment: Basically, the PKS Management Plane components like OpsManager, BOSH, the PKS instance as well as Harbor.
- POD IP Block: Used by the Kubernetes PODs. IMPORTNAT! Maximum suffix is 24.
- Node IP Block: Used by the Kubernetes Master, and Worker-Nodes. IMPORTNAT! Maximum suffix of 22.
- Floating IPs: Used for SNAT IP addresses whenever a Namespace is created (NAT mode) as well as for Load Balancers which will be automatically provisioned by NSX-T, including the load balancer fronting the PKS API server and load balancers for pod ingress.
I use self-signed certificates in my environment and for this reason I´ve toggled the radio button Disable SSL certificates verification to allow unsecured connections to the NSX Manager.
At this point, I´d also like to point out to the documentation regarding the automated generation of certificates:
If NSX-T Data Center uses custom certificates and you do not provide the CA certificate for NSX Manager, Enterprise PKS Management Console automatically generates one and registers it with NSX Manager. This can cause other services that are integrated with NSX Manager not to function correctly.
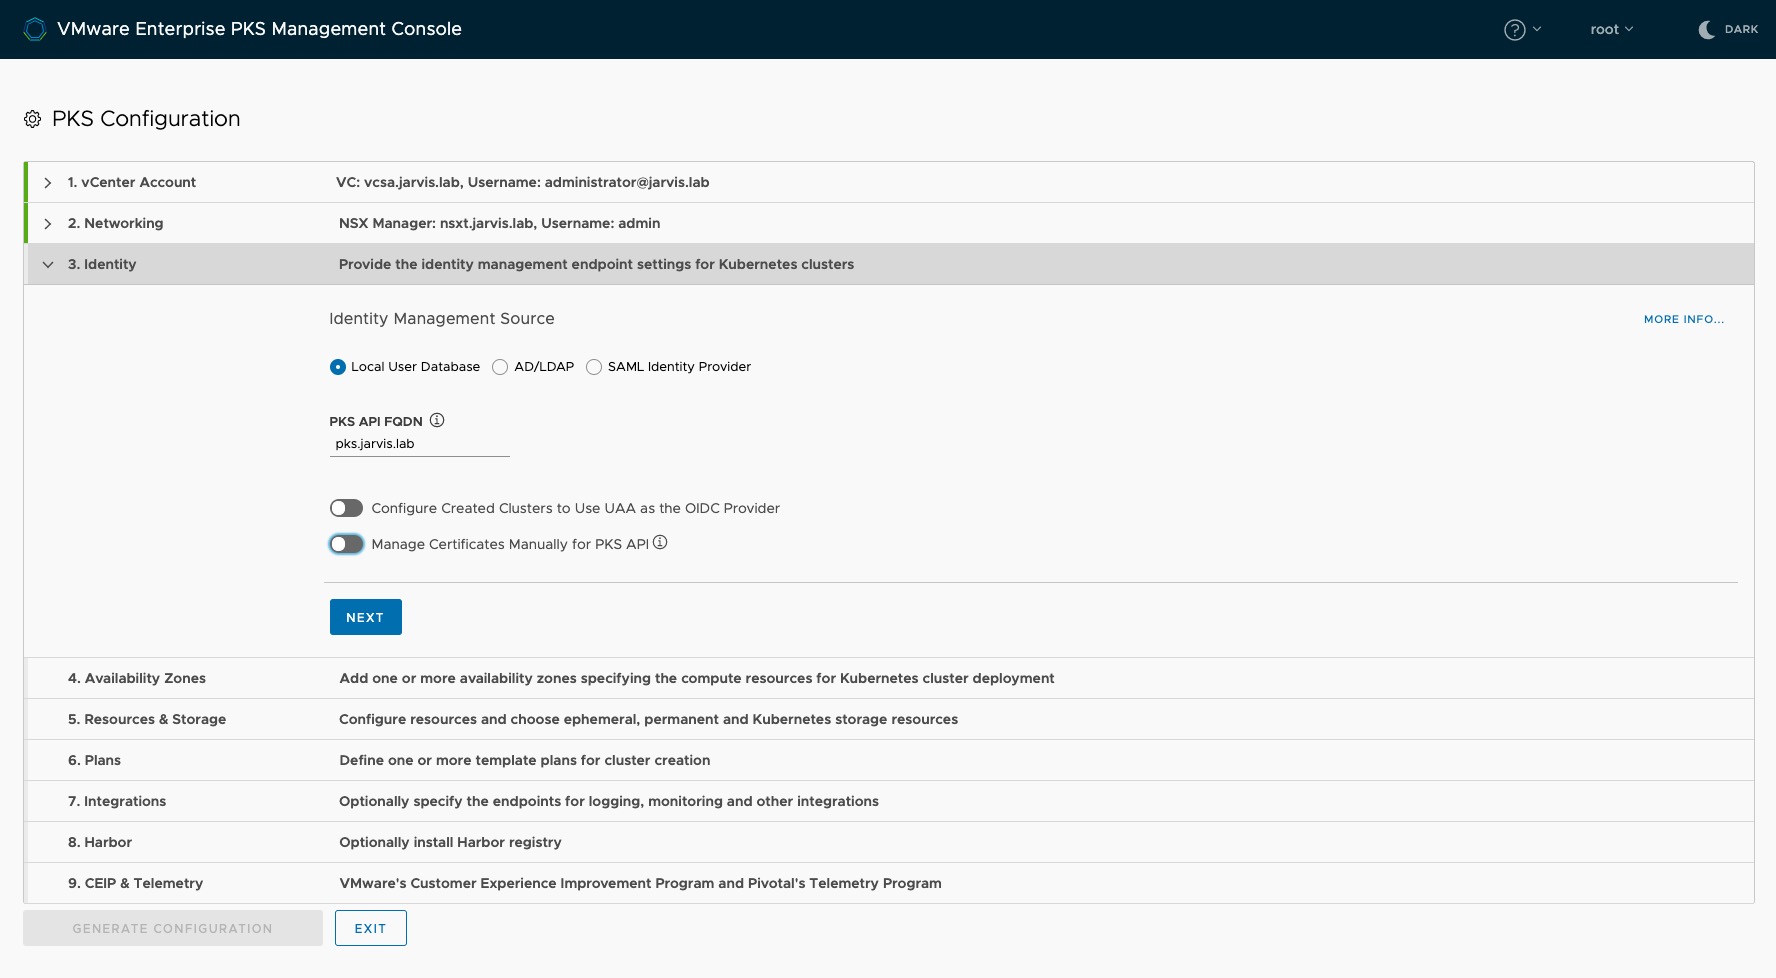
Step 3: Identity
Specify in this Step how you would like to add Users and Groups to Enterprise PKS. EPMC offers three option here:
- Create Users and Groups and assign roles to those which will be stored into the UAA database:
or
- Add an External LDAP Server and define the User search base and the Group search base:
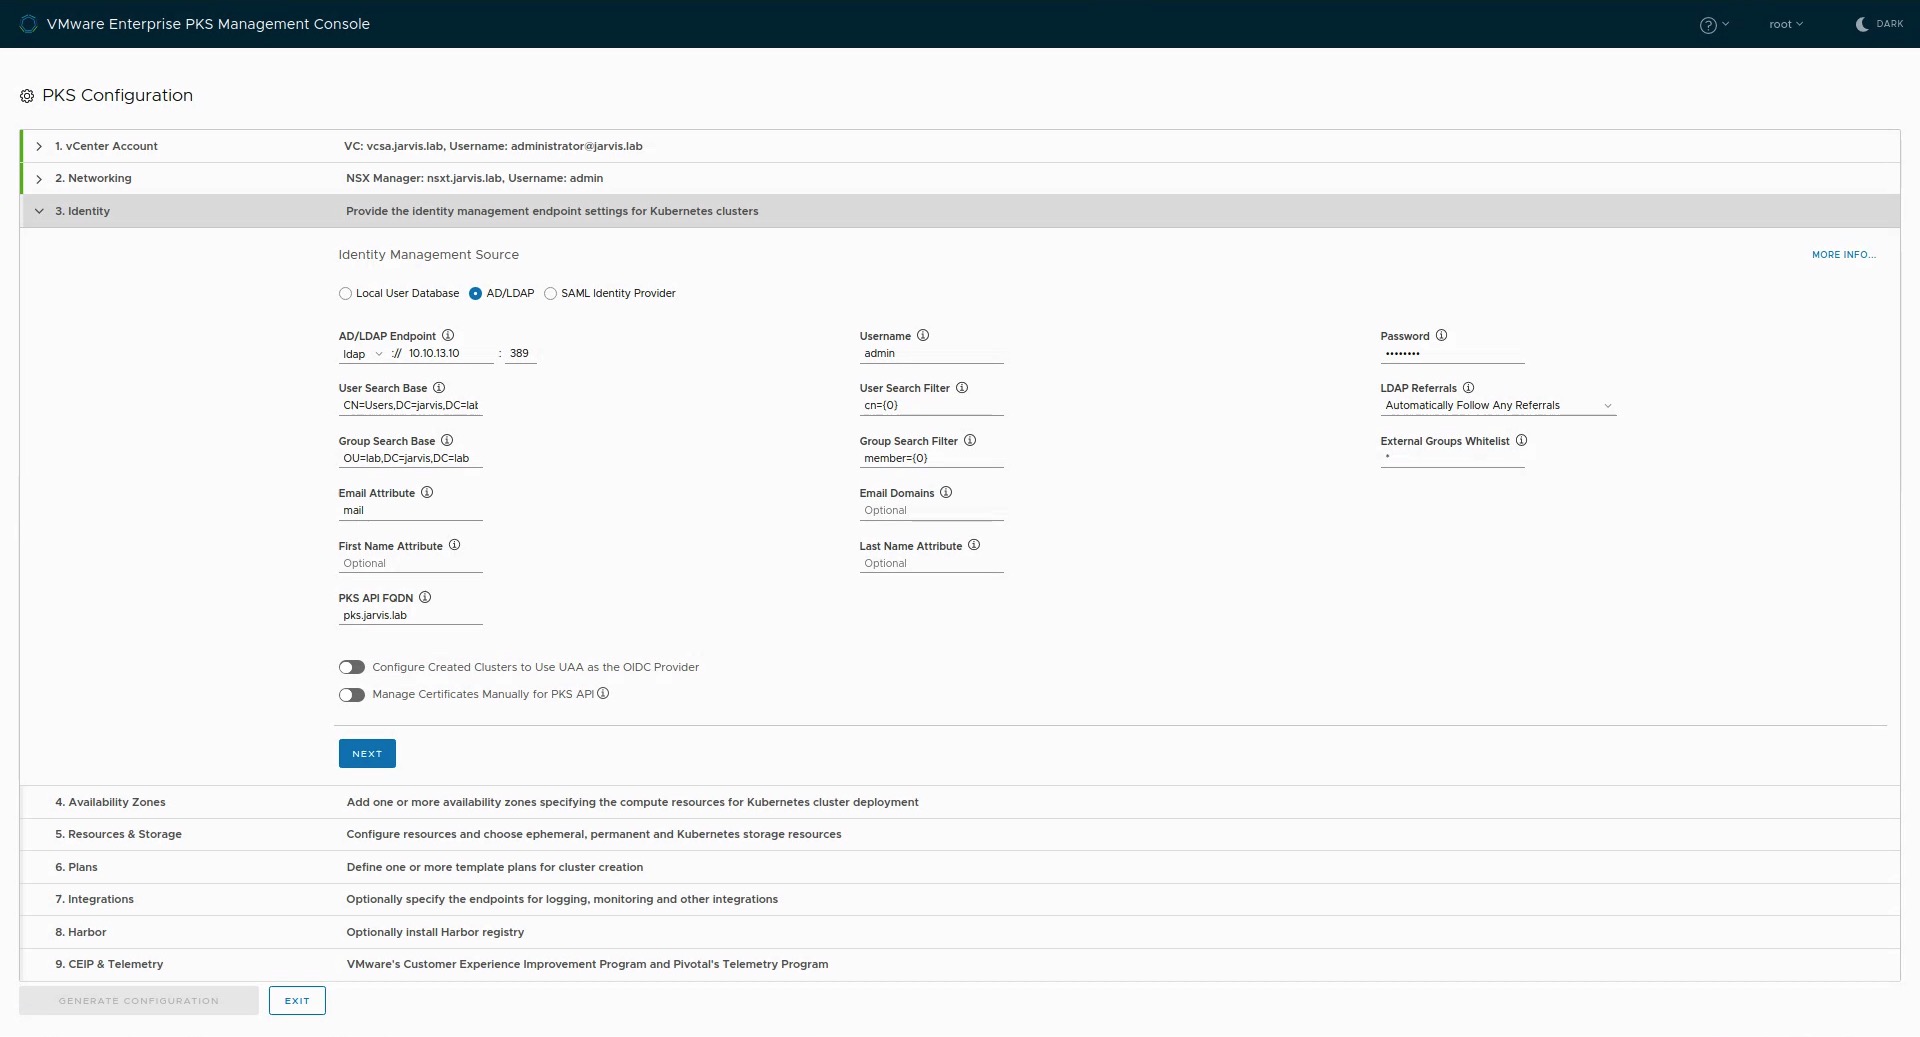
or you can use a
- SAML Identity Provider like e.g. Okta or Azure Active Directory
To finish this step, enter the address for the PKS API Server like pks.jarvis.lab in my case.
Optionally, you can use OpenID Connect to authenticate users who access Kubernetes clusters with kubectl by using e.g. Okta as an external IDP. This will give administrators the ability to grant access on an namespace or cluster-wide level to Kubernetes end users.
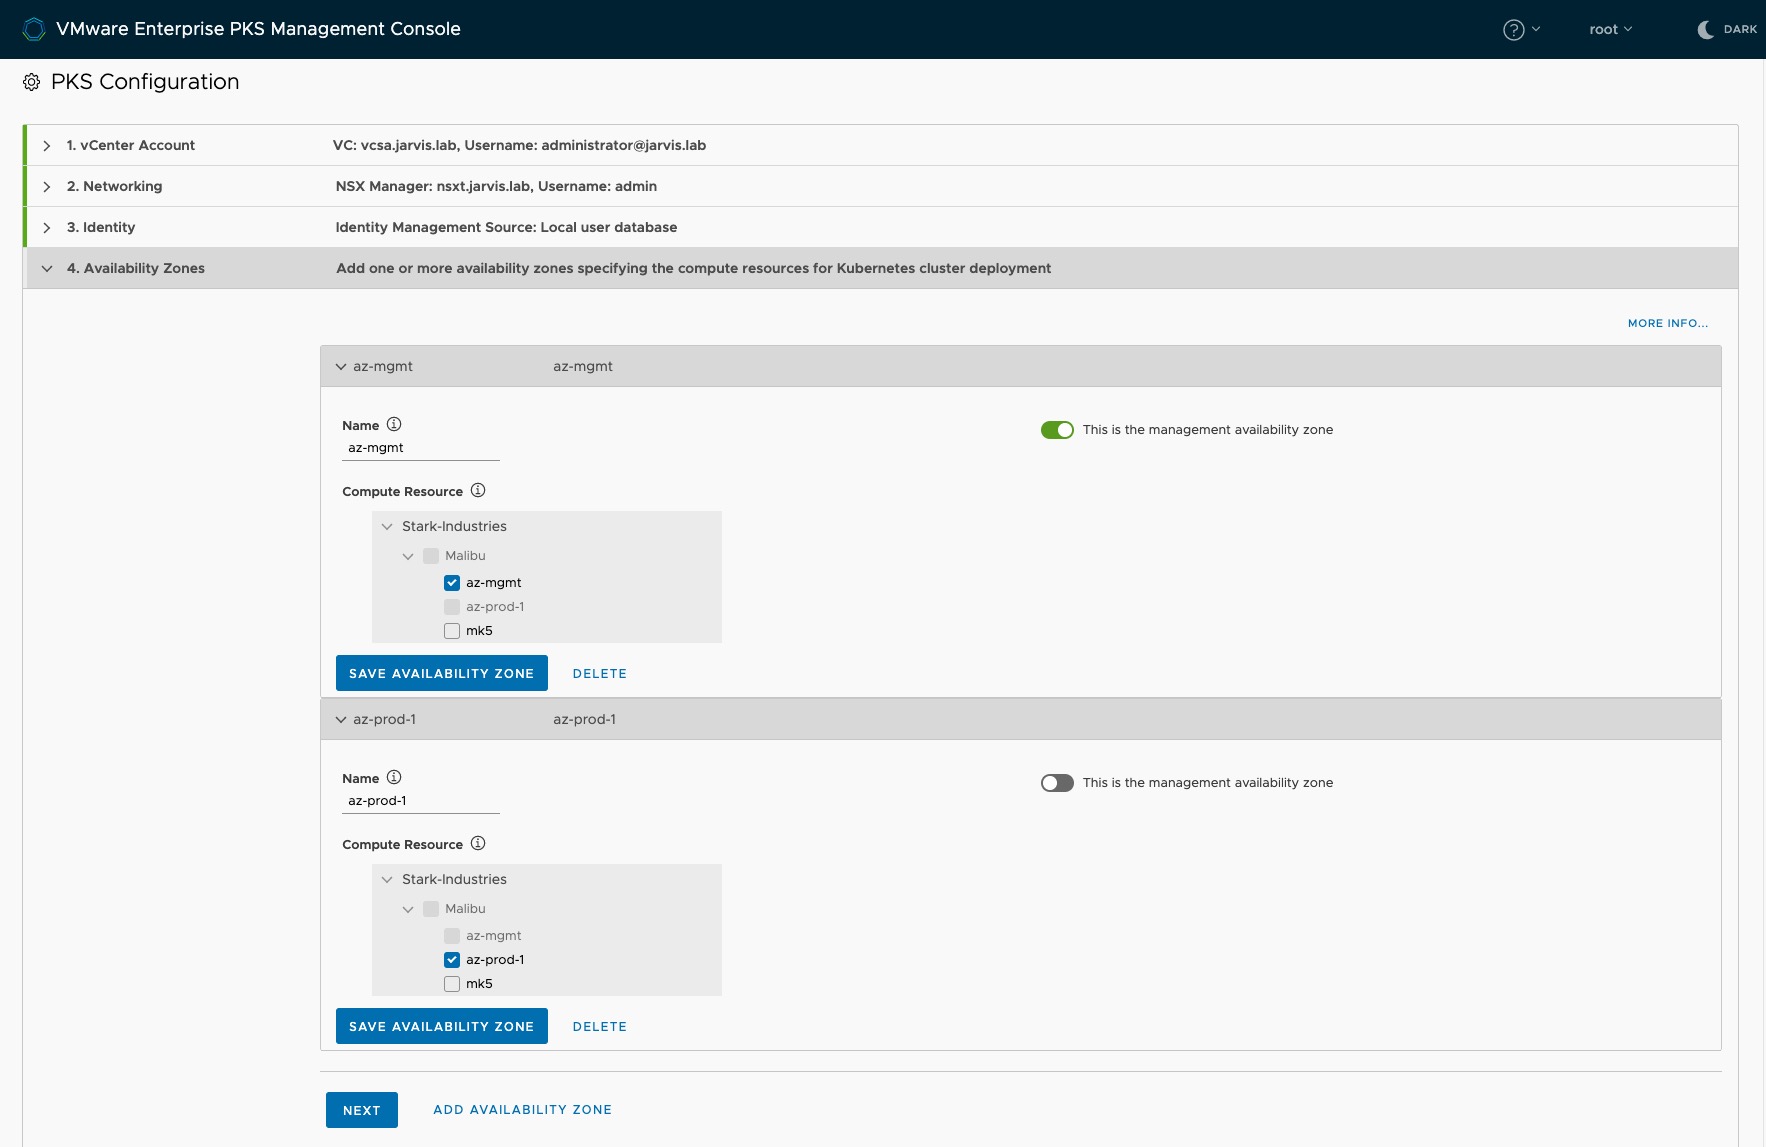
Step 4: Availability Zones
Availability Zones (AZ) are one of four layers of fault tolerance in VMware Enterprise PKS. As a design-recommendation, you should separate the PKS Management Plane from the Kubernetes cluster. This can easily be done by tagging the first AZ as the Management AZ. Click on Save Availability Zone and add another one for the Kubernetes cluster(s) with the recommendation to deploy more than one, for high-availability purposes.
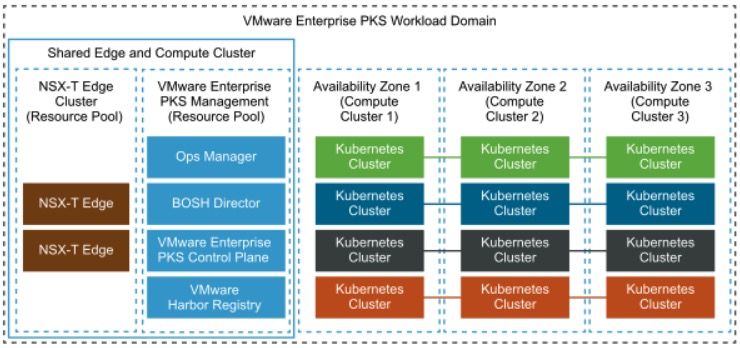
Source: VMware VVD5.1 | Availability Design for Enterprise PKS with NSX-T Workload Domains
As mentioned at the beginning of this post (Prerequisites), I created two Resource Pools and gave them the appropriate description. az-mgmt and az-prod-1.
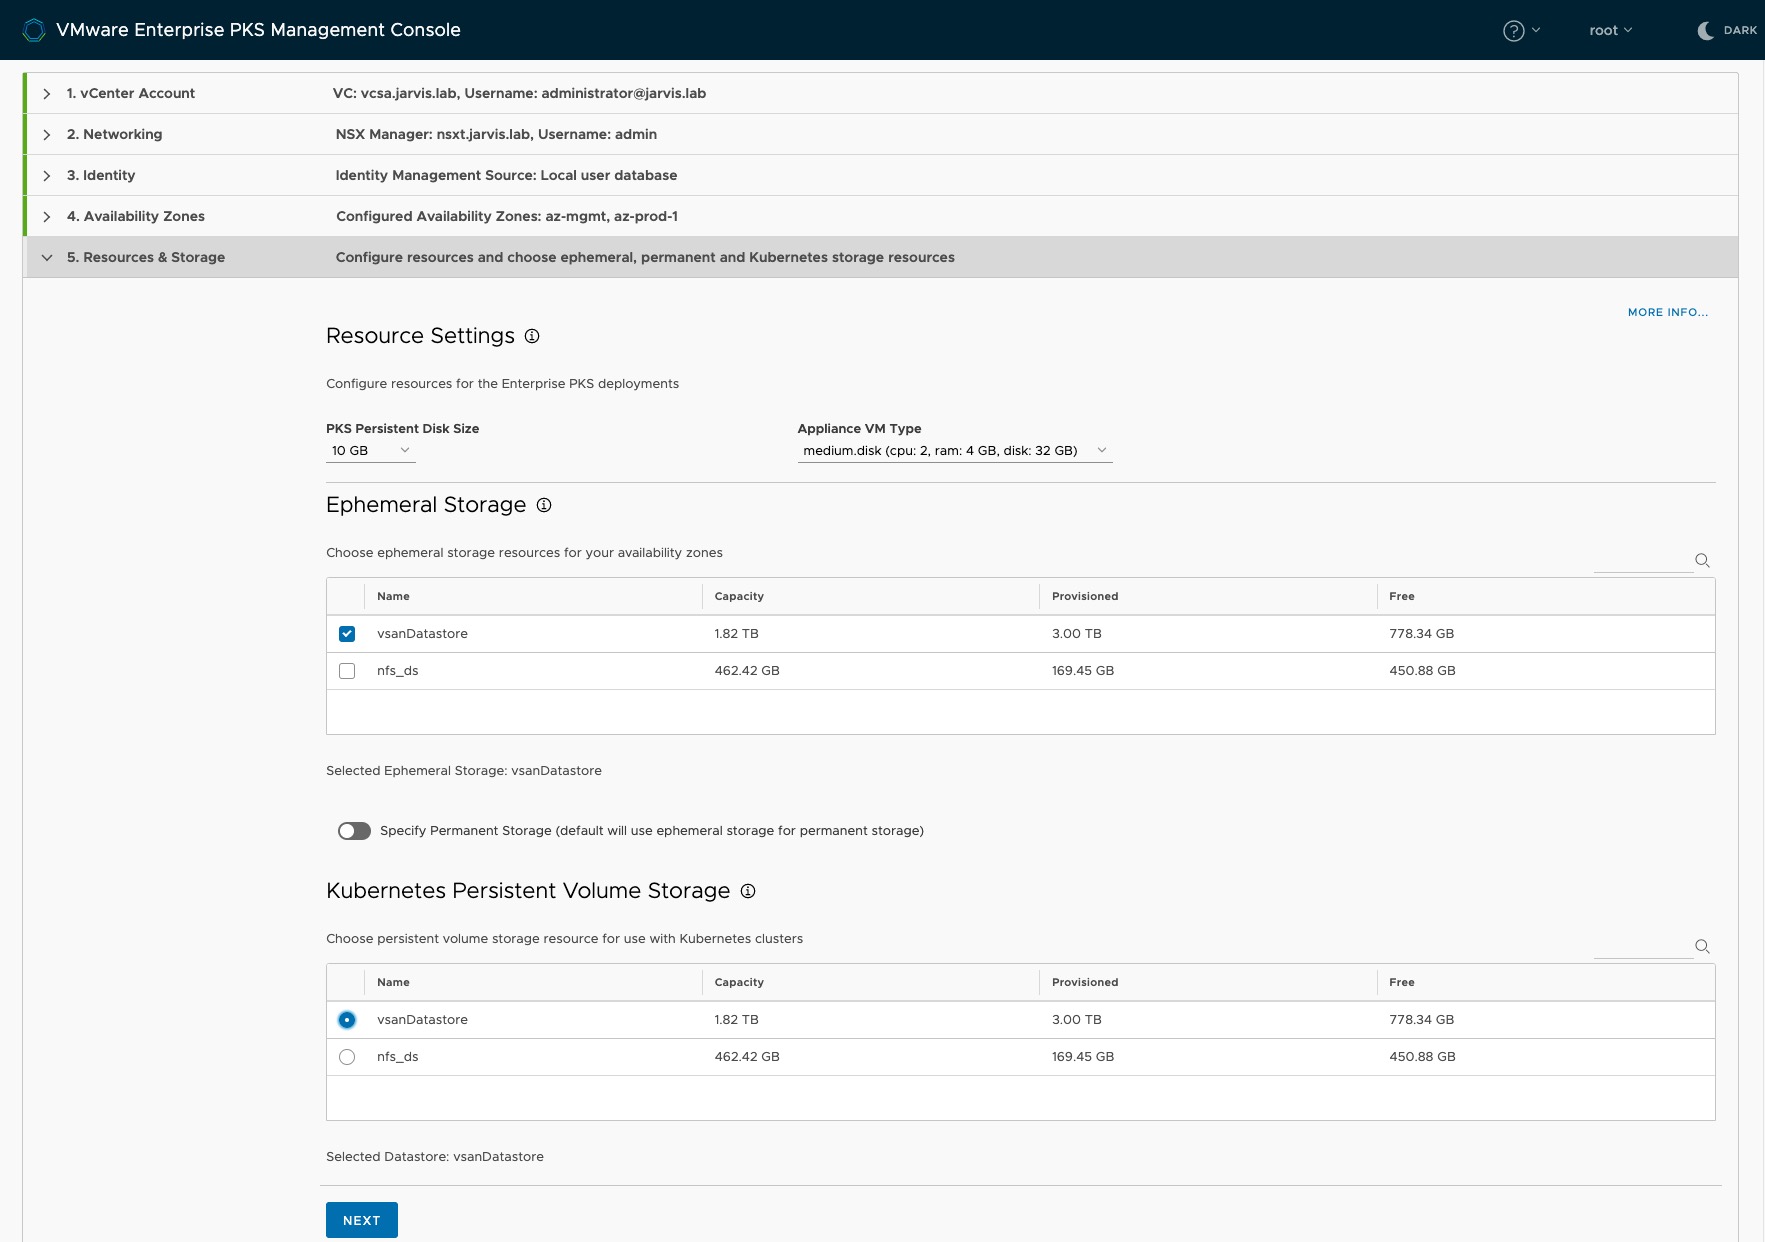
Step 5: Resources & Storage
As you can see on the screenshot Figure XII, we have to configure three Resources now. Resources in this step is meant to be
a) the storage for the service virtual machines which are as needed for compilation purposes (during installation, upgrade, and operation) by Ent. PKS, called Ephemeral Storage as well as
b) the Kubernetes Persistent Volume Storage were all the vmdks will be stored for the Kubernetes persistent volumes (stateful applications) AND optionally
c) the Permanent Storage for Enterprise PKS data. If you let this option default (radio switch off), the same selected datastore for Ephemeral Storage will be used for it.
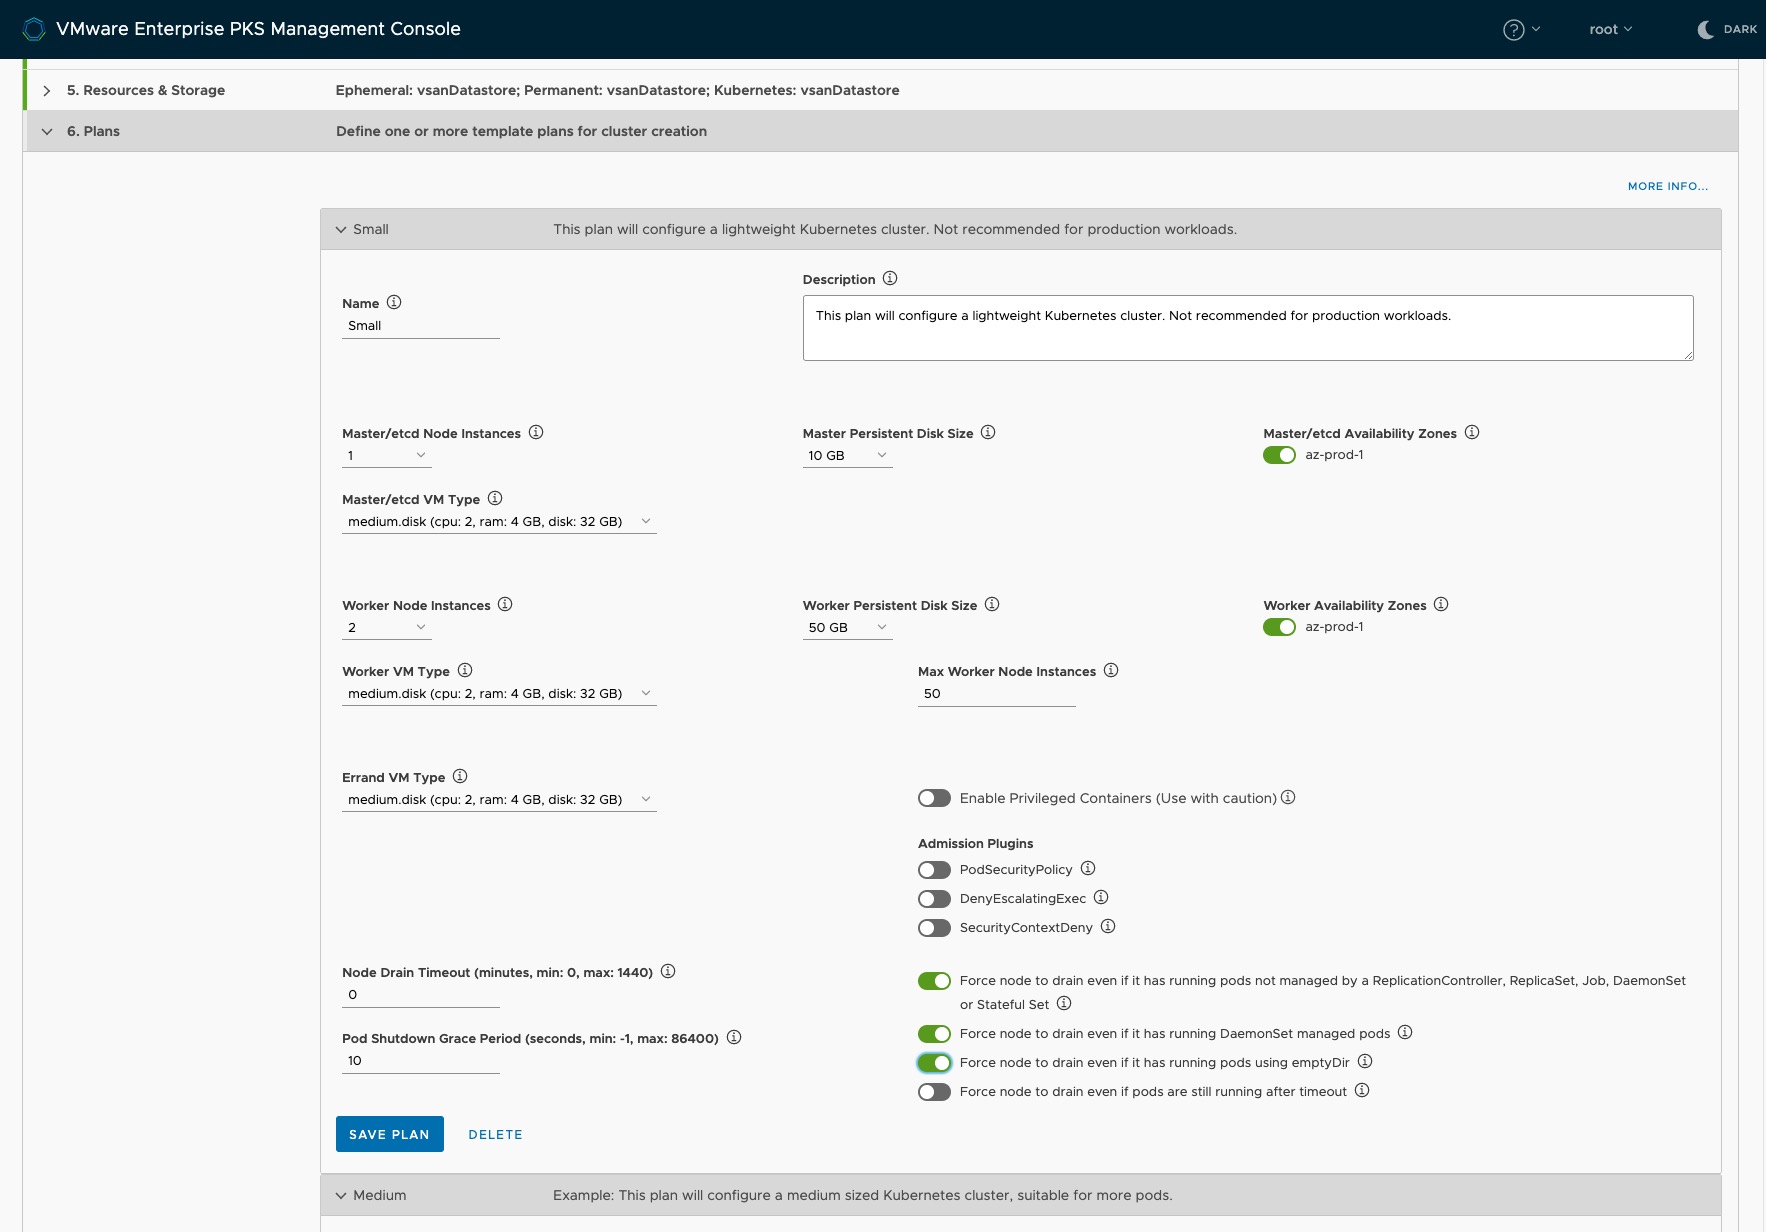
Step 6: Plans
Plans are configuration sets defining the sizes as well as the deployment target (AZ) of the Kubernetes clusters. The EPMC provides by default three “T-Shirt sizes”: Small, Medium and Large. I won´t go into details regarding the other per plan available options here, however I´d like to recommend reading the documentation (Resources section).

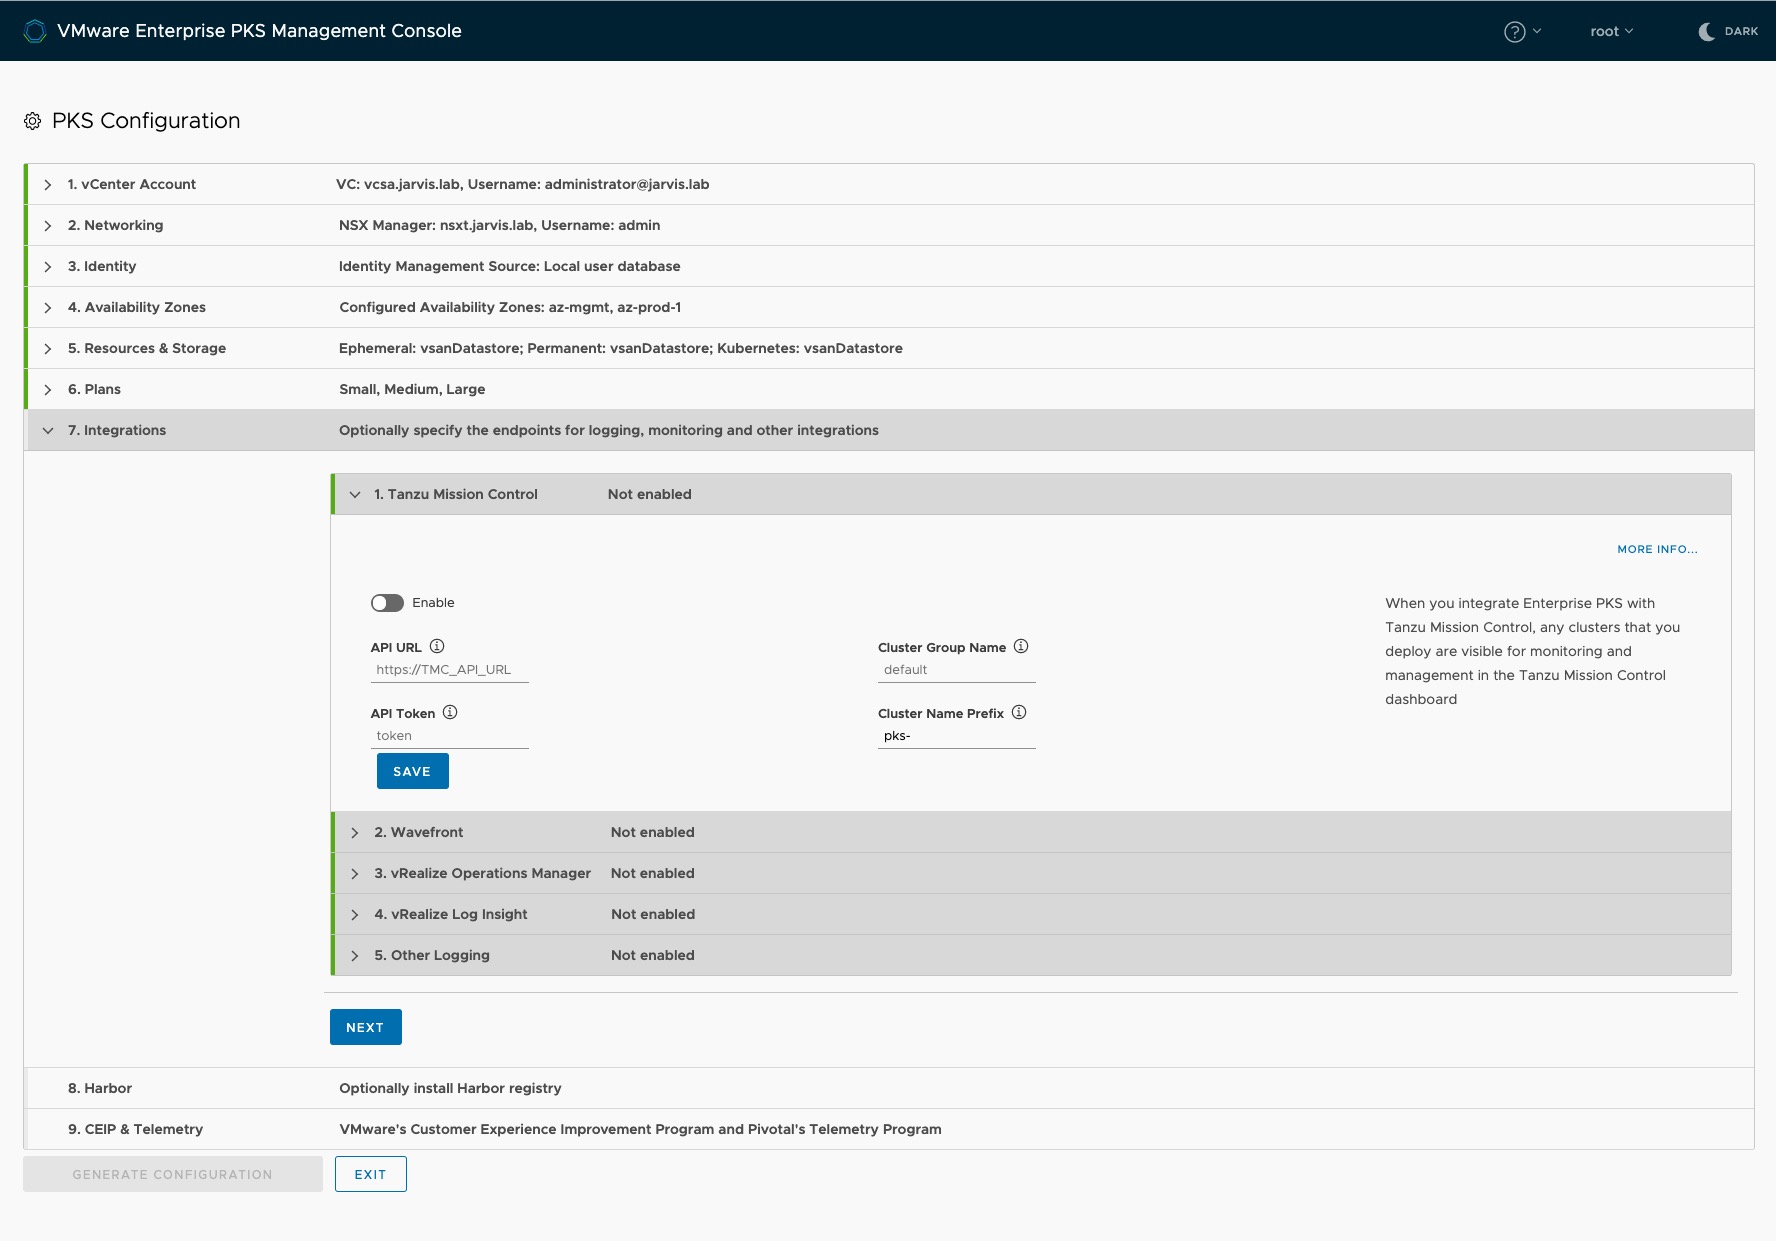
Step 7: Integrations
The integration of vRealize Operations Manager, vRealize Log Insight and Wavefront for monitoring, logging and enterprise observability can be all together done in Step 7. To monitor your Kubernetes clusters with vROps, it is necessary to import the Management Pack for Container Monitoring. A description of how to import the Management Pack as well as some more details on how it works (cAdvisor), can be found through this POST by my friend Alex.
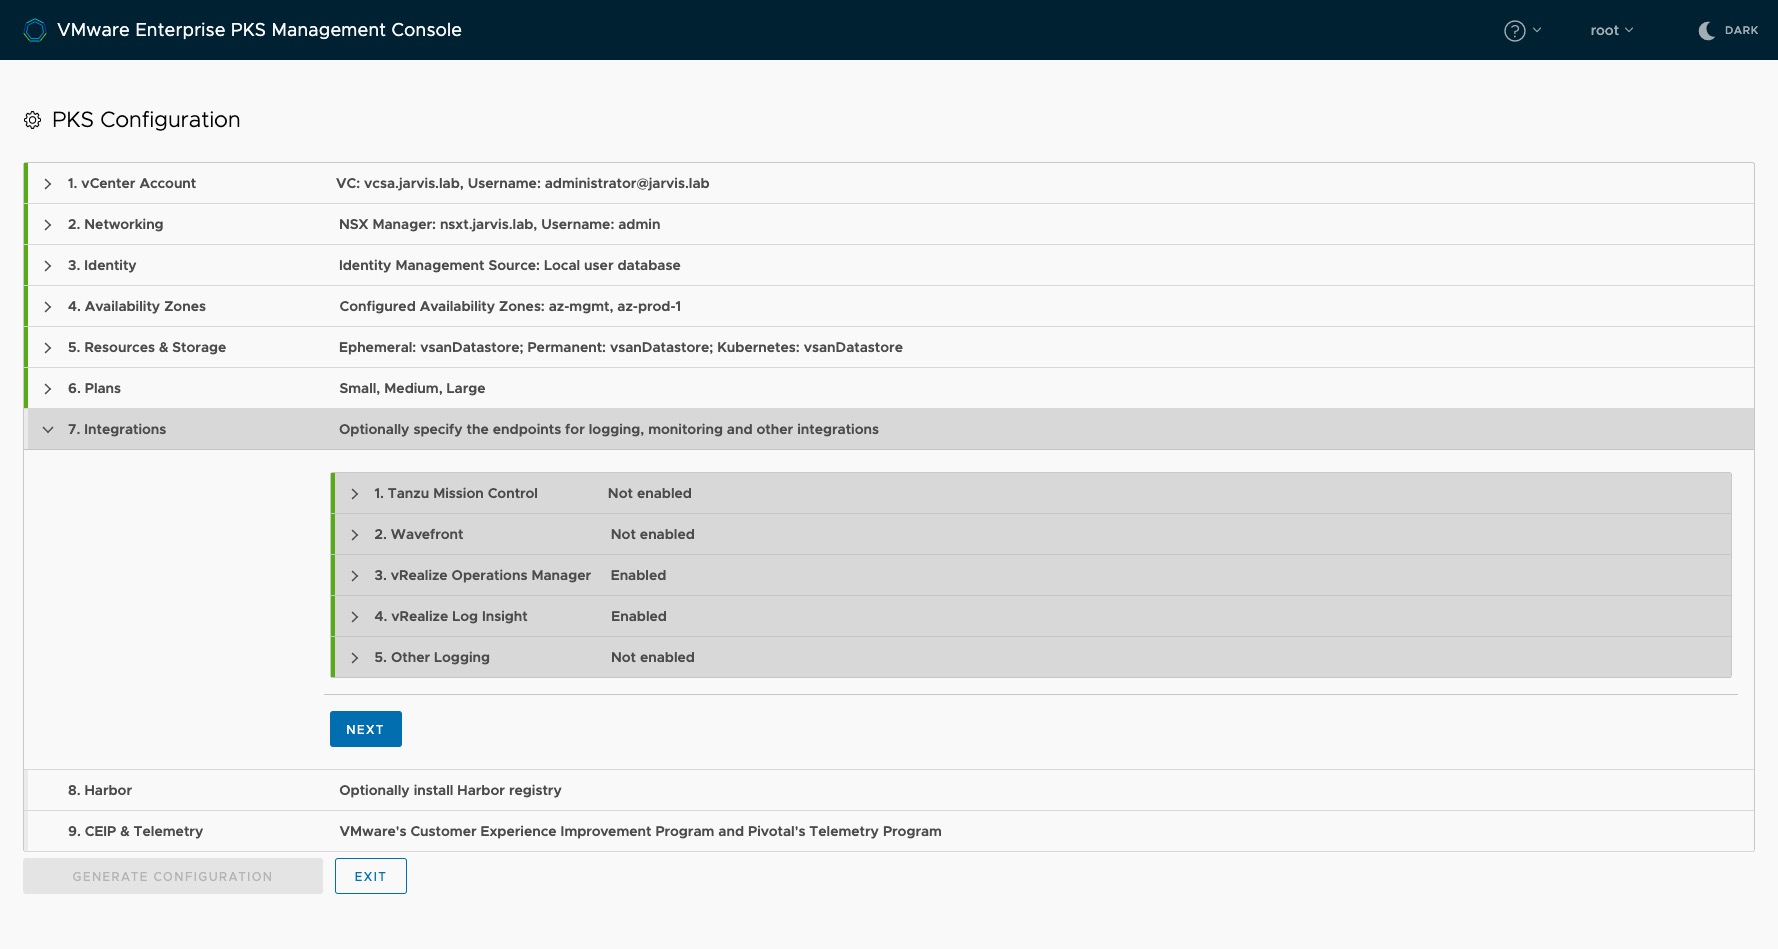
New in EPMC version 1.1.0 is the ability to attach a by PKS created Kubernetes cluster to VMware Tanzu Mission Control (TMC) 🚀. Tanzu Mission Control provides you the ability to handle multi-cluster Kubernetes deployments across multiple clouds with operational consistency.
More to find here: https://blogs.vmware.com/cloudnative/2019/08/26/vmware-tanzu-mission-control/
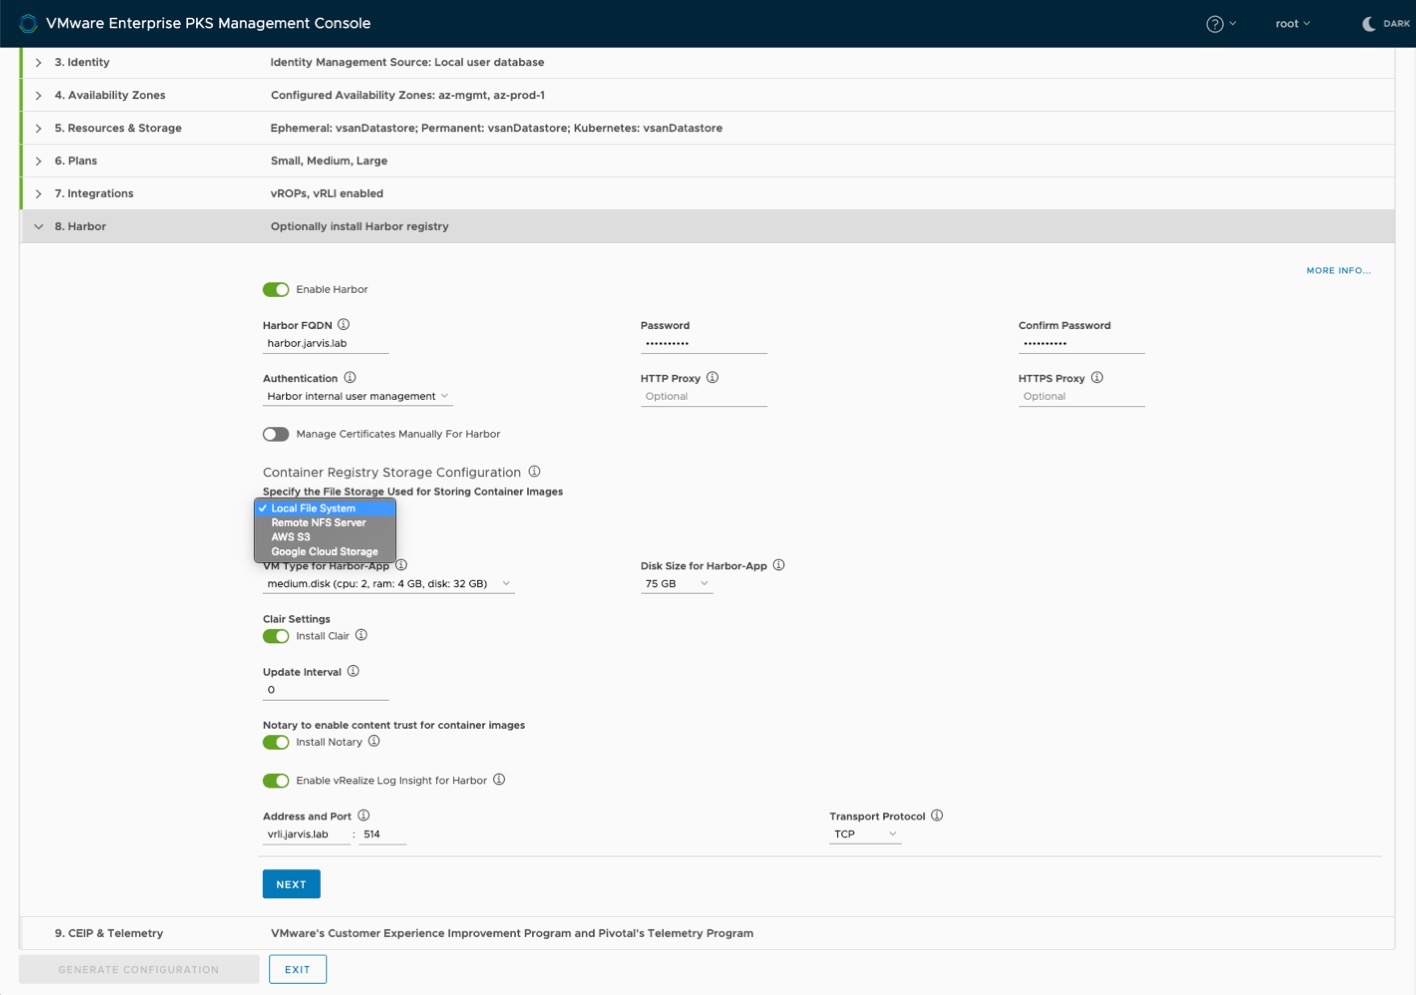
Step 8: Harbor
Running production grade Kubernetes in your organization requires the use of a container image registry as well. Harbor is where your container images found a place which they can call “Home”. Configure it in Step 8.
Step 9: CEIP
Please stay a moment here and read the following blog post from Pivotal regarding the Enhanced Telemetry for PKS before you proceed further.
https://content.pivotal.io/blog/announcing-enhanced-telemetry-for-pks
Also: https://docs-pcf-staging.cfapps.io/pks/1-6/telemetry.html#sample-reports
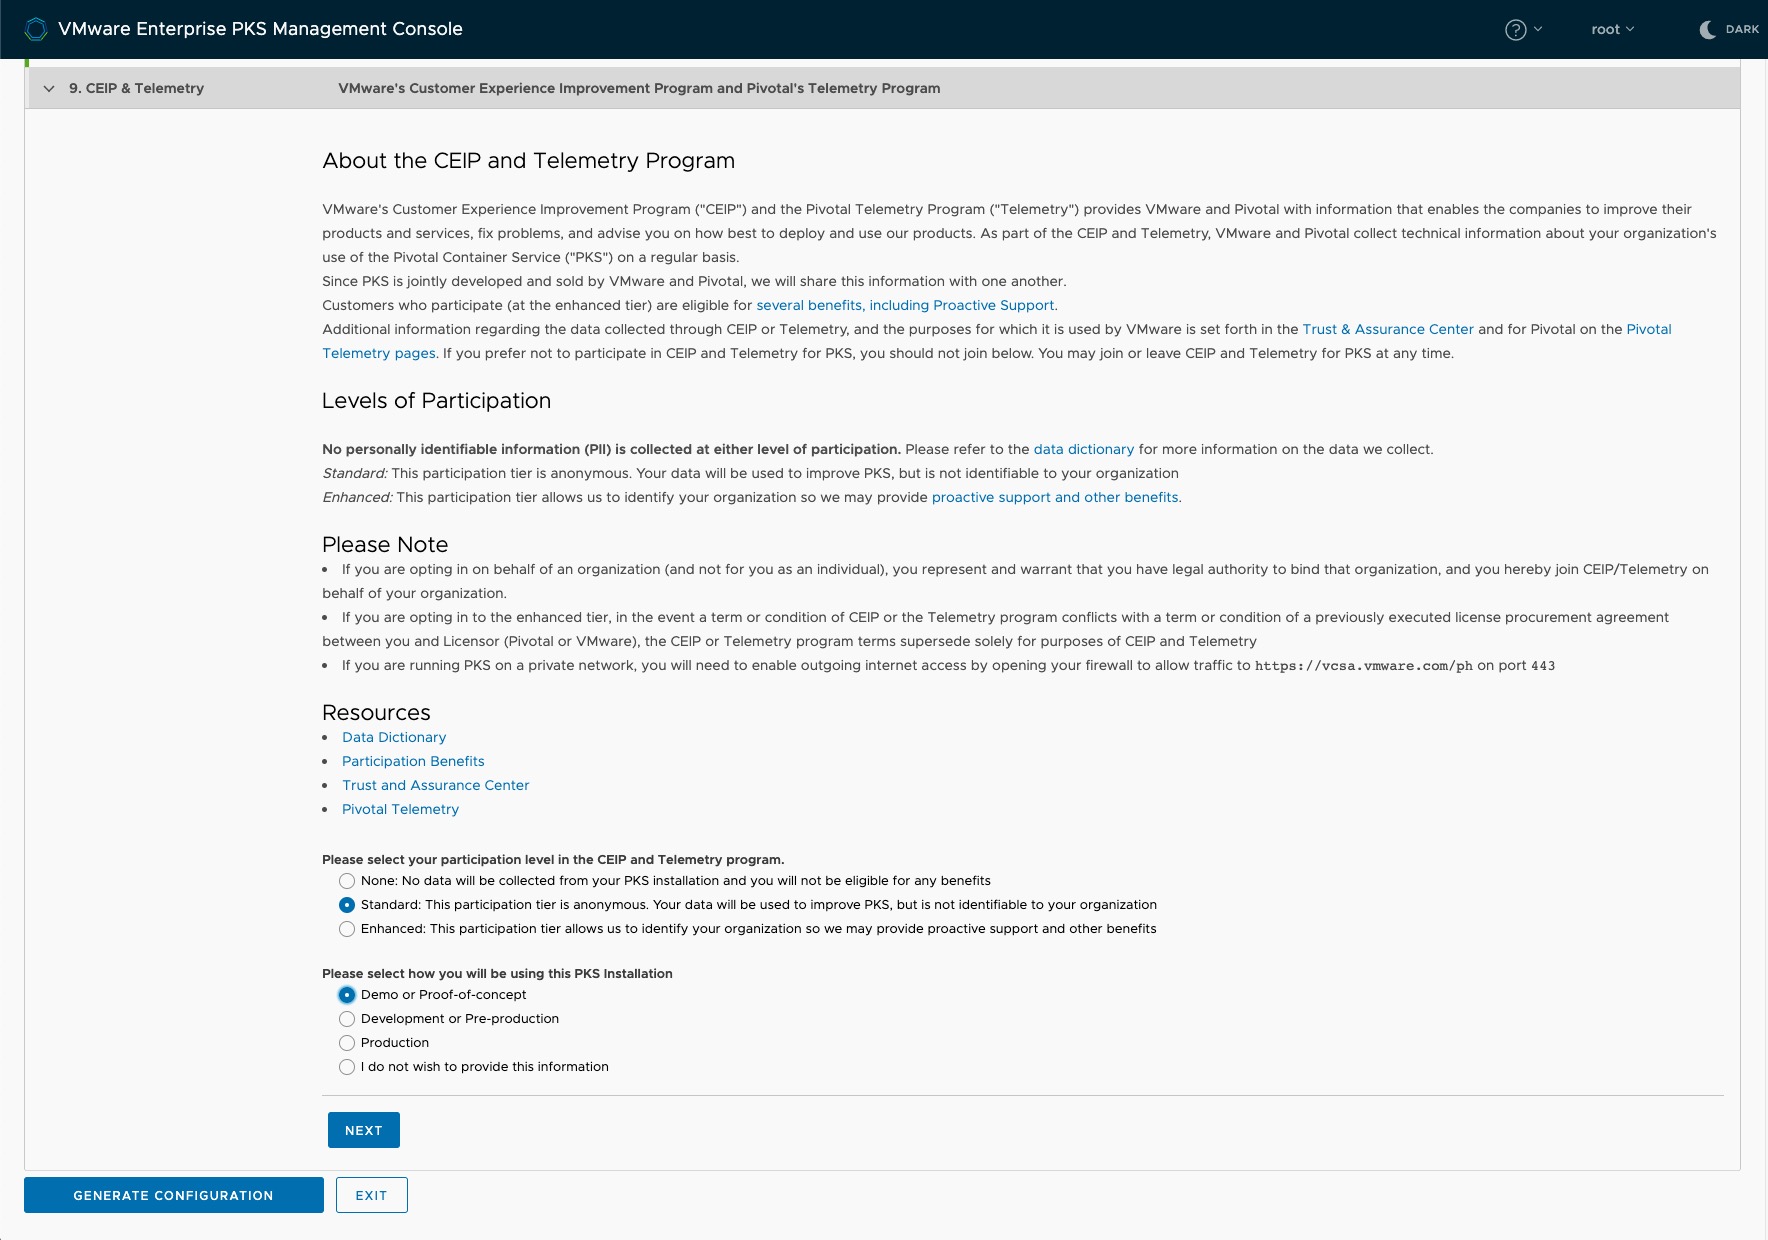
Validate your deployment config and click on Generate Configuration.
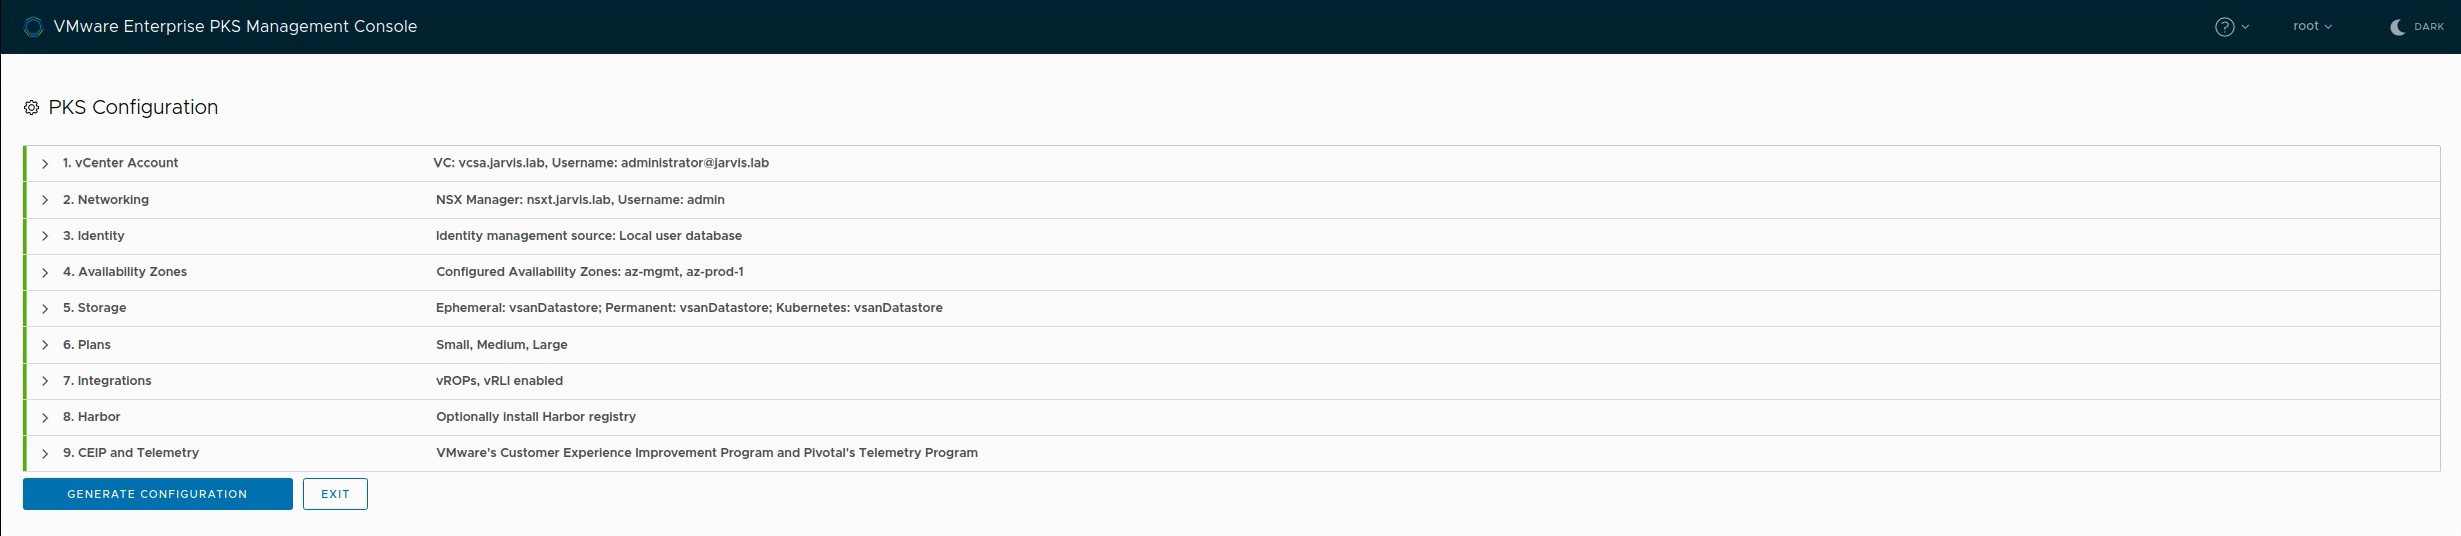
Let the magic happen
You can see now that every configuration we made in the past 9 steps, is available and still editable in an in-browser text editor. Export the configuration as an YAML file to have it availavle for further deployments (see Figure V: Start or Import an Configuration).
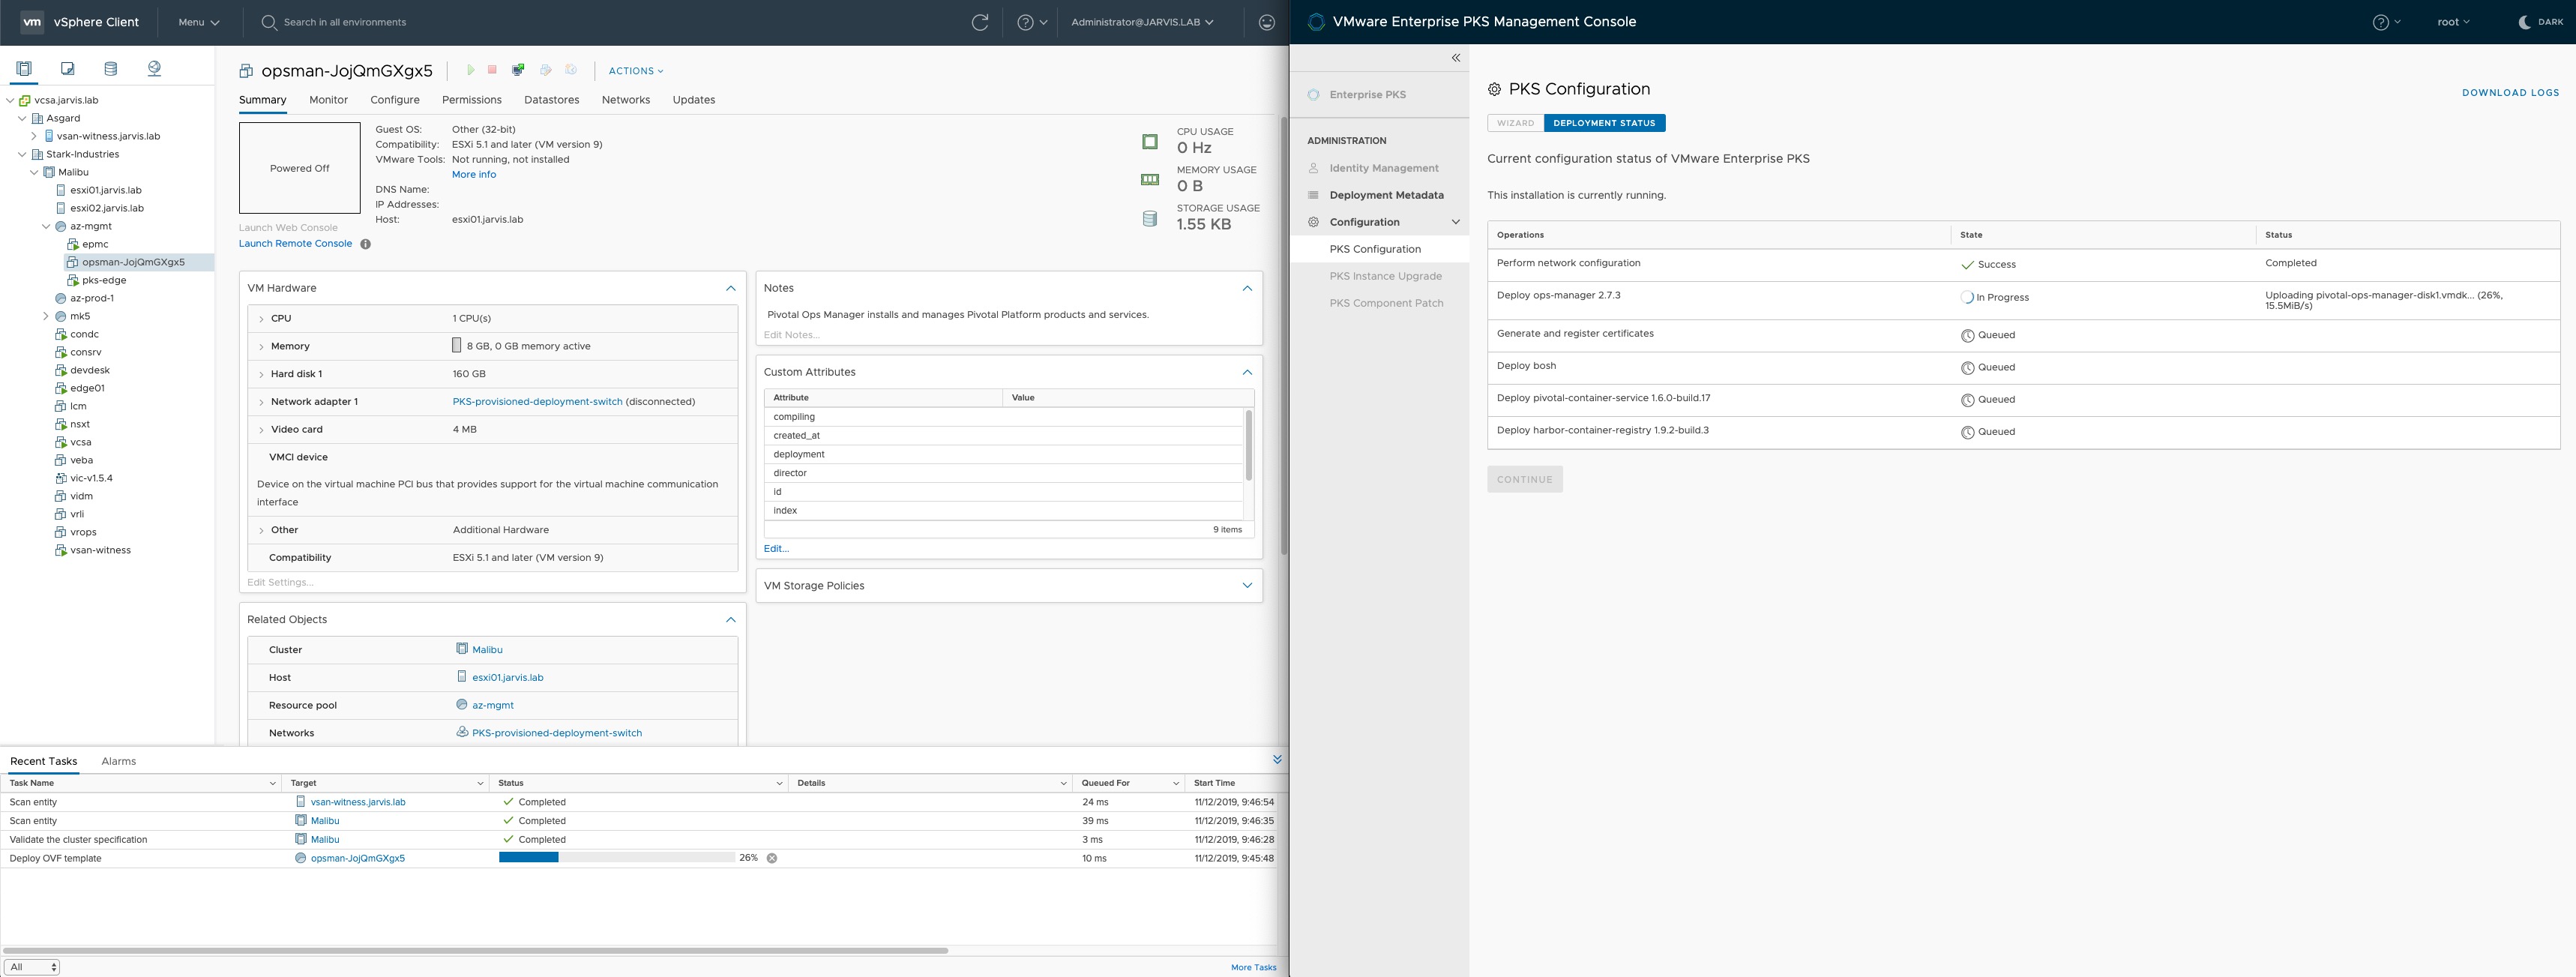
Click APPLY CONFIGURATION

Observe the Deployment status and rejoice the green hooks.
Troubleshooting
If you are running into troubles with the Enterprise PKS Management Console, you can connect to it via ssh (root) and execute the following command to obtain the server log:
- Either:
journalctl -u pks-mgmt-server > server.logand thancat server.log - Or:
journalctl -u pks-mgmt-server.service -fto see more details like the following indicates:
Nov 27 21:51:50 epmc.jarvis.lab pks-mgmt-server[939]: time="2019-11-27T21:51:50Z" level=info msg="Update for deployment 08fd9eeb-2ada-
42c0-8d41-dba9a1b9a2e6 - Deploy harbor-container-registry 1.9.3-build.2: state( running) configuring Harbor product on ops_manager\n"
Nov 27 21:51:50 epmc.jarvis.lab pks-mgmt-server[939]: configuring product...
Nov 27 21:51:55 epmc.jarvis.lab pks-mgmt-server[939]: setting up networkfinished setting up networksetting propertiesfinished setting propertiesapplying resource configuration for the following jobs:errands are not provided, nothing to do here
Nov 27 21:51:56 epmc.jarvis.lab pks-mgmt-server[939]: time="2019-11-27T21:51:56Z" level=info msg="Update for environment, _harbor.depl
oyment_config : **********"
Nov 27 21:51:56 epmc.jarvis.lab pks-mgmt-server[939]: finished configuring producttime="2019-11-27T21:51:56Z" level=info msg="Update for deployment 08fd9eeb-2ada-42c0-8d41-dba9a1b9a2e6 - Deploy harbor-container-registry 1.9.3-build.2: state( running) installing Harbor product on ops_manager\n"
Nov 27 21:51:57 epmc.jarvis.lab pks-mgmt-server[939]: attempting to apply changes to the targeted Ops Manager
Nov 27 21:52:02 epmc.jarvis.lab pks-mgmt-server[939]: time="2019-11-27T21:52:02Z" level=info msg="Update for deployment 08fd9eeb-2ada-42c0-8d41-dba9a1b9a2e6 - Deploy harbor-container-registry 1.9.3-build.2: state( running) Installing BOSH\n"
Nov 27 21:52:38 epmc.jarvis.lab pks-mgmt-server[939]: time="2019-11-27T21:52:38Z" level=info msg="Update for deployment 08fd9eeb-2ada-42c0-8d41-dba9a1b9a2e6 - Deploy harbor-container-registry 1.9.3-build.2: state( running) Putting Tile Credentials into CredHub\n"
Nov 27 21:52:50 epmc.jarvis.lab pks-mgmt-server[939]: time="2019-11-27T21:52:50Z" level=info msg="Update for deployment 08fd9eeb-2ada-42c0-8d41-dba9a1b9a2e6 - Deploy harbor-container-registry 1.9.3-build.2: state( running) Updating runtime configs for harbor-container-registry\n"
Nov 27 21:54:33 epmc.jarvis.lab pks-mgmt-server[939]: time="2019-11-27T21:54:33Z" level=info msg="Update for deployment 08fd9eeb-2ada-42c0-8d41-dba9a1b9a2e6 - Deploy harbor-container-registry 1.9.3-build.2: state( running) Installing VMware Harbor Registry\n"
Nov 27 22:08:57 epmc.jarvis.lab pks-mgmt-server[939]: time="2019-11-27T22:08:57Z" level=info msg="Update for deployment 08fd9eeb-2ada-42c0-8d41-dba9a1b9a2e6 - Deploy harbor-container-registry 1.9.3-build.2: state( running) Running errand smoke-testing for VMware Harbor Registry\n"
Nov 27 22:11:38 epmc.jarvis.lab pks-mgmt-server[939]: time="2019-11-27T22:11:38Z" level=info msg="Failed to read channel\n"
Nov 27 22:11:38 epmc.jarvis.lab pks-mgmt-server[939]: time="2019-11-27T22:11:38Z" level=info msg="Update for deployment 08fd9eeb-2ada-42c0-8d41-dba9a1b9a2e6 - Deploy harbor-container-registry 1.9.3-build.2: state( running) Cleaning up BOSH director\n"
Nov 27 22:11:38 epmc.jarvis.lab pks-mgmt-server[939]: time="2019-11-27T22:11:38Z" level=info msg="Update for environment, _harbor.is_deployed : true"
Nov 27 22:11:38 epmc.jarvis.lab pks-mgmt-server[939]: time="2019-11-27T22:11:38Z" level=info msg="Update for deployment 08fd9eeb-2ada-42c0-8d41-dba9a1b9a2e6 - Deploy harbor-container-registry 1.9.3-build.2: state( running) checking harbor liveness\n"
Nov 27 22:11:41 epmc.jarvis.lab pks-mgmt-server[939]: time="2019-11-27T22:11:41Z" level=info msg="Update for deployment 08fd9eeb-2ada-42c0-8d41-dba9a1b9a2e6 - Deploy harbor-container-registry 1.9.3-build.2: state( success) finished deploying Harbor\n"
When it comes to BOSH realted issues, also have a look at this post by my colleague Keith Lee: PKS Troubleshooting – Part 1: Using BOSH CLI
All about the Day-2 capabilities of the Enterprise PKS Management Console can be read here: https://rguske.github.io/post/pks-management-console-day-2/