 environment by using KinD and the vCenter simulator.")
A practitioner's guide - Spin up a local VEBA environment with KinD and vCenter simulator
Introduction
In my previous blog post I took A closer look at VMware’s Project Nautilus and went through some of the implementation details (Fusion 12). I described how it provides a single development platform on the desktop by enabling you to run, build and manage OCI compliant Containers as well as how easy it is now to instantiate Kubernetes Clusters besides Virtual Machines.
The question
This post is intented to answer a question which came into my mind during my work on VMware’s Open Source project VMware Event Broker Appliance (VEBA) and as I’ve heard of Project Nautilus for the first time.
To be honest, the answer to this question was already partially answered with YES before the idea was born to leverage VMware Fusion (or Workstation) for this use case. Fortunately, now seems to be the right time to write about it. Michael Gasch, the maintainer of the Event Router helped me great in supporting the joint idea by not only creating a vcsim container image but also by making necessary code changes to the Event Router to support vcsim as a supported Event Provider ( PR #231) .
vcsim is now supported as a Event Provider for the Event Router. Adjustments to this post were made accordingly.Thanks Michael!
Modular Architecture
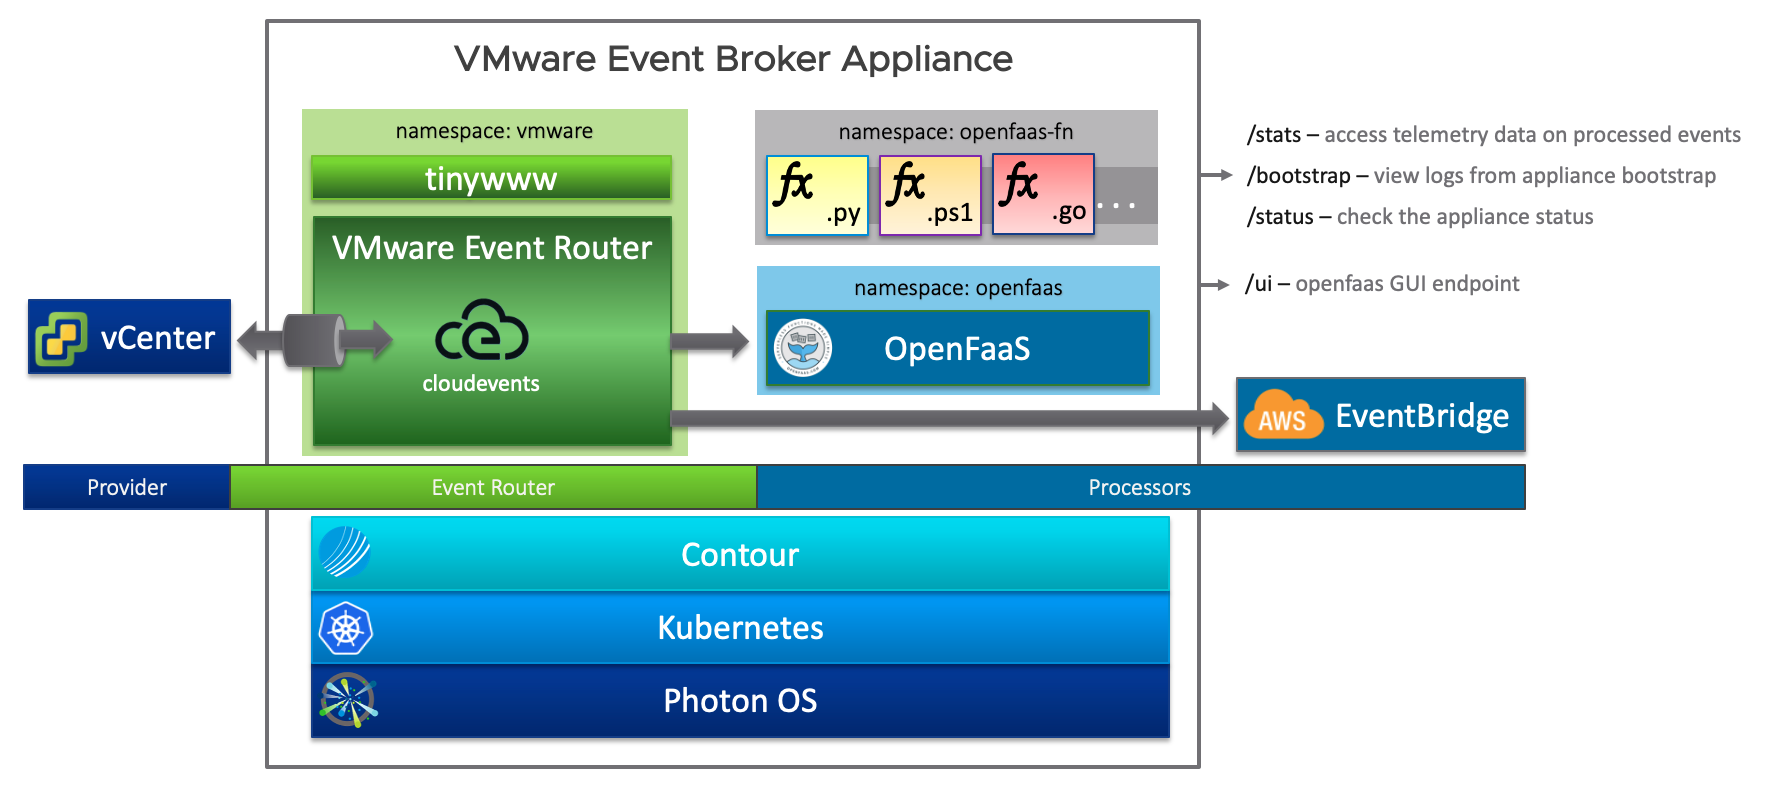
A look into the inners of VEBA shows us that it is built out of several pieces (modular approach) like e.g. VMware’s Photon OS (Operating System), Kubernetes (Orchestrator/ Runtime) and the Event-Processor (Application). The event provider part is covered by the Event Router which is responsible for connecting to event stream sources, such as the VMware vCenter Server and forward events to an event processor like e.g. OpenFaaS or AWS EventBridge.
The following picture of the high-level architecture gives you an idea how everything is in concert.
Heavyweight vs Lightweight
Heavyweight
Normally, you would deploy VEBA into a dedicated environment, be it a homelab, a development environment or even in production. Since we are listening to the vCenter Event stream, we also need a vCenter Server (Appliance) to which we connect VEBA to. Your developed functions would then be tested against those environments and since we are talking about testing or prototyping and given the fact that our customers are already using VEBA in production, it would be good (if not even necessary) to have a development environment as tiny and fast deployable as posibble available.
With a decent desktop model, you could run VEBA as well as the vCenter Server locally but from a hardware requirement point of view this would mean that your desktop should be equipped with at least 24 GB of RAM for adequate testing. And not to forget about the ESXi host (nested) and at least one VM!
Appliance(s) deployment requirements
| Appliance | CPU | Memory | Documentation |
|---|---|---|---|
| vCenter Server Appliance | 2 | 12 GB | Documentation |
| VMware Event Broker Appliance | 2 | 8 GB | Documentation |
| TOTAL | TOTAL | ||
| 4 vCPU’s | 20 GB Memory |
Lightweight
The lightweight alternative would be, to e.g. leverage VMware’s Fusion or Workstation to spin up a Kubernetes cluster locally and to deploy the Event Router, OpenFaaS as well as your function(s) on top of it.
Asking yourself now: And what about the vCenter Server? Good question!
Here comes vcsim into play. vcsim is a vSphere API mock framework which is part of the govmomi project, a Go library for interacting with VMware vSphere APIs - or in simple terms - it’s a vCenter and ESXi API based simulator.
The following content in the table below serves as an overview of what and how we are going to deploy in the next sections. As I have already indicated, my intention is to use Fusion (I’m a Mac user) to instantiate the Kubernetes cluster but ultimately, you could use any tool that runs Kubernetes local on your machine.
| Component | Kind | Installation via | Documentation |
|---|---|---|---|
| Kubernetes | 1 Node | via Fusion - vctl and kind |
Enabling KIND to Use vctl Container as Nodes to Run Kubernetes Clusters |
| OpenFaaS | Kubernetes Deployment | via .yaml files |
Deployment guide for Kubernetes |
| vcsim | Binary or Container | via kubectl or vctl |
govcsim Installation |
| Function | Container | via faas-cli |
Get started: Install the CLI |
CLI’s we are going to use:
Just to give you an idea…
Want to see it in action? I’ve putted a short recording in the Conclusion section at the end of this post.
Let’s get started
1. Create the Kubernetes cluster node
- Start with the deployment of the CRX VM that hosts the Kubernetes node container by executing (skip this if you aren’t using Fusion):
vctl system startvctlassigns 2 GB of memory and 2 CPU cores by default for the CRX VM- Depending on your needs, you can adjust the configuration by using e.g.
vctl system config --k8s-cpus 4 --k8s-mem 8192to have more CPUs and Memory assigned - The next step is the Kubenretes cluster creation itself by leveraging
KinDwhich will be available after executingvctl kind- Create a new Kubernetes node with e.g. the following parameters:
kind create cluster --image kindest/node:v1.19.1 --name kind-1.19.1- More details here: rguske - KinD create Cluster
- Validate the creation of your Kubernetes cluster by executing:
kubectl get nodes -o wide

NAME                        STATUS   ROLES    AGE   VERSION   INTERNAL-IP      EXTERNAL-IP   OS-IMAGE                                     KERNEL-VERSION       CONTAINER-RUNTIME
kind-1.19.1-control-plane   Ready    master   96s   v1.19.1   192.168.43.153   <none>        Ubuntu Groovy Gorilla (development branch)   4.19.138-7.ph3-esx   containerd://1.4.0
Off to Step 2!
2. Installing OpenFaaS® (event processor)
Installing OpenFaaS® as the event processor on Kubernetes is pretty easy, straight forward and well documented. The following guidance is based on the official documentation. I’m reusing what already exists just to avoid forcing you to switch back and forth the browser tabs. I am going to cover the deployment by using plain yaml files. You could also use arkade or a helm chart for the installation.
kubectl and plain YAML
- Clone the official repository from Github and switch into the faas-netes folder:
git clone https://github.com/openfaas/faas-netes && cd faas-netes- Validate that you are using the right Kubernetes Context:
kubectl config current-context- Your context should start with
kind-like e.g. mine:kind-kind-1.19.1 - Create the necessary Kubernetes Namespaces for OpenFaaS® by applying the
namespaces.ymlfile:
kubectl apply -f namespaces.yml- Validate that the namespaces
openfaasandopenfaas-fnwere created:
kubectl get ns

NAME                 STATUS   AGE
default              Active   18m
kube-node-lease      Active   18m
kube-public          Active   18m
kube-system          Active   18m
local-path-storage   Active   17m
openfaas             Active   55s
openfaas-fn          Active   55s
The next step is to create a password to access the OpenFaaS® Gateway with the user admin:
- Generate a random password:
PASSWORD=$(head -c 12 /dev/urandom | shasum| cut -d' ' -f1)- Use your own:
PASSWORD=VMware1!- Create the Kubernetes Secret for OpenFaaS®:
kubectl -n openfaas create secret generic basic-auth \
--from-literal=basic-auth-user=admin \
--from-literal=basic-auth-password="$PASSWORD"
The basis is settled and now off to the main deployment. Every component of OpenFaaS® is described in a yaml file which is stored in the according /yaml directory:
tree -L 2 yaml

yaml
├── README.md
├── alertmanager-cfg.yml
├── alertmanager-dep.yml
├── alertmanager-svc.yml
├── basic-auth-plugin-dep.yml
├── basic-auth-plugin-svc.yml
├── controller-rbac.yml
├── crd.yml
├── faas-idler-dep.yml
├── gateway-dep.yml
├── gateway-external-svc.yml
├── gateway-svc.yml
├── nats-dep.yml
├── nats-svc.yml
├── prometheus-cfg.yml
├── prometheus-dep.yml
├── prometheus-rbac.yml
├── prometheus-svc.yml
└── queueworker-dep.yml- Deploy all the listed components now to your cluster by executing:
kubectl apply -f yaml- Validate the deployment by checking if the pods are in state
running:
kubectl get pods -n openfaasNAME READY STATUS RESTARTS AGE
alertmanager-68bf7d4b6f-kxhw8 1/1 Running 0 39m
basic-auth-plugin-5b89b8c4c9-dkfmv 1/1 Running 0 39m
faas-idler-97694ffb4-hhwv7 1/1 Running 2 39m
gateway-fc64ff4f6-d9bgt 2/2 Running 1 39m
nats-7d86c64647-vl764 1/1 Running 0 39m
prometheus-84dcddb5c8-h2dvt 1/1 Running 0 39m
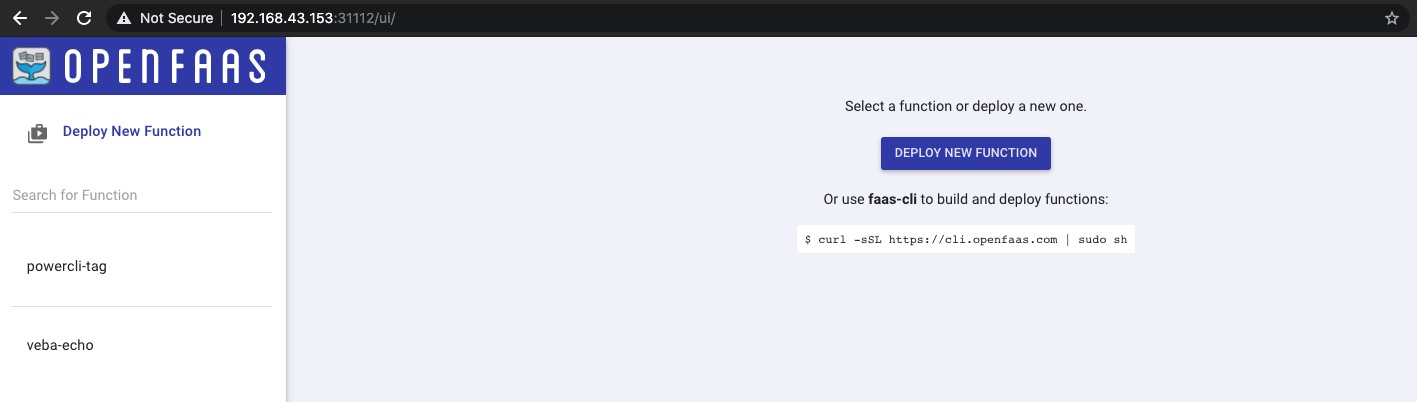
queue-worker-77f4446d48-jflvj 1/1 Running 0 39mDesired state fulfilled! To access the OpenFaaS® Gateway UI, we need the according IP address of it. Copy the name of the OpenFaaS Gateway pod and replace it in the following command:
kubectl get pods/gateway-fc64ff4f6-d9bgt -n openfaas -o=jsonpath='{.status.hostIP}'

192.168.43.153
And now by using the port :31112 the portal will show up in your browser tab:
3. vcsim - run the vSphere API Simulator
Before our function(s) can be invoked based on a vSphere event, we need a stream of such coming from a source to which the VMware Event Router is listening to. Like aforementioned, vcsim will help us out here. Interestingly, vcsim is not new and William Lam already wrote about it in 2017(!): govcsim – Neat incubation project (vCenter Server & ESXi API based simulator).
For our purposes, Michael prepared a Docker image which we are going to deploy as a Kubernetes pod and in which vcsim is running as our simulated vSphere endpoint. Furthermore, the necessary govc CLI binaries are also available via the container.
The image is available HERE.
- We will deploy
vcsimas well as theEvent Routerin a dedicatednamespacecalledvmware:- Create the namespace:
kubectl create ns vmware- Start deploying and running
vcsimin Kubernetes:
kubectl run vcsim --image=embano1/vcsim:0.24.0 --port=8989 --image-pull-policy=Always -n vmware- Inspect the logs of the Pod to get to know the username and password which we are going to use for the Event Router configuration later on:
kubectl logs -f -n vmware vcsim

export GOVC_URL=https://administrator:REPLACEME@10.244.0.17:8989/sdk GOVC_SIM_PID=1- Expose vcsim as a service to receive traffic:
kubectl expose pod vcsim -n vmware- Connect to the deployed pod and verify that
vcsimis ready for use:
kubectl exec -i -t vcsim -n vmware bash- Set the necessary environment variables for
GOVC_URLandGOVC_INSECURE:
vcsim@vcsim:~$

export GOVC_URL=https://administrator:REPLACEME@vcsim:8989/sdk
vcsim@vcsim:~$
export GOVC_INSECURE=1- Check if your simulated vSphere Endpoint is working properly:
vcsim@vcsim:~$ govc ls

/DC0/vm
/DC0/host
/DC0/datastore
/DC0/network- List all available Virtual Machines:
vcsim@vcsim:~$ govc ls "/DC0/vm/*"

/DC0/vm/DC0_H0_VM0
/DC0/vm/DC0_H0_VM1
/DC0/vm/DC0_C0_RP0_VM0
/DC0/vm/DC0_C0_RP0_VM1- Power Off and On a Virtual Machine:
# By default, the VMs are in Powered On state
# Trying to power on a powered on VM would throw a "govc: *types.InvalidPowerState" error
vcsim@vcsim:~$ govc vm.power -off /DC0/vm/DC0_H0_VM0

Powering off VirtualMachine:vm-57... OK
vcsim@vcsim:~$ govc vm.power -on /DC0/vm/DC0_H0_VM0

Powering on VirtualMachine:vm-57... OK
Awesome!
4. Deploy the Event Router
During my work on this post, Michael and I discussed various aspects of the overall deployment of a development environment and especially the usability and simplicity was a main focus for us. Long story short - it ended up with the decision to include vcsim as a supported Event Provider for the Event Router 😁 👏.
Before we can deploy the Router into our recently created namespace vmware, we need to create the event-router-config.yaml file from which we will create our Kubernetes Secret in a bit. If VSCode (code) isn’t your default editor adjust it accordingly.
code event-router-config.yaml- You can copy the complete provided code and paste into your empty
event-router-config.yamlfile:
apiVersion: event-router.vmware.com/v1alpha1
kind: RouterConfig
metadata:
  name: router-config-1
  labels:
    key: value
eventProvider:
  name: veba-demo-vcsim-01
  type: vcsim
  vcsim:
    insecureSSL: true
    address: https://vcsim.vmware:8989/sdk
    auth:
      type: basic_auth
      basicAuth:
        username: administrator
        password: REPLACEME
eventProcessor:
  type: openfaas
  name: veba-demo-openfaas
  openfaas:
    address: http://gateway.openfaas:8080
    async: false
    auth:
      type: basic_auth
      basicAuth:
        username: admin
        password: VMware1!
metricsProvider:
  type: default
  name: veba-demo-metrics
  default:
bindAddress: "0.0.0.0:8082"- Create the Kubernetes Secret:
kubectl -n vmware create secret generic event-router-config --from-file=event-router-config.yaml- Download the Event Router deployment specification locally and change the image version from
latesttodevelopment:- Available Images on Dockerhub
wget https://raw.githubusercontent.com/vmware-samples/vcenter-event-broker-appliance/development/vmware-event-router/deploy/event-router-k8s.yaml && code event-router-k8s.yamlapiVersion: apps/v1
kind: Deployment
metadata:
labels:
app: vmware-event-router
name: vmware-event-router
spec:
replicas: 1
selector:
matchLabels:
app: vmware-event-router
template:
metadata:
labels:
app: vmware-event-router
spec:
containers:
- image: vmware/veba-event-router:development
args: ["-config", "/etc/vmware-event-router/event-router-config.yaml", "-verbose"]
name: vmware-event-router
resources:
requests:
cpu: 200m
memory: 200Mi
volumeMounts:
- name: config
mountPath: /etc/vmware-event-router/
readOnly: true
volumes:
- name: config
secret:
secretName: event-router-config
---
apiVersion: v1
kind: Service
metadata:
labels:
app: vmware-event-router
name: vmware-event-router
spec:
ports:
- port: 8080
protocol: TCP
targetPort: 8080
selector:
app: vmware-event-router
sessionAffinity: None- Deploy the Event Router:
kubectl apply -f event-router-k8s.yaml -n vmware- Check the logs to see if everything works as desired (replace the pod name with yours):
kubectl logs -f -n vmware vmware-event-router-7bb7fd8577-jhlg9Finally, we’ve reached the last step - The deployment of an example function.
5. Test with an example function
- Clone the VEBA repository locally and directly change into the echo function folder:
git clone https://github.com/vmware-samples/vcenter-event-broker-appliance.git && cd vcenter-event-broker-appliance/examples/python/echo- Edit the
stack.yml
code stack.yml- For
gateway:add your noted IP (OpenFaaS® Gateway)
version: 1.0
provider:
  name: openfaas
  gateway: http://192.168.43.153:31112
functions:
  veba-echo:
    lang: python
    handler: ./handler
    image: vmware/veba-python-echo:latest
    environment:
      write_debug: true
      read_debug: true
    annotations:
topic: "VmPoweredOnEvent,VmPoweredOffEvent"- Login with
faas-cli loginand by using the option-g, which obvisouly stands for Gateway:
faas-cli login --username admin --password 'VMware1!' --tls-no-verify -g http://192.168.43.153:31112- Deploy the
veba-echofunction:
faas-cli deploy -f stack.yml --tls-no-verify- Double check that the function is in state
running:- via
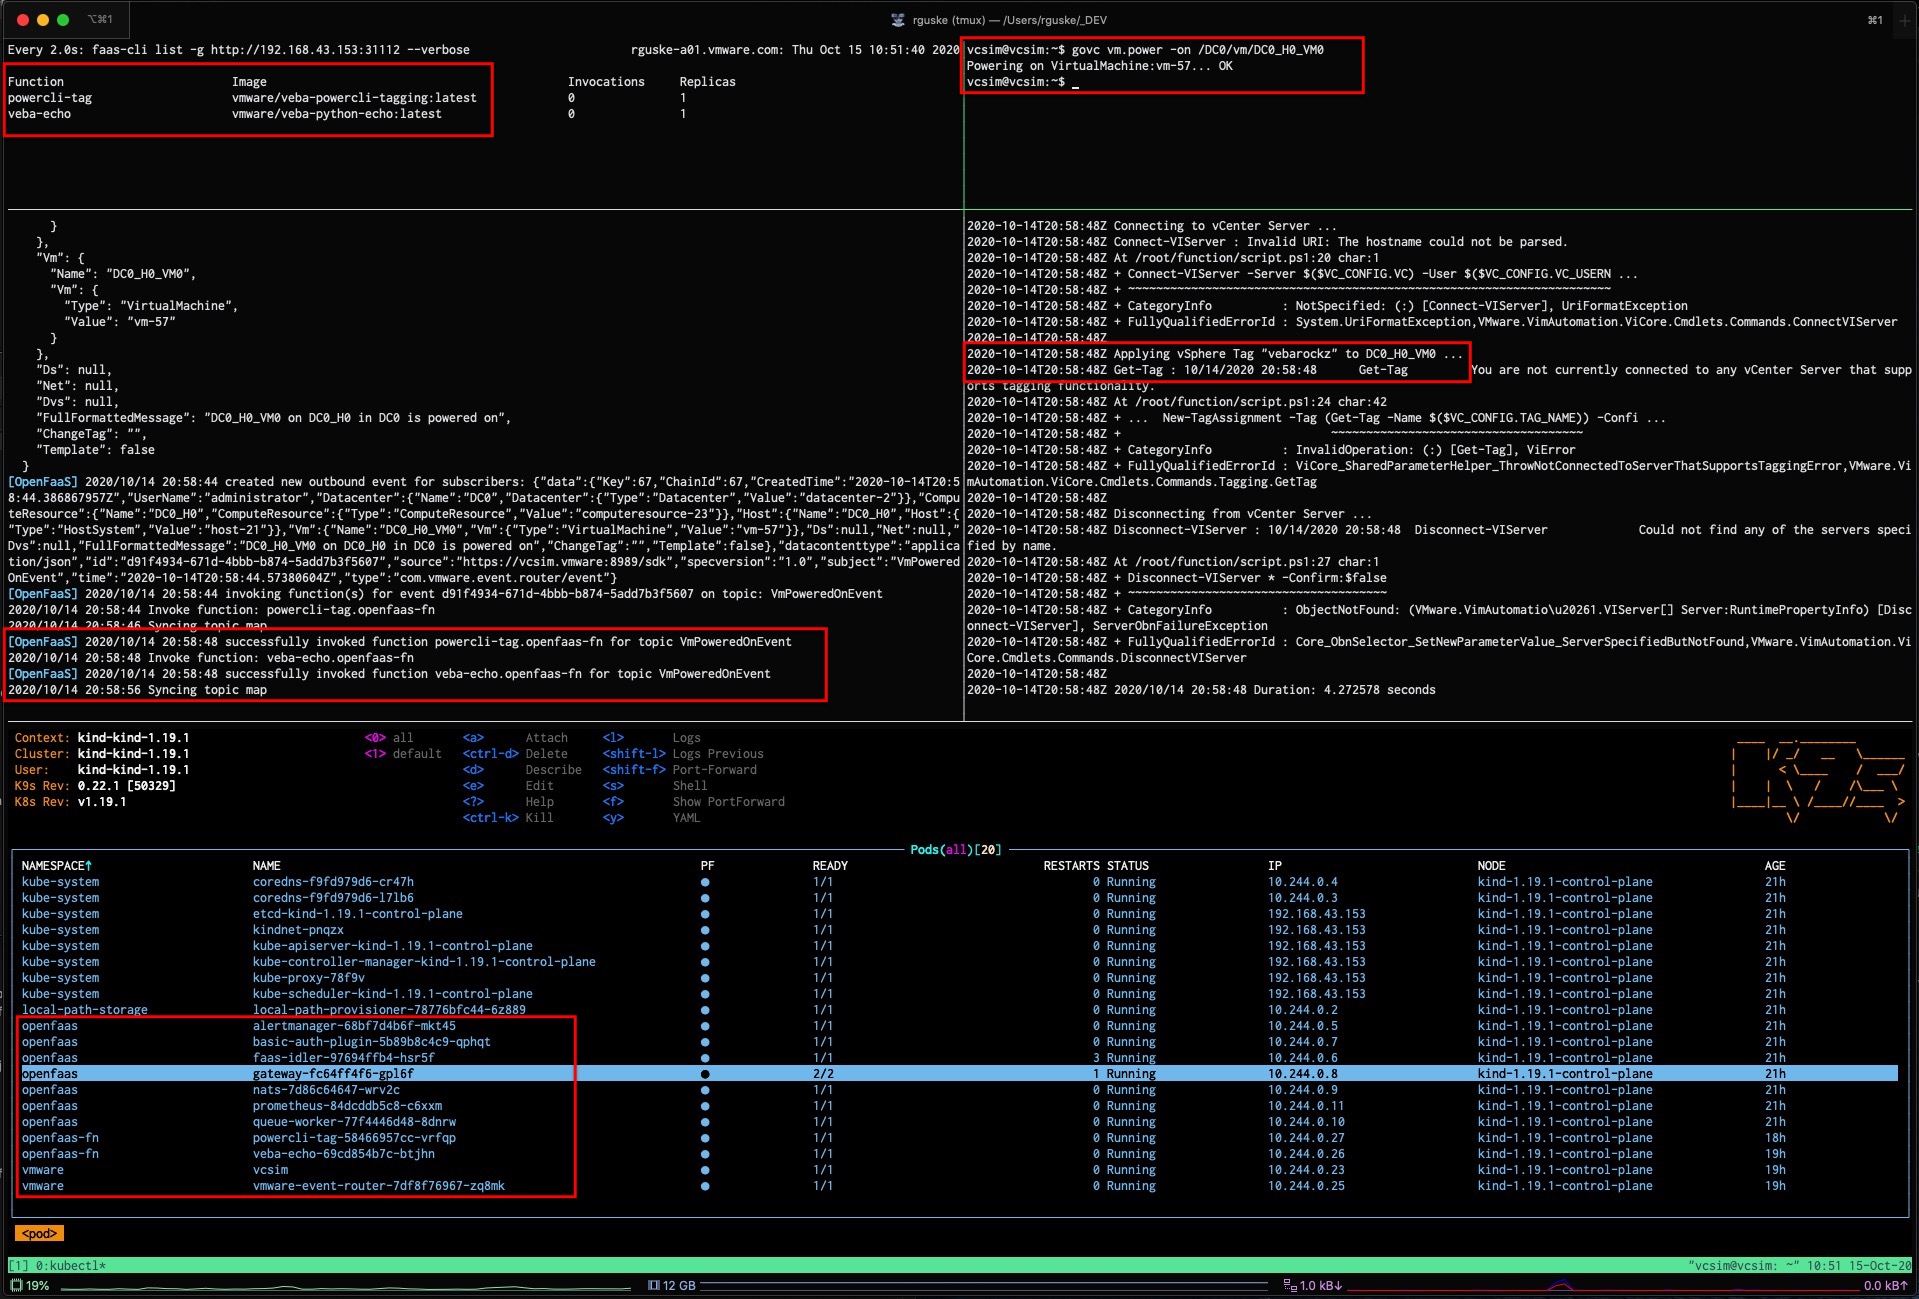
faas-cli list -g http://192.168.43.153:31112 --verbose
- via
Function                        Image                                           Invocations     Replicas
powercli-tag                    vmware/veba-powercli-tagging:latest             0               1
veba-echo vmware/veba-python-echo:latest 0 1- And by using
kubectl get pods -n openfaas-fn -o wide
NAME                            READY   STATUS    RESTARTS   AGE   IP            NODE                        NOMINATED NODE   READINESS GATES
powercli-tag-58466957cc-vrfqp   1/1     Running   0          8h    10.244.0.27   kind-1.19.1-control-plane   <none>           <none>
veba-echo-69cd854b7c-btjhn      1/1     Running   0          9h    10.244.0.26   kind-1.19.1-control-plane   <none>           <none>
I have also deployed the powercli-tag function for my tests and you can watch the result via the recording below.
Conclusion (+ Recording)
With the ability to leverage VMware Fusion or Workstation to quickly create a KinD Kubernetes cluster, leads you really to this at the beginning mentioned “single development platform on the desktop” experience. Of course, every tool which makes it easy to run Kubernetes locally is great and useable.
We’ve deployed the necessary components like e.g. OpenFaaS®, the VMware Event Router, the vCenter Simulator vcsim as well as example functions onto the local running (KinD) Kubernetes cluster.
To finally test our deployed functions, we had to invoke them by creating events from a source. We leveraged a container image for that, which was created by Michael Gasch and which includes the vCenter Simulator vcsim as well as the binaries for the govc CLI to execute the relevant commands.
Watch it here: