vSphere Integrated Containers Part III: Deployment of a Virtual Container Host

In this part I´d like to guide you through the Deployment of a Virtual Container Host aka VCH.
I definitely don ́t want to make it a habit to use already written descriptions, but this one described it very well, thus I had like to quote this:
A VCH is the virtual functional equivalent of a Linux VM running Docker. From a Docker client point of view, the Virtual Container Host looks very similar to a native Docker host. Hence, there are differences between a native Docker host and a Virtual Container Host (VCH), and between a Linux container and a container VM.
Source: Architecture Overview (VIC 1.2)
Now let´s download the vic-bundle.tar.gz to our desktop locally to make use of the vic-machine command line utility what gives us the possibility to deploy VCHs and to manage their lifecycle.
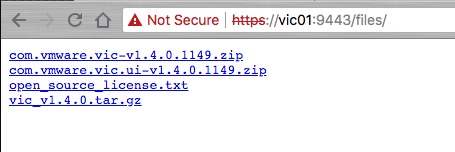
Open the VIC Getting Started page which you can reach by using the VIC IP, FQDN or DNS short name and port 9443. So in my case: https://vic01:9443. You´ll see in the lower left corner Infrastructure Deployment Tools where you can download the vic-bundle.tar.gz file. The other option is to use the url directly: https://vic01:9443/files/.
It´s up to you which way you choose, it´s just important to have the vic-machine utility on the machine where you´ll execute the commands from (local or a remote-execution host). Before we finally can begin with the deployment of our first VCH, we need to open the required port for the outgoing communication, via Serial over LAN, and using port 2377 between the ESXi Host(s) and our VCH.
This is the first time we´ll make use of the vic-machine utility which is basically for lifecycle-management operations of a Virtual Container Host. There´s support for three platforms on which you can use vic-machine. Here is an short example for the create command:
### Windows
./vic-machine-windows create --option argument --option argument
### Linux
./vic-machine-linux create --option argument --option argument### MacOS
./vic-machine-darwin create --option argument --option argumentIn the following you´ll find all neccessary pieces of information:
Running vic-machine Commands.
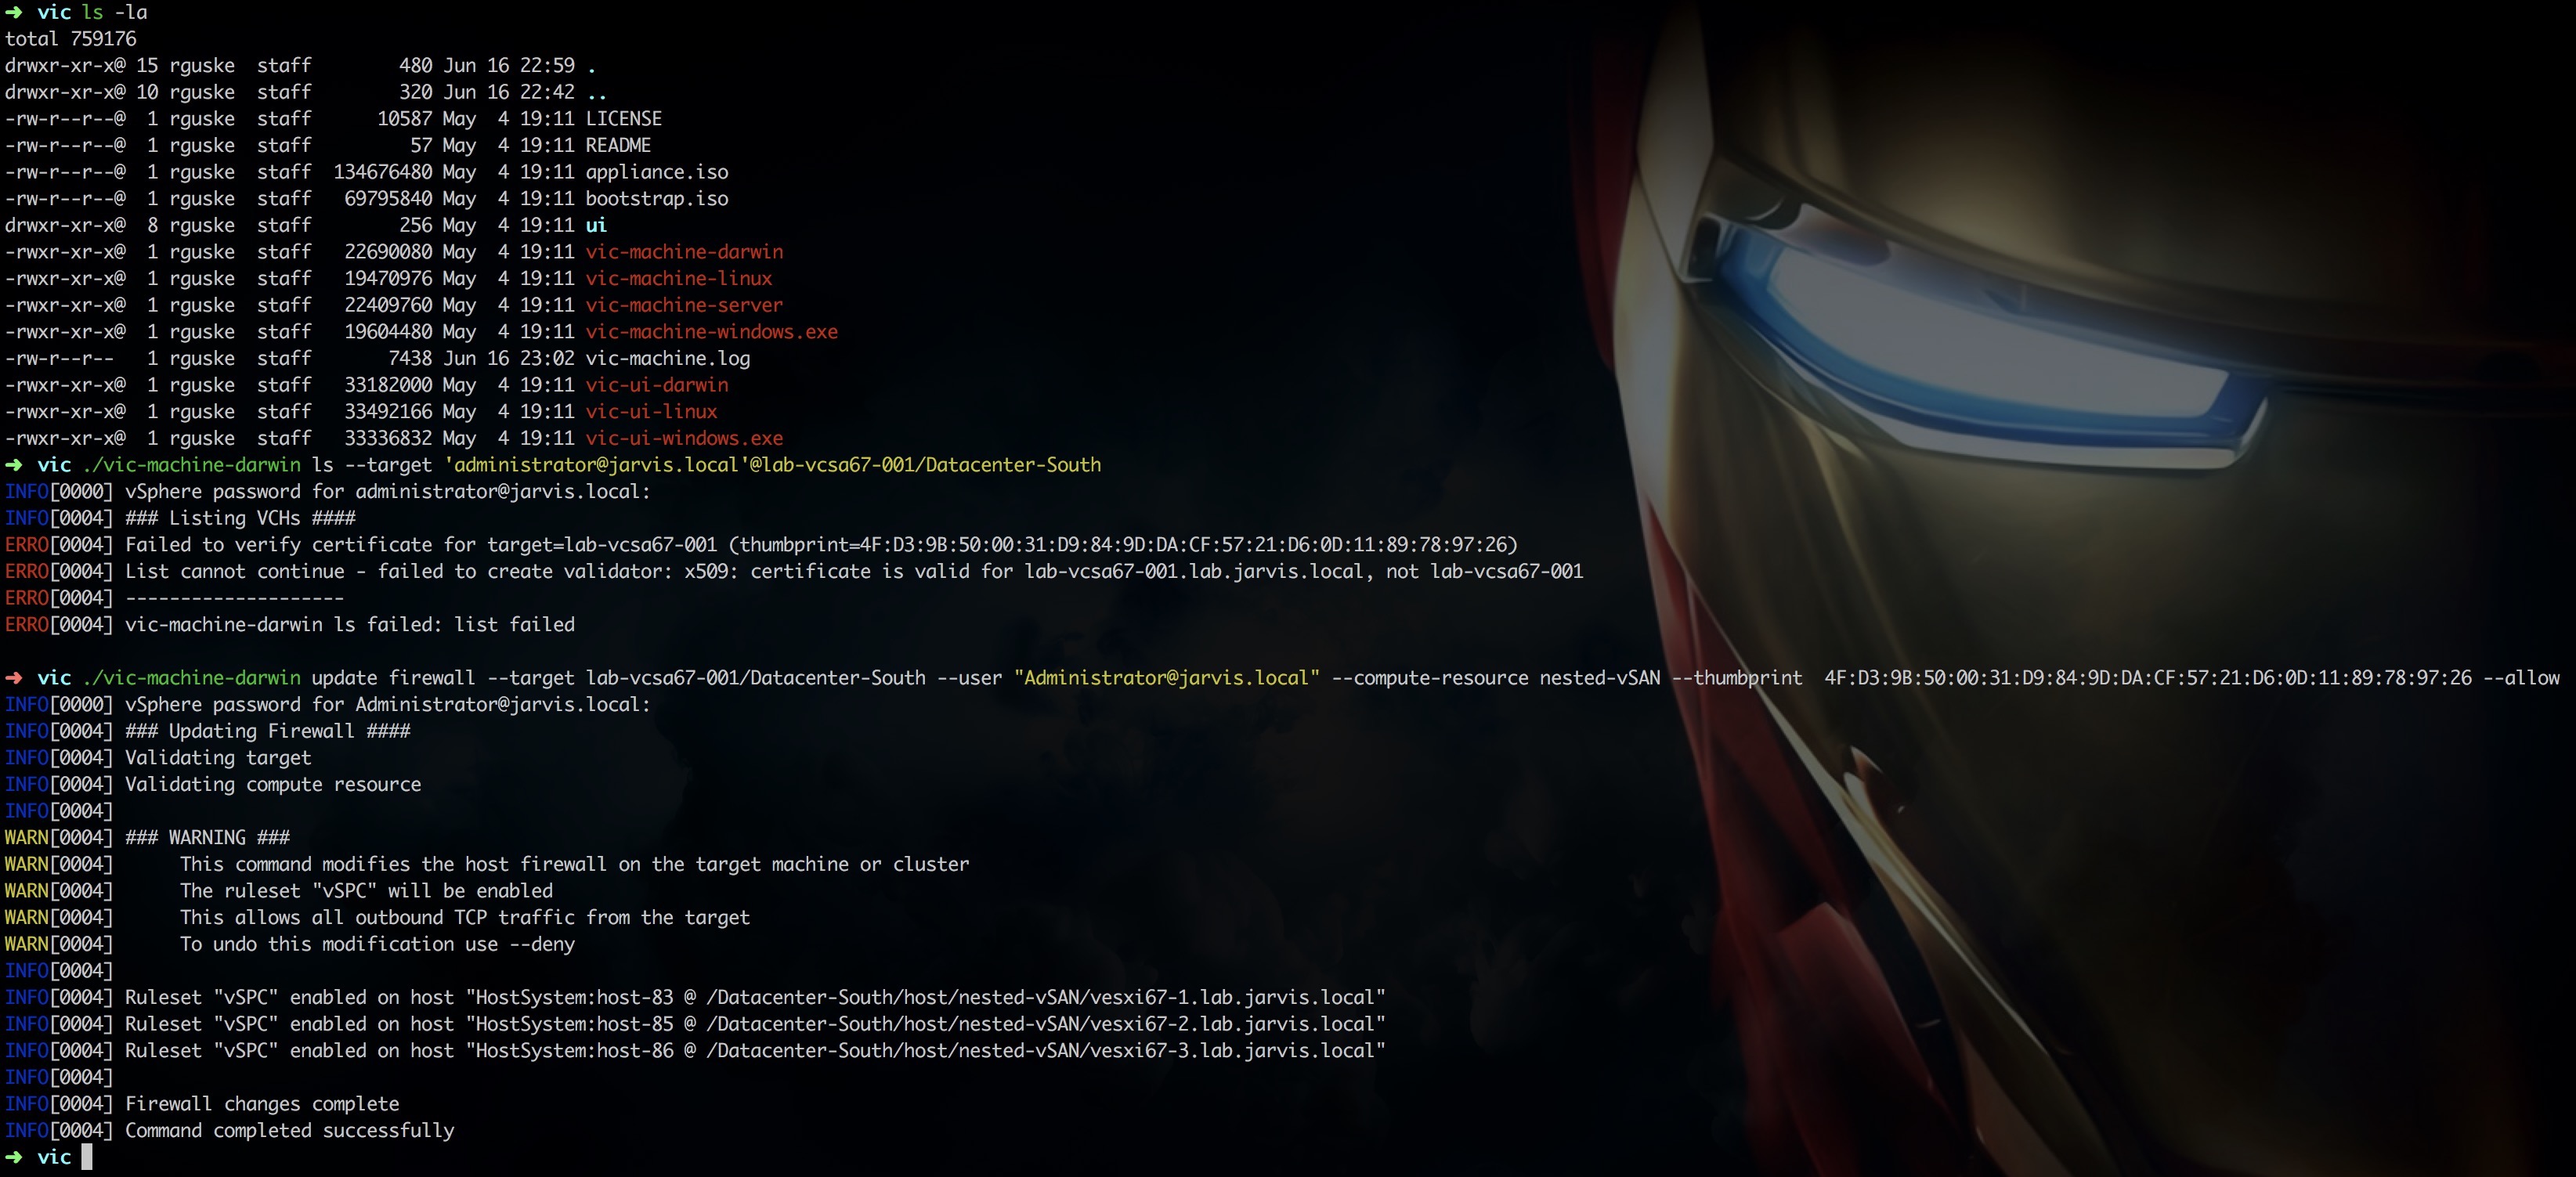
Before we can really open up the required port it´s neccassary to know the Thumbprint of your vCenter Server. By executing the following you should get what you need:
### In my example
./vic-machine-darwin ls --target administrator@jarvis.local@lab-vcsa67-001/Datacenter-South
I´ll receive an certificate related error but the result counts - the output shows us the vCenter Server Thumbprint.
INFO[0000] vSphere password for administrator@jarvis.local:
INFO[0003] ### Listing VCHs ####
ERRO[0003] Failed to verify certificate for target=lab-vcsa67-001 (thumbprint=4F:D3:9B:50:00:31:D9:84:9D:DA:CF:57:21:D6:0D:11:89:78:97:26)
ERRO[0003] List cannot continue - failed to create validator: x509: certificate is valid for lab-vcsa67-001.lab.jarvis.local, not lab-vcsa67-001
ERRO[0003] --------------------
ERRO[0003] vic-machine-darwin ls failed: list failed
Switch to your downloaded and unzipped vic-bundle folder. Execute the following command to open the needed ports:
./vic-machine-darwin update firewall \
--target lab-vcsa67-001/Datacenter-South \
--user administrator@jarvis.local \
--compute-resource nested-vSAN \
--thumbprint  4F:D3:9B:50:00:31:D9:84:9D:DA:CF:57:21:D6:0D:11:89:78:97:26 \
--allow
You´ll get an output similar like this:
Now let´s go to the point of what the title of Part III is promising you and we´ll start with the deployment of a VCH through the wizard which got available through the vic-plugin installation. Open the vSphere Integrated Containers subsection in your vSphere Client and under Virtual Conatiner Hosts choose + NEW VIRTUAL CONTAINER HOST.
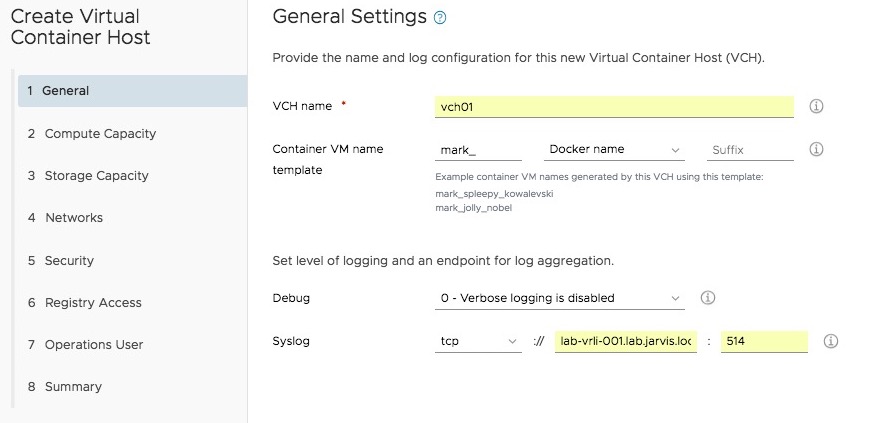
General
The General section is more important than it appears at the first glance! Because besides the possibility to configure an endpoint for log aggregation and the level of logging deepness, we could enter a naming-prefix for the instanciated Container-VMs what gives us, from a security point of view, more capabilities and flexibility.
For instance, we could establish a NSX Security Group by using the naming-prefix as a membership-criteria. Consequently, our Container-VMs becomes dynamically a member of the Security Group which gives us back the control of the East-West traffic within our Datacenter.
Compute
Next we have to chose our Compute-Resource where our VCH runs on. That can be an ESXi Host, a Cluster or a Resource-Pool.
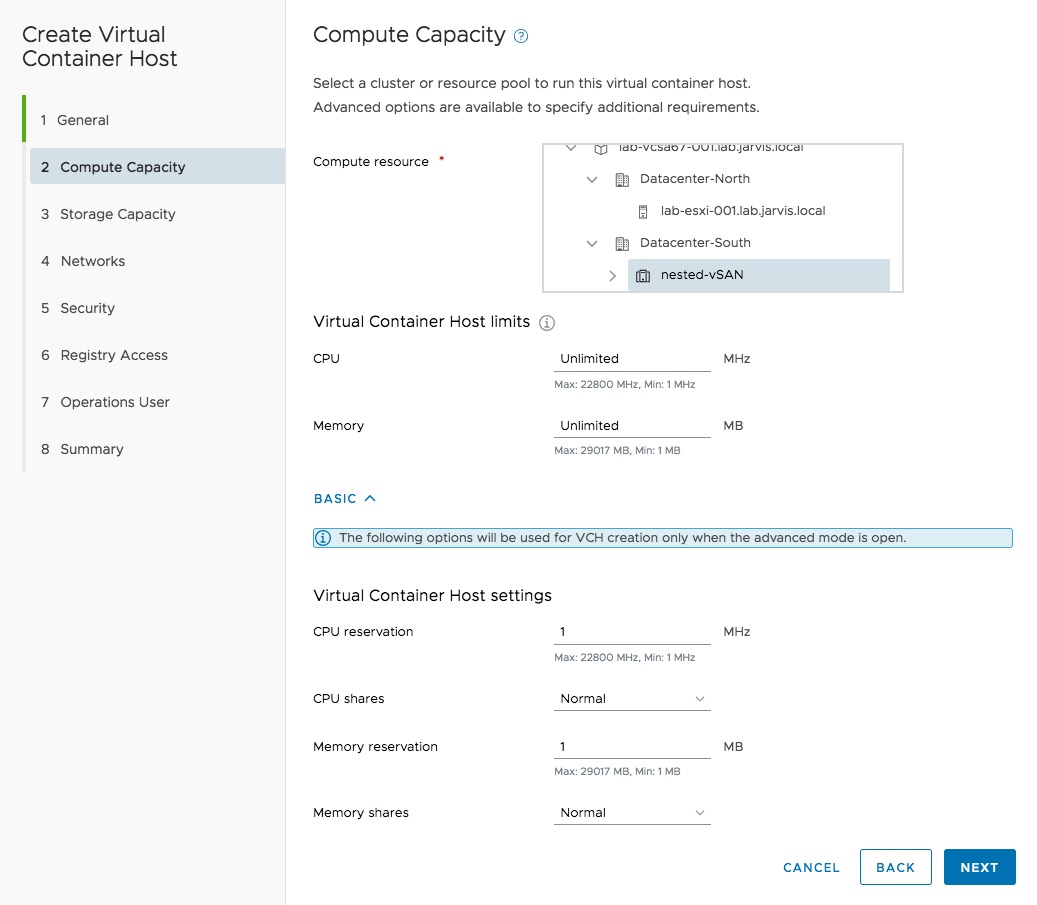
The default settings for the CPU and Memory Limits (internally referred to as MAX) is set to Unlimited. I assume in most cases these settings can be untouched but if you decide to configure limits (MAX) and reservations (MIN) please remind the following:
Reservation
A reservation specifies the guaranteed minimum allocation for a virtual machine
Shares
Shares specify the relative importance of a virtual machine (or resource pool). If a virtual machine has twice as many shares of a resource as another virtual machine, it is entitled to consume twice as much of that resource when these two virtual machines are competing for resources.
Shares are typically specified as High, Normal, or Low and these values specify share values with a 4:2:1 ratio, respectively. You can also select Custom to assign a specific number of shares (which expresses a proportional weight) to each virtual machine..
Limit
Limit specifies an upper bound for CPU, memory, or storage I/O resources that can be allocated to a virtual machine. A server can allocate more than the reservation to a virtual machine, but never allocates more than the limit, even if there are unused resources on the system. The limit is expressed in concrete units (megahertz, megabytes, or I/O operations per second).
CPU, memory, and storage I/O resource limits default to unlimited. When the memory limit is unlimited, the amount of memory configured for the virtual machine when it was created becomes its effective limit.
Storage
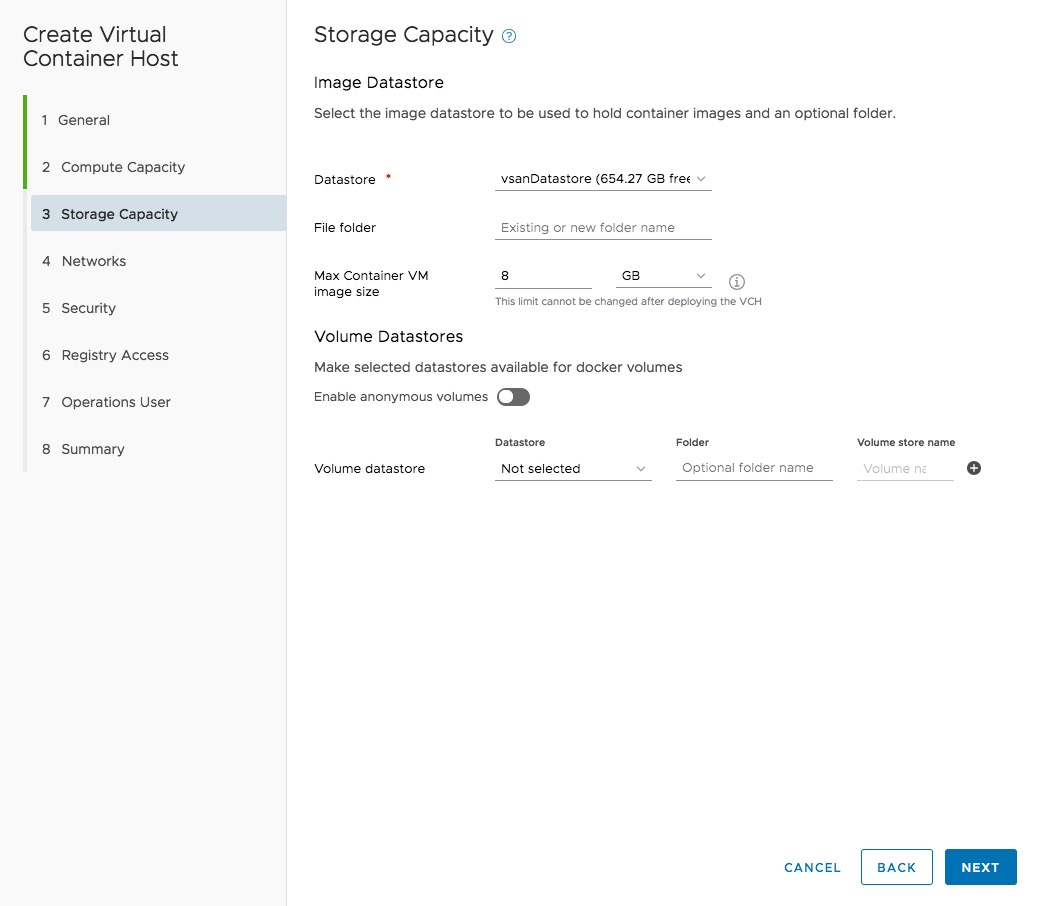
To persistently store our container-images we can configure a Datastore in point 3. It´s also possible to set a maximum for the Container-VM Image size but keep in mind, if you configure it once, it can´t be re-configured afterwards. 8GB is set by default and due to the small footprint of a container, what is one of the major benefits of it, this predefined size should be sufficient in most cases.
VIC can operate with any type of datastores: local VMFS, shared like NFS and iSCSI or vSAN. I´m running my Homelab on a single physical server and to make use of the benefits from Cluster-Features like DRS, vMotion or HA, I´ve implemented three nested ESXi Hosts and configured a vSAN All-Flash Cluster.
Reference: virtuallyGhetto.com | Nested Virtualization by William Lam
Therefore, I´ve chosen my vSAN Datastore. Containers are ephemeral but this does not necessarily mean that the same applies to data. Of course persistence belongs to containers as well, and databases like e.g. a MongoDB or MySQL have to be stored persistently.
As you can see through the picture above, we can make use of docker volumes which can be created and assigned by using the command docker volume create.
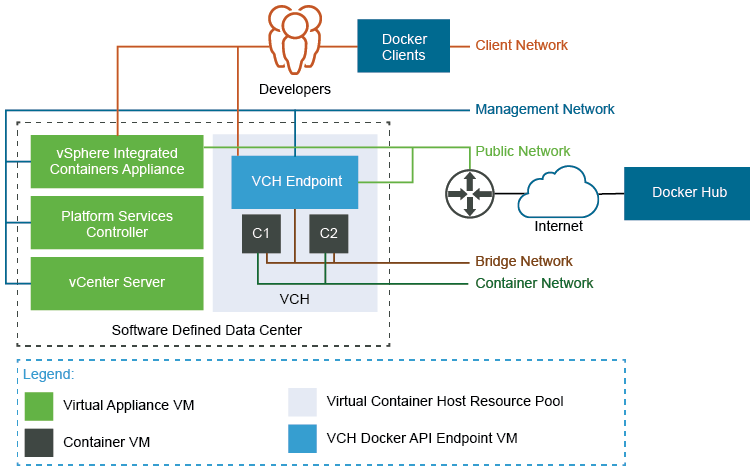
Network
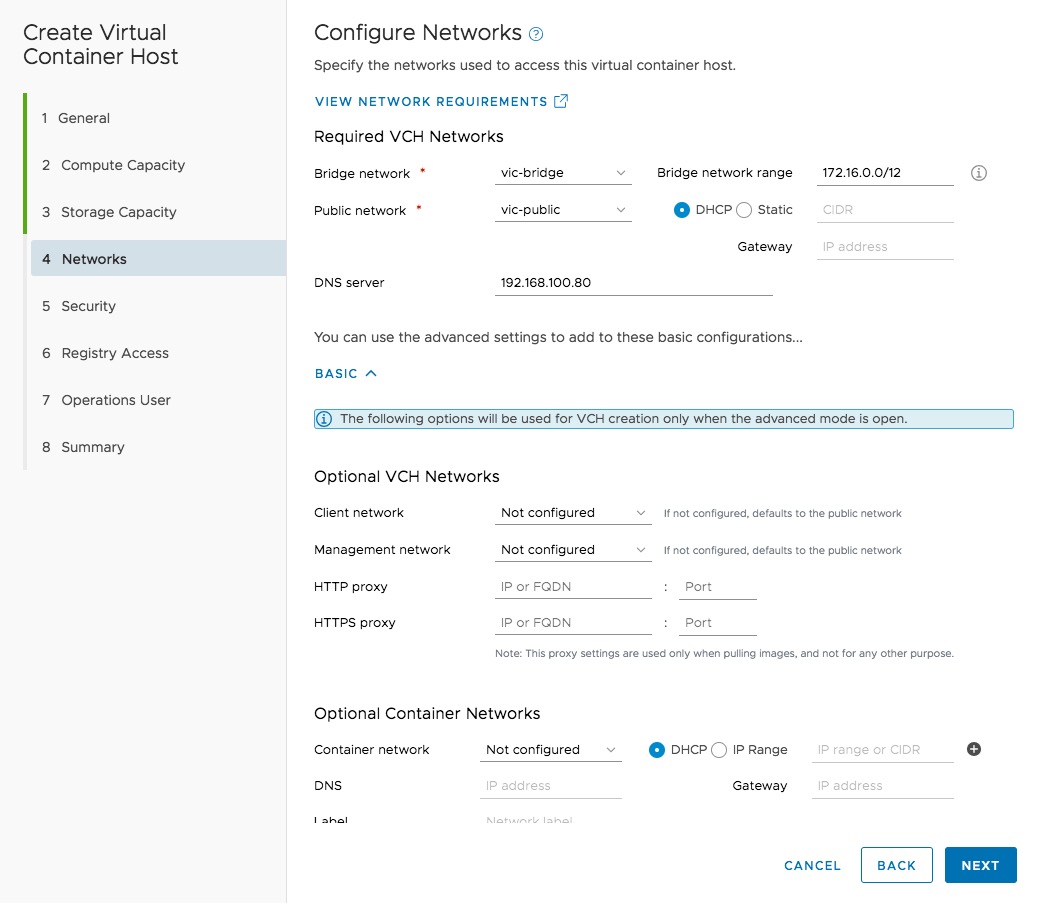
This part is a little bit more comprehensive and like in most cases a picture quickly creates clarity.
Resource: VIC Documentation Networking Requirements
The picture above shows you the available networks, which are described by the following:
- Docker Client Management Network: the network used to interact with the VCH VM via a Docker client
- vSphere Management Network: the network used by the VCH VM and the Container-VMs to interact with vSphere
- Public Network: the equivalent of eth0 on a Docker host. This is the network used to expose services to the public world (via –p)
- Bridge Network(s): the equivalent of Docker0 on a Docker Host.
- Container Network(s): these are networks containers can attach to directly for inbound/ outbound communications to by-pass the VCH VM
I´d like to get your attention on the last network - the Container Network. With VIC, you have the ability to directly connect a Container-VM to a dedicated network what is a differentiator to e.g. the native Docker Container-Host. These Container Networks will be configured during the VCH deployment or afterwards by using the vic-machine configure command. More about this later on.
The mapped container networks are available for use by the Docker API and with that a container developer can use classical docker commands like docker network ls to list the container networks or docker run, docker createwith the --network=*mapped-network-name*option. There exists already two great posts about this topic. Check it out:
- Connecting Containers Directly to External Networks
- Basic Network Configuration with vSphere Integrated Containers Engine
Security
By default, Virtual Container Hosts authenticate connections from Docker API clients by using server and client TLS certificates. This configuration is commonly referred to as tlsverify in documentation about containers and Docker.
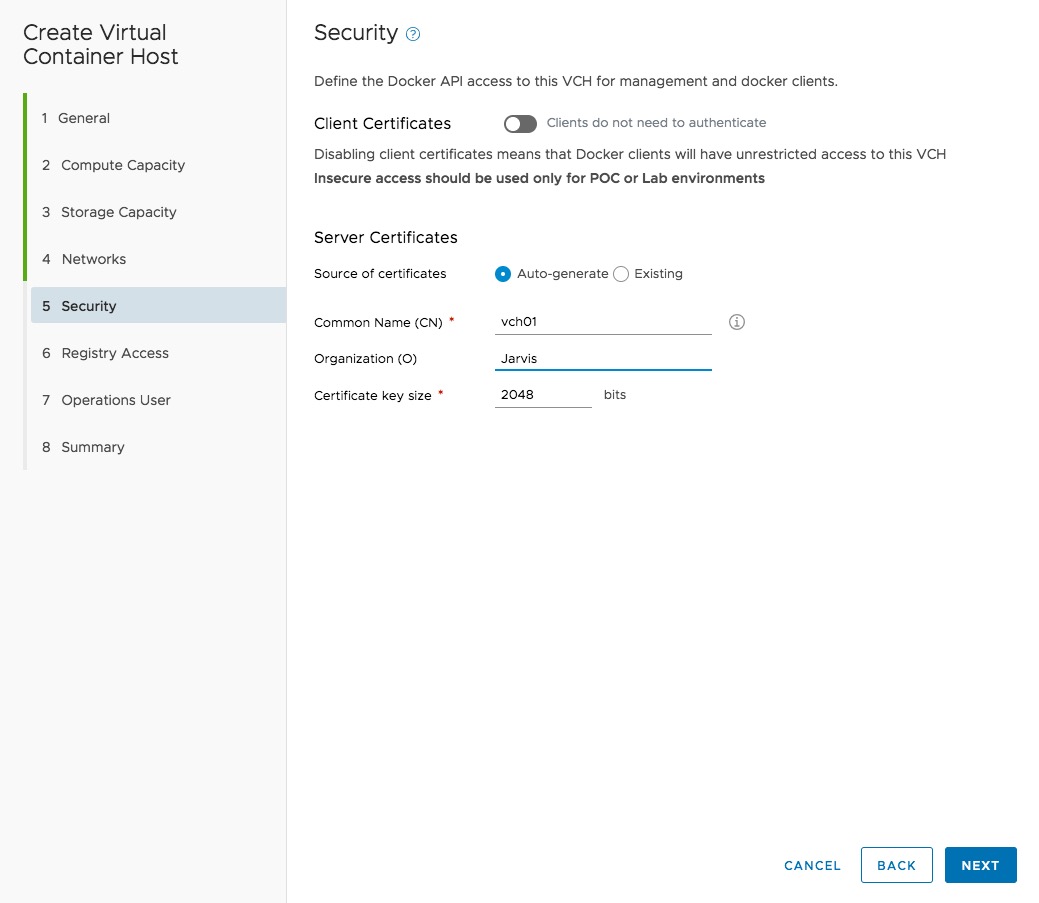
I like to refer you to the Offical VIC Documentation Page under Section VCH Security.
Operations User
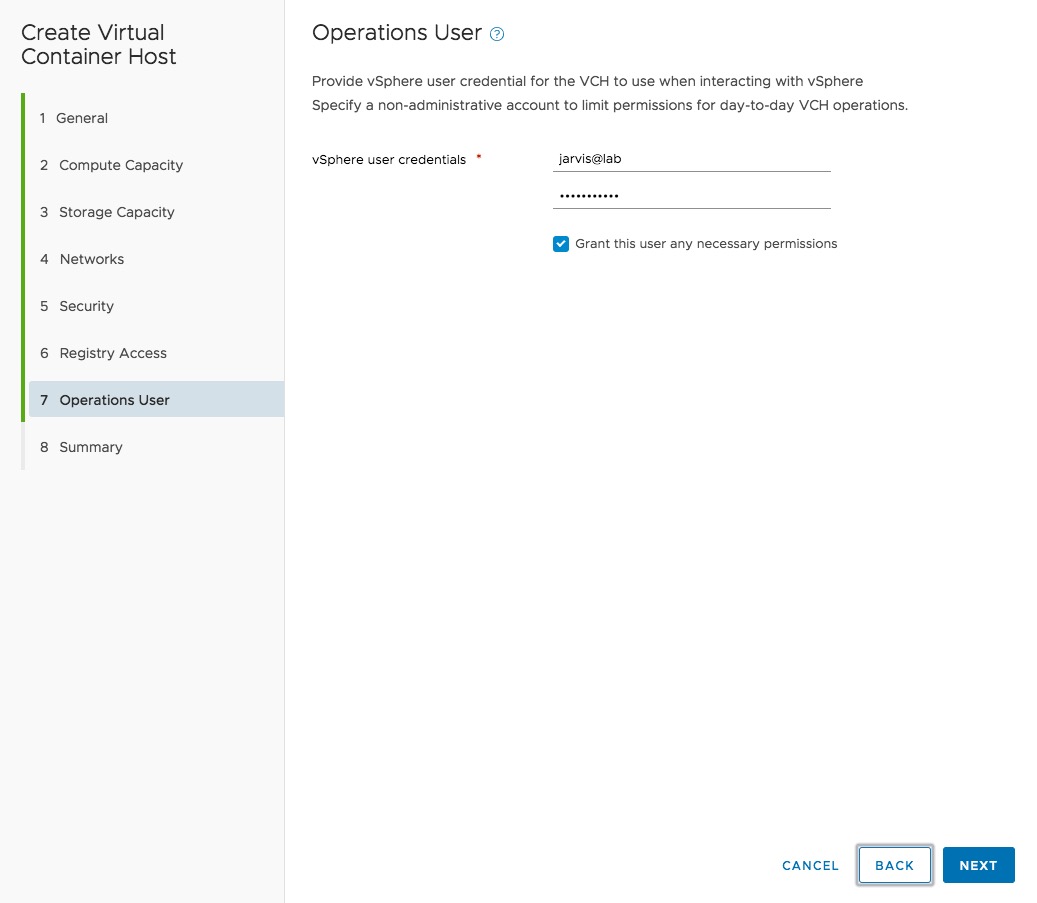
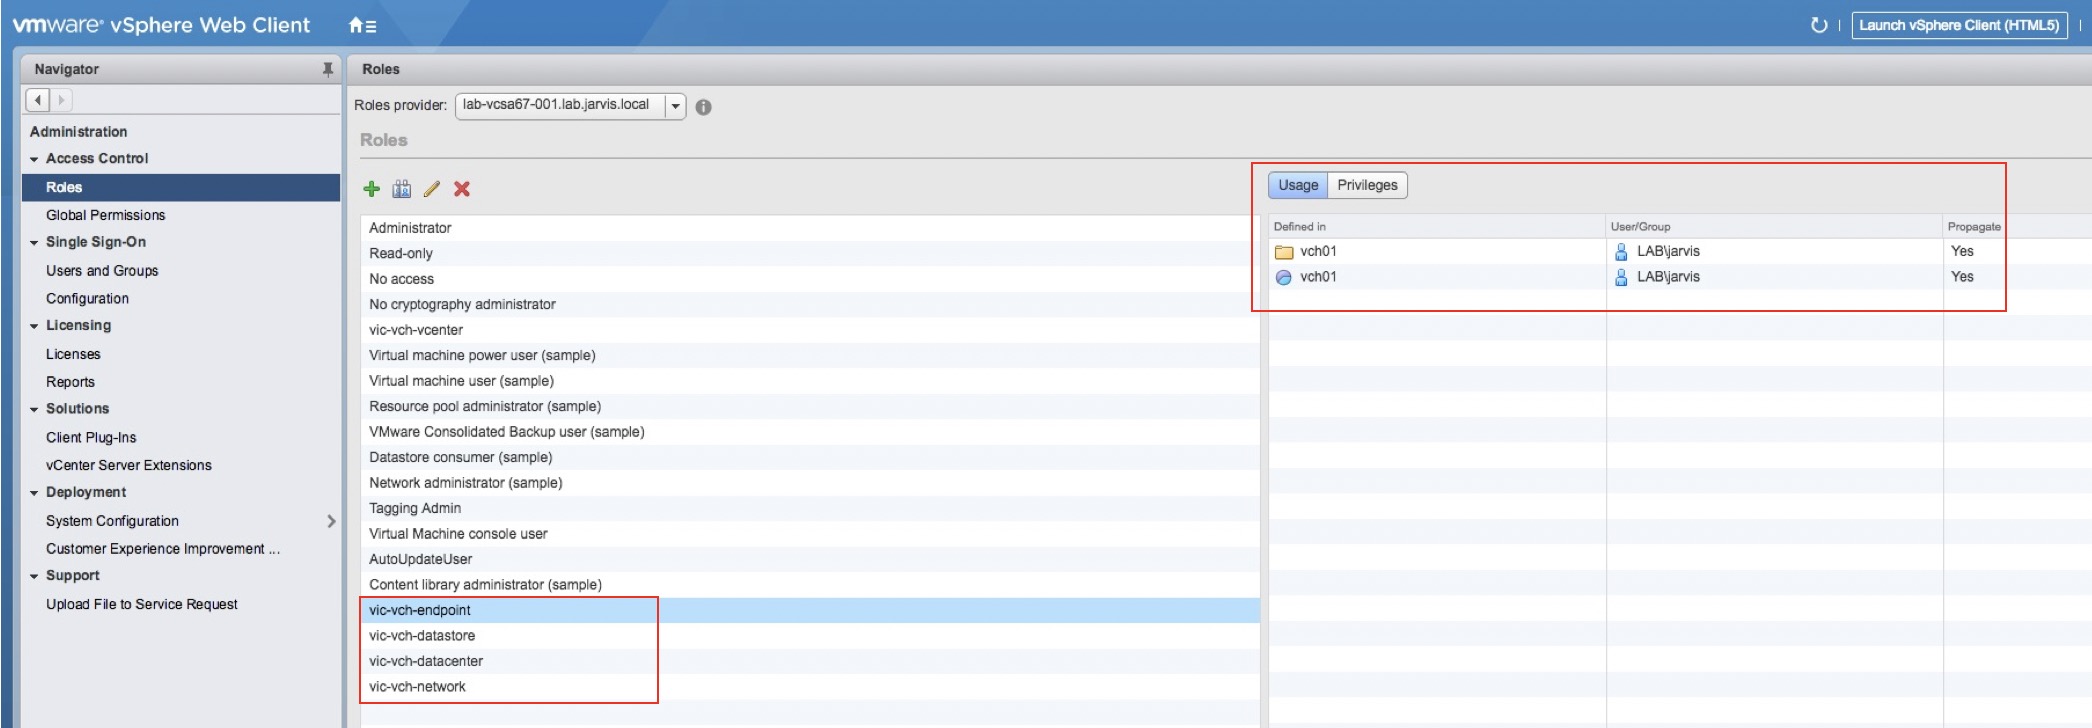
The operations user account must exist before you create a VCH. If you are deploying the VCH to a cluster, vSphere Integrated Containers Engine can configure the operations user account with all of the necessary permissions for you. You can see that I use my user Jarvis for day-to-day operations for my VCH´s.
More here: Configure the Operations User
Summary
Like always when a summary appears by the end of a wizard - validate your configuration again!
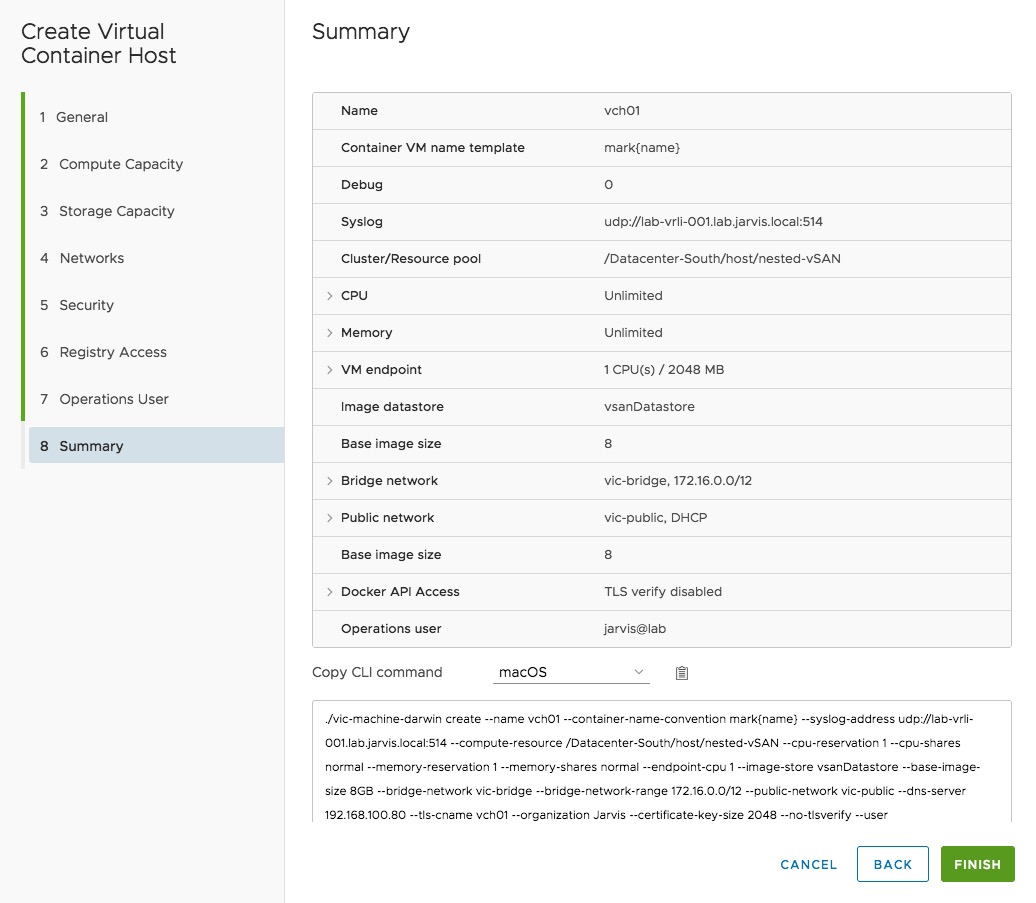
I´d recommend to copy the command lines to your notes, so that you can use them for further (manual) deployments.
It seems that we´ve gone a long way until here, right? But let us recap:
- we´ve downloaded the OVA
- we´ve deployed the VIC-Appliance
- we´ve installed the VIC vSphere Client Plug-In
…and now we´ve ran through the VCH deployment wizard and we´re just one click away to have our first Virtual Container Host deployed.
Hit FINISH!
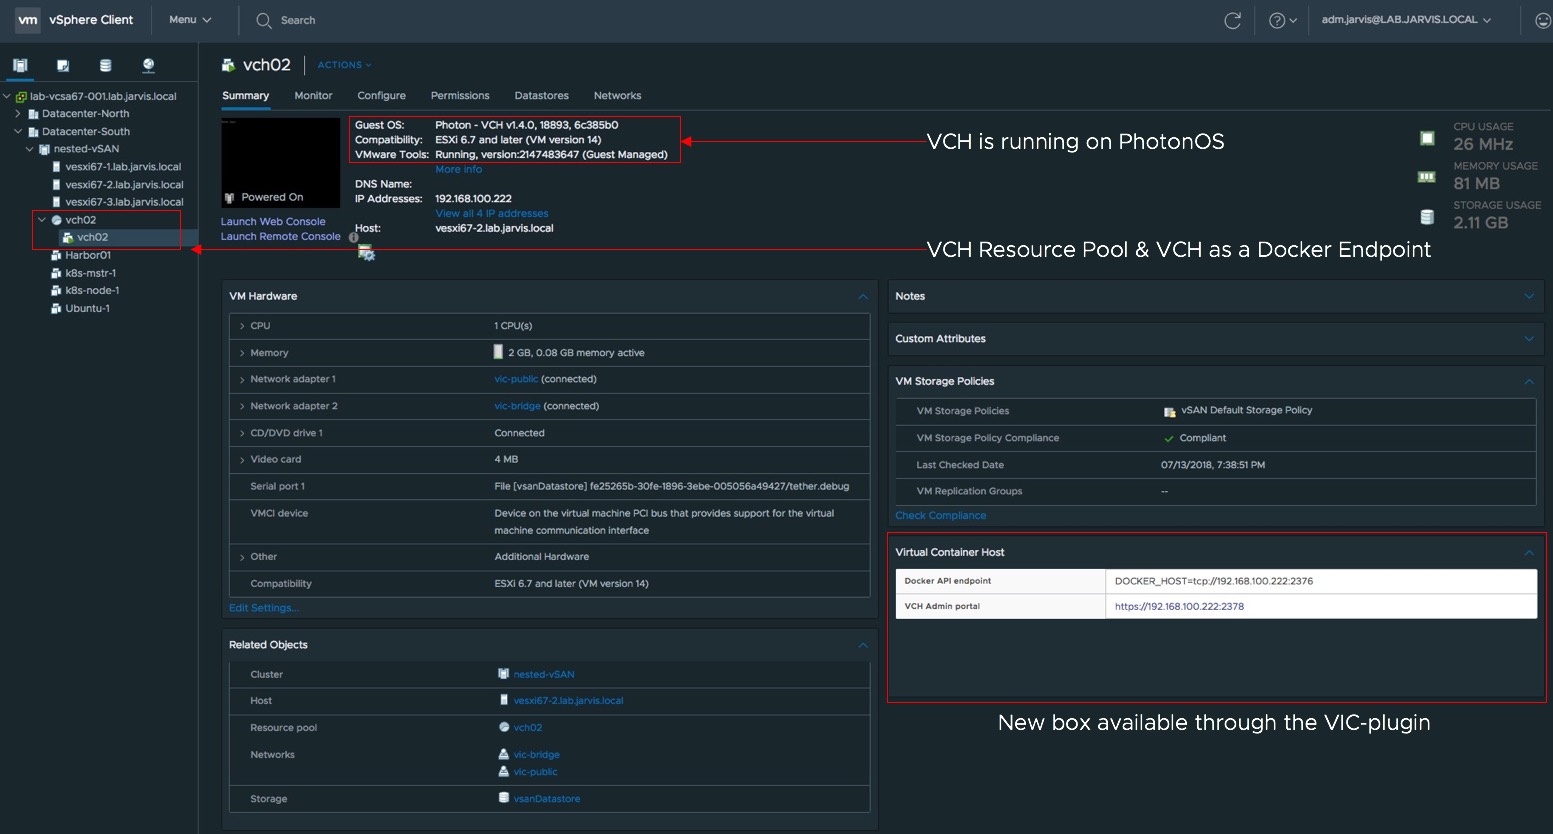
Now let´s check the deployment in our vCenter…
…and over the command line by using vic-machine (as mentioned) as well:
./vic-machine-darwin ls \
--target "lab-vcsa67-001" \
--user "administrator@jarvis.local" \
--thumbprint 4F:D3:9B:50:00:31:D9:84:9D:DA:CF:57:21:D6:0D:11:89:78:97:26INFO[0000] vSphere password for administrator@jarvis.local:
INFO[0006] ### Listing VCHs ####
INFO[0006] Validating target
ID PATH NAME VERSION UPGRADE STATUS
vm-212 /Datacenter-South/host/nested-vSAN/Resources vch02 v1.4.0-18893-6c385b0 Up to dateLooks good! What infos else?
docker -H 192.168.100.223:2376 --tls info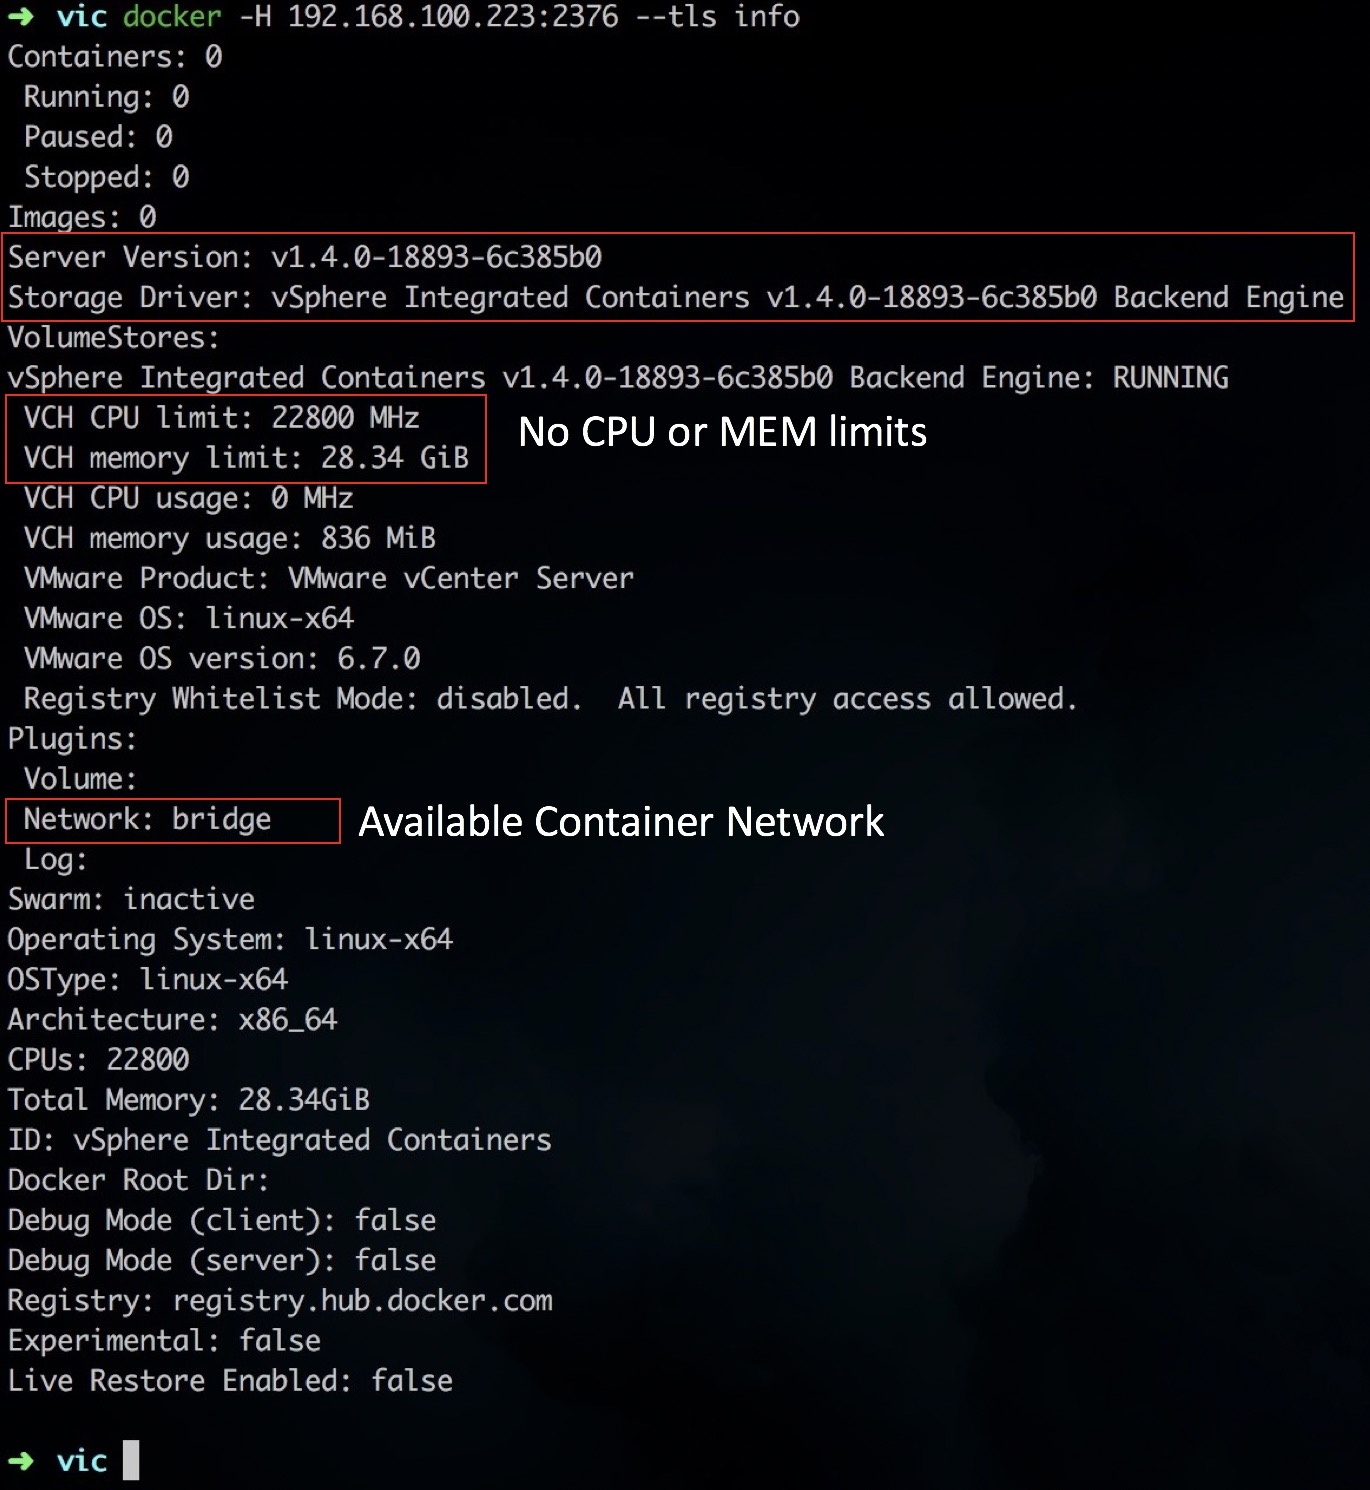
Alright, we´ve deployed our first Virtual Container Host we can go ahead with Part IV.
Continue with:
vSphere Integrated Containers Part IV: docker run a Container-VM
Previous articles:
vSphere Integrated Containers Part II: vSphere Client Plug-In