
Bootable Containers - An Entire Operating System as a Containerfile
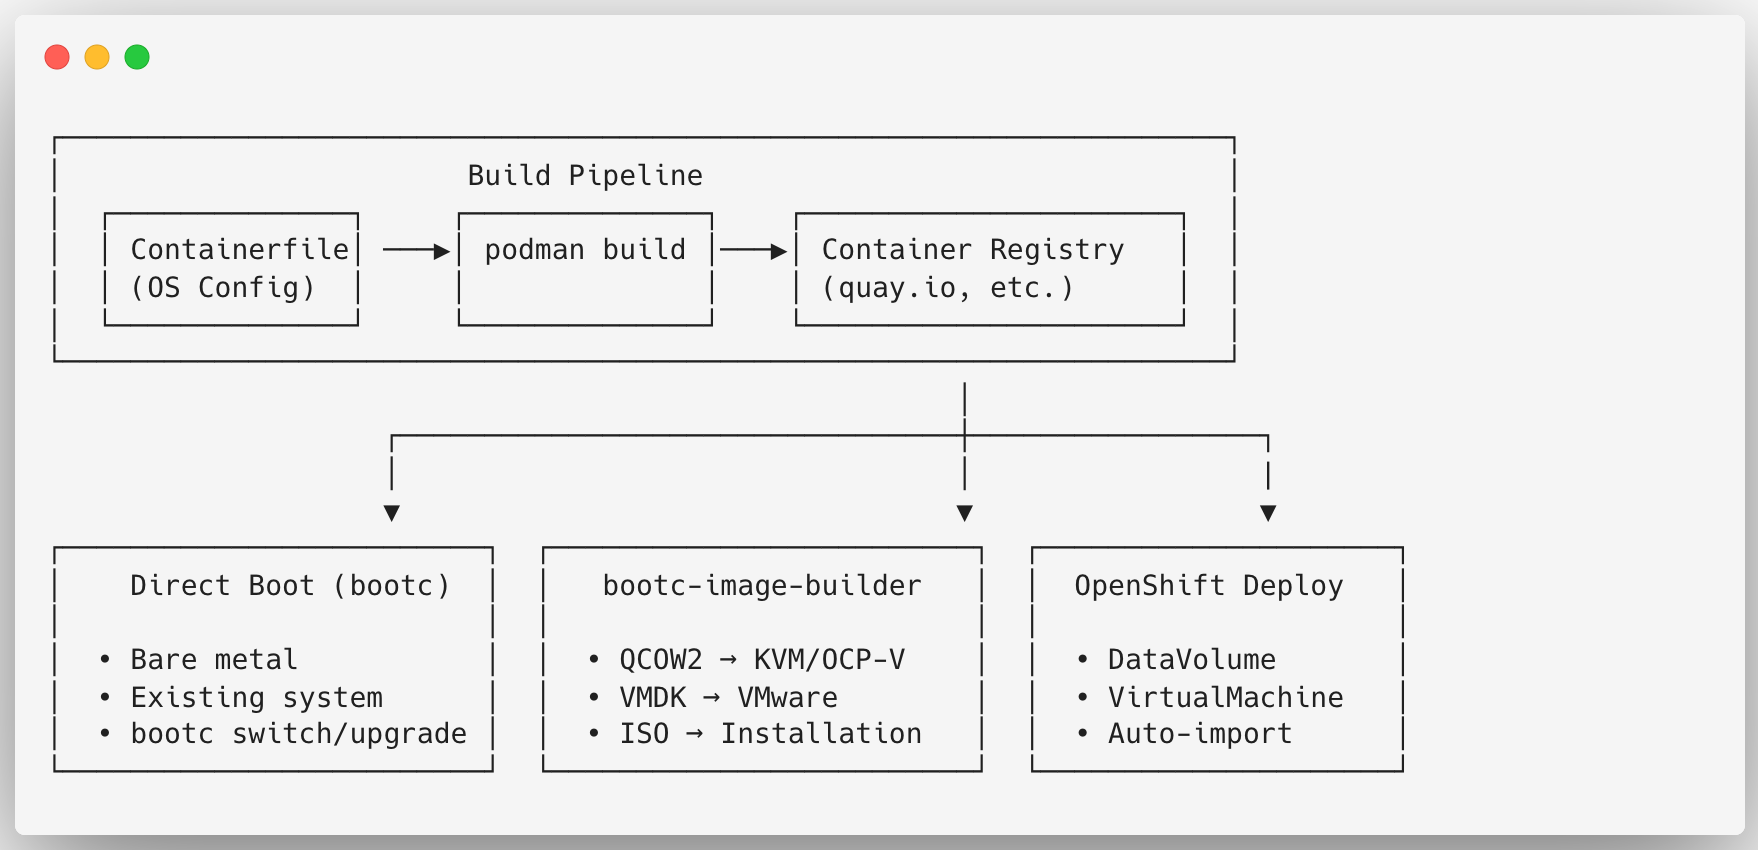
From an Inherited Session in Hamburg to This Post
Last week I stood on stage at ContainerDays 2026 in beautiful Hamburg with a talk titled “Bootable Containers: An entire OS as a Containerfile”, a session I “only” inherited from my esteemed colleagues Cedric Clyburn and Paulo Menon, who unfortunately couldn’t make it to the event. I promised them I’d give it my very best 😅, and I shared the story on LinkedIn if you want the full context.
The talk was recorded, so as all the others as well, and the recording will be up soon on the official Container Days YouTube channel. In the meantime, this post is essentially the learning guide I built for myself while “onboarding” onto the topic, turned into something more permanent than just a slide deck…a hands-on walkthrough of what bootable containers actually are, how to build one, boot it as a VM, and automate the whole thing.
repository 👉 rguske/bootable-containers
What Are Bootable Containers?
If you’ve ever built and pushed a container image with podman build / podman push, you already know 90% of the workflow. The remaining 10% is the mental shift. The Containerfile you write no longer just describes an application but a bootable Linux system, kernel and all.
| Aspect | Package Mode | Image Mode |
|---|---|---|
| OS Content Model | Individual RPM packages | Versioned OCI OS image |
| Updates | Package-by-package | Atomic image replacement |
| Rollback | Complex, often impossible | Simple, automatic |
| Root Filesystem | Mutable | Immutable (except /etc, /var) |
| Configuration | Runtime, imperative | Build time, declarative |
| Consistency | Drift over time | Guaranteed identical |
Why does this matter?
Because it solves common challenges in enterprises! Different teams, different platforms, different toolings. The fundamental enterprise problem is therefore configuration state management at scale. Traditional systems are continuously modified. Bootable Containers instead let organizations manage the OS as a versioned, tested, signed, and reproducible artifact.
- Unified workflow - same tools (Podman,
Containerfile, registries) for apps and operating systems. - Immutability - the root filesystem is read-only, which kills configuration drift dead.
- Atomic updates - the whole OS updates as one unit, not package by package.
- Easy rollbacks - boot into the previous image version the moment something goes sideways.
Key Components
Mentionable key components are podman, bootc as well as bootc-image-builder which are part of Red Hat’s contributions to the CNCF of a comprehensive set of container tools.
📰 Red Hat to Contribute Comprehensive Container Tools Collection to Cloud Native Computing Foundation
The continued importance of cloud-native applications in an AI and hybrid cloud-centric world demands an open, more accessible ecosystem of development tools. Today, we’re pleased to help drive cloud-native evolution further into the next-generation of IT with our intent to contribute a comprehensive set of container tools to the Cloud Native Computing Foundation (CNCF), including bootc, Buildah, Composefs, Podman, Podman Desktop and Skopeo.
bootc
repository 👉 bootc-dev/bootc
bootc is the tool that lives inside the running system and manages which bootable container image is currently booted.
# Check current booted image
bootc status

# Switch to a new image
bootc switch quay.io/myorg/my-bootc:latest

# Update to the latest version of the current image
bootc upgrade

# Rollback to the previous image
bootc rollback
bootc-image-builder
repository 👉 osbuild/image-builder
Building the container image is only half the story — at some point you need an actual bootable disk. bootc-image-builder is a containerized tool that converts a bootc container image into whichever disk format your target platform needs:
| Output Type | Use Case |
|---|---|
qcow2 |
KVM, OpenShift Virtualization, libvirt |
vmdk |
VMware vSphere |
raw |
Bare metal, direct disk write |
iso |
Installation media |
ami |
AWS EC2 |
Building a Bootable Web Server
registry.redhat.io/rhel9/rhel-bootc:9.6) as well as Fedora bootc images (quay.io/fedora/fedora-bootc:41).Let’s build (multi-arch) the simplest possible thing: an Apache httpd web server, packaged as a bootable container instead of a regular one.
Clone the repository git clone git@github.com:rguske/bootable-containers.git and change into the demos/webserver directory.
export USERNAME=<username>Replace the Container Image Registry with the one you have access to.
# Create a manifest for a multi-arch image
podman manifest create quay.io/${USERNAME}/bootc-webserver:v1.0

# build for both architectures
podman build \
  --platform linux/amd64,linux/arm64 \
  --manifest quay.io/${USERNAME}/bootc-webserver:v1.0 .
Push the manifest to your registry:
# Push the manifest
podman manifest push --all quay.io/${USERNAME}/bootc-webserver:v1.0
Since a bootable container is designed to boot as a full system with systemd as PID 1, you can’t just podman run it the normal way and expect the web server to answer.
For a quick local sanity check, bypass systemd and run httpd directly:
podman run \
  --rm \
  --name webserver-test \
  -p 8080:80 \
  quay.io/${USERNAME}/bootc-webserver:v1.0 \
  /usr/sbin/httpd -DFOREGROUND
Validate its functionality by either using curl http://localhost:8080 or simply browsing it on your computer.
If you compare a bootable container side by side with a regular container, the differences are clear:
| Aspect | Regular Container | Bootable Container |
|---|---|---|
| Purpose | Run a single application | Run a full operating system |
| Init (PID 1) | Application process | systemd |
| Kernel | Uses host kernel | Contains its own kernel |
| Size | ~100 MB | ~1.5 GB |
| Can boot as VM | No | Yes |
| Atomic updates | No | Yes (via bootc) |
From Container Image to Virtual Machine
This is the part that felt like magic the first time I ran it end to end. The same container image I just pushed to my registry becomes an actual, bootable virtual machine disk and lands in OpenShift Virtualization as a PVC.
Step 1: Convert to qcow2
bootc container image itself works fine on macOS. Converting it to a qcow2 disk with bootc-image-builder does not! It needs direct access to the host’s container storage (-v /var/lib/containers/storage:/var/lib/containers/storage), which only works reliably on native Linux x86_64. I run this step on a small Linux VM.In order to do the conversion bootc-image-builder is used. A container to create disk images from bootc container inputs.
# Pull the bootc image first (bootc-image-builder no longer pulls automatically)
sudo podman pull quay.io/${USERNAME}/bootc-webserver:v1.0

mkdir -p output

sudo podman run \
  --rm -it --privileged \
  --pull=newer \
  --security-opt label=type:unconfined_t \
  -v "$PWD/output":/output \
  -v /var/lib/containers/storage:/var/lib/containers/storage \
  quay.io/centos-bootc/bootc-image-builder:latest \
  --type qcow2 \
  quay.io/${USERNAME}/bootc-webserver:v1.0

# Result: output/qcow2/disk.qcow2
Pay attention to the -v "$PWD/output":/output \ option which bootc-image-builder will use to create the output directory and to store the disk.qcow2 file.
Example output building the disk image:
[-] Disk image building step
[5 / 5] Pipeline qcow2 [--------------------------------------------------------------------------------------------------------->] 100.00%
[2 / 2] Stage org.osbuild.qemu [------------------------------------------------------------------------------------------------->] 100.00%
Message: Results saved in .
Step 2: Upload the qcow2 file into a DataVolume
OpenShift Virtualization (KubeVirt) never talks to your registry directly to boot a VM. It goes through a DataVolume, which is CDI’s (Containerized Data Importer) way of saying “materialize this content as a PVC”. The VirtualMachine object then simply mounts that PVC as its boot disk.
Create an OpenShift project (Kubernetes namespace) in which the VM will be created:
oc new-project bootable-containersReadWriteMany PVC. On block storage classes, ReadWriteMany is only accepted with volumeMode: Block — requesting it with the default Filesystem mode gets rejected outright with non-block volume with RWX access mode is not supported. Set both accessModes: [ReadWriteMany] and volumeMode: Block together on the DataVolume.Upload the previously created qcow2 file into a DataVolume:
# Make sure replacing
virtctl image-upload dv bootc-webserver \
  --size 10Gi \
  --storage-class kubevirt-odf-replica-two-block \
  --access-mode ReadWriteMany \
  --volume-mode block \
  --image-path ~/output/qcow2/disk.qcow2 \
  --insecure
Example virtctl image-upload output:
[...]

PVC bootable-containers/bootc-webserver-cds not found
DataVolume bootable-containers/bootc-webserver-cds created
Waiting for PVC bootc-webserver-cds upload pod to be ready...
Pod now ready
Uploading data to https://cdi-uploadproxy-openshift-cnv.apps.rguske-ocp42.rguske.coe.muc.redhat.com

1.69 GiB / 1.69 GiB [------------------------------------------------------------------------------------------------------------------------------------------------------------------------------] 100.00% 182.13 MiB p/s 9.7s

Uploading data completed successfully, waiting for processing to complete, you can hit ctrl-c without interrupting the progress
Like I mentioned above, the job of uploading the qcow2 image file will be done by the Containerized Data Importer in form of a pod.
Check the logs of the created CDI pod:
oc get pod -w

NAME                                                    READY   STATUS              RESTARTS   AGE
cdi-upload-prime-e159413b-5485-49bc-9afe-584d347a0fc2   0/1     ContainerCreating   0          29s
cdi-upload-prime-e159413b-5485-49bc-9afe-584d347a0fc2   1/1     Running             0          29s
oc logs cdi-upload-prime-e159413b-5485-49bc-9afe-584d347a0fc2 -fStep 3: Create the Virtual Machine
After uploading the virtual disk file into a PVC…
oc get dv,pvc
NAME                                         PHASE       PROGRESS   RESTARTS   AGE
datavolume.cdi.kubevirt.io/bootc-webserver   Succeeded   N/A                   7m27s

NAME                                    STATUS   VOLUME                                     CAPACITY   ACCESS MODES   STORAGECLASS                     VOLUMEATTRIBUTESCLASS   AGE
persistentvolumeclaim/bootc-webserver   Bound    pvc-c15578c5-9a63-4eac-8a22-4064ac03e2bc   10Gi       RWX            kubevirt-odf-replica-two-block   <unset>                 7m27s
…the consequently next step is to create the virtual machine and boot it (based on a bootable container image 🚀).
Apply the following VM spec:
oc apply -f - <<EOF
apiVersion: kubevirt.io/v1
kind: VirtualMachine
metadata:
  name: bootc-webserver
  namespace: bootable-containers
spec:
  runStrategy: Always
  template:
    metadata:
      labels:
        kubevirt.io/domain: bootc-webserver
    spec:
      domain:
        cpu:
          cores: 2
        devices:
          disks:
          - disk:
              bus: virtio
            name: rootdisk
          interfaces:
          - masquerade: {}
            name: default
        resources:
          requests:
            memory: 4Gi
      networks:
      - name: default
        pod: {}
      volumes:
      - dataVolume:
          name: bootc-webserver
        name: rootdisk
EOF
Validate the state of the virtual machine by checking its Kubernetes objects like VirtualMachine and/or VirtualMachineInstance:
oc get vm,vmi
NAME                                         AGE   STATUS    READY
virtualmachine.kubevirt.io/bootc-webserver   24m   Running   True

NAME                                                 AGE   PHASE     IP            NODENAME          READY
virtualmachineinstance.kubevirt.io/bootc-webserver   24m   Running   10.129.2.71   rguske-ocp42-n3   True
Step 4: Exposing the Webserver VM
According to the status, our vm is up and running and the webserver ready to serve. But how is the website reachable from the outside? How is ingress done? As the IP address of the virtualmachineinstance shows, the vm is connected to the pod network, which is an “internal” only network.
Now, the cool thing about OpenShift Virtualization is, that of course you can just connect your virtual machine workloads directly to your data center, e.g. to VLAN baked networks. Like you would do on other Hypervisor platforms as well. But since vms are first citizens on OpenShift, you can also simply use standard Kubernetes network concepts like Services and Ingress/Routes.
For my example and for the sake of the demo, I only want to expose the website itself on port 443/https.
Create a Service type ClusterIP:
oc apply -f - <<EOF
apiVersion: v1
kind: Service
metadata:
  labels:
    kubevirt.io/domain: bootc-webserver
  name: bootc-webserver
  namespace: bootable-containers
spec:
  type: ClusterIP
  selector:
    kubevirt.io/domain: bootc-webserver
  ports:
  - name: http
    port: 80
    protocol: TCP
    targetPort: 80
EOF
The necessary object for Ingress communication is an OpenShift Route.
Create the route accordingly:
oc apply -f - <<EOF
apiVersion: route.openshift.io/v1
kind: Route
metadata:
  labels:
    kubevirt.io/domain: bootc-webserver
  name: bootc-webserver
  namespace: bootable-containers
spec:
  port:
    targetPort: http
  tls:
    insecureEdgeTerminationPolicy: Redirect
    termination: edge
  to:
    kind: Service
    name: bootc-webserver
    weight: 100
  wildcardPolicy: None
EOF
Once the route resolves, you’re looking at a web page served by a VM, whose entire operating system started life as a Containerfile.
oc get svc,route
NAME                      TYPE        CLUSTER-IP      EXTERNAL-IP   PORT(S)   AGE
service/bootc-webserver   ClusterIP   172.30.184.41   <none>        80/TCP    37m

NAME                                       HOST/PORT                                                                         PATH   SERVICES          PORT   TERMINATION     WILDCARD
route.route.openshift.io/bootc-webserver   bootc-webserver-bootable-containers.apps.rguske-ocp42.rguske.coe.muc.redhat.com          bootc-webserver   http   edge/Redirect   None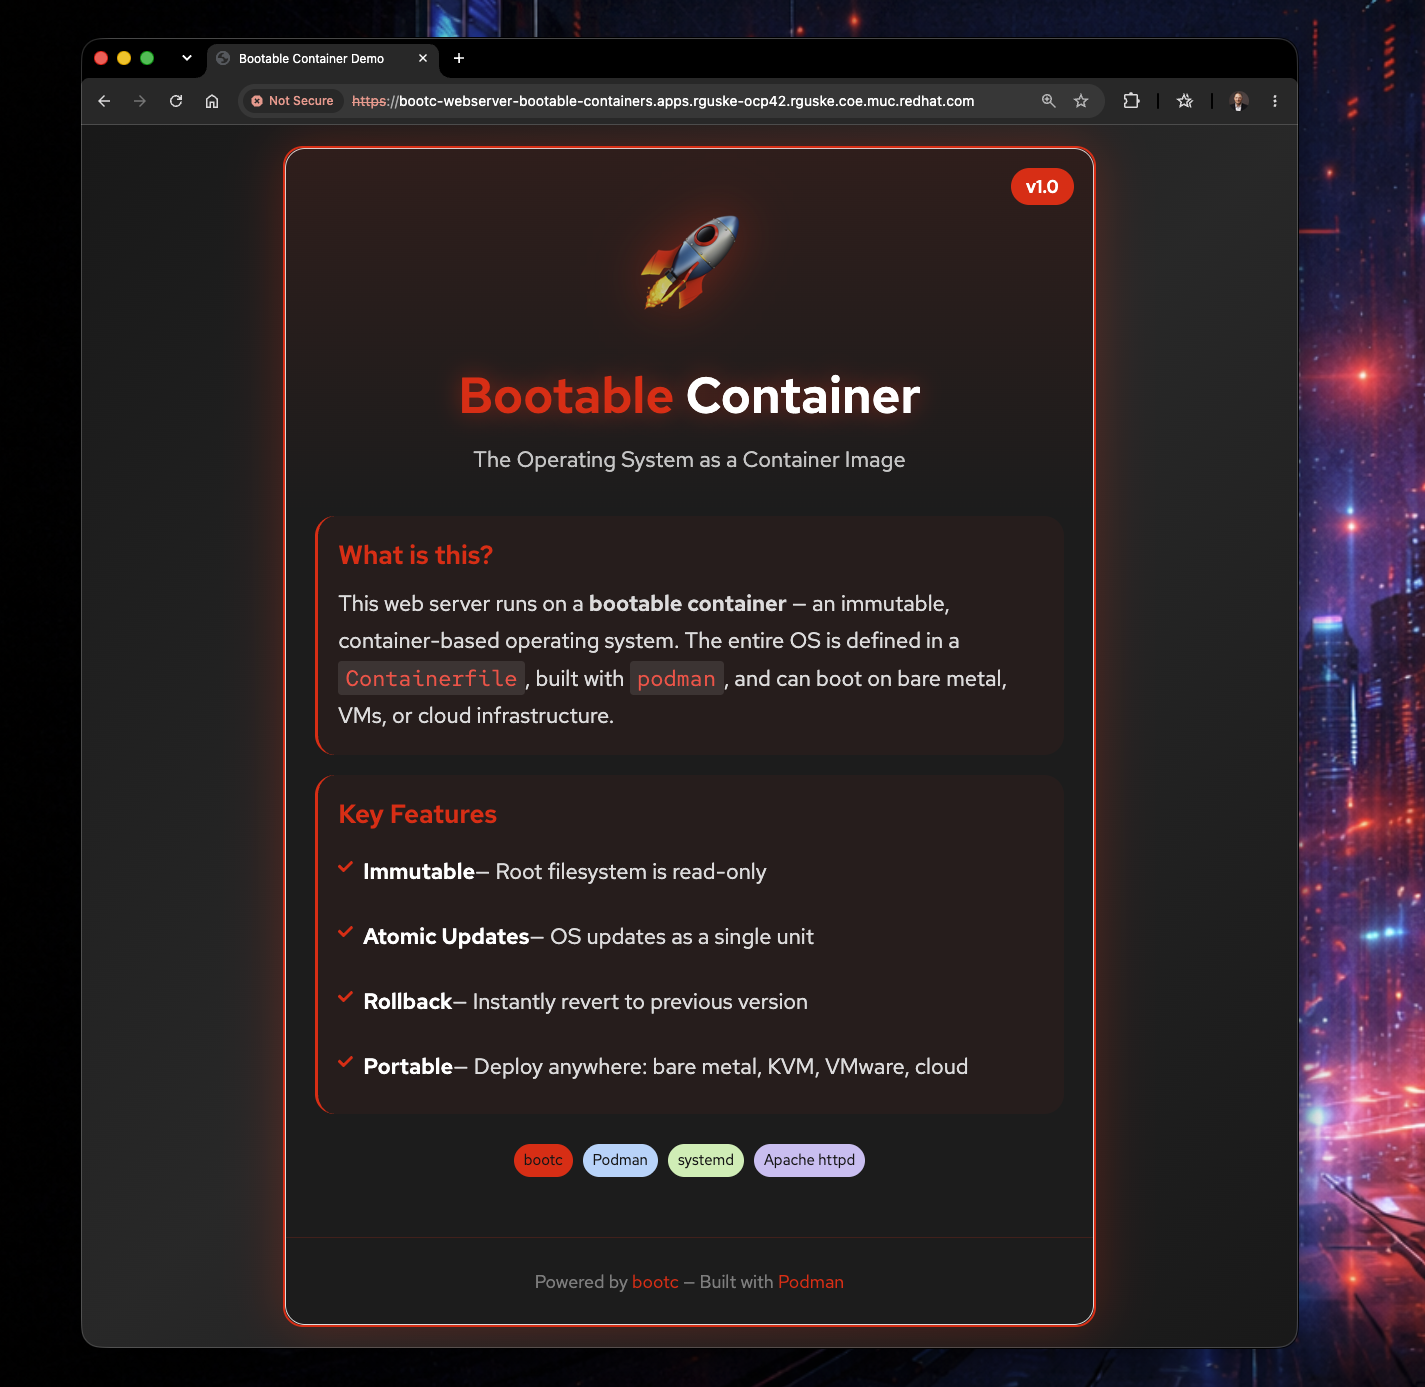
The VM ships with two users out of the box:
| User | Password | Configured via |
|---|---|---|
bootc-user |
redhat |
Containerfile (always available) |
rhel |
R3dH4t1! |
cloud-init (only if cloud-init is installed) |
Before I walk you through the update process of a bootable container image based vm, I’d like to describe an alternative method of uploading a virtual disk into the platform using virttl image-upload.
Alternative Step 2: Package the disk as a container image
The trick to get a raw disk file into OpenShift Virtualization cleanly is to wrap it back into a container image, scratch-based, containing nothing but the disk:
Create the following Containerfile.ocpv file. IMPORTANT! The ADD section points to the converted virtual disk file (output/qcow2/disk.qcow2).
Ensure to correctly point to your path!
cat > Containerfile.ocpv <<EOF
FROM registry.access.redhat.com/ubi9/ubi-minimal:latest AS builder
ADD --chown=107:107 output/qcow2/disk.qcow2 /disk/
RUN chmod 0440 /disk/*
FROM scratch
COPY --from=builder /disk/* /disk/
LABEL name="bootc-webserver-disk" version="1.0"
EOF
Build and push the new -disk image:
podman build -f Containerfile.ocpv -t quay.io/${USERNAME}/bootc-webserver:v1.0-disk .
podman push quay.io/${USERNAME}/bootc-webserver:v1.0-disk
Alternative Step 3: From registry to PVC to VM
Instead of manually uploading the virtual disk to a pvc, you can alternatively point a DataVolume at your -disk image, and CDI pulls that container image, unpacks the qcow2 file inside it, and writes it straight onto a freshly created pvc.
I have an example “ready to use” in my repository. If you already cloned it, change to the root of the cloned repository and adjust the files in /openshift-virtualization accordingly to match your environment. Steps and guidance are provided in the repo.
I’m using kustomize in order to roll out all the objects. Once you fire up oc apply -k openshift-virtualization/, everything will be created consequently:
oc apply -k openshift-virtualization/

namespace/bootable-containers-demo created
service/bootc-webserver created
datavolume.cdi.kubevirt.io/bootc-webserver-disk created
virtualmachine.kubevirt.io/bootc-webserver created
route.route.openshift.io/bootc-webserver created
The important part though is the DataVolume spec:
apiVersion: cdi.kubevirt.io/v1beta1
kind: DataVolume
metadata:
  name: bootc-webserver-disk
  namespace: bootable-containers-demo
  labels:
    app: bootc-webserver
spec:
  source:
    registry:
      url: "docker://quay.io/YOUR_USERNAME/bootc-webserver:v1.0-disk"
      # Uncomment if using a private registry
      # secretRef: quay-pull-secret
  pvc:
    accessModes:
      - ReadWriteMany
    volumeMode: Block
    resources:
      requests:
        storage: 20Gi
    storageClassName: kubevirt-ceph-rbd-virt
As you can see, spec.source.registry.url points to our v1.0-disk image which is available in my registry (quay.io/rguske/bootc-webserver:v1.0-disk).
After creating the DataVolume this way, the CDI will create an importer-prime pod which will import the disk.qcow2:
oc get pod

NAME                                                  READY   STATUS    RESTARTS   AGE
importer-prime-fedfa4be-5513-46be-88f2-ee7cb0b3a69e   1/1     Running   0          2m33s
oc logs importer-prime-fedfa4be-5513-46be-88f2-ee7cb0b3a69e
I0909 08:11:26.549387 1 importer.go:108] Starting importer
I0909 08:11:26.582453 1 importer.go:183] begin import process
I0909 08:11:26.582807 1 registry-datasource.go:199] Registry certs directory not configured
I0909 08:11:26.582886 1 data-processor.go:361] Calculating available size
I0909 08:11:26.586002 1 data-processor.go:369] Checking out block volume size.
I0909 08:11:26.586110 1 data-processor.go:386] Target size 21474836480.
I0909 08:11:26.586186 1 data-processor.go:260] New phase: TransferScratch
I0909 08:11:26.586346 1 registry-datasource.go:101] Copying registry image to scratch space.
I0909 08:11:26.586407 1 transport.go:199] Downloading image from 'docker://quay.io/rguske/bootc-webserver:v1.0-disk', copying file from 'disk' to '/scratch'
I0909 08:11:27.537052 1 transport.go:231] Processing layer {Digest:sha256:bc0fd6090d4c5a5de6a6f478bed866e06b556d0141bc596aa54163e615b361a3 Size:1796891230 URLs:[] Annotations:map[] MediaType:application/vnd.oci.image.layer.v1.tar+gzip CompressionOperation:0 CompressionAlgorithm:<nil> CryptoOperation:0}
I0909 08:11:28.282302 1 transport.go:158] File 'disk/disk.qcow2' found in the layer
I0909 08:11:28.285689 1 file.go:230] copyWithSparseCheck to /scratch/disk/disk.qcow2Check if all objects are deployed successfully:
oc -n bootable-containers-demo get vm,vmi,dv,pvc,svc,route

NAME                                         AGE   STATUS    READY
virtualmachine.kubevirt.io/bootc-webserver   76m   Running   True

NAME                                                 AGE   PHASE     IP            NODENAME          READY
virtualmachineinstance.kubevirt.io/bootc-webserver   76m   Running   10.129.2.75   rguske-ocp42-n3   True

NAME                                              PHASE       PROGRESS   RESTARTS   AGE
datavolume.cdi.kubevirt.io/bootc-webserver-disk   Succeeded   100.0%                76m

NAME                                         STATUS   VOLUME                                     CAPACITY   ACCESS MODES   STORAGECLASS                     VOLUMEATTRIBUTESCLASS   AGE
persistentvolumeclaim/bootc-webserver-disk   Bound    pvc-852a040e-47c3-49ca-9130-927a36ff0381   20Gi       RWX            kubevirt-odf-replica-two-block   <unset>                 76m

NAME                      TYPE        CLUSTER-IP       EXTERNAL-IP   PORT(S)   AGE
service/bootc-webserver   ClusterIP   172.30.211.241   <none>        80/TCP    76m

NAME                                       HOST/PORT                                                                              PATH   SERVICES          PORT   TERMINATION     WILDCARD
route.route.openshift.io/bootc-webserver   bootc-webserver-bootable-containers-demo.apps.rguske-ocp42.rguske.coe.muc.redhat.com          bootc-webserver   http   edge/Redirect   None
Bootc Atomic Upgrade & Rollback
The single best way I found to feel what “atomic OS update” actually means is to build two versions of the same image, switch between them live, and then panic-rollback 😄.
Before I dig into it, I’d like to explain the difference between bootc switch and bootc upgrade, since both change the bootc-managed OS, but they serve different purposes.
bootc switchchanges the system to a different image reference, likequay.io/rguske/bootc-webserver:v1.1. This is typically used to move between channels, repositories, or explicitly selected versions.bootc upgradekeeps the system on the same configured image reference and checks whether that reference now points to a newer image. If the system tracksquay.io/acme/webserver:prod, it pulls the newer image behind :prod, stages it, and the new deployment becomes active after reboot.
A simple way to remember it:
bootc upgrade
same image reference → newer content

bootc switch
different image reference → different OS stream/imagedev, stage and prod as a second tag. If the system tracks quay.io/acme/webserver:prod, it pulls the newer image behind :prod and stages it.bootc switch/upgrade
In order to use bootc switch, we need to connect to our vm. OpenShift provides two simple way to access the vm console.
- OpenShift WebConsole Virtualization –> VirtualMachine –> VM –> Overview –>
Open web console virtctl console <vm-name>
- being in your OpenShift project, simply execute:
virtctl console bootc-webserver- Login using the configured username/password combination (
bootc-user/redhat) - Checkt the
booted imagestatus
[bootc-user@bootc-webserver ~]$ sudo bootc status
[ 4689.242601] SELinux:  Context unconfined_u:object_r:invalid_bootcinstall_testlabel_t:s0 is not valid (left unmapped).
● Booted image: quay.io/rguske/bootc-webserver:v1.0
        Digest: sha256:5d100215e05a702733f7ddbcdca54f0d69e3a4437d3c5396dab368b5ca0c8c51 (amd64)
Version: 9 (2026-07-31T22:34:55Z)- Current image reference is
quay.io/rguske/bootc-webserver:v1.0. - For the sake of my demo, I haven’t applied multiple tags to my image, which consequently means, I have to
switchto my new image version instead of upgrading within the same reference. - Let’s reference to an updated version
v1.1usingbootc switch:
sudo bootc switch quay.io/${USERNAME}/bootc-webserver:v1.1- Example output:
layers already present: 66; layers needed: 7 (1.1 GB)
Fetched layers: 1.07 GiB in 4 minutes (4.95 MiB/s)

  Deploying: done (15 seconds)
Queued for next boot: quay.io/rguske/bootc-webserver:v1.1- The switch will be applied after rebooting the system:
sudo systemctl reboot- After the reboot, the new image is active:
[bootc-user@bootc-webserver ~]$ sudo bootc status
[  114.802632] SELinux:  Context unconfined_u:object_r:invalid_bootcinstall_testlabel_t:s0 is not valid (left unmapped).
● Booted image: quay.io/rguske/bootc-webserver:v1.1
        Digest: sha256:728e8e1d196a4707ab8017948e27e0d73534cee037c4038fd9c05da8a2375a46 (amd64)
       Version: 9 (2026-07-31T22:34:55Z)

  Rollback image: quay.io/rguske/bootc-webserver:v1.0
          Digest: sha256:5d100215e05a702733f7ddbcdca54f0d69e3a4437d3c5396dab368b5ca0c8c51 (amd64)
Version: 9 (2026-07-31T22:34:55Z)- As aforementioned
bootc upgradewon’t work with my demo:
[bootc-user@bootc-webserver ~]$ sudo bootc upgrade
[  462.222832] evm: overlay not supported
No changes in quay.io/rguske/bootc-webserver:v1.1 => sha256:728e8e1d196a4707ab8017948e27e0d73534cee037c4038fd9c05da8a2375a46
No update available.
One reboot later, the beautiful (IMO) purple v1.1 theme shows up:
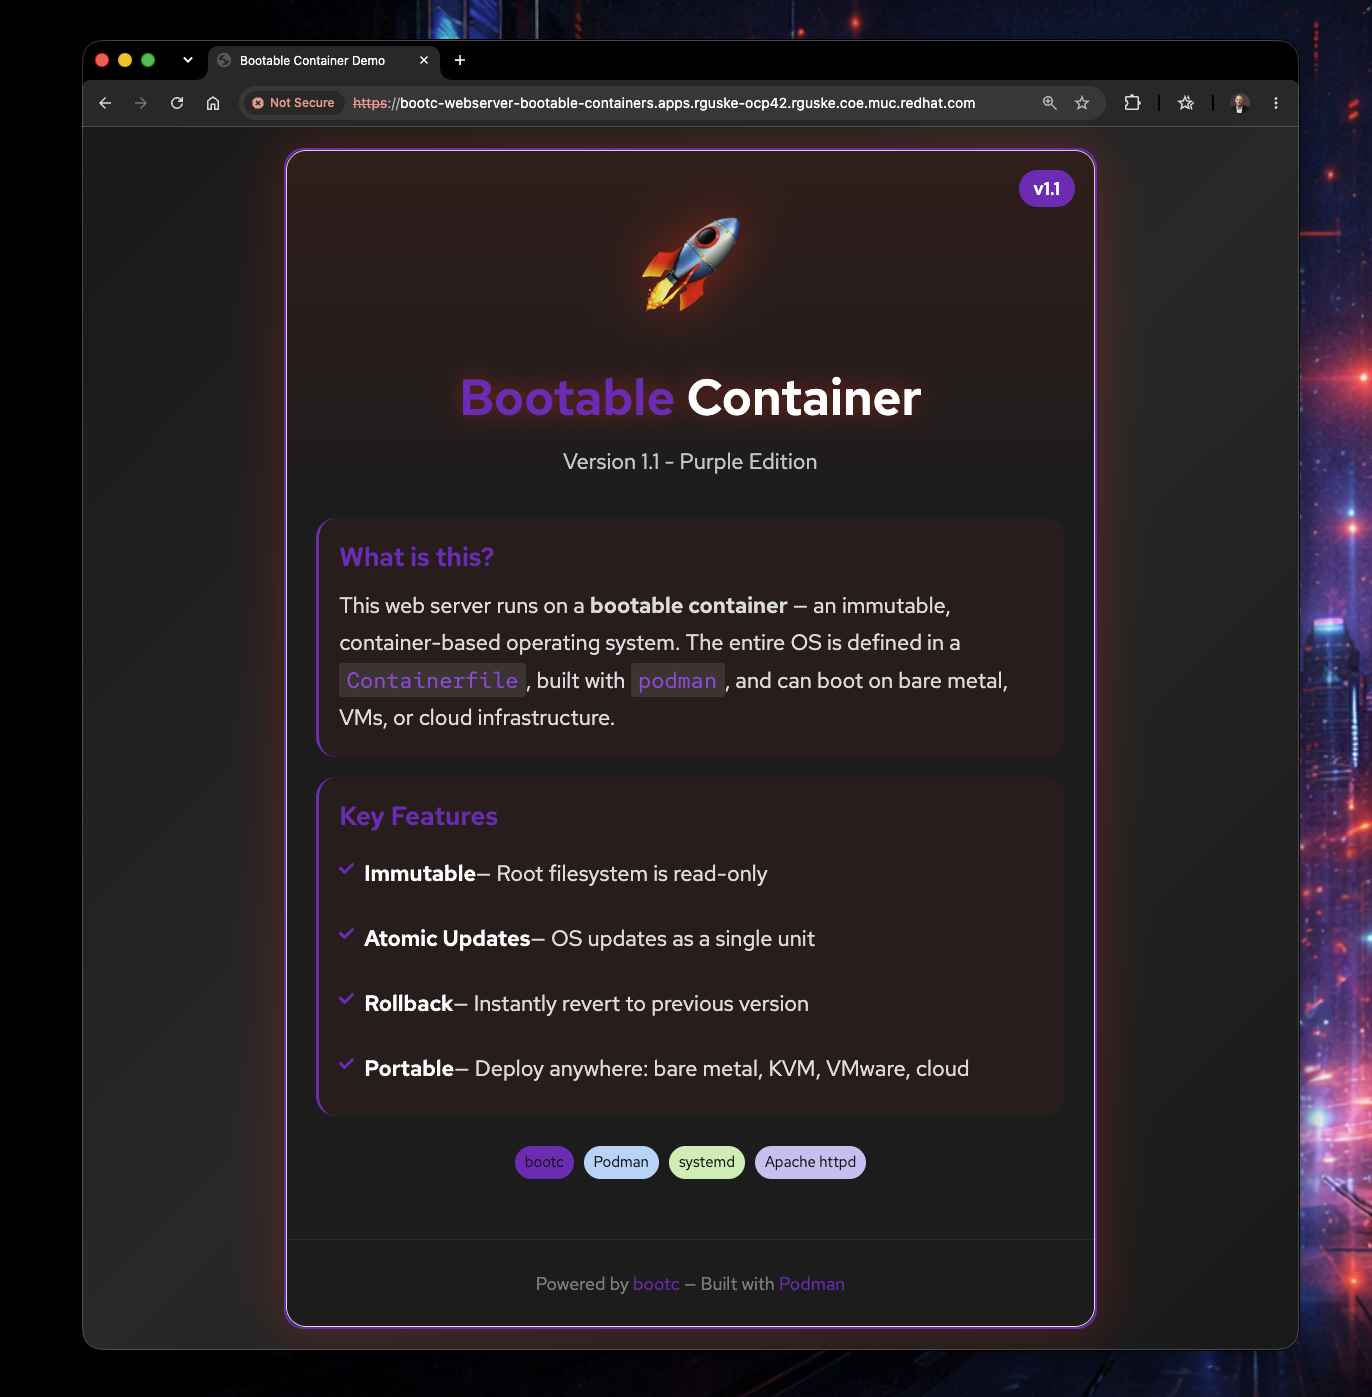
If that had gone wrong, the fix is just as boring (in the best way):
sudo bootc rollback
sudo systemctl rebootAutomating It: Three Flavors of CI/CD
Building and switching images by hand is fine for a demo, but the whole point of image mode is that it fits into the container tooling you already have including your CI/CD. I ended up building the same pipeline three different ways, mostly to figure out which one I’d actually reach for on a real project.
Git Push → Build bootc → Convert to QCOW2 → Package → Deploy VMGitHub Actions
The simplest option if your code already lives on GitHub. It builds the bootc image, converts it to qcow2, pushes both, and if the OpenShift API is reachable from GitHub’s runners, deploys the VM too.
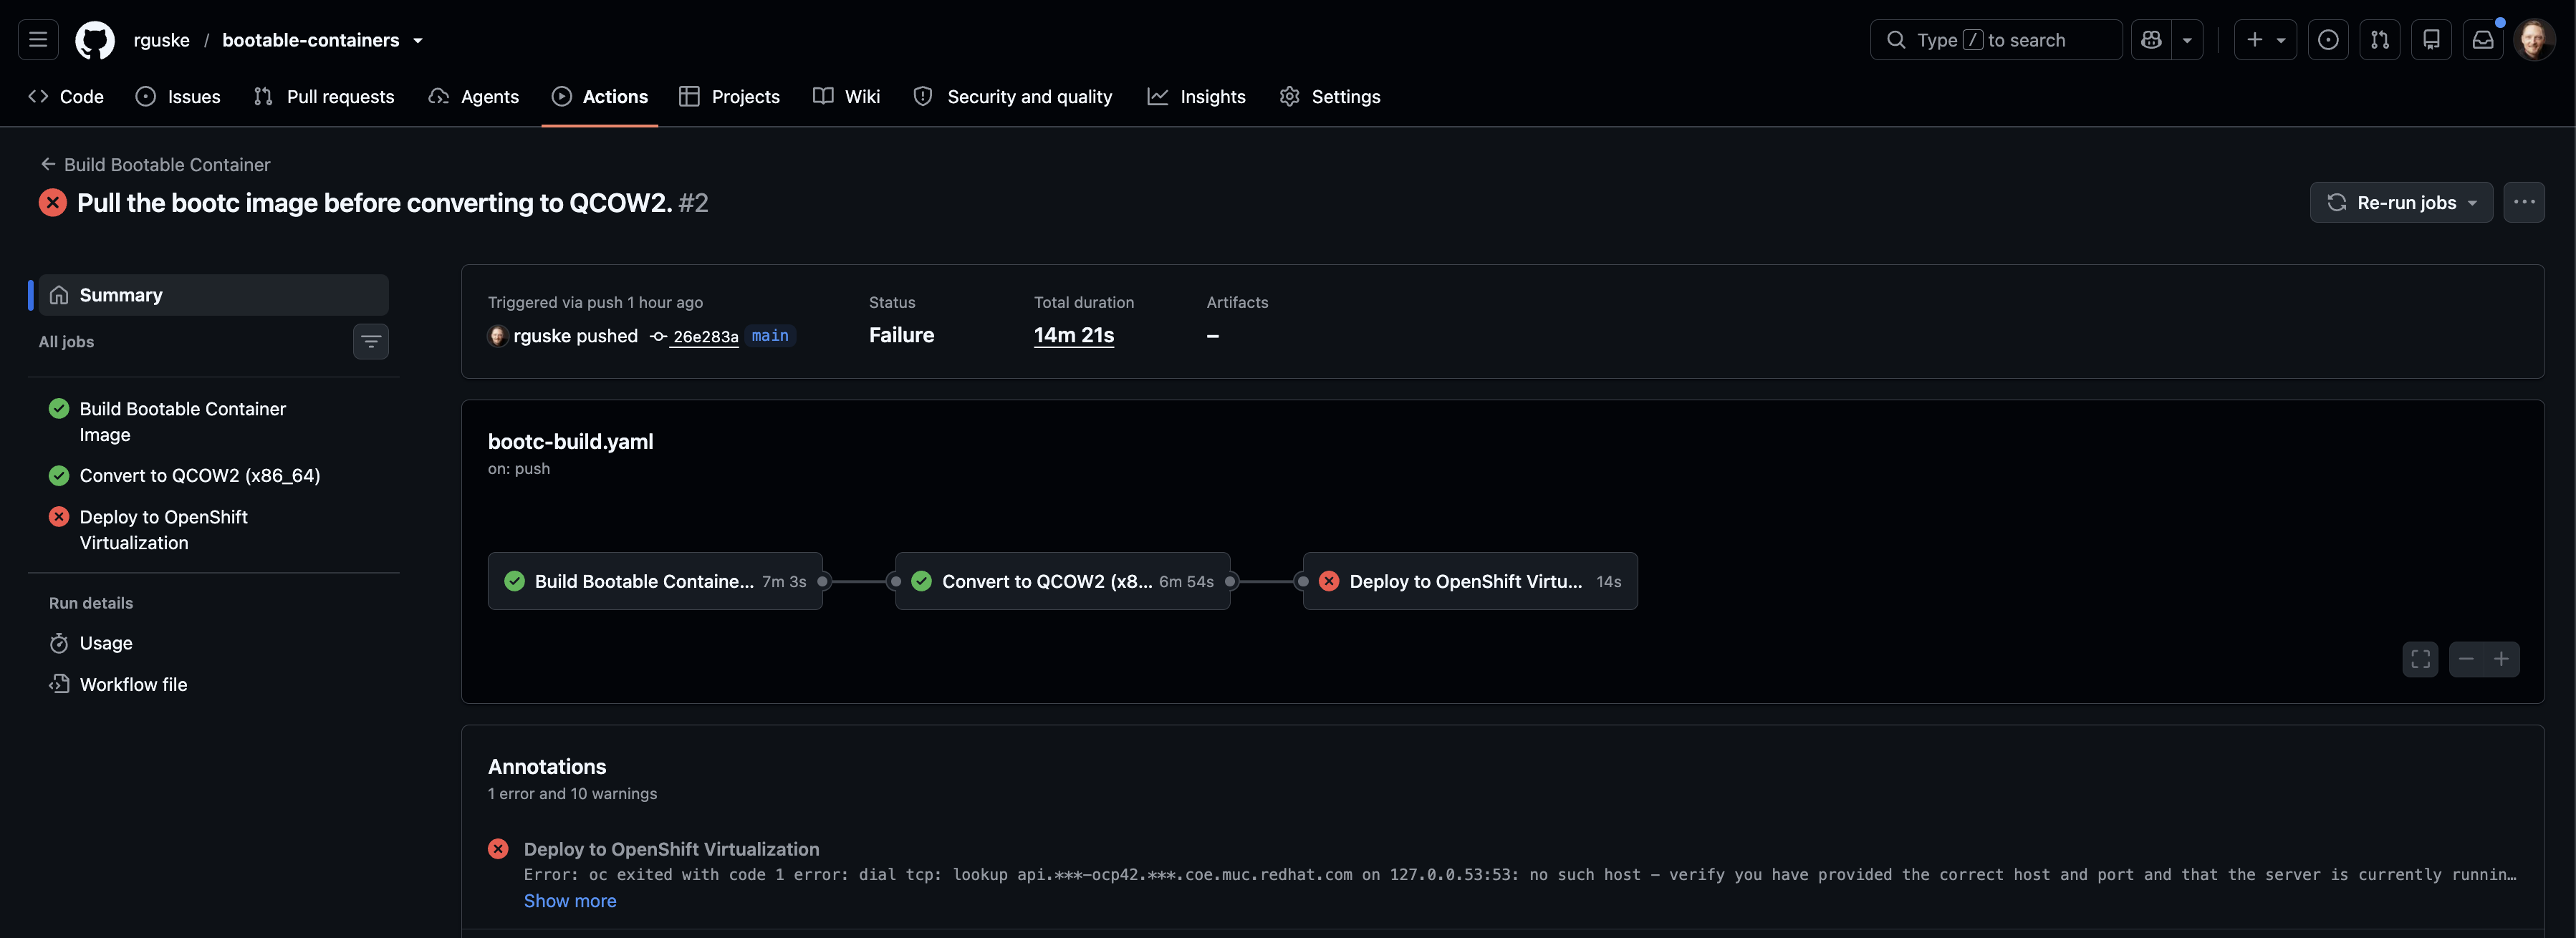
oc login fails. Run the deploy step from somewhere that can actually reach the cluster, or pick one of the two options below.OpenShift Pipelines (Tekton)
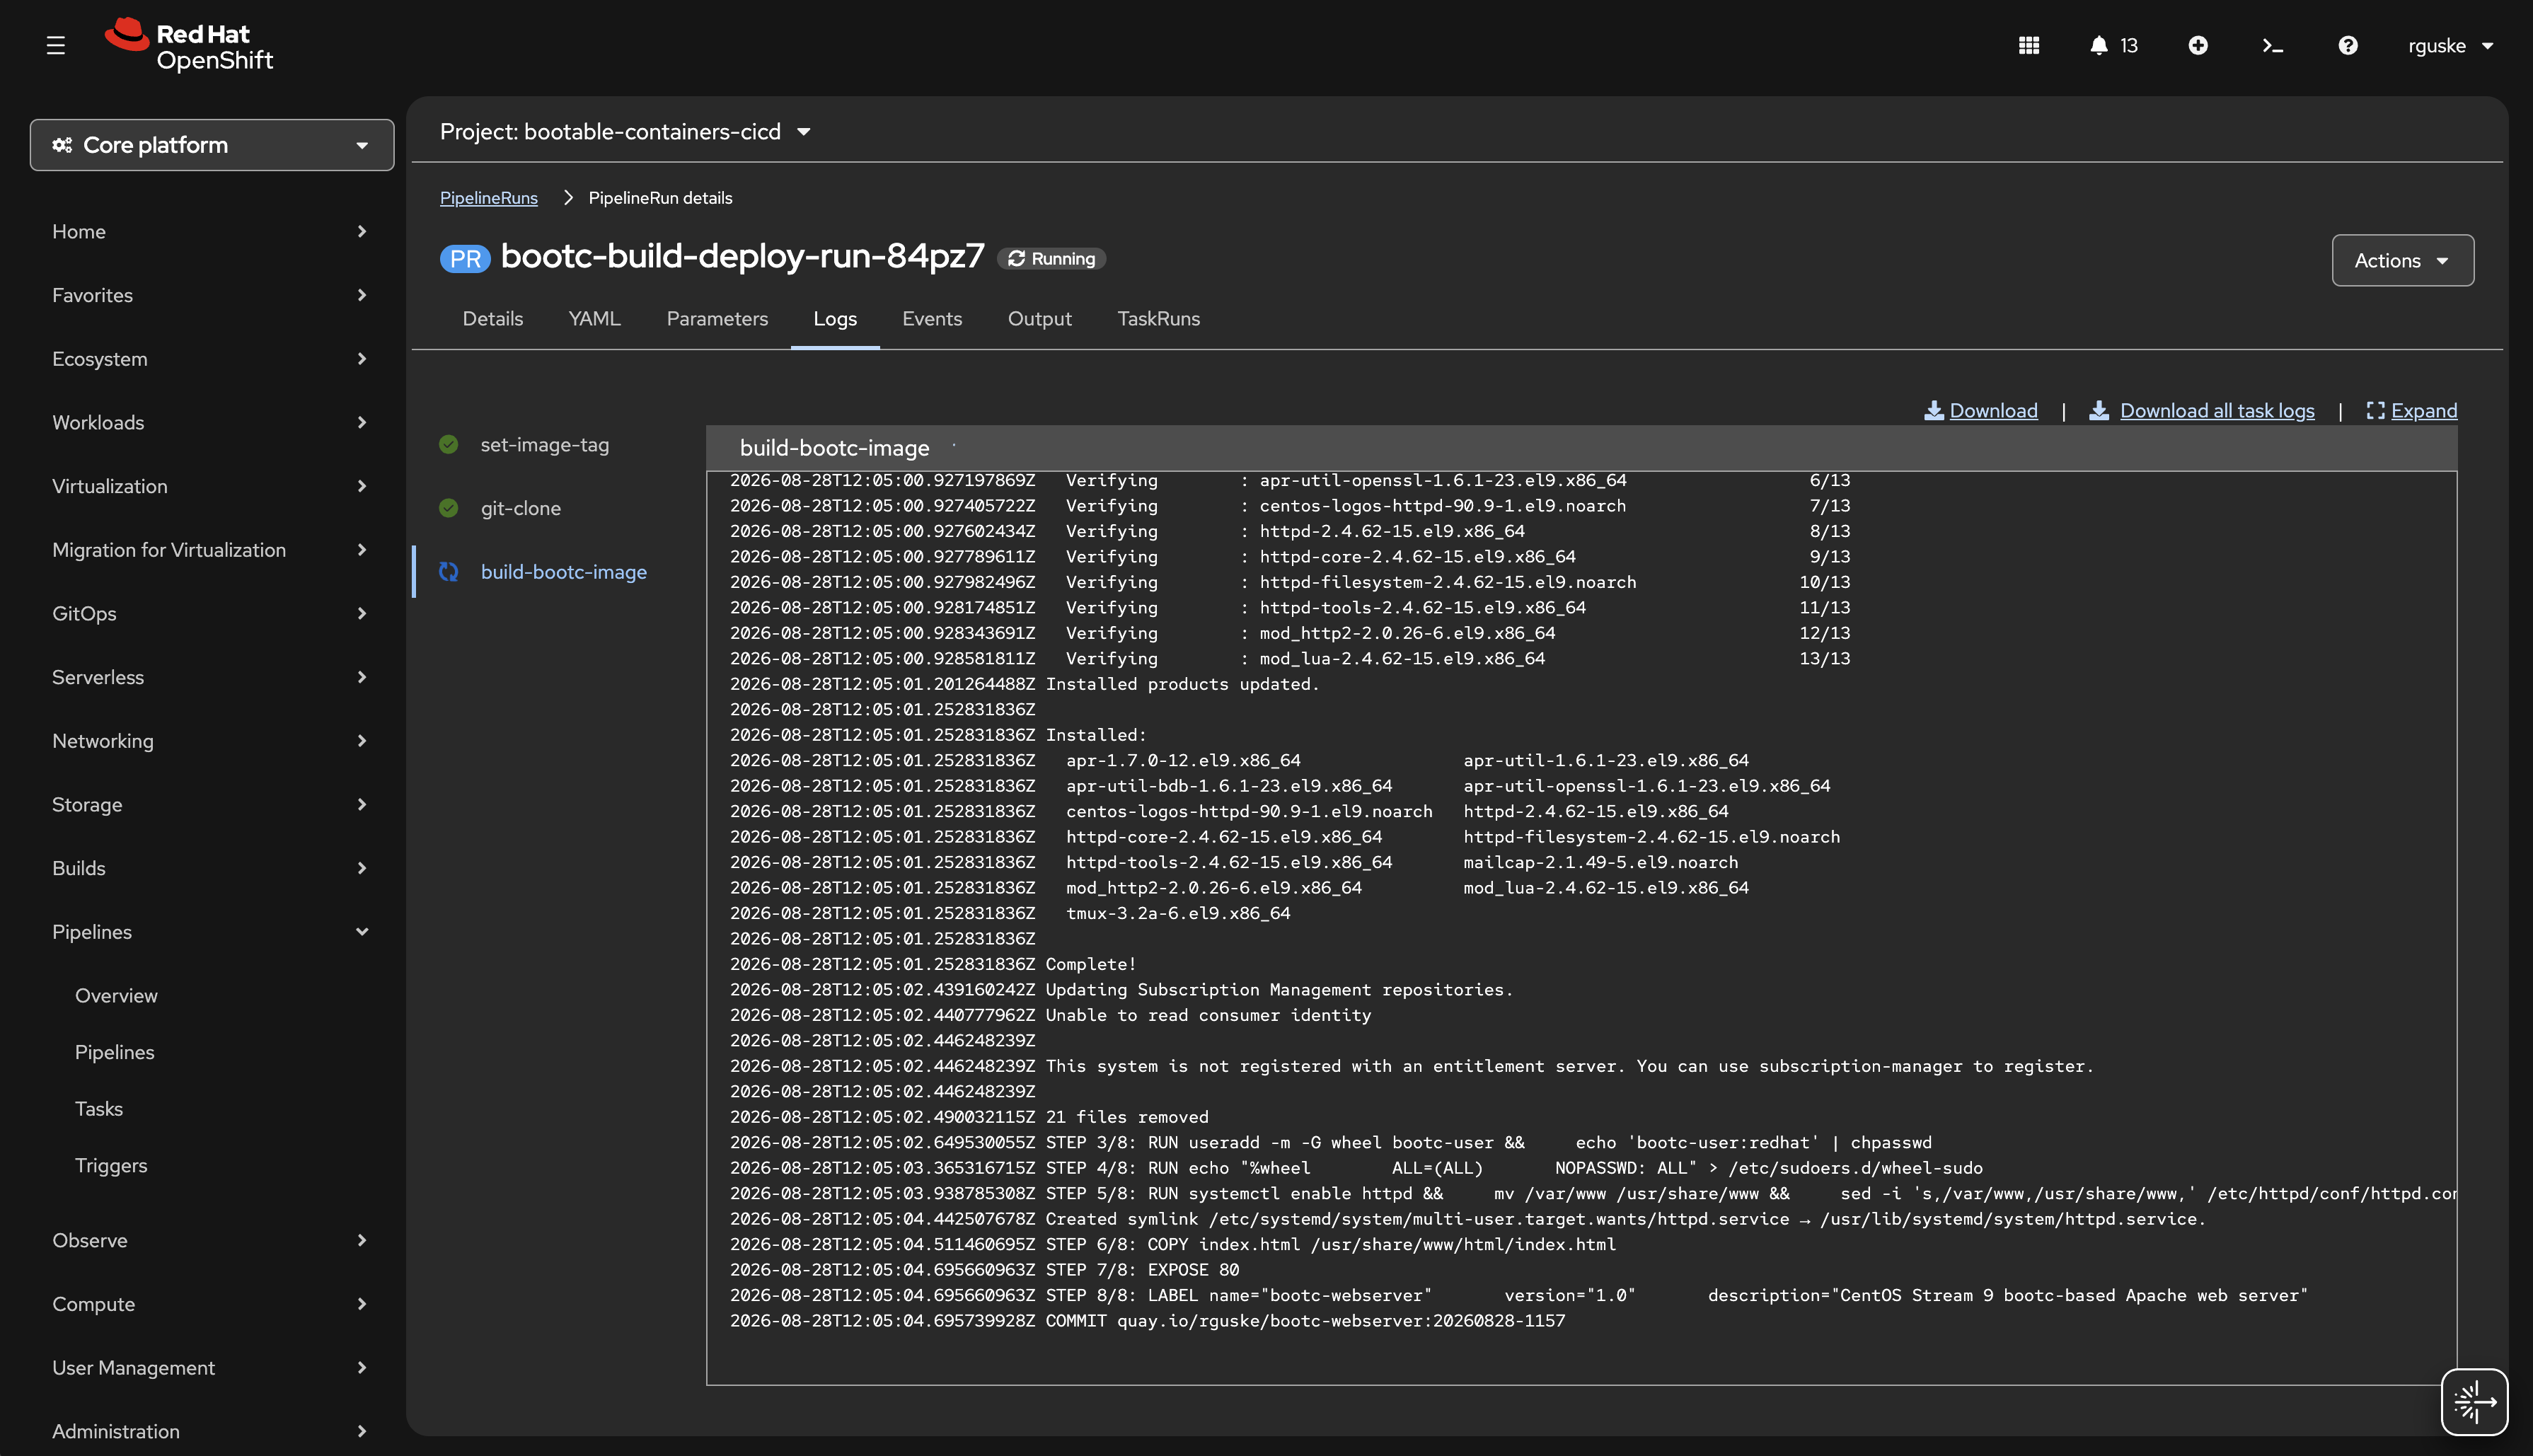
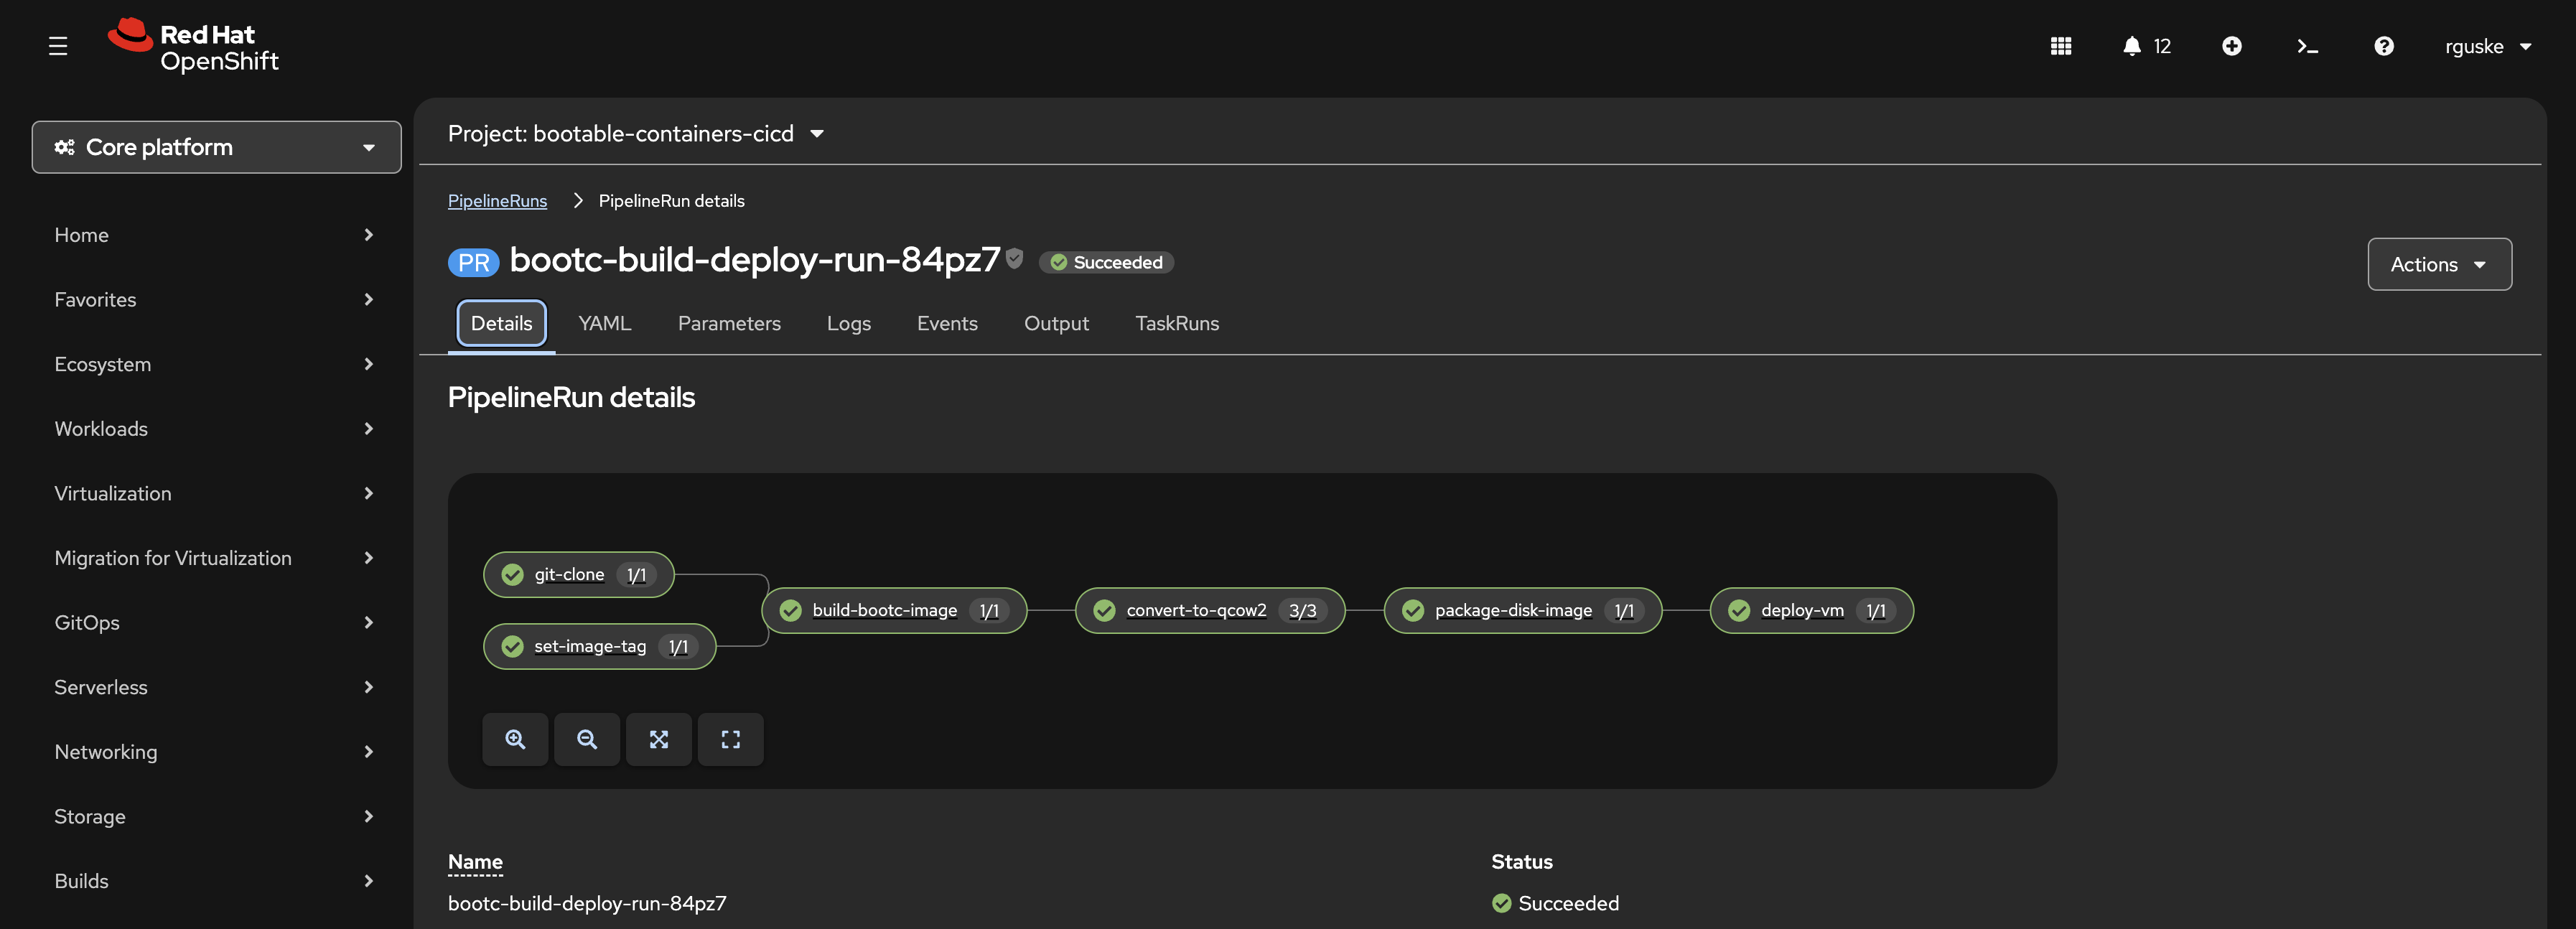
For anything more OpenShift-native or fully air-gapped, Tekton pipelines running inside the cluster are the better fit. This one needs the OpenShift Pipelines operator installed and each of its five tasks (git-clone, build-bootc-image, convert-to-qcow2, package-disk-image, deploy-vm) mirrors a step from the manual walkthrough above.
GitOps with ArgoCD
And finally, the declarative option. A single ArgoCD Application pointed at the same openshift-virtualization/ manifests, deliberately synced into its own namespace so it doesn’t fight with the manually deployed VM from earlier.
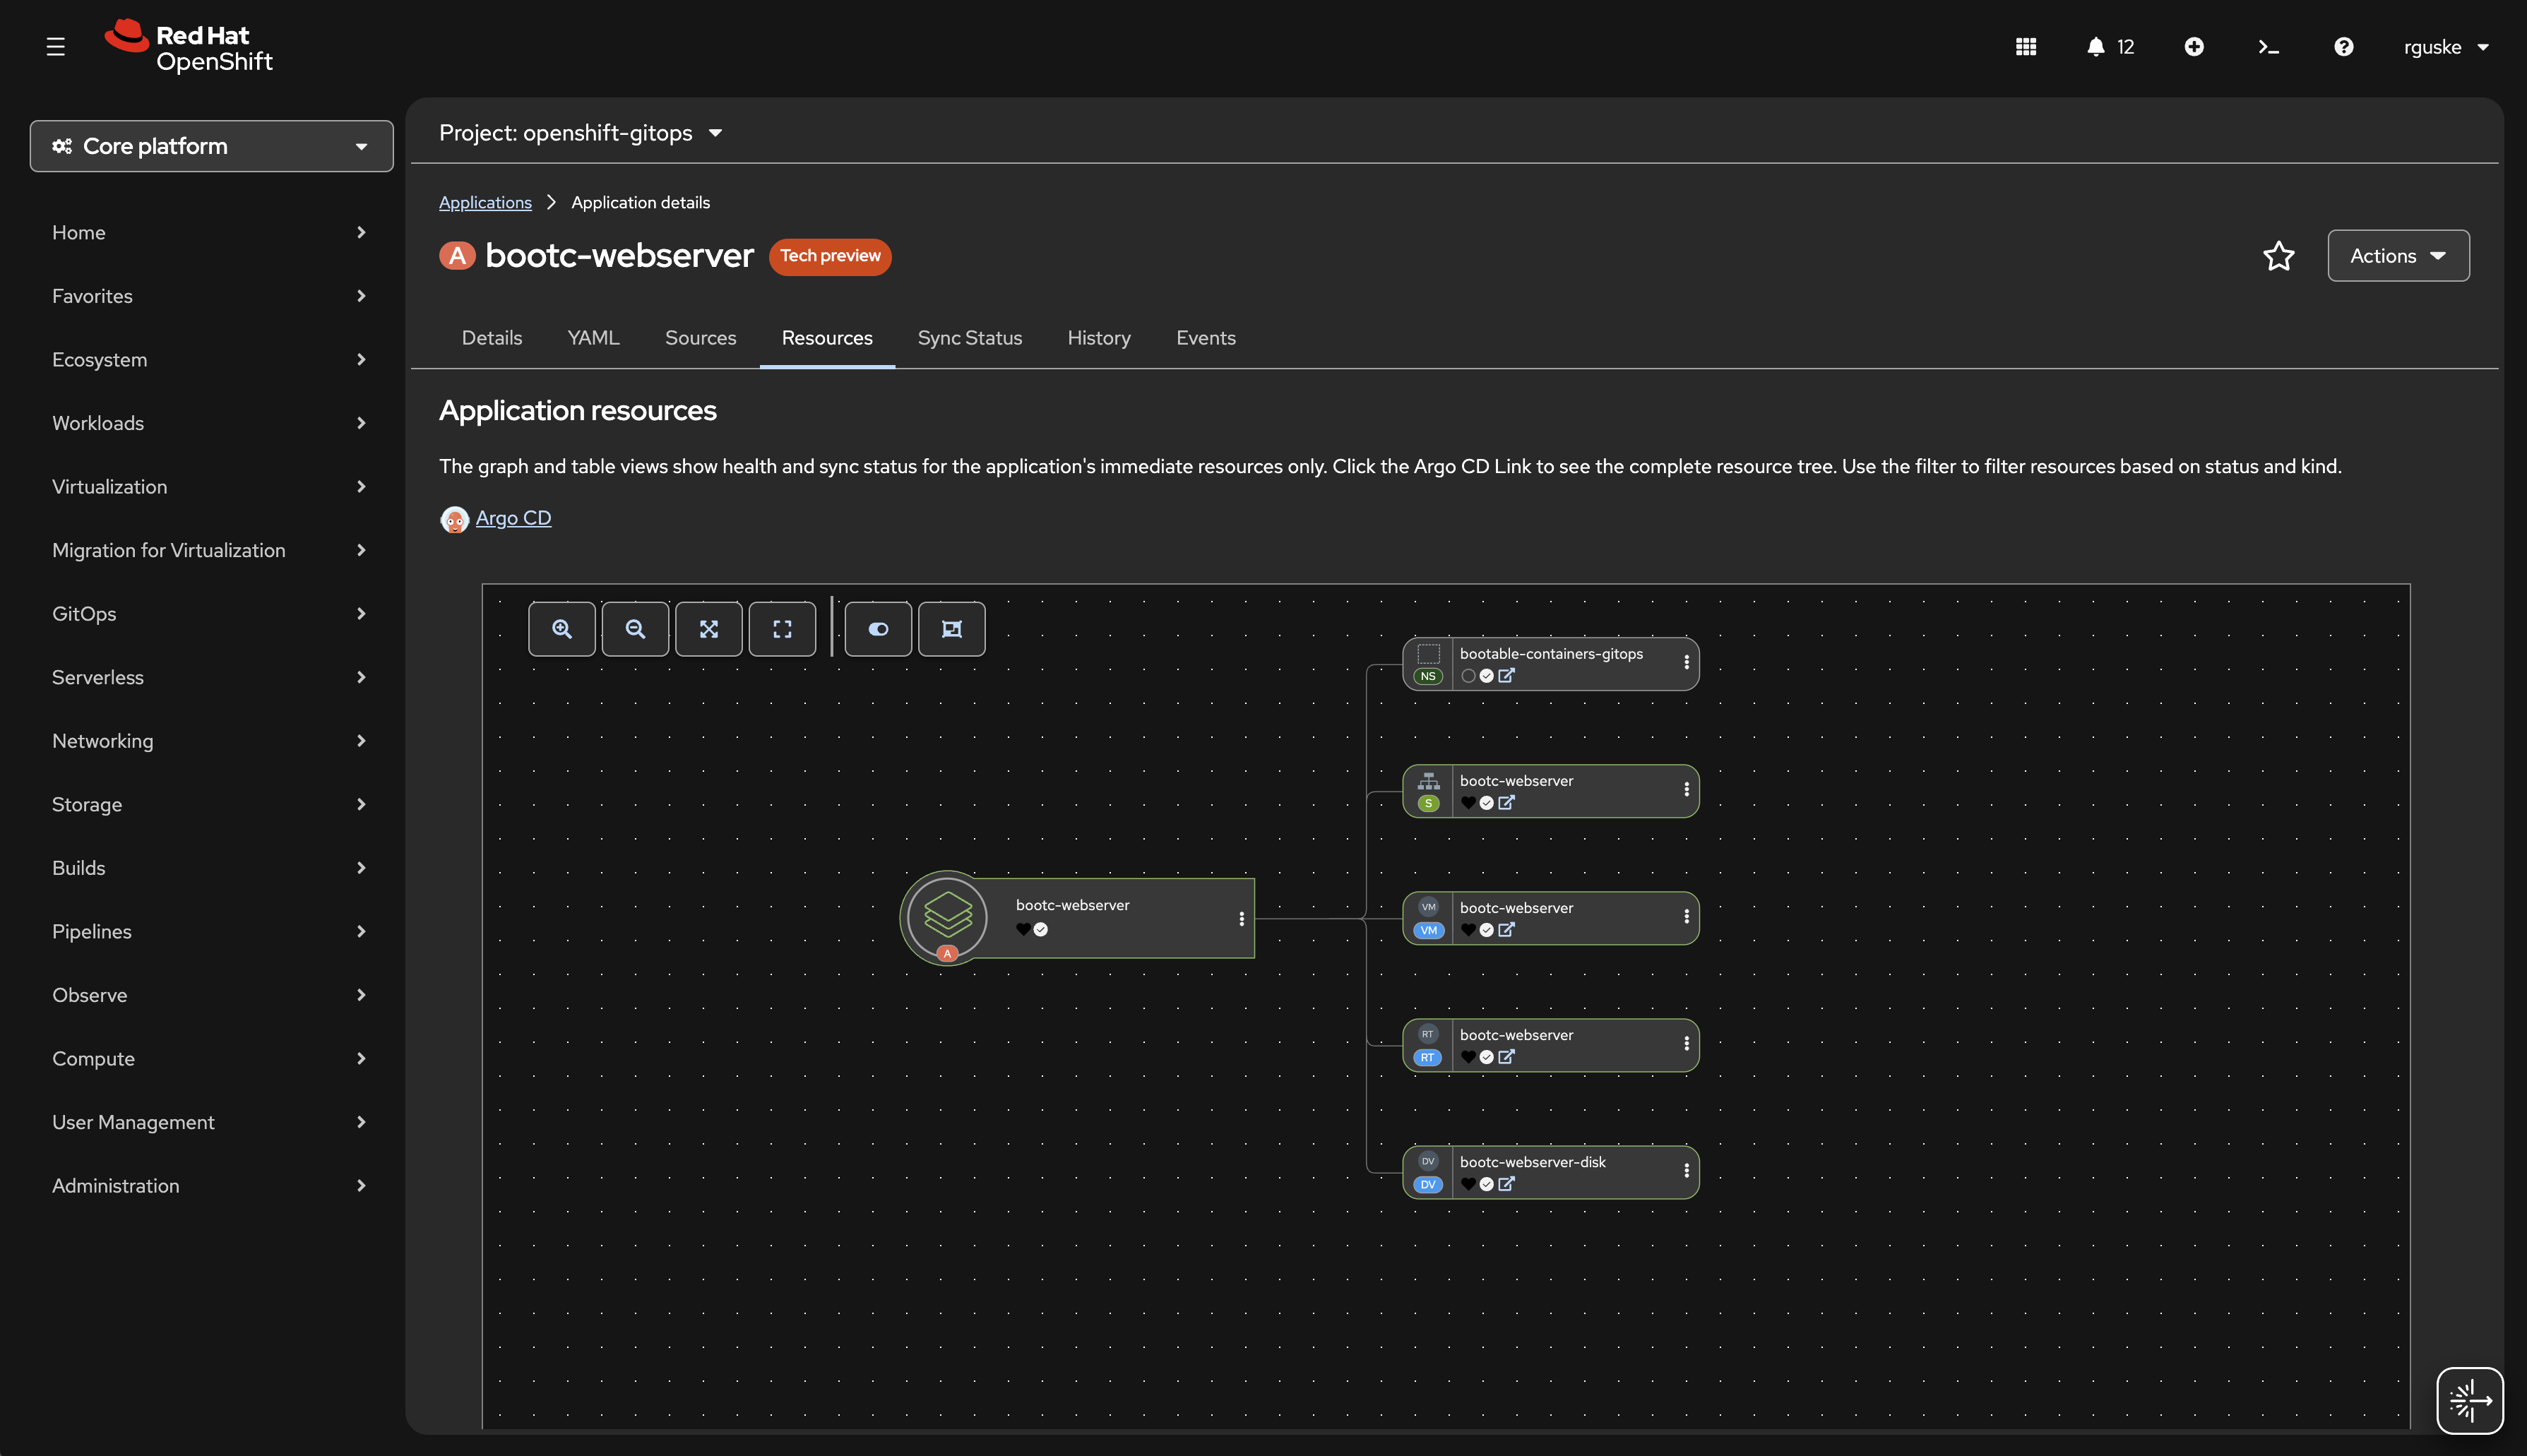
ArgoCD’s default RBAC can’t manage VirtualMachine, DataVolume, or Route objects. Without an explicit RBAC grant for the argocd-application-controller/-server ServiceAccounts, the Application just sits OutOfSync/Missing forever.
Example configuration 👉 rbac.yaml
Battle Scars
A few things I ran into while building this, in case they save you an hour or two.
bootc-image-builder via Podman Machine on macOS first. It fails, because the tool needs a bind-mount of the host’s container storage, and Podman Machine’s virtualization layer doesn’t expose that reliably. Do this step on a native Linux x86_64 box. A small VM works fine.bootc-image-builder no longer pulls images automatically. Skip the podman pull step and you’ll get a confusing image not known error instead of a helpful “please pull first” message. Always sudo podman pull <image> immediately before invoking it.Conclusion
Bootable containers collapse a distinction that’s existed for as long as I’ve worked with Operating Systems. “The app” and “the OS it runs on” used to need completely different tooling, different update mechanisms, and different mental models. With bootc, they’re the same Containerfile, the same registry, the same podman build, and my favorite part, the same instant, atomic rollback you already rely on for application containers.
References
- Image Mode for RHEL - Red Hat Docs
- bootc Project on
- bootc-image-builder on
- CentOS bootc Images
- Image Mode Overview - Red Hat Developer
- Deploy Image Mode RHEL to OpenShift Virtualization
- rhel-bootc-examples (Red Hat CoP)
- bootc-org/examples
- Fedora bootc Documentation
Thanks for reading.