Deploying Tanzu Packages using Tanzu Mission Control Catalog

The Challenge
Just providing a Kubernetes cluster to an application team is in most cases half of the battle. It’s often necessary to provide certain capabilities for e.g. logging or for ingress to those clusters, to ultimately support a production workload. Extending Kubernetes environments with open source solutions, to support the aforementioned capabilities, should provide a decent level of simplicity in terms of deployment and lifecycle management.
A Catalog of Extensions
Tanzu Mission Control, a VMware Cloud Service (SaaS), is VMware’s multi-cloud Kubernetes management platform which provides a centralized management for consistently operating and securing Kubernetes infrastructures and modern applications through a centralized policy management across all deployed and attached Kubernetes clusters.
By deeply incorporating open source projects like e.g. Velero for backup & recovery or Sonobuoy for cluster conformance checks, just to name a few, as well as the integration in other VMware solutions like Tanzu Service Mesh or Tanzu Observability, Tanzu Mission Control already offers a rich set of features to multiple personas/teams. This set was recently extended by a another great new feature which is called Catalog.
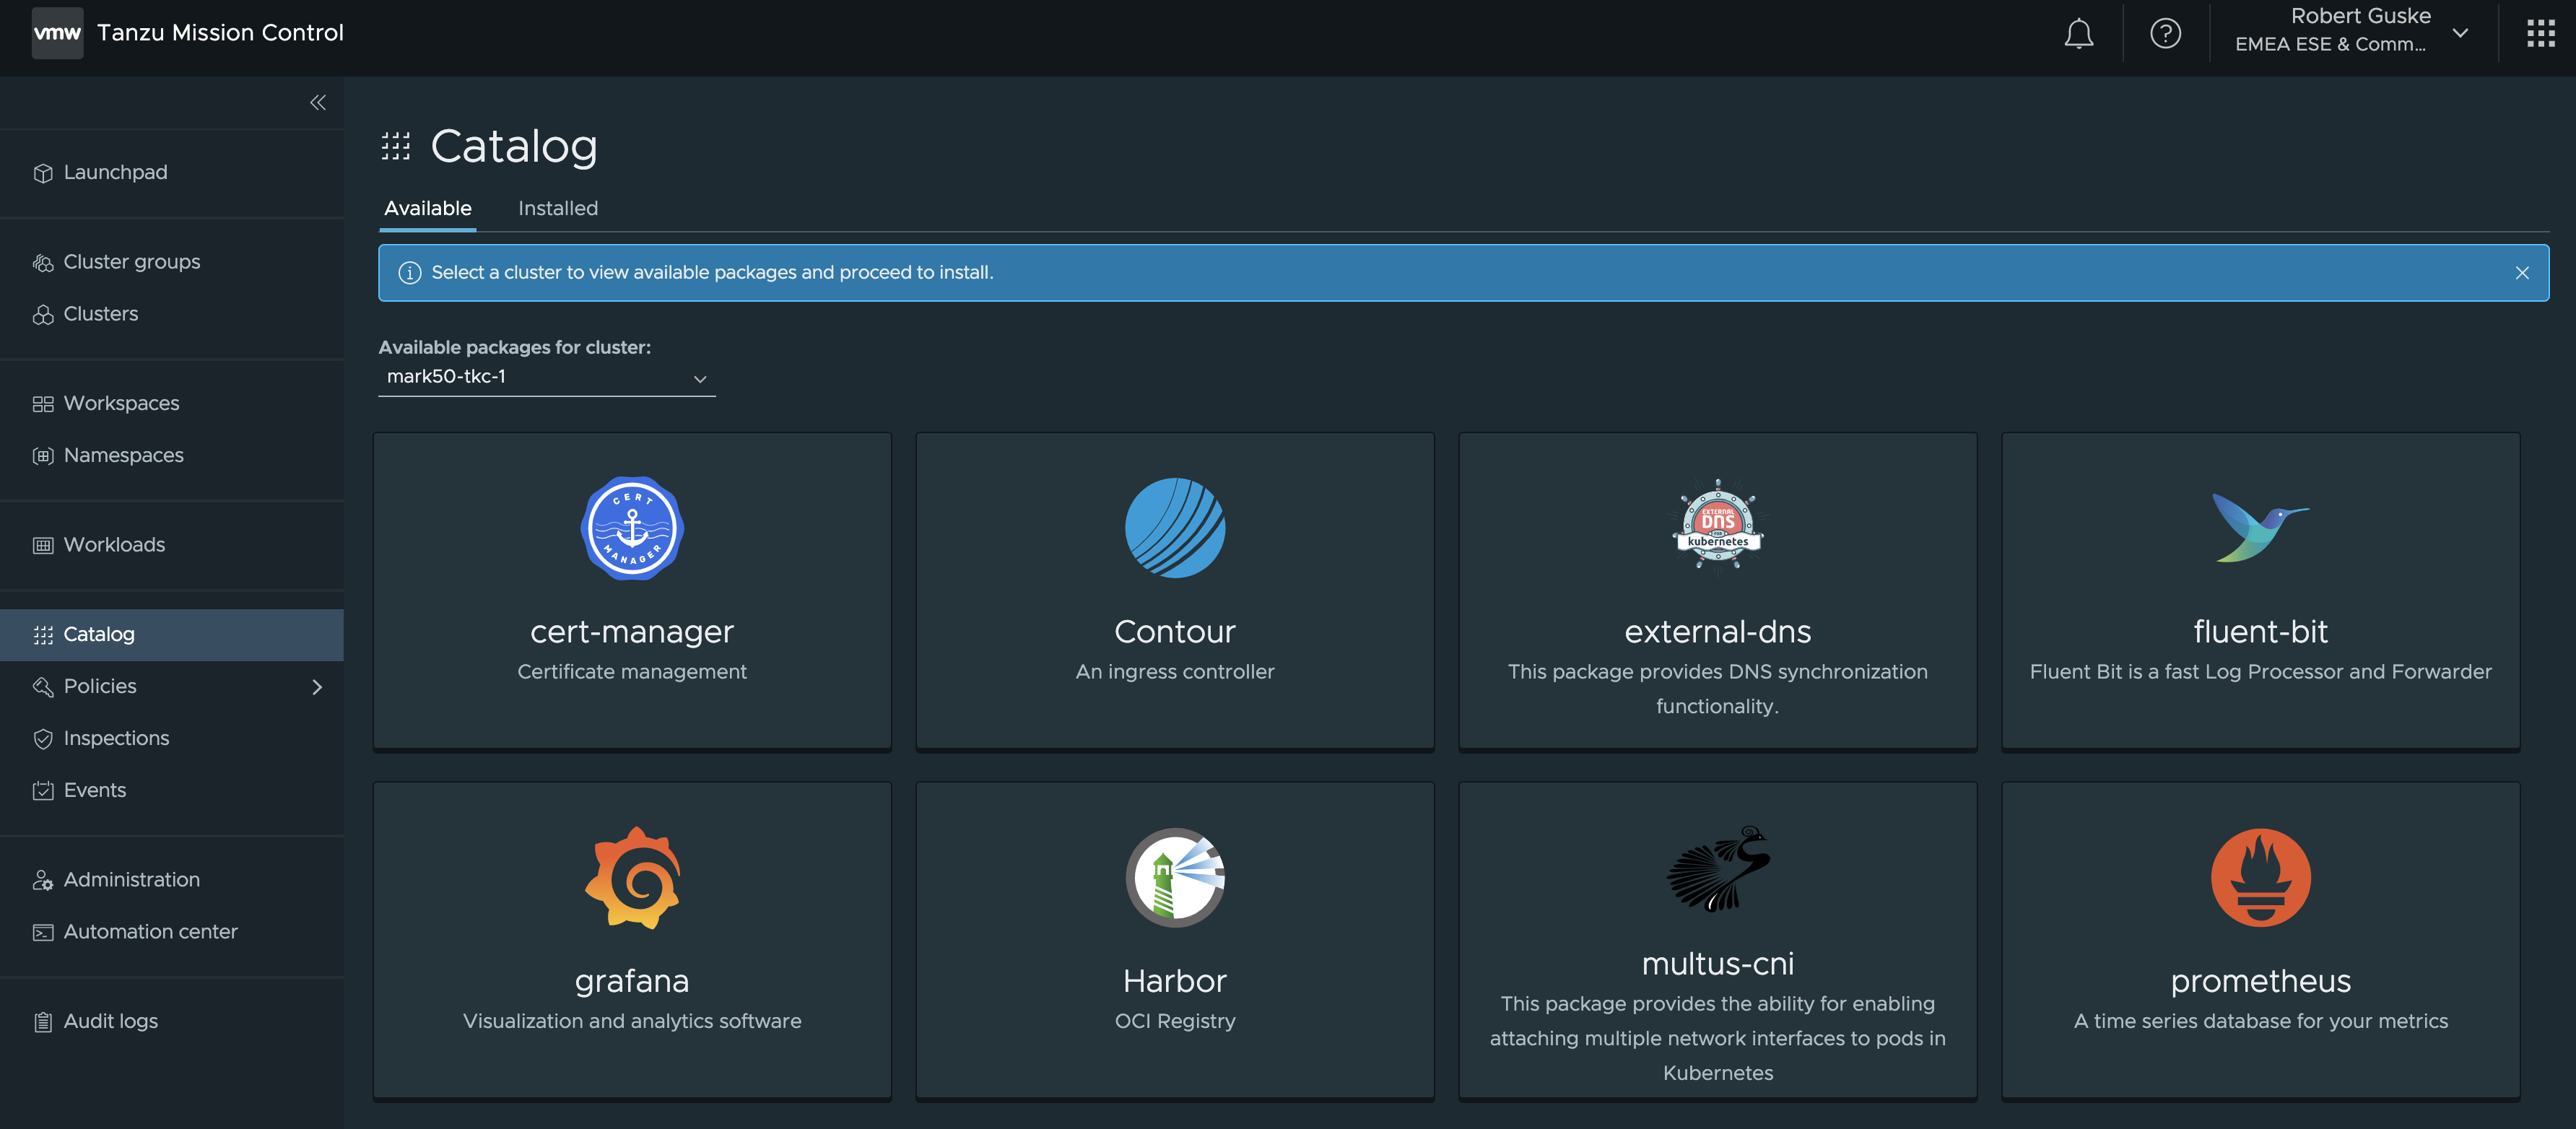
The Catalog is providing this in my introduction required simplicity. It provides a simple, easy and opinionated way to install packages with official support by VMware. The default included packages are Cert-Manager, Contour, External-DNS, Grafana, Fluent Bit, Harbor, Multus-CNI, and Prometheus. Furthermore, it provides the possibility to add your own repositories which gives you even more flexibility and extensibility.
At this point, I’d like to highlight the following post by Corey Dinkens, in which he introduced the installation of External-DNS using TMC Catalog.
👉 Automatically Manage DNS for Kubernetes with ExternalDNS and Tanzu Mission Control Catalog
Figure I shows all currently available PACKAGES.
Extensions, Solutions, PACKAGES
If you’ve read the article diligently up to here, you may noticed that I always used the terms solutions or extensions when talking about extending your Kubernetes environments. In Catalog, VMware is referring to Packages, and the reason for this is that Catalog is using Carvel behind the scenes. Project Carvel provides a comprehensive toolbox for building, templating, packaging, deploying, and day2-ing modern applications. This is a 🔥 topic and I’d recommend reading this great blog post 👉 Tanzu Packages Explained 👈 by my dear friend Alex to get to know it.
Setting the Scenes
To make use of Tanzu Mission Control and ultimately of the introduced features (across clouds!), you have to make your Kubernetes cluster available in TMC. This can be done in two ways. Creating or attaching.
Creating a cluster is only possible if you have registered a Tanzu Kubernetes Grid (TKGm) Management cluster or a vSphere with Tanzu (TKGs) Management (Supervisor) cluster in TMC.
Attaching on the other hand, can be done to any conformant Kubernetes cluster.
Keep the following table in mind before deploying Tanzu Packages using the Catalog to your Kubernetes cluster.
| Supported | Not Supported |
|---|---|
| Tanzu Kubernetes Grid Service workload clusters | Tanzu Kubernetes Grid Service Supervisor clusters |
| Tanzu Kubernetes Grid workload clusters (version 1.4 and later) | Tanzu Kubernetes Grid Management clusters |
| GKE (GCP) | Tanzu Kubernetes Grid workload clusters (version 1.3 and earlier) |
| EKS (AWS) | Tanzu Standard packages are not supported on clusters where PSP is enabled |
| AKS (Azure) | |
| Kind |
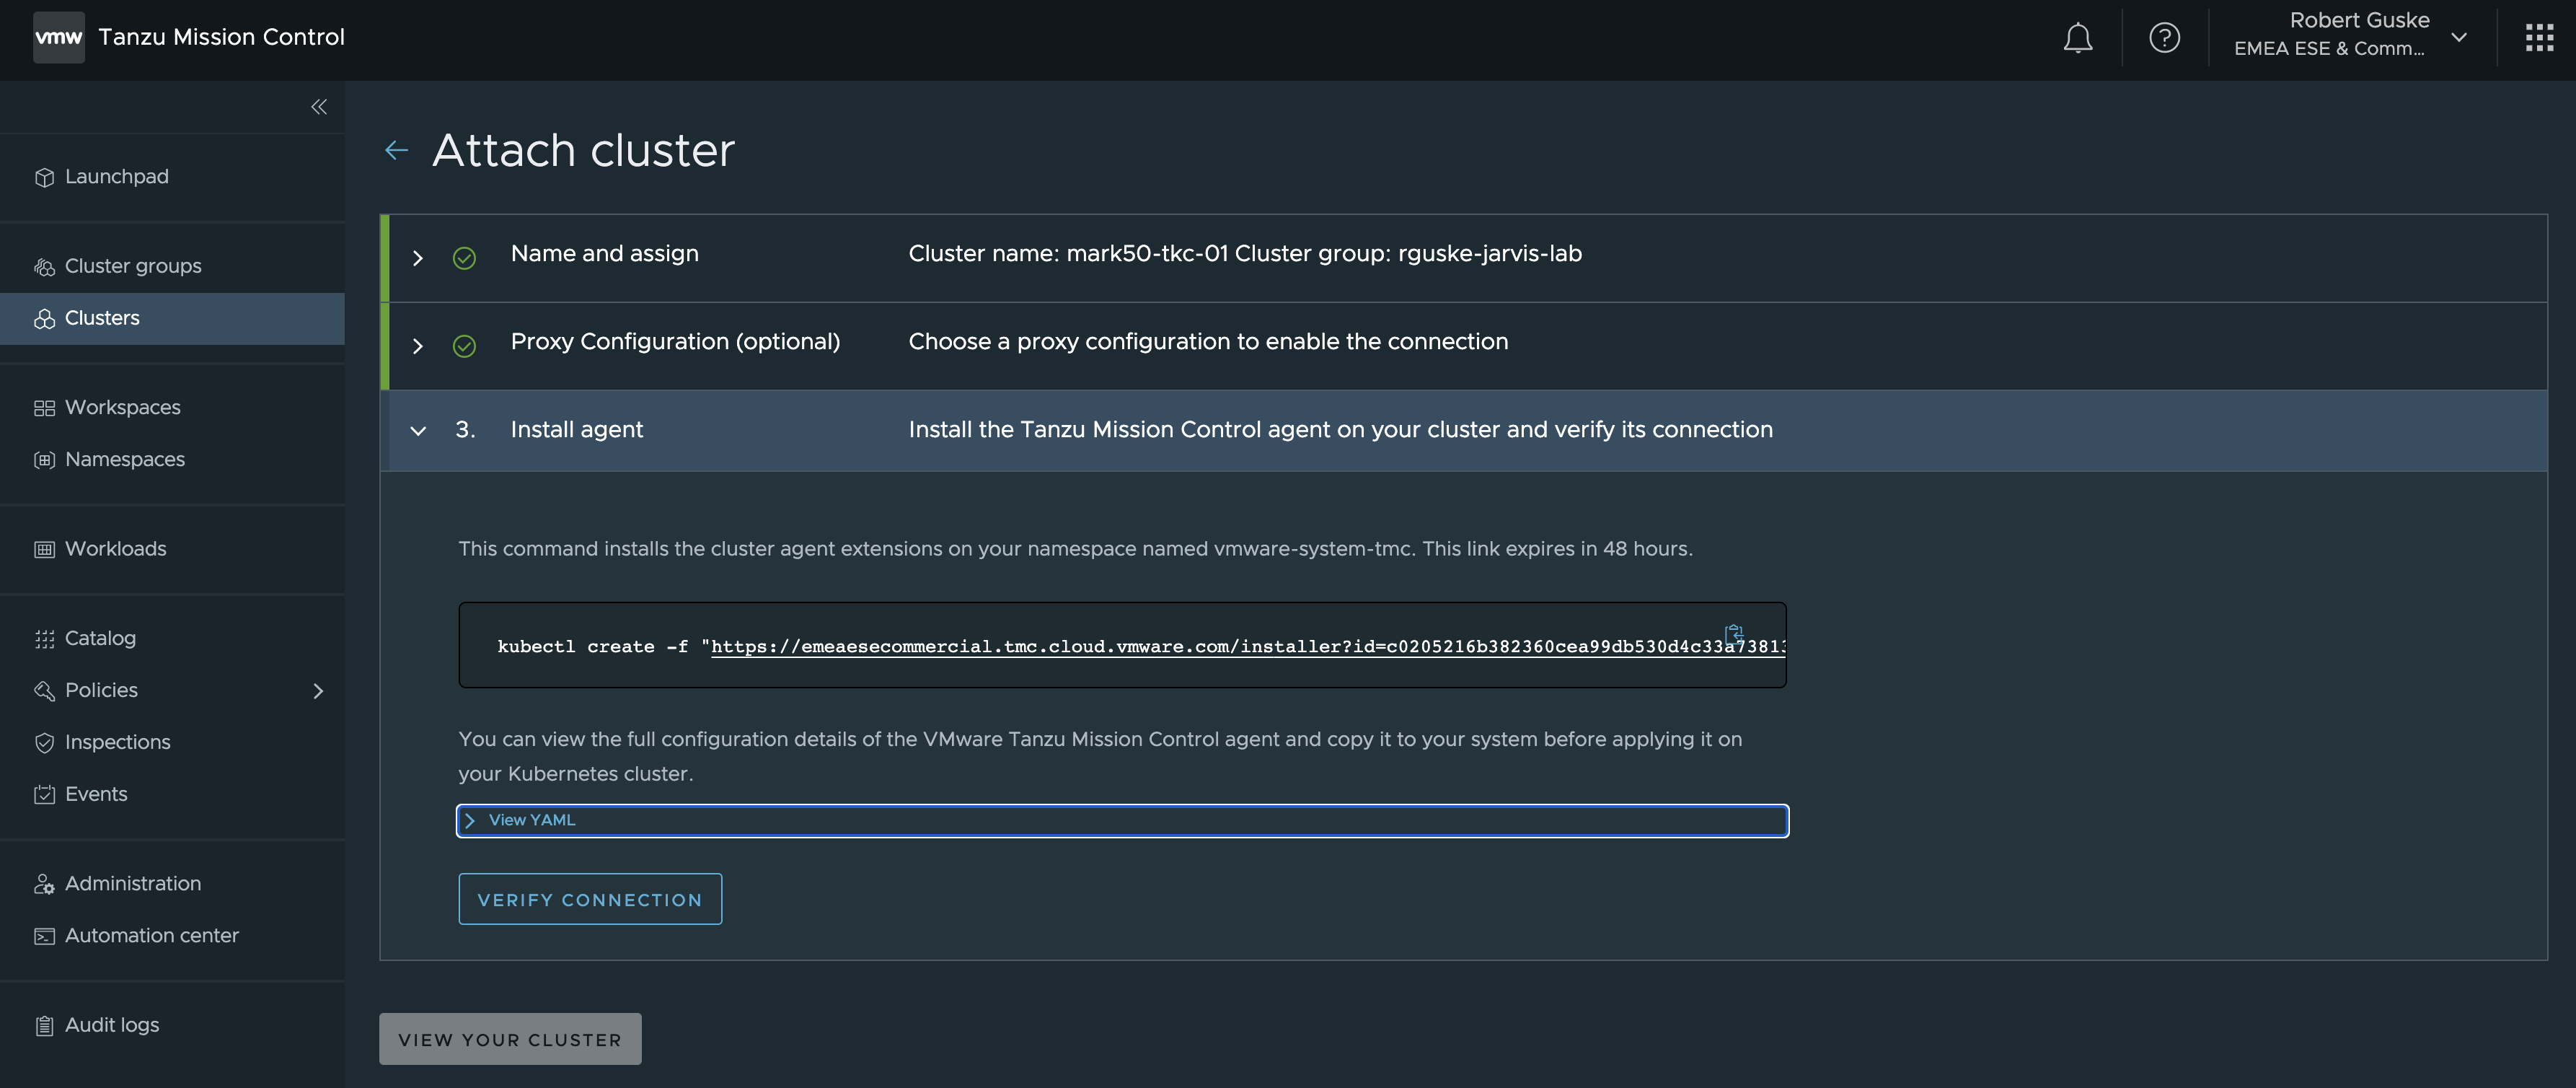
Attach a K8s Cluster to TMC - GUI
Attaching a Kubernetes cluster is made simple by e.g. using the TMC UI. On the left pane under the section clusters, select ATTACH CLUSTER and provide the requested data.
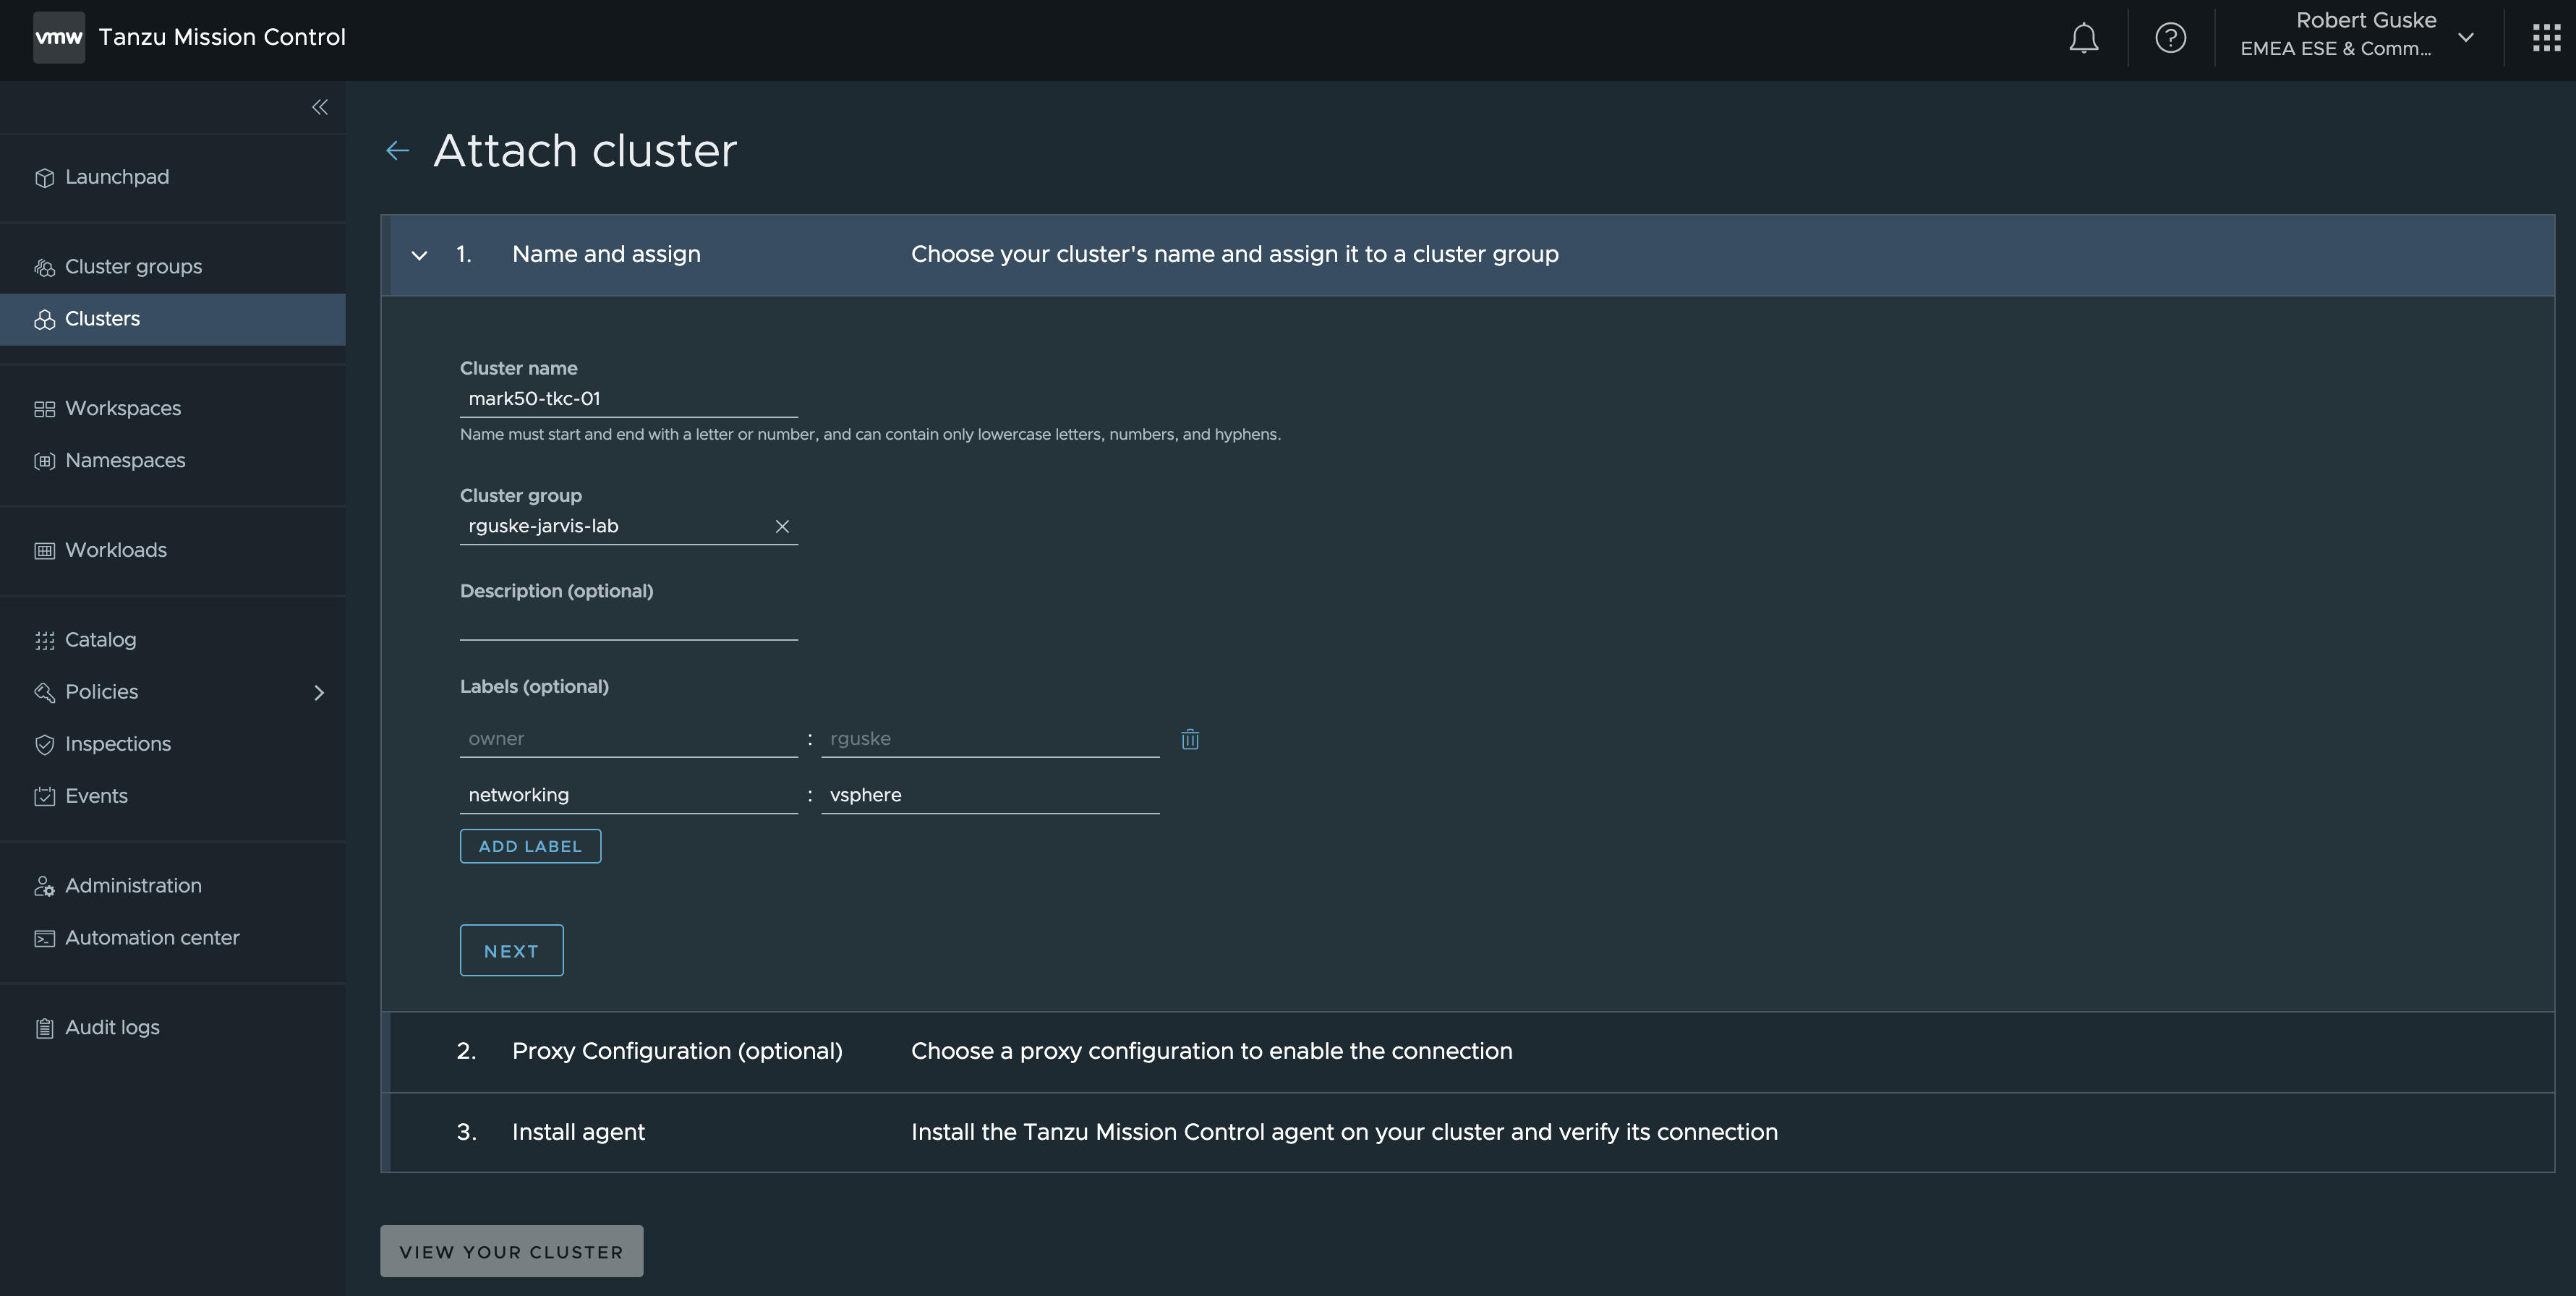
Following the steps to the end, a kubectl command is provided which can be executed directly to your Kubernetes cluster in order to attach your cluster to TMC.
Wasn’t that simple? 🙂 Now let’s do it again but this time we are going to use the TMC CLI.
Attach a K8s Cluster to TMC - CLI
The TMC CLI can be downloaded directly from the TMC portal.
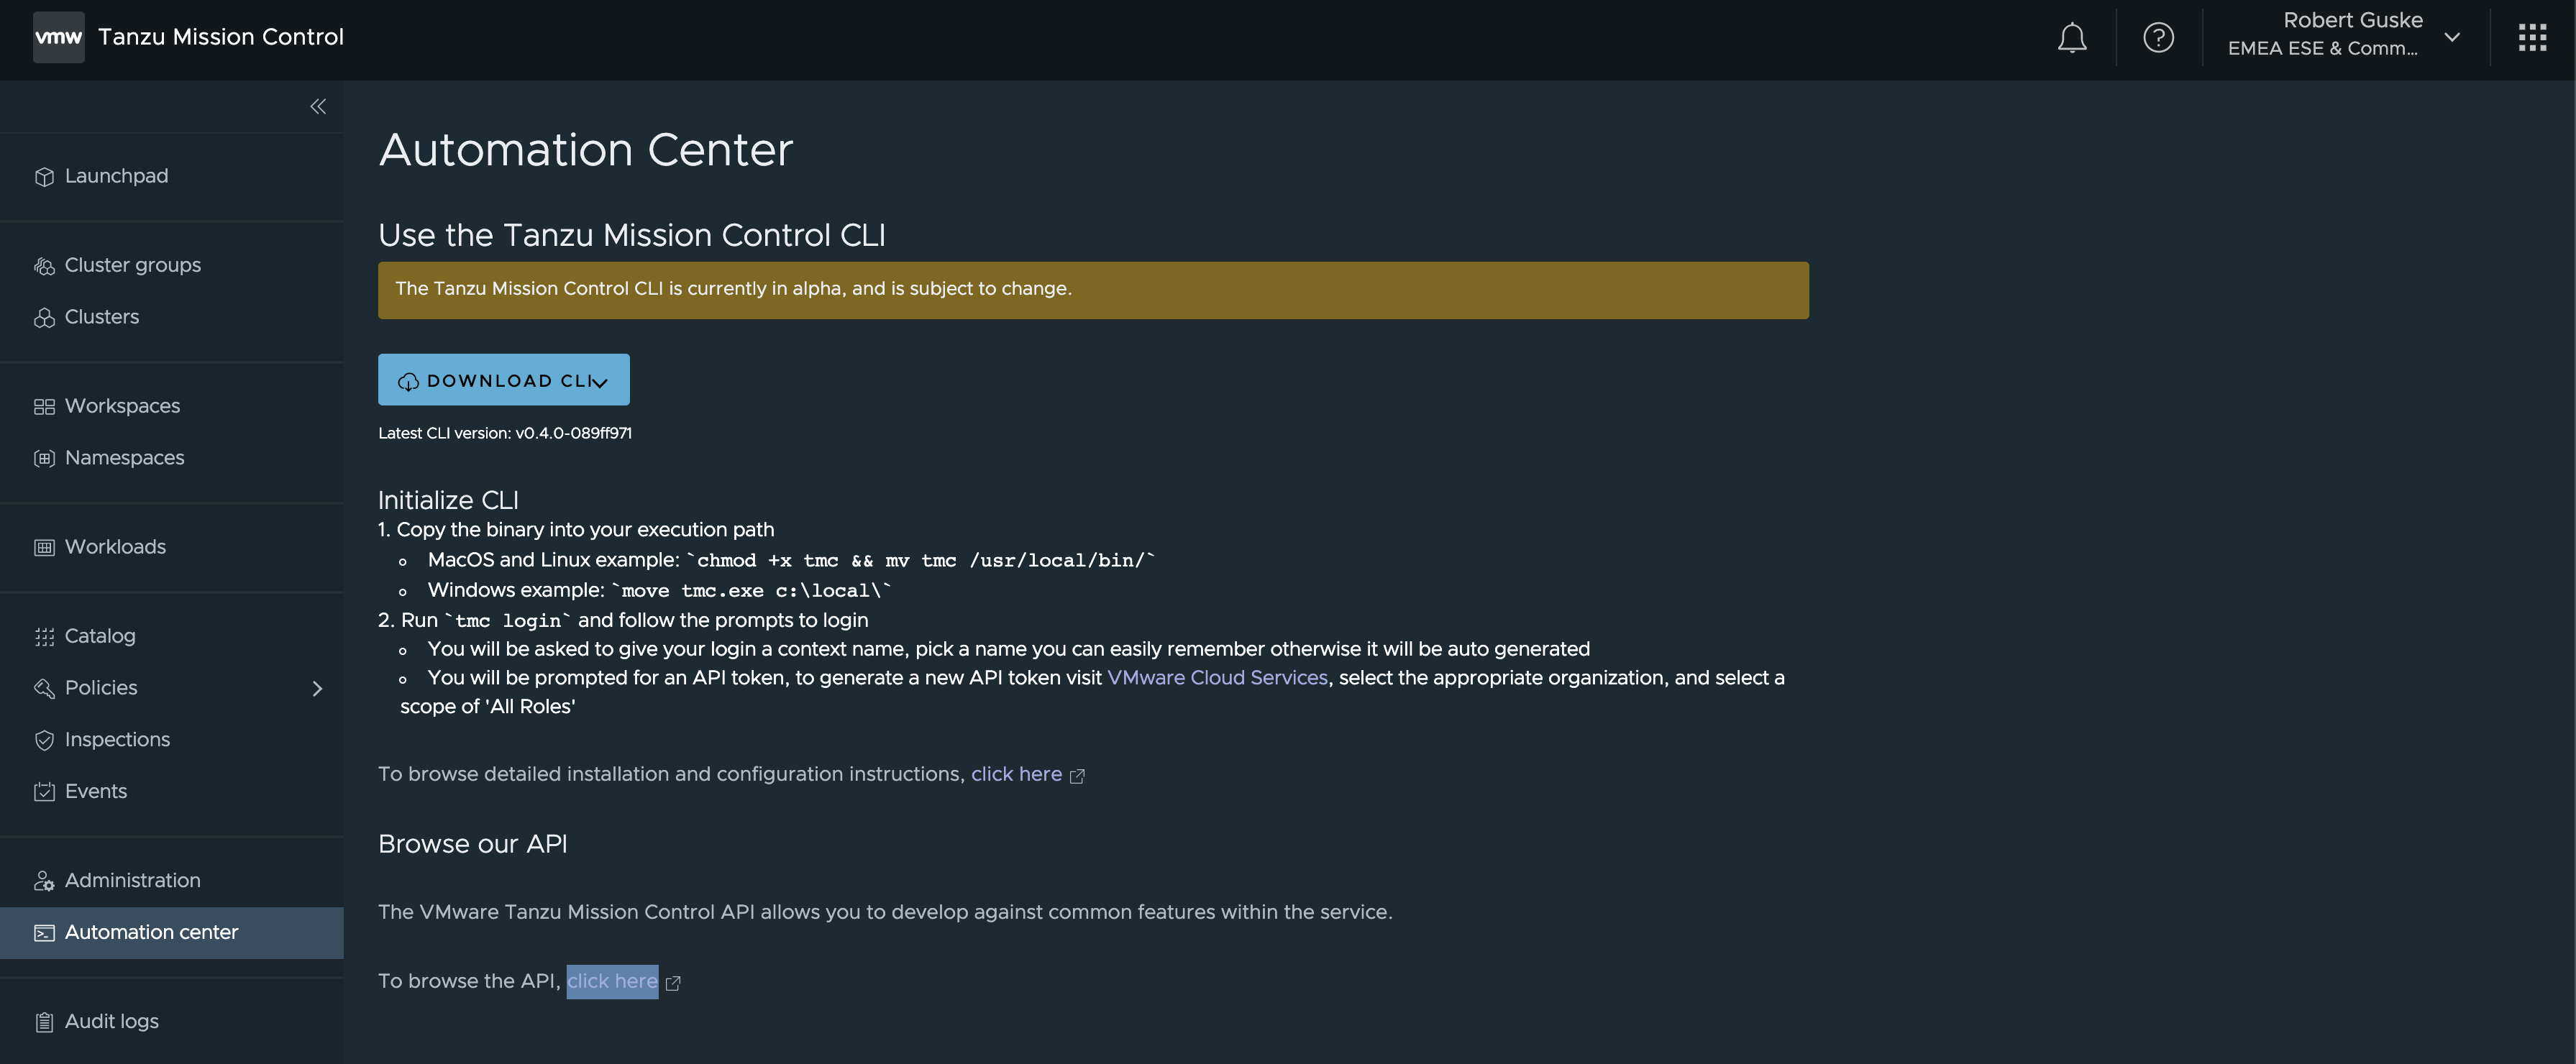
Go to Automation center and follow the provided instructions. In order to make use of the CLI you have to be a member of a VMware Cloud Services organization that has access to Tanzu Mission Control.
Attaching a cluster requires that you are associated with the clustergroup.edit role on the cluster group in which you want to attach the cluster.
The TMC CLI is currently in v1alpha1 version available but it already provides a bunch of resources with which we can interact with.
tmc --help
____  _ ____
 | |\/| |___

Usage:
  tmc [resource|action|helper] [flags]

Resources:
  account           Account management
  audit             Run an audit request on an org
  cluster           A Kubernetes Cluster.
  clustergroup      A group of Kubernetes clusters.
  dataprotection    Backup, restore, or migrate cluster data.
  integration       Get available integrations and their information from registry.
  managementcluster A management cluster maintains the connection between a Tanzu Kubernetes Grid instance and the platform.
  organization      Organization level management.
  workspace         A group of managed Kubernetes namespaces.

Actions:
  login             Login to Tanzu Mission Control.
  update            Update the CLI to the latest version.

Policies:
  iam               Permission management for resources.
  policy            Policy management for resources.

Helpers:
  completion        Generate completion scripts.
  configure         Configure the current context environment
  system            System level configuration and resources.
version Print CLI version.tmc completion bash or zsh and add the script to your shell profile.Start with tmc login and follow the prompts. You will be asked for an API token which you have to generate via the VMware Cloud Services portal.
tmc login
If you don't have an API token, visit the VMware Cloud Services console, select your organization, and create an API token with the TMC service roles:
  https://console.cloud.vmware.com/csp/gateway/portal/#/user/tokens
API TokenIn case your client is behind a proxy server, you have to add the following URL to your proxy allowlist.
console.cloud.vmware.com
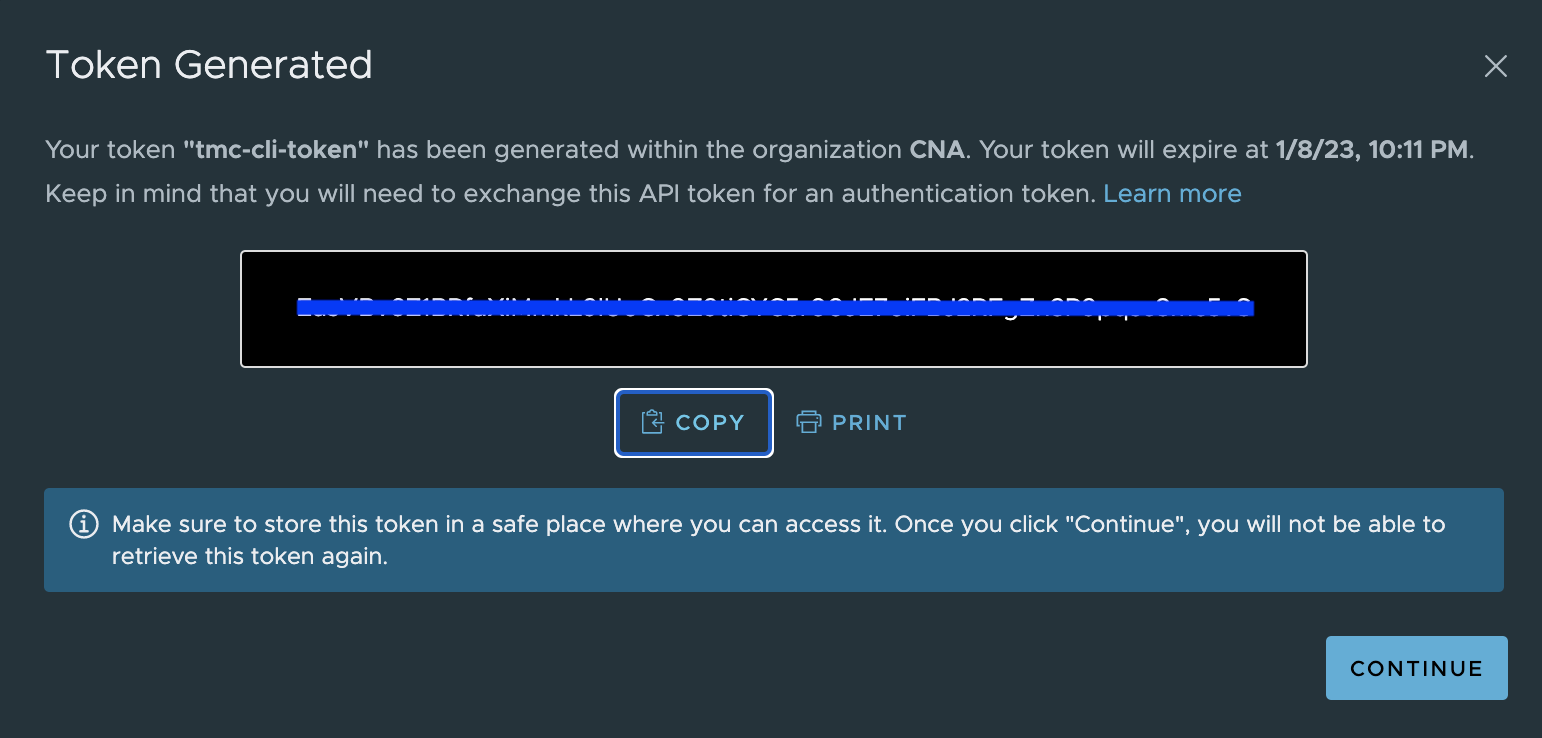
Select the appropriate organization, and select a scope of All Roles. GENERATE token.
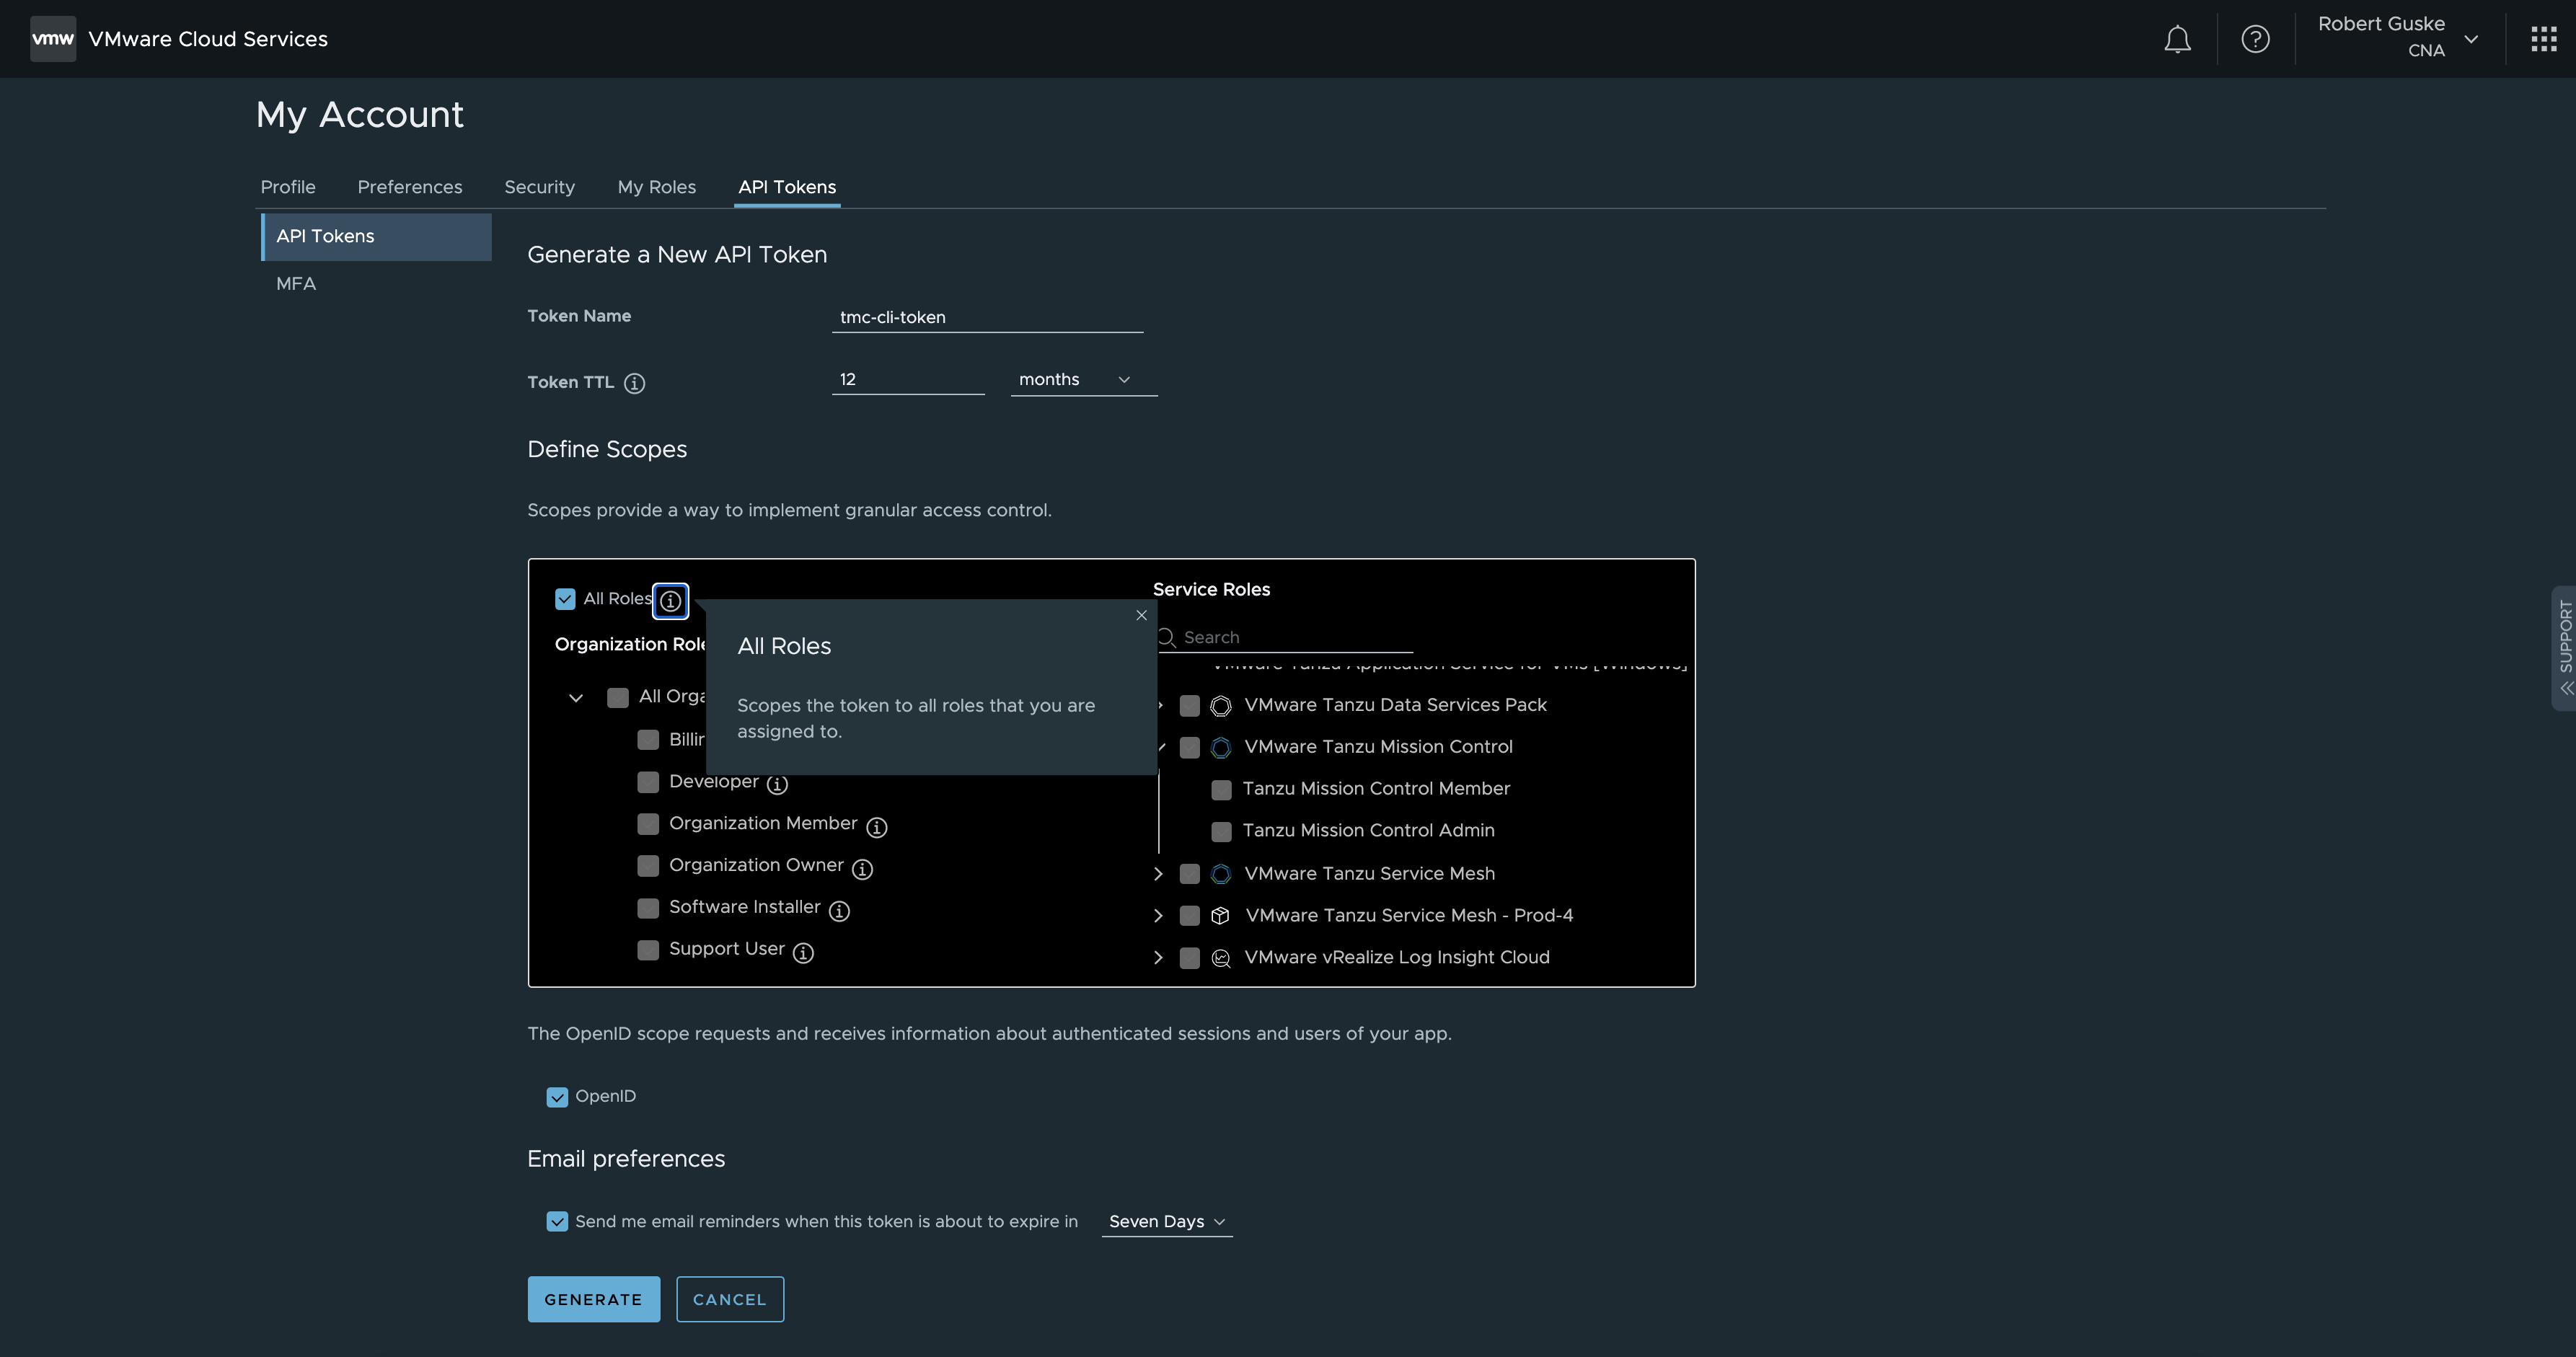
Copy the token and paste it when you were prompted for.
tmc login
i If you don't have an API token, visit the VMware Cloud Services console, select your organization, and create an API token with the TMC service roles:
  https://console.cloud.vmware.com/csp/gateway/portal/#/user/tokens
? API Token ****************************************************************

[...]
After providing the requested API token, you have to give your login a context name. Choose a name you can easily remember! Otherwise, a random context name will be auto generated.
[...]

? Login context name rguske-jarvis-lab
? Select default log level warning
? Management Cluster Name rguske-mgmt-mark50
? Provisioner Name mark50-ns-1
√ Successfully created context rguske-jarvis-lab, to manage your contexts run `tmc system context -h`
Now, let’s attach our first cluster to TMC/to our cluster group. For my purposes, I’m using a Tanzu Kubernetes cluster (TKC) which I’ve deployed in a declaritive way on vSphere (vSphere with Tanzu). If you are using a TKC as well, make sure you are logged in.
k vsphere login --insecure-skip-tls-verify --vsphere-username administrator@mark50.lab --server=mark50.jarvis.tanzu --tanzu-kubernetes-cluster-name mark50-tkc-1 --tanzu-kubernetes-cluster-namespace mark50-ns-1

KUBECTL_VSPHERE_PASSWORD environment variable is not set. Please enter the password below
Password:
Logged in successfully.

You have access to the following contexts:
   mark50-ns-1
   mark50-tkc-1
   mark50.jarvis.tanzu

If the context you wish to use is not in this list, you may need to try
logging in again later, or contact your cluster administrator.

To change context, use `kubectl config use-context <workload name>`
Attaching the cluster of your choice can be done by executing the command like this: tmc cluster attach -n mark50-tkc-1 -g rguske-jarvis-lab -l owner=rguske -l networking=vsphere -k ~/.kube/config
Hint: There are many good reasons to use labels and therefore I added two of them (-l owner=rguske -l networking=vsphere) to my cluster.
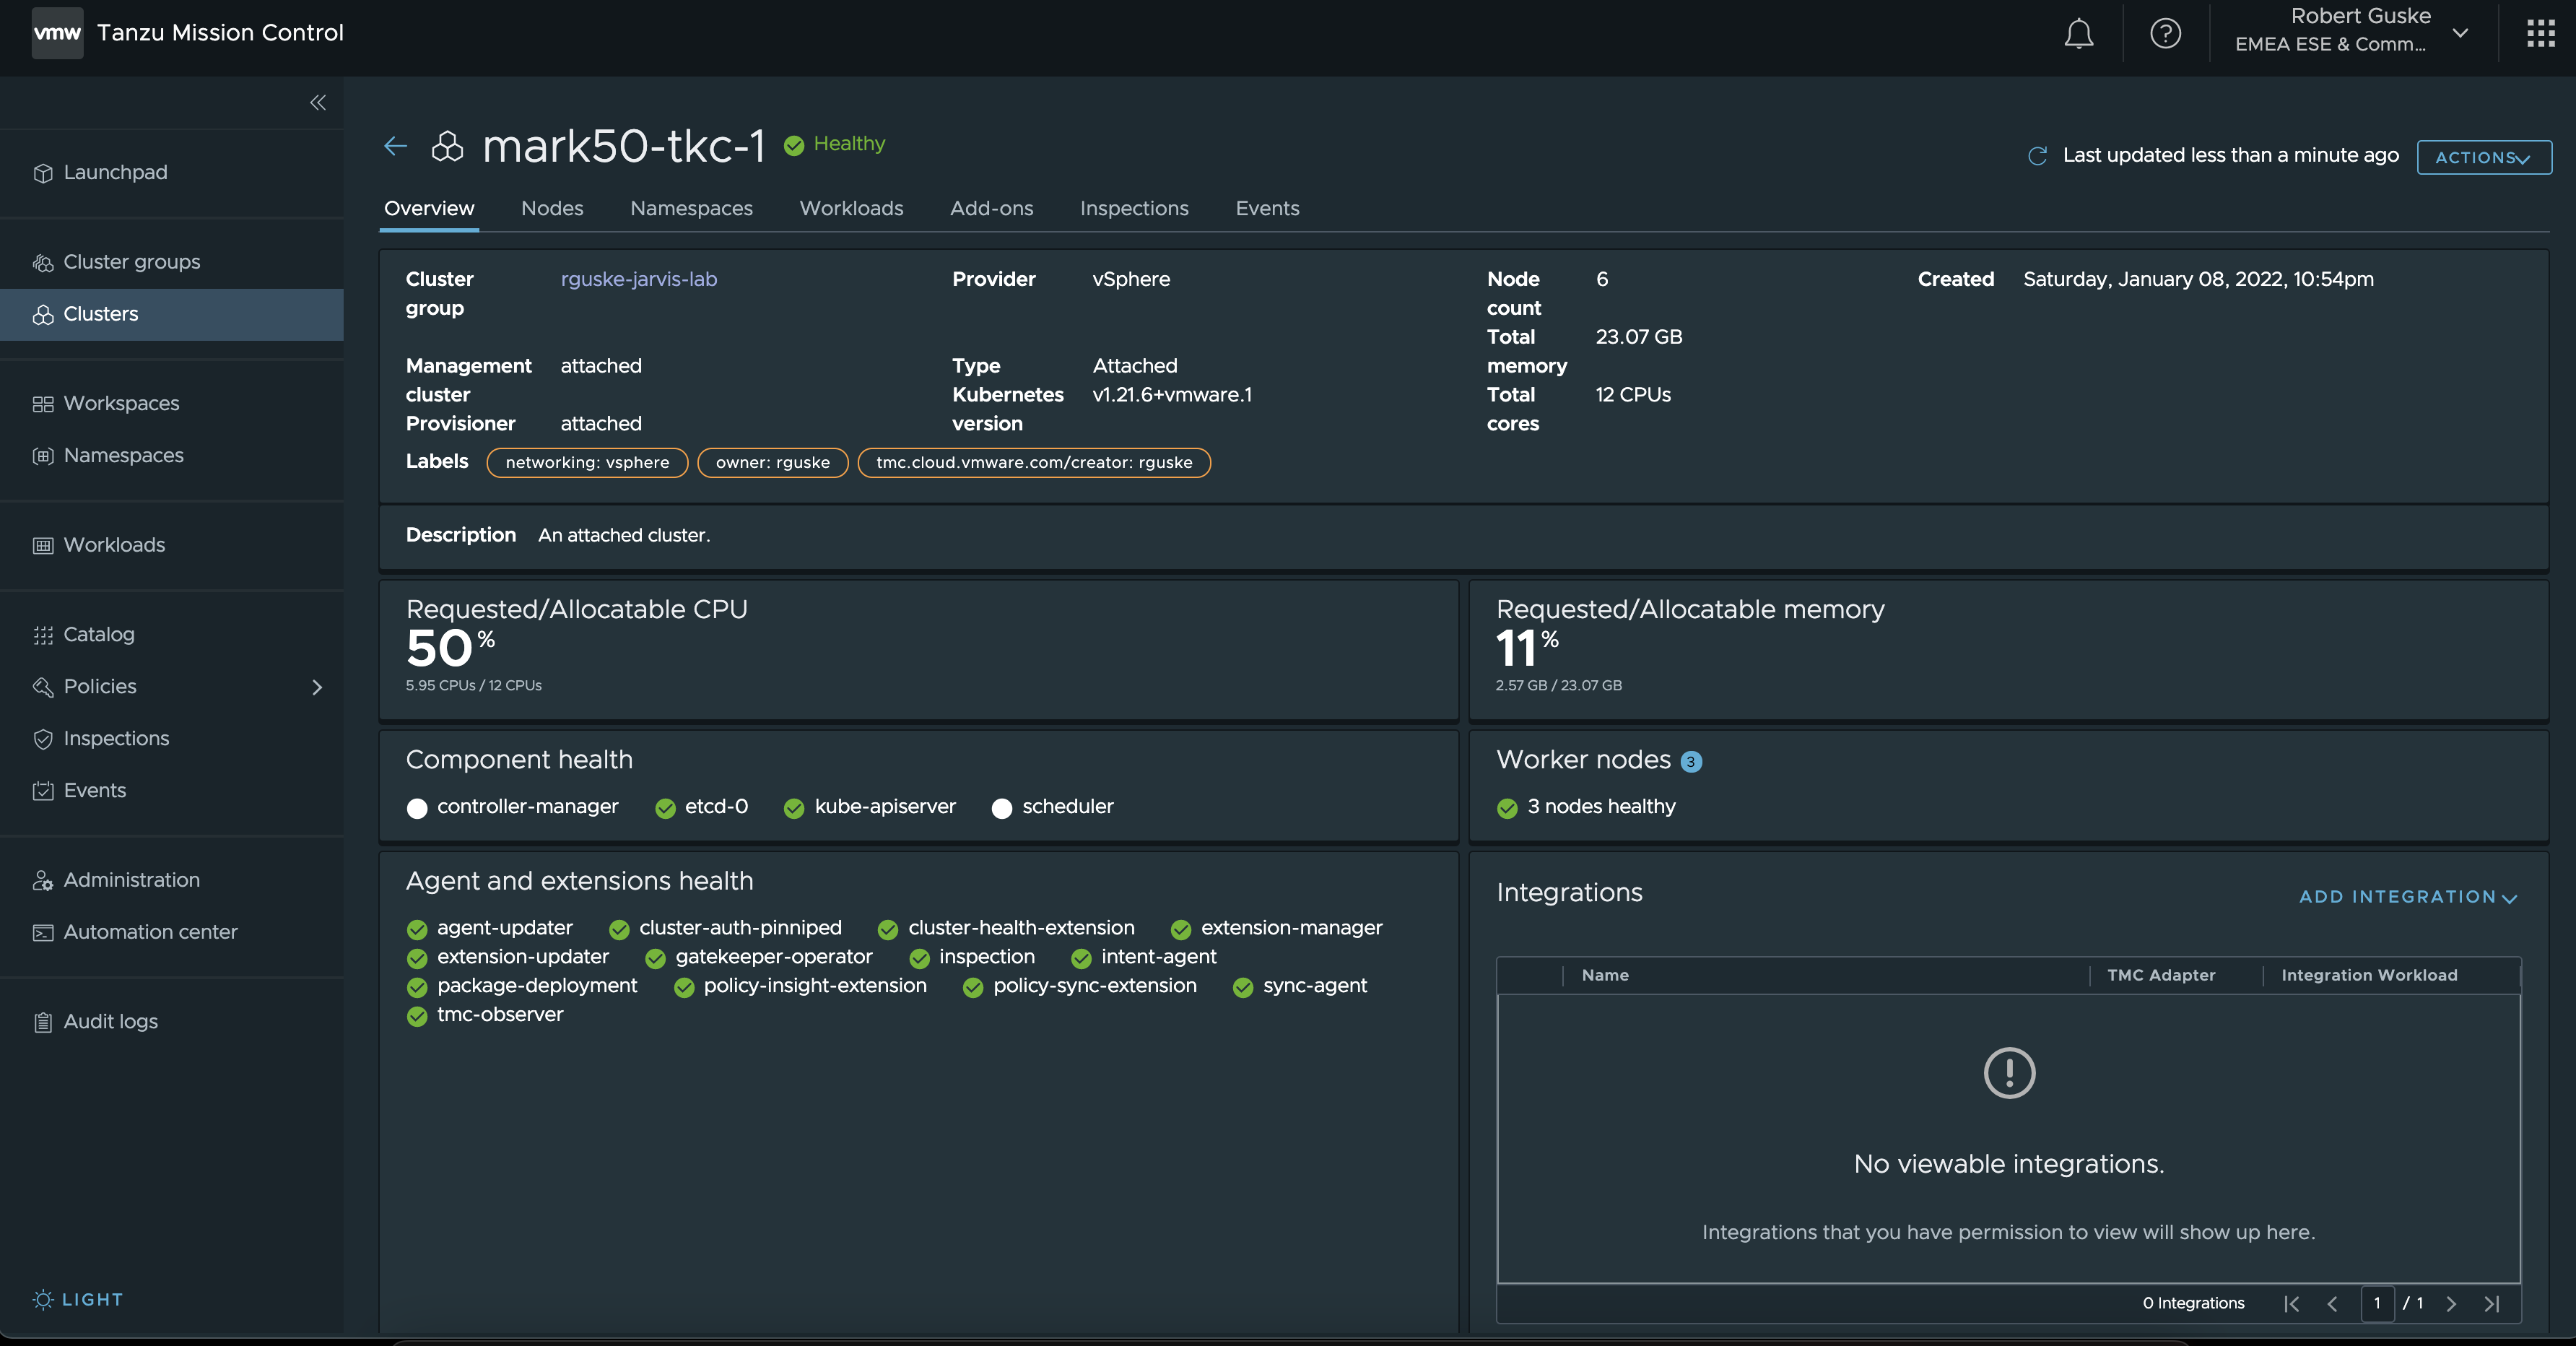
And just a couple of seconds later, the Kubernetes cluster is part of my Cluster Group, fully manageable and ready to get enhanced through Tanzu Mission Control.
🎥 Recording
I’ve recorded the whole process with asciinema.
Install Catalog Package Cert-Manager
I know, I know…only now I’m getting to the actual topic of this post 😄 but I thought it is useful to run a quick recap on the cluster attachment process first.
You have made it this far, now continue 💪
At the end of this post, I’ll have three packages installed on my attached cluster. Cert-Manager to support numerous ways of generating certificates, Contour as the Kubernetes ingress controller and Harbor as our Enterprise Container Registry.
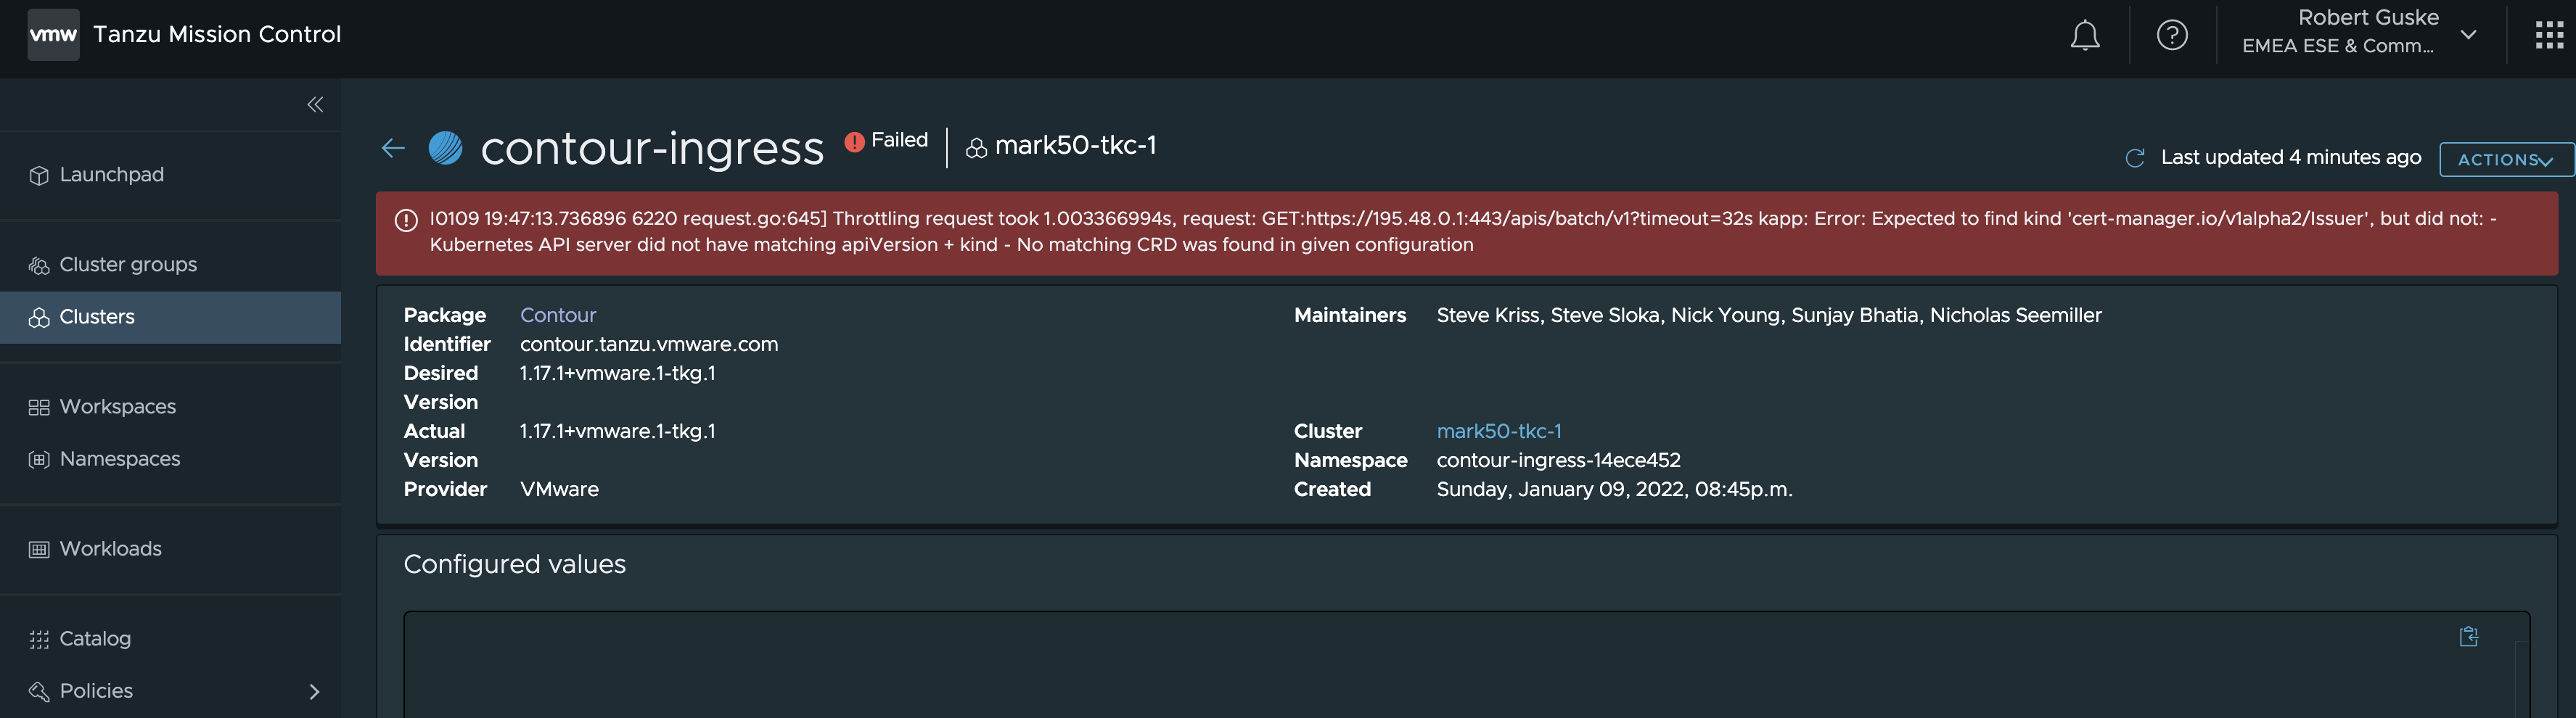
Cert-Manager has always to be installed first, in order to e.g. have self-signed certificates generated for the installations as well as to be kind of an issuer of your own provided certs. If you are installing another package first, it will end up like shown in Figure VIII.
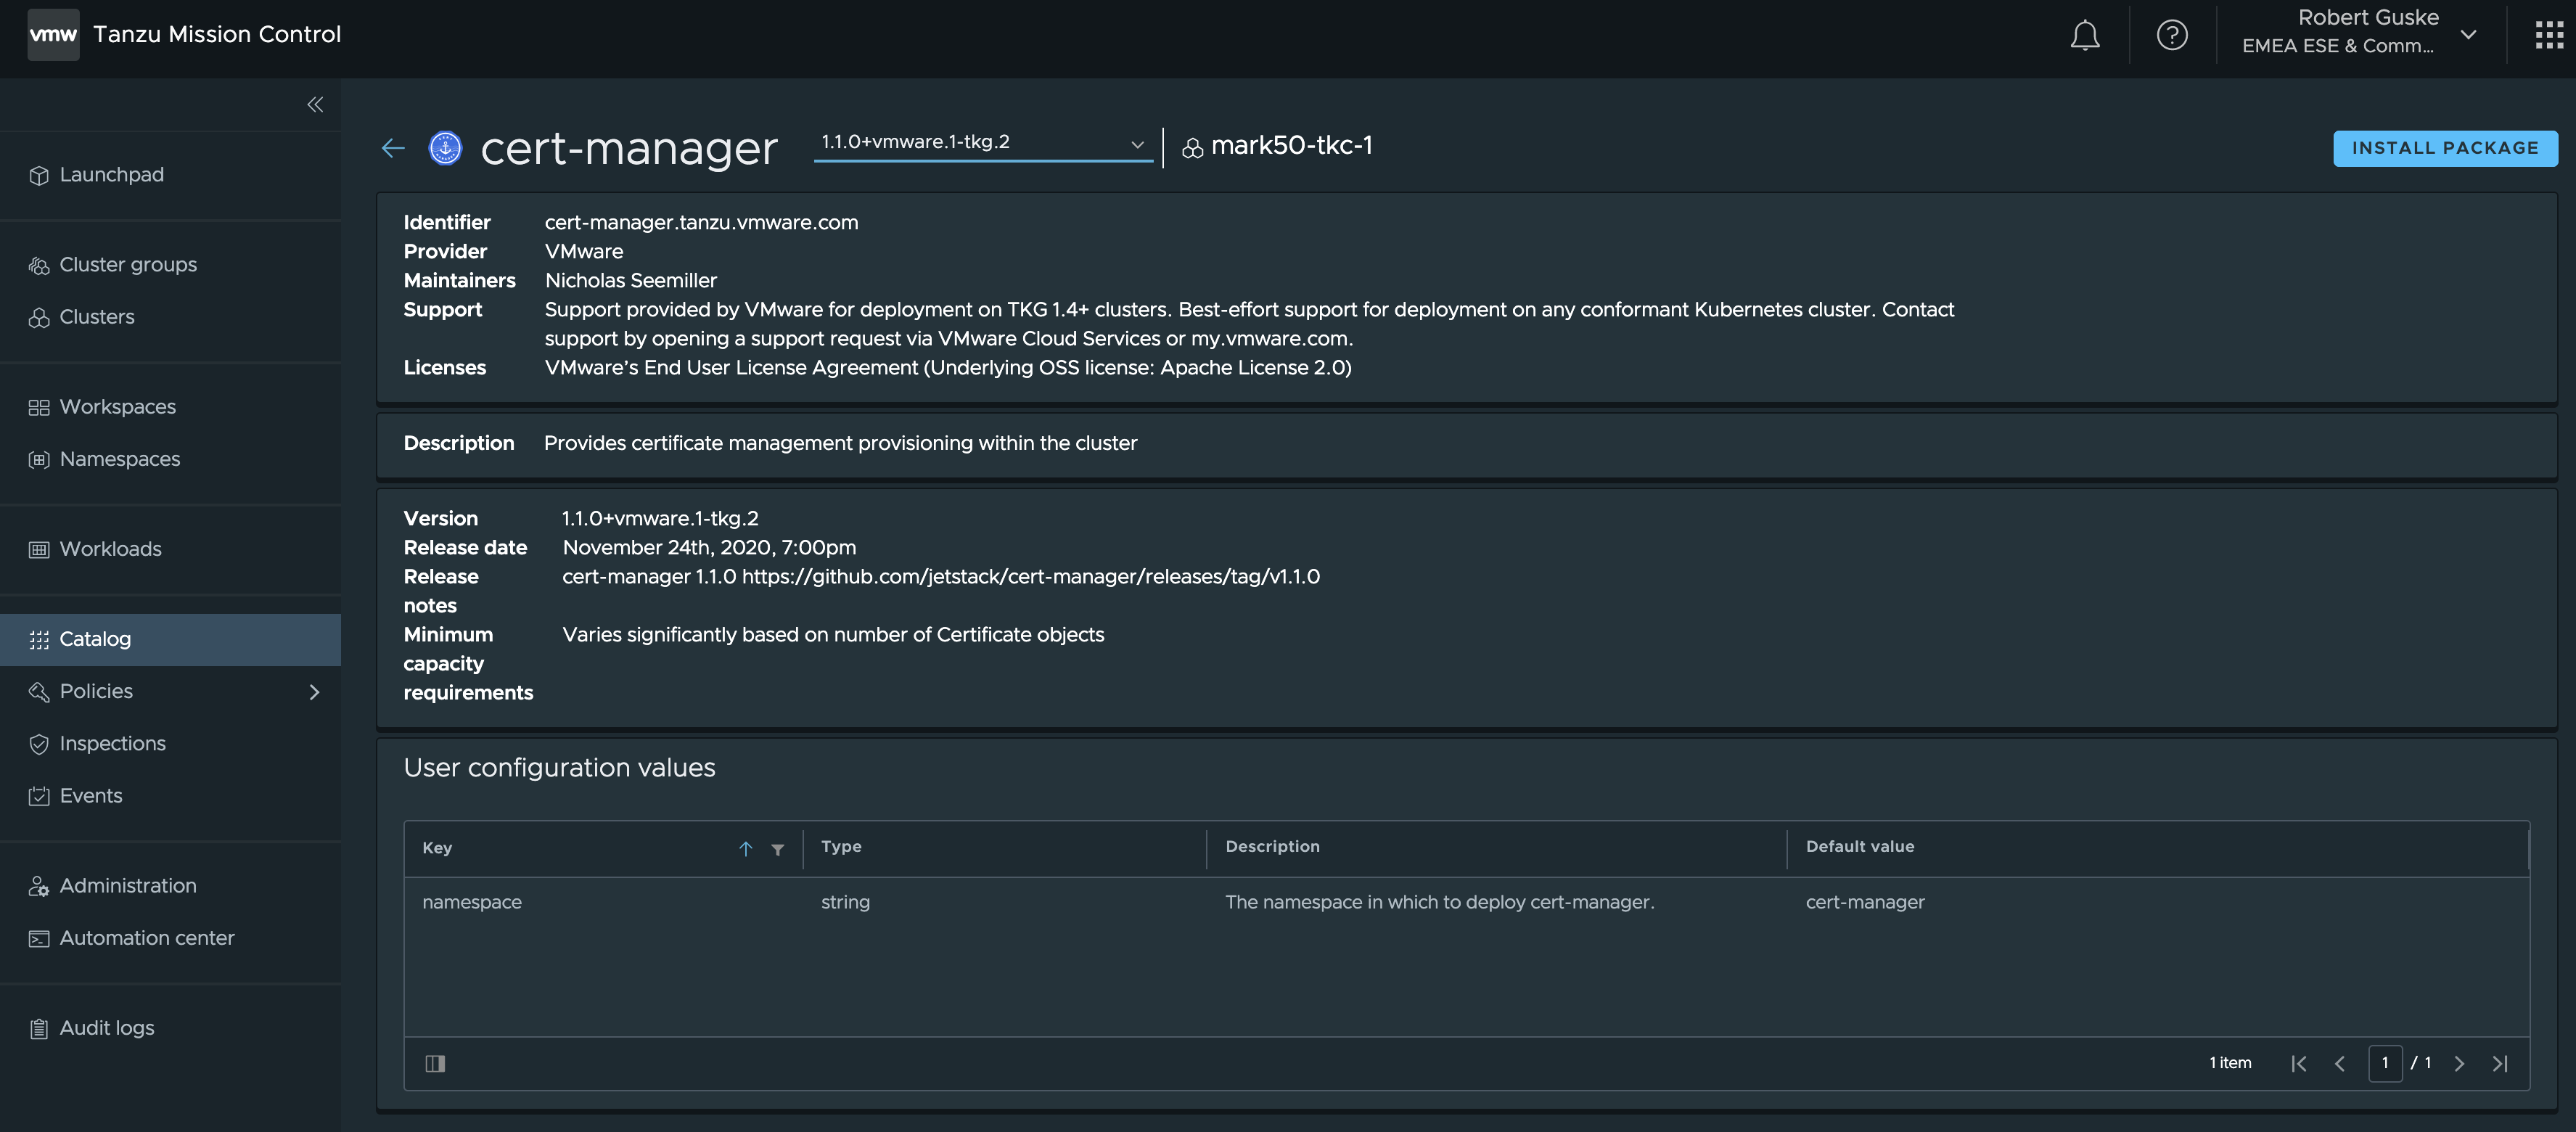
Open the Catalog page and select the Cert-Manager package. The first page which will be shown, provides package related information about the maintainers, version as well as the support.
On the top right corner, there’s a shiny INSTALL PACKAGE button which brings us to the actual installation steps.
When it comes to Kubernetes specific object installations and configurations, like e.g. ServiceAccounts, Roles, Rolebindings, etc. TMC creates those uniquely for the automated installation for us as it is shown in Step 2 (Figure X).

If you like to have the package installed in a custom namespace, create the namespace beforehand and select Custom.. Nothing more to add here for Cert-Manager (straight forward).
INSTALL PACKAGE
Install Catalog Package Contour
Exposing HTTP and HTTPS routes from outside your Kubernetes cluster to a service which is running inside your cluster is what an Ingress Controller does. Contour is a popular open source Ingress Controller which greatly supports your Layer-7 wishes and it’s available as a package in Catalog.
I’m skipping the first two sections here and jump directly into section 3, which is all about Configuration values.
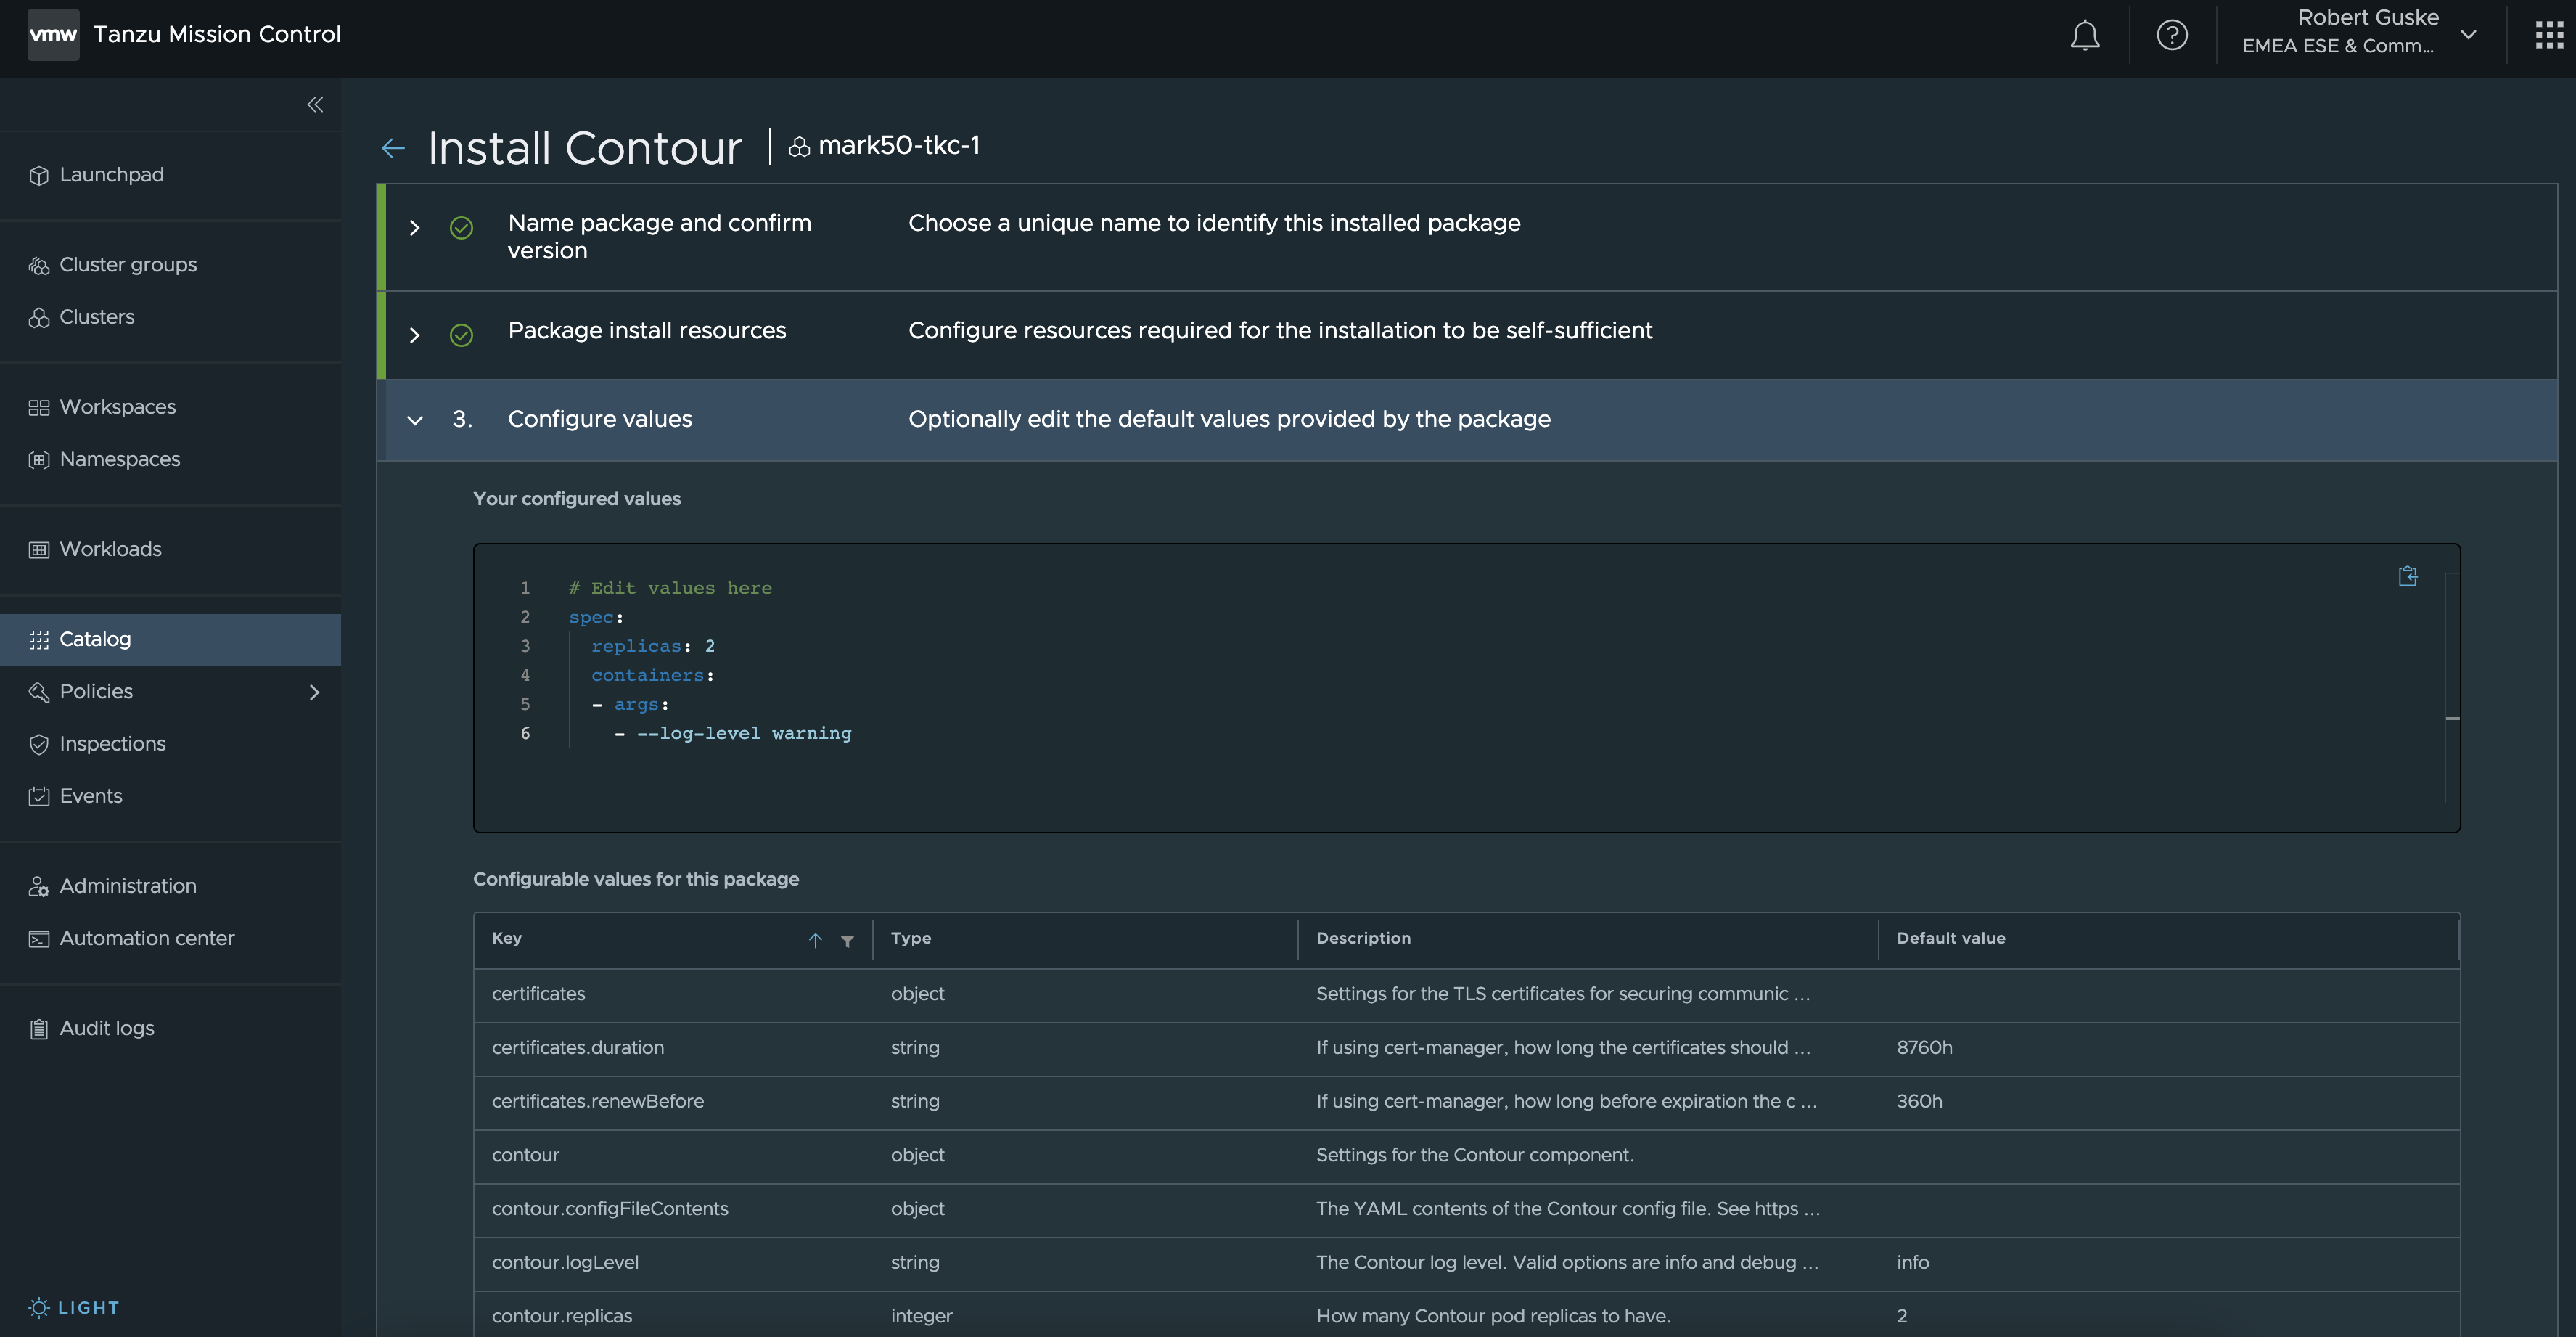
Configuration types/values can be added in the following format, depending on the Key.
- string (sequence of characters)
- e.g.
--log-level warning
- e.g.
- boolean (true/false)
- e.g.
hostNetwork: false
- e.g.
- object
- e.g. pointing to a
secret,configmaporcertificate
- e.g. pointing to a
- integer (integer value)
- e.g.
replicas: 2
- e.g.
I oriented myself on the official Contour Configuration File example to create my config. These are my specified values:
spec:
  containers:
    - args:
        - --log-level warning
  replicas: 2
envoy:
 service:
   type: LoadBalancer
   nodePorts:
     http: null
     https: null
   externalTrafficPolicy: Cluster
   disableWait: false
 hostPorts:
   enable: true
   http: 80
   https: 443
 hostNetwork: false
Right after hitting the INSTALL PACKAGE button again, two new Namespaces were created.
k get ns
NAME                           STATUS   AGE
contour-ingress-14ece452       Active   60s
default                        Active   45h
kube-node-lease                Active   45h
kube-public                    Active   45h
kube-system                    Active   45h
tanzu-package-repo-global      Active   21h
tanzu-system                   Active   21h
vmware-system-auth             Active   45h
vmware-system-cloud-provider   Active   45h
vmware-system-csi              Active   45h
vmware-system-tmc              Active   3h23m
The first namespace is contour-ingress-14ece452 and is it where the needed resources for the package installation itself are installed to.
 k -n contour-ingress-14ece452 get cm,sa
NAME                                          DATA   AGE
configmap/contour-ingress-ctrl                1      13m
configmap/contour-ingress-ctrl-change-rpwwf   1      6m15s
configmap/kube-root-ca.crt                    1      13m

NAME                             SECRETS   AGE
serviceaccount/contour-ingress   1         13m
serviceaccount/default           1         13m
The second namespace tanzu-system-ingress is the actual namespace for the package deployment (Pods, ReplicaSets, Deployments, etc.).
k -n tanzu-system-ingress get cm,sa,po,deploy,svc
NAME DATA AGE
configmap/contour 1 95s
configmap/kube-root-ca.crt 1 97s
configmap/leader-elect 0 84s
NAME SECRETS AGE
serviceaccount/contour 1 95s
serviceaccount/default 1 97s
serviceaccount/envoy 1 95s
NAME READY STATUS RESTARTS AGE
pod/contour-6676bfcfd8-668k5 1/1 Running 0 93s
pod/contour-6676bfcfd8-zbc5h 1/1 Running 0 93s
pod/envoy-82phh 2/2 Running 0 95s
pod/envoy-nrpj8 2/2 Running 0 94s
pod/envoy-xqgp7 2/2 Running 0 94s
NAME READY UP-TO-DATE AVAILABLE AGE
deployment.apps/contour 2/2 2 2 95s
NAME TYPE CLUSTER-IP EXTERNAL-IP PORT(S) AGE
service/contour ClusterIP 195.49.186.113 <none> 8001/TCP 95s
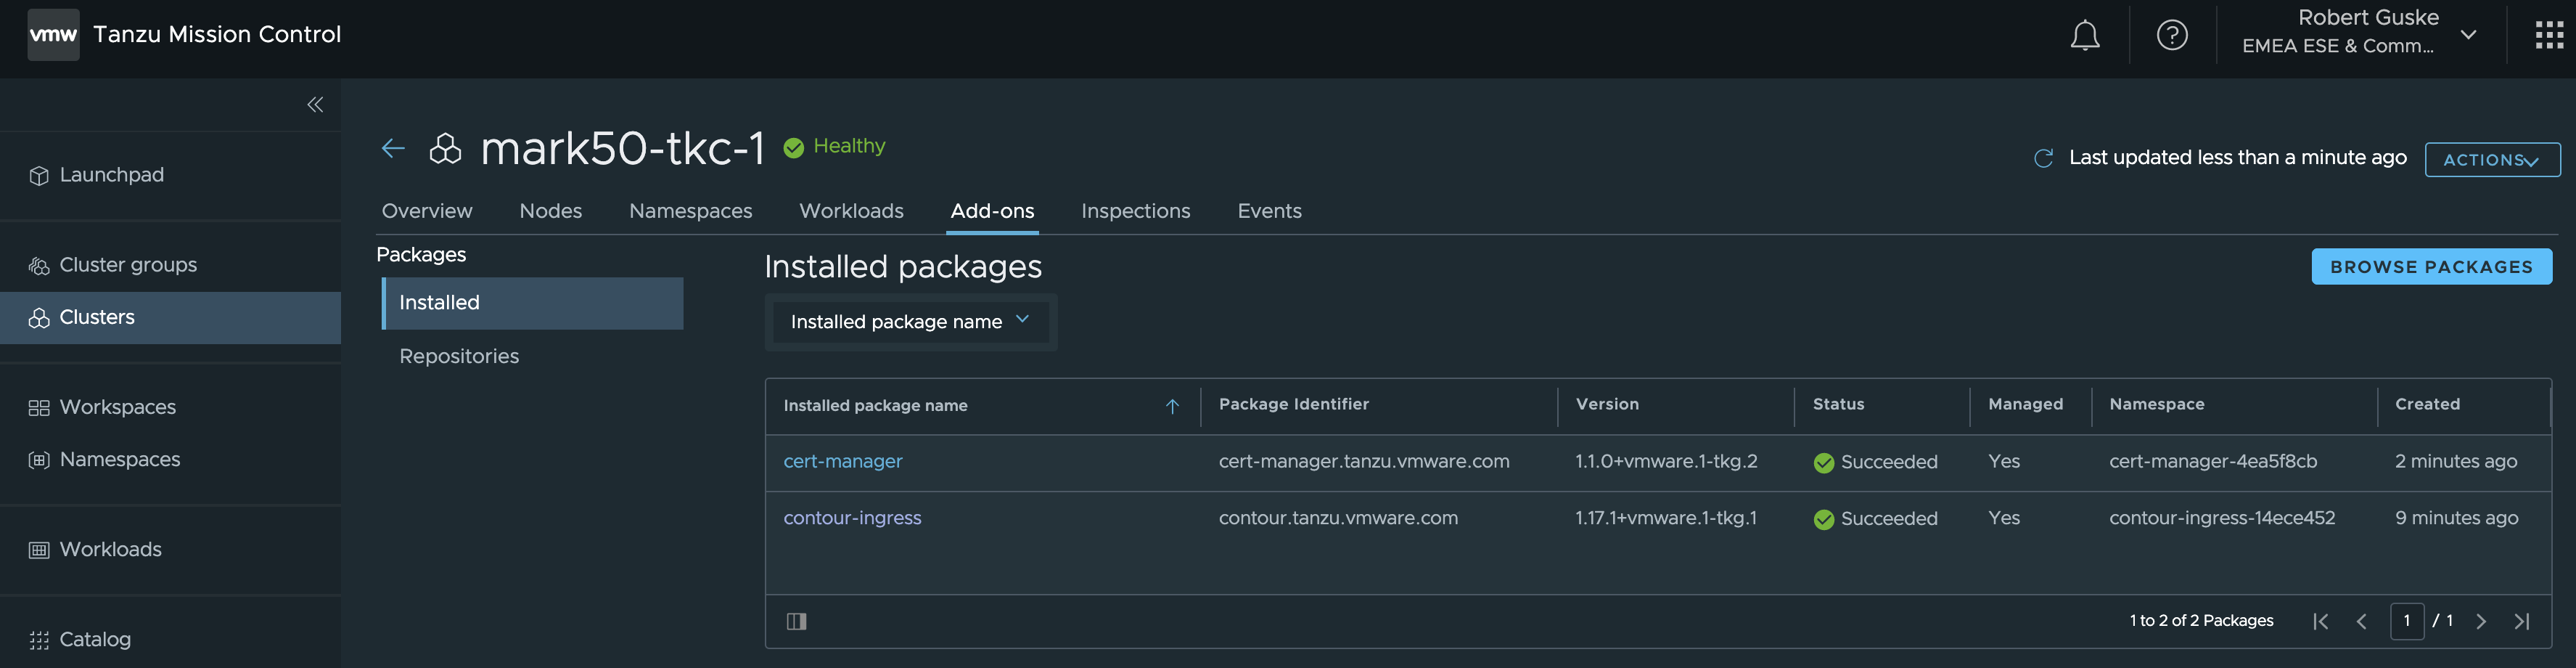
service/envoy NodePort 195.63.98.167 <none> 80:32242/TCP,443:32025/TCP 95sHere we go! Two ✅ Succeeded package installations.
Install Catalog Package Harbor
Alrighty! Contour is ready for serving our kind: Service and kind: Ingress requests and this is what we need (L4) for our Harbor installation. As we already did for the Cert-Manager as well as for the Contour package, provide all necessary data in Step 1 and 2 and enter your specific values in Step 3.
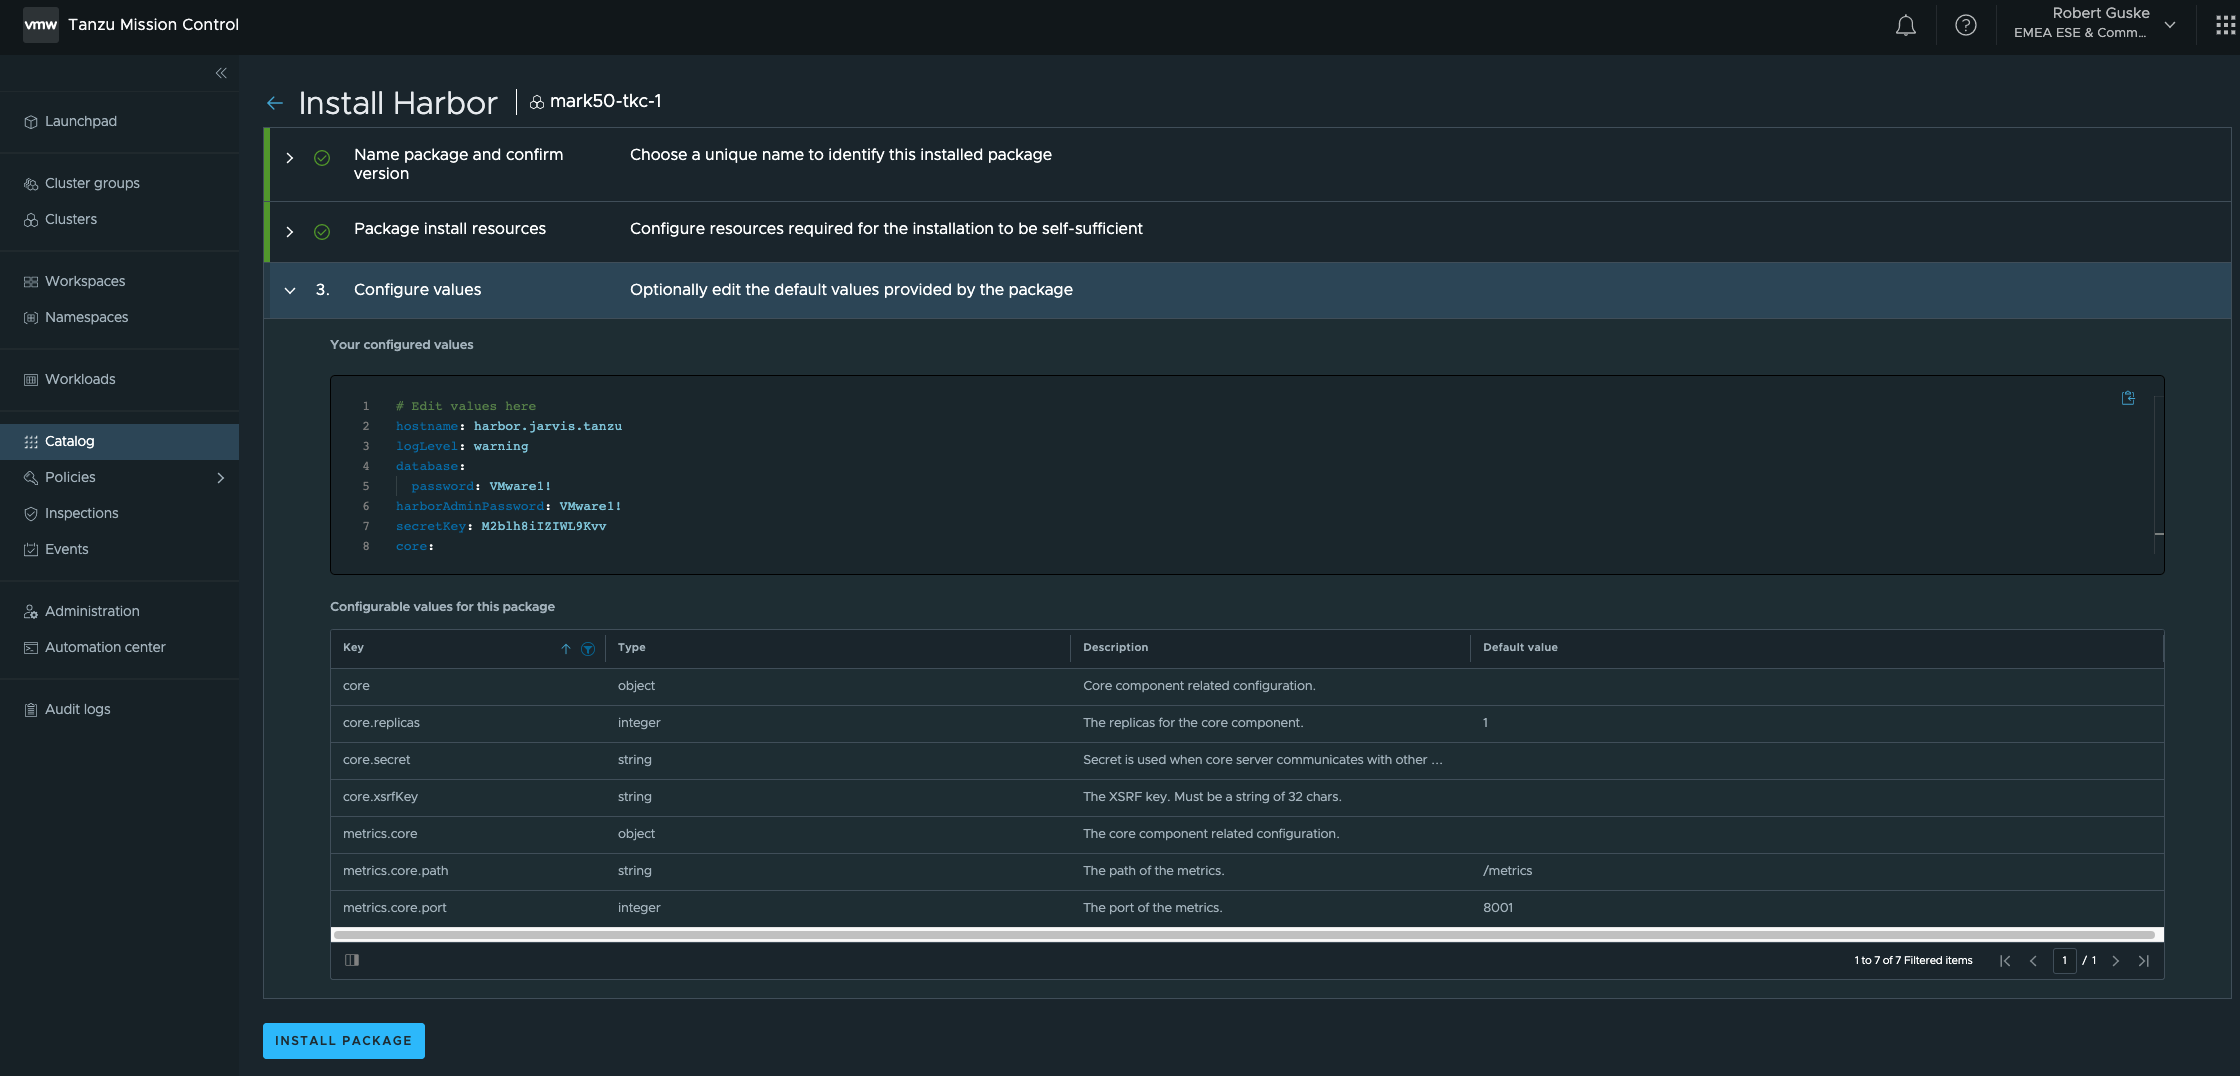
Like I mentioned in the Contour section, I was using the official data-values.yaml files for my configuration. For Harbor, I used the example here: Deploy Harbor Registry as a Shared Service
This is how I ended up with:
# Edit values here
hostname: harbor.jarvis.tanzu
port:
  https: 443
logLevel: warning
database:
  password: VMware1!
harborAdminPassword: VMware1!
secretKey: M2blh8iIZIWL9Kvv
core:
  secret: jML4MAuLIEgOFmq8
  xsrfKey: ZcEYnGlUSBJvP7jrf9zKuZh4OFoNfIUQ
jobservice:
  secret: 6TW3Ylpg8LpYjixp
registry:
  secret: Ee48fjRlkMm4n2l6
trivy:
  enabled: true
persistence:
  persistentVolumeClaim:
    registry:
      storageClass: "ftt0-r0"
      accessMode: ReadWriteOnce
      size: 10Gi
    jobservice:
      storageClass: "ftt0-r0"
      accessMode: ReadWriteOnce
      size: 1Gi
    database:
      storageClass: "ftt0-r0"
      accessMode: ReadWriteOnce
      size: 1Gi
    redis:
      storageClass: "ftt0-r0"
      accessMode: ReadWriteOnce
      size: 1Gi
    trivy:
      storageClass: "ftt0-r0"
      accessMode: ReadWriteOnce
      size: 5Gi
Unfortunately, the notary-signer pod instantiation failed with CrashLoopBackOff.
k -n tanzu-system-registry get pod
NAME                                    READY   STATUS             RESTARTS   AGE
harbor-core-f7ddbf886-bfmwk             1/1     Running            0          43m
harbor-database-0                       1/1     Running            0          43m
harbor-jobservice-7b5857687c-ctlxq      1/1     Running            0          43m
harbor-notary-server-677b7b4f9f-rnwmb   1/1     Running            1          43m
harbor-notary-signer-8665f66696-q84ks   0/1     CrashLoopBackOff   13         43m
harbor-portal-65c68794b9-6r7ws          1/1     Running            0          43m
harbor-redis-0                          1/1     Running            0          43m
harbor-registry-74d4f6d4bc-p58pv        2/2     Running            0          43m
harbor-trivy-0                          1/1     Running            0          43
Fortunately, searching for the provided error message from the logs…
{"level":"info","msg":"Version: 0.6.1, Git commit: d6e1431f","time":"2022-02-10T05:50:44Z"}{"level":"fatal","msg":"Could not read config at :/etc/notary/server-config.postgres.json, viper error: open : no such file or directory","time":"2022-02-10T05:50:44Z"}…led me directly to a known issue with a provided workaround on the VMware Knowledge Base - KB85725
🎥 Recording KB85725
tanzu-system-registry! In my case it’s named as harbor-b77eba03.After following the guidance, my Harbor instance was up and running 😃
kubectl -n tanzu-system-registry get pods
NAME                                    READY   STATUS    RESTARTS   AGE
harbor-core-f7ddbf886-bfmwk             1/1     Running   0          60m
harbor-database-0                       1/1     Running   0          60m
harbor-jobservice-7b5857687c-ctlxq      1/1     Running   0          60m
harbor-notary-server-677b7b4f9f-rnwmb   1/1     Running   1          60m
harbor-notary-signer-5cb4fd8894-8cmzc   1/1     Running   0          2m36s
harbor-portal-65c68794b9-6r7ws          1/1     Running   0          60m
harbor-redis-0                          1/1     Running   0          60m
harbor-registry-74d4f6d4bc-p58pv        2/2     Running   0          60m
harbor-trivy-0                          1/1     Running   0          60m
tanzu package installed list -A
/ Retrieving installed packages...
NAME PACKAGE-NAME PACKAGE-VERSION STATUS NAMESPACE
cert-manager cert-manager.tanzu.vmware.com 1.1.0+vmware.1-tkg.2 Reconcile succeeded cert-manager-4ea5f8cb
contour-ingress contour.tanzu.vmware.com 1.17.1+vmware.1-tkg.1 Reconcile succeeded contour-ingress-e311d7d7
harbor harbor.tanzu.vmware.com 2.2.3+vmware.1-tkg.1 Reconcile succeeded harbor-b77eba03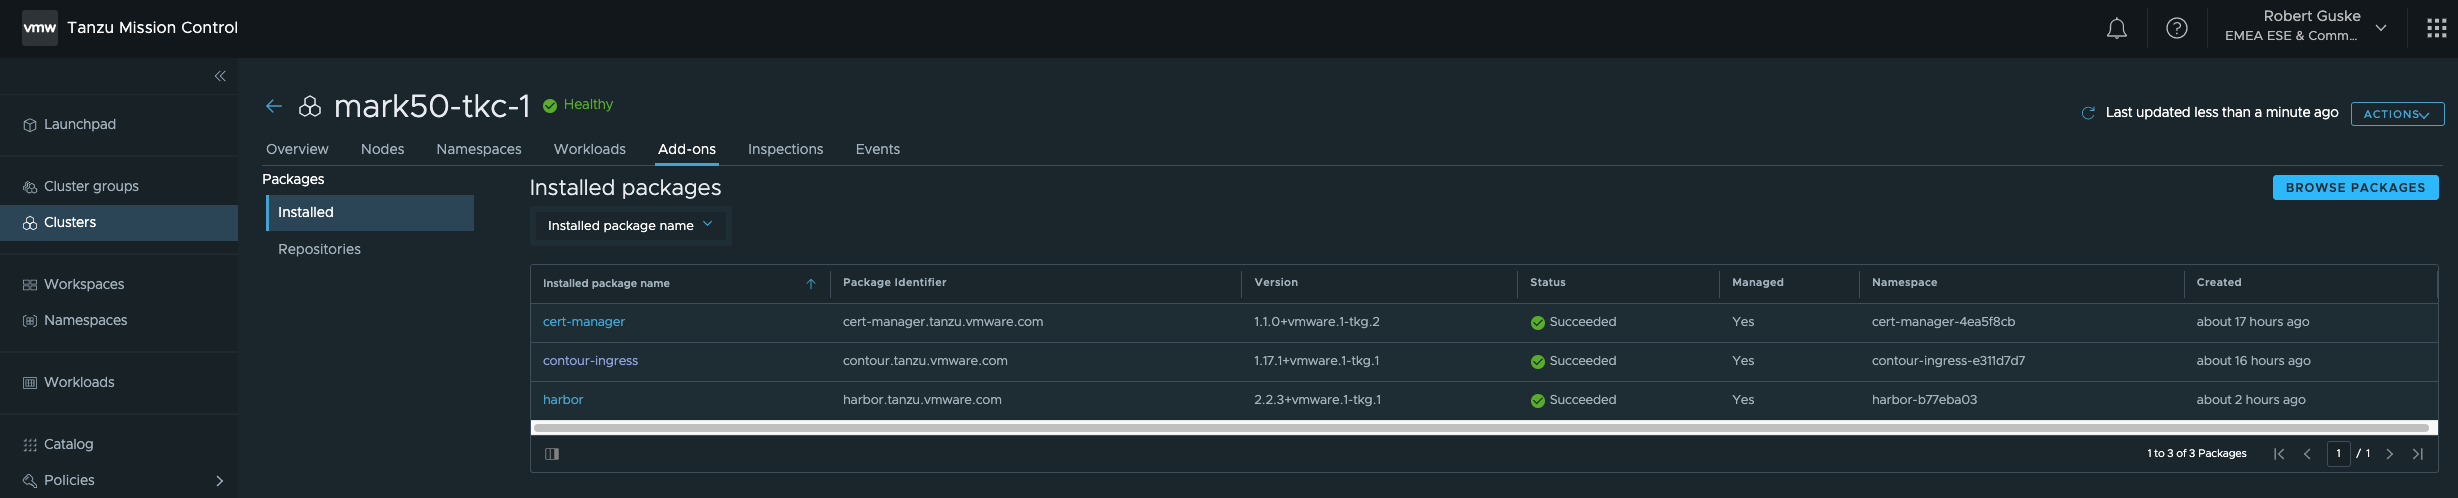
Since the Harbor UI is exposed via the Envoy service load balancer that is running in the tanzu-system-ingress, it’s of high interest for us to get the assigned IP address.
Execute kubectl get svc envoy -n tanzu-system-ingress -o jsonpath='{.status.loadBalancer.ingress[0]}' to let it be displayed. Use this IP address to create a new DNS record on your DNS server.
Important! Use the same FQDN as provided in the Configuration values section. In my case: harbor.jarvis.tanzu
Check if the Harbor portal is reachable using your browser.
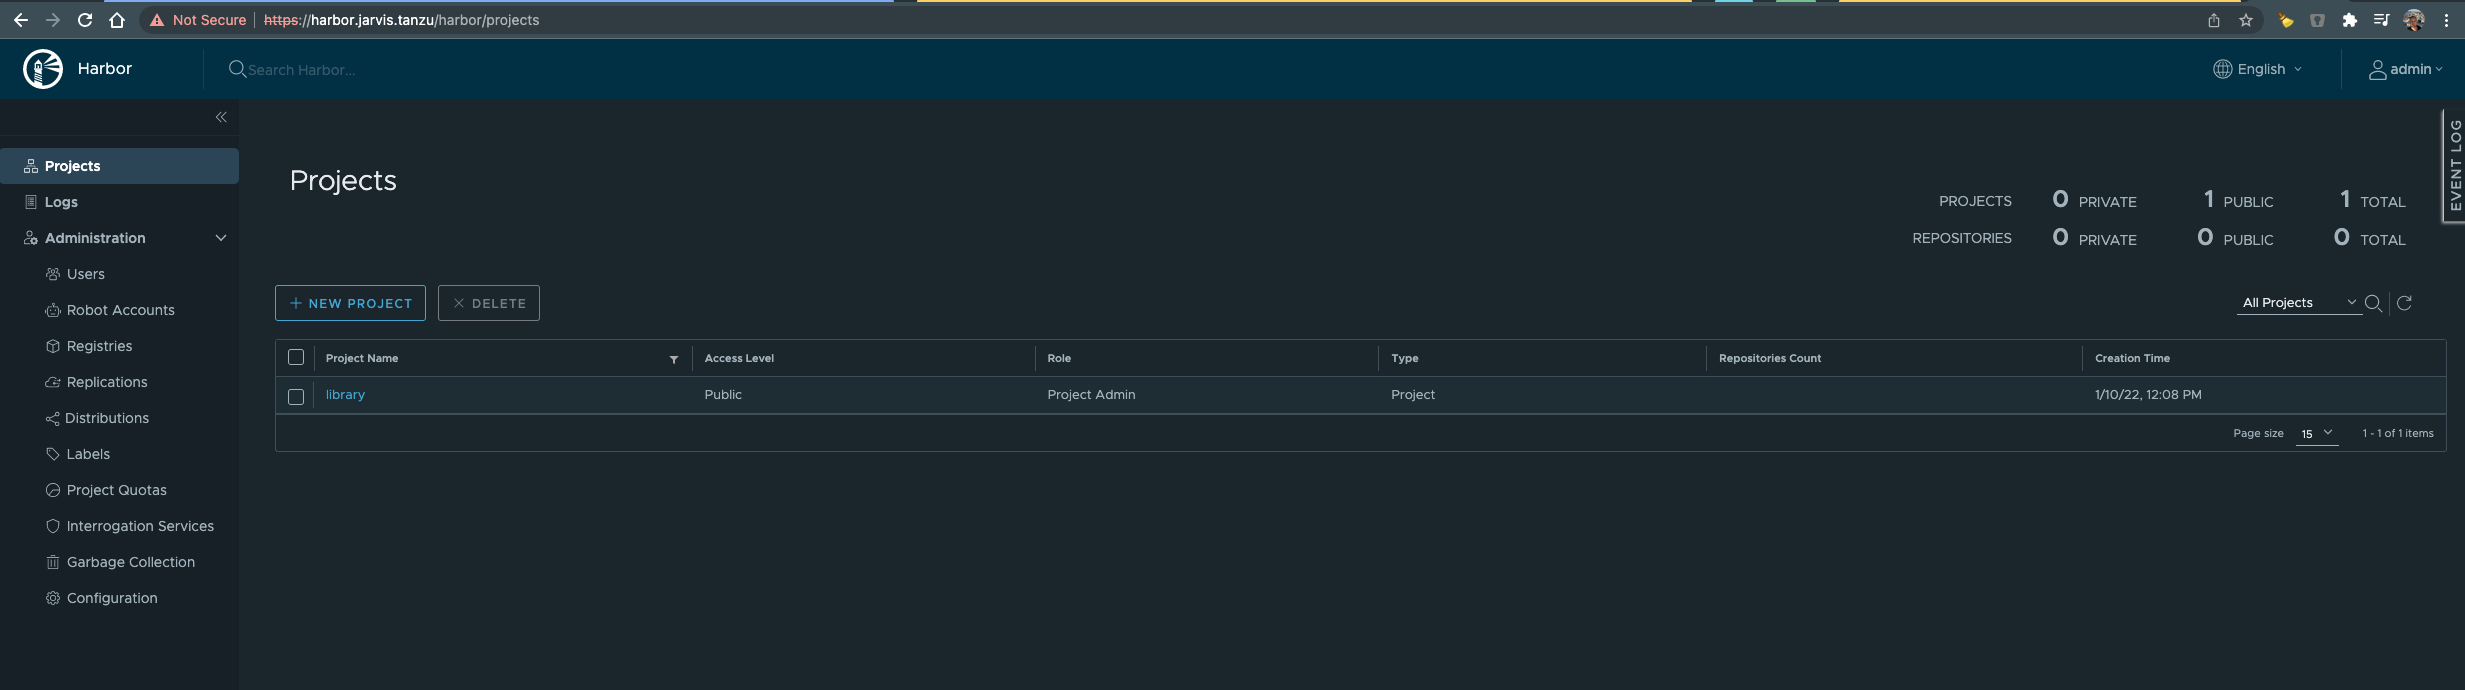
Awesome! Login with the specified harborAdminPassword
That’s it! We’ve easily extended our fresh to TMC attached Kubernetes cluster with capabilities to serve certificate related issues, to serve Ingress as well as with the ability to provide an Enterprise Container Registry with features for image scanning (Clair) and image signing (Notary).
Optional: Detach Kubernetes Cluster
If you want to remove these resources, run the following kubectl commands:
kubectl delete crd packageinstalls.packaging.carvel.dev
kubectl delete crd packagerepositories.packaging.carvel.dev
kubectl delete crd internalpackagemetadatas.internal.packaging.carvel.dev
kubectl delete crd internalpackages.internal.packaging.carvel.dev
kubectl delete crd apps.kappctrl.k14s.io
kubectl delete APIService v1alpha1.data.packaging.carvel.dev
kubectl delete ns tanzu-system
kubectl delete ns tanzu-package-repo-global
kubectl delete tanzupackage-install-admin-role kapp-controller-cluster-role
kubectl delete clusterrolebinding kapp-controller-cluster-role-binding pkg-apiserver:system:auth-delegator
kubectl delete psp tanzu-system-kapp-ctrl-restricted
kubectl delete rolebinding pkgserver-auth-reader -n kube-system
Conclusion
See “A Catalog of Extensions” right under my tweet 😃
Resources
| Resource | Link |
|---|---|
| Pathfinder - VMware Tanzu Standard Overview | Click |
| Tanzu - VMware Tanzu Mission Control Starter | Click |
| Blog - Tanzu Packages Explained | Click |
| Blog - Automatically Manage DNS for Kubernetes with ExternalDNS and Tanzu Mission Control Catalog | Click |
| Docs - Tanzu Mission Control v1alpha1 API Resource | Click |
| Docs - Install the Tanzu CLI and Other Tools | Click |
| Docs - TMC Install a Package | Click |
| Docs - Add a Package Repository to Your Cluster | Click |
| Docs - Tanzu Packages Harbor Installation | Click |
| Docs - harbor-data-values File for vSphere 7 | Click |
| Contour Docs - Contour Configuration Reference | Click |
| KB - The harbor-notary-signer pod fails to start in a Harbor installation under Tanzu Kubernetes Grid 1.4 (85725) | Click |