Hands-on the Avi Kubernetes Operator (AKO)

VMUG UserCon 2021
It was this exiting time of the year again where lots of great VMware User Group events happened around the globe and this year, I had the pleasure to present two topics at the VMUG UserCon DACH (🇩🇪 🇦🇹 🇨🇭). One of the sessions had the title “NSX Advanced Load Balancer (Avi) - Next Gen Load Balancer for Next Gen (& Traditional) Apps”. This was my first session in which I teamed up for a presentation and I was very happy to have it done with no one else than James Lepthien, a luminary in networking.
Next up @vmw_rguske and @0x86DD at DACH #UserCon
— Michael Schroeder - Microlytix@techhub.social (@microlytix) July 20, 2021
about AVI Loadbalancer#NSX #Kubernetes pic.twitter.com/veccoK4Fkj
James and I prepared two demos for our session and both rest on the Avi Kubernetes Operator - AKO. Our goal was to demonstrate L4 and L7 enterprise-grade app services of VMware’s software-defined NSX Advanced Load Balancer as well as the simplicity when it is used for Kubernetes based application deployments.
Recording (in German)
May I introduce - The Avi Kubernetes Operator
The Avi Kubernetes Operator is this necessary entity which has to be installed on a Kubernetes cluster to translate the Kubernetes Objects to Avi objects and automates the implementation of L4 and L7 services on the Service Engines (SE) via the Avi Controller API. As the name suggests, the AKO is a Kubernetes Operator and runs as a stateless POD within the cluster. It’s onward Kubernetes 1.16 supported 1.
Deploy the AKO via Helm
The deployment is made easy by using Helm (v3)2 for it. Of course it requires an already existing NSX Advanced Load Balancer deployment, which e.g. comes as a deployment option for the vSphere with Tanzu solution. I won’t cover the deployment of the Avi Controller in this post but be sure, lot’s of great content already exists which will serve you well. However, what I can do, is to recommend the usage of this awesome Fling: New Fling: Easy Deploy for NSX Load Balancing a.k.a EasyAvi.
Presuming that you have an Avi Controller instance running and vSphere is configured as your Default Cloud, we will kick of the tires now.
1. Add the AKO repo
To have the ability to deploy the AKO version of our choice (mostly the latest), we have to add the Helm repository first.
helm repo add ako https://projects.registry.vmware.com/chartrepo/akoAs of writing this post, version 1.4.2 is the latest available version.
helm search repo ako/ako --versions

NAME                    CHART VERSION   APP VERSION     DESCRIPTION
ako/ako                 1.4.2           1.4.2           A helm chart for Avi Kubernetes Operator
ako/ako                 1.4.1           1.4.1           A helm chart for Avi Kubernetes Operator
ako/ako                 1.3.4           1.3.4           A helm chart for Avi Kubernetes Operator
ako/ako                 1.3.3           1.3.3           A helm chart for Avi Kubernetes Operator
ako/ako                 1.3.1           1.3.1           A helm chart for Avi Kubernetes Operator
ako/ako                 1.2.3           1.2.3           A helm chart for Avi Kubernetes Operator
ako/ako                 1.2.2           1.2.2           A helm chart for Avi Kubernetes Operator
ako/ako                 1.2.1           1.2.1           A helm chart for Avi Kubernetes Operator
ako/ako-operator        1.3.1           1.3.1           A Helm chart for Kubernetes AKO Operator
2. Deploy AKO on Kubernetes
To get the AKO into the desired operating state, it is necessary to hand over the appropriate configuration parameters as a Kubernetes Configmap as well as Secret, to our Kubernetes Cluster. This can be done in two ways.
Method 1: Using the values.yaml file as your configuration source of truth
The command helm show values ako/ako --version 1.4.2 > values.yaml will create the values.yaml file into the folder in which you are currently in (pwd). Open the file and adjust the parameters accordingly to your setup:
- Avi Controller
ControllerSettings.controllerHost='' - Avi Controller Version
ControllerSettings.controllerVersion='' - The Log Level (INFO, WARN, ERROR, DEBUG)
AKOSettings.logLevel='' - Username for the Avi Controller
avicredentials.username='' - Password for the User
avicredentials.password='' - Virtual IP network for the Virtual Service
NetworkSettings.subnetIP='' - Virtual IP network subnetmask
NetworkSettings.subnetPrefix='' - Virtual IP network name (dPG)
NetworkSettings.networkName='' - Name of your IaaS Cloud
ControllerSettings.cloudName='' - Name of the Service Engine Group
ControllerSettings.serviceEngineGroupName='' - Name of your Kubernetes Cluster
AKOSettings.clusterName='' AKOSettings.cniPlugin=''- Optional: Define the AKO function mode (default is
ClusterIP)L7Settings.serviceType=''
The description for the specific parameters/ tunables can be studied here: TUNABLES.
Save your adjusted configuration for now and create the namespace for the AKO first.
kubectl create ns avi-system
Finally install the AKO:
helm install ako/ako --generate-name --version 1.4.2 -f values.yaml --namespace=avi-system
Method 2: Pass over all configuration parameters directly via helm
This method is propably the way to go if you like to automate the AKO deployment. Just replace my used values with yours.
helm install ako/ako  \
--generate-name \
--version 1.4.2 \
--set ControllerSettings.controllerHost='avi-ctrl.jarvis.lab' \
--set ControllerSettings.controllerVersion='20.1.5' \
--set AKOSettings.logLevel='WARNING' \
--set avicredentials.username='admin' \
--set avicredentials.password='VMware1!' \
--set NetworkSettings.subnetIP='10.10.18.0' \
--set NetworkSettings.subnetPrefix='26' \
--set NetworkSettings.networkName='dpg-sedatapath-18' \
--set ControllerSettings.cloudName='Default-Cloud' \
--set ControllerSettings.serviceEngineGroupName='vmug-se-group' \
--set AKOSettings.clusterName='veba-of' \
--set L7Settings.serviceType='NodePort' \
--namespace=avi-system
3. Validate the deployment
Directly after firing up the helm install command, you should see:
NAME: ako-1627467371
LAST DEPLOYED: Wed Jul 28 12:16:11 2021
NAMESPACE: avi-system
STATUS: deployed
REVISION: 1
Furthermore, you can check your helm deployments (all or specific ones) by using helm list and with appending the respective namespace.
helm list -n avi-system

NAME            NAMESPACE       REVISION        UPDATED                                         STATUS          CHART           APP VERSION
ako-1627467371  avi-system      1               2021-07-28 12:16:11.301093764 +0200 CEST        deployed        ako-1.3.1       1.3.1
And numero tres - The validation with kubectl:
kubectl -n avi-system get po,secret,configmap

NAME        READY   STATUS    RESTARTS   AGE
pod/ako-0   1/1     Running   0          10m

NAME                                          TYPE                                  DATA   AGE
secret/ako-sa-token-cvjx5                     kubernetes.io/service-account-token   3      10m
secret/avi-secret                             Opaque                                2      10m
secret/default-token-5kx5g                    kubernetes.io/service-account-token   3      27d
secret/sh.helm.release.v1.ako-1627481569.v1   helm.sh/release.v1                    1      10m

NAME                         DATA   AGE
configmap/avi-k8s-config     32     10m
configmap/kube-root-ca.crt   1      27d
Of course, it’s always helpful and enlightend to check the logs of the fresh deployed pod, to get first impressions if everything is working as expected.
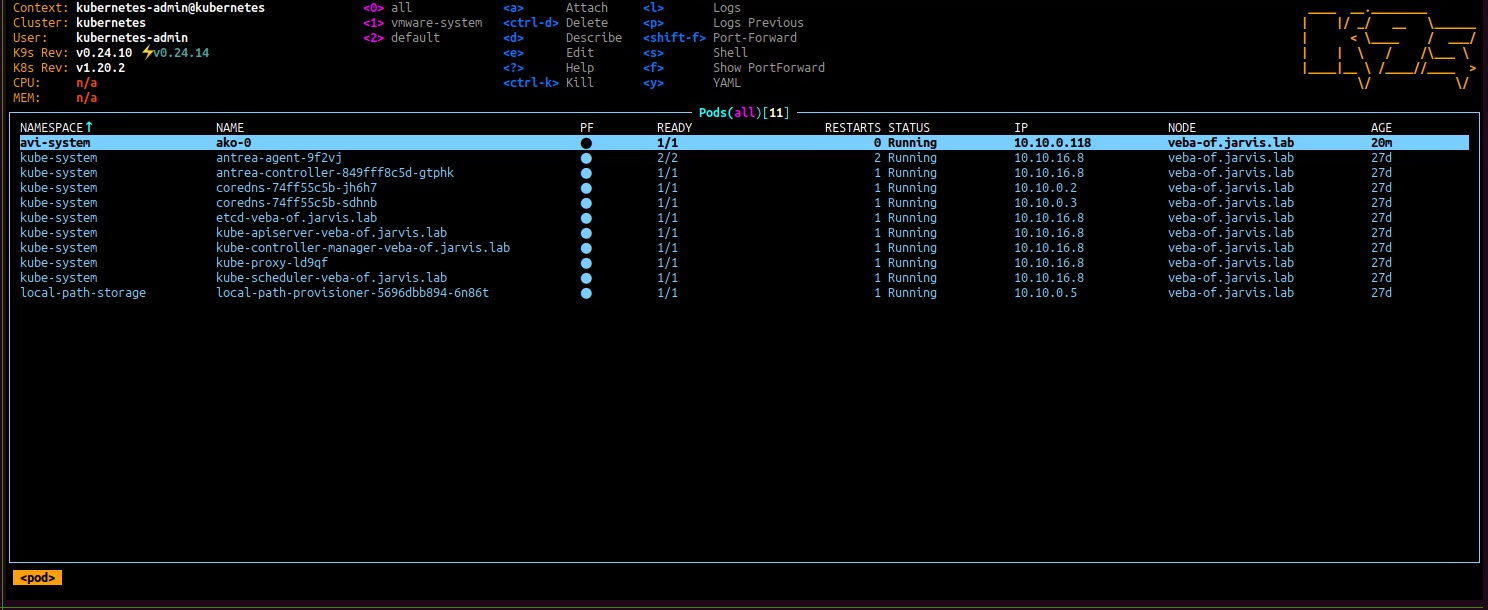
Pro Tip: Make use of cli tools which makes your life easier on the shell. I’m using k9s a lot to check my Kubernetes poppy’s as well as stern for a greater log view.
K9s:
Additionally: Uninstalling the AKO
Uninstalling AKO is as simple as the installtion. Just use the full name of the helm deployment and execute it as follows: helm uninstall ako-1627467371 -n avi-system.
Configure a Subdomain Delegation in NSX-ALB
The NSX-ALB part - Virtual Service for DNS
Before heading to my first demo example, it’s worth to stop by the setup and configuration of DNS Provider in Avi Vantage. This allows us to make Kubernetes Services (e.g. type: LoadBalancer) reachable via a resolvable DNS name by using a delegated subdomain configuration with a specified DNS Service Domain name which is or which are (in case of multiple) configured in the Avi DNS Profile.
I followed the documentation to setup the DNS Service: DNS Provider (Avi Vantage)
Parent topic: Avi DNS Architecture and Features
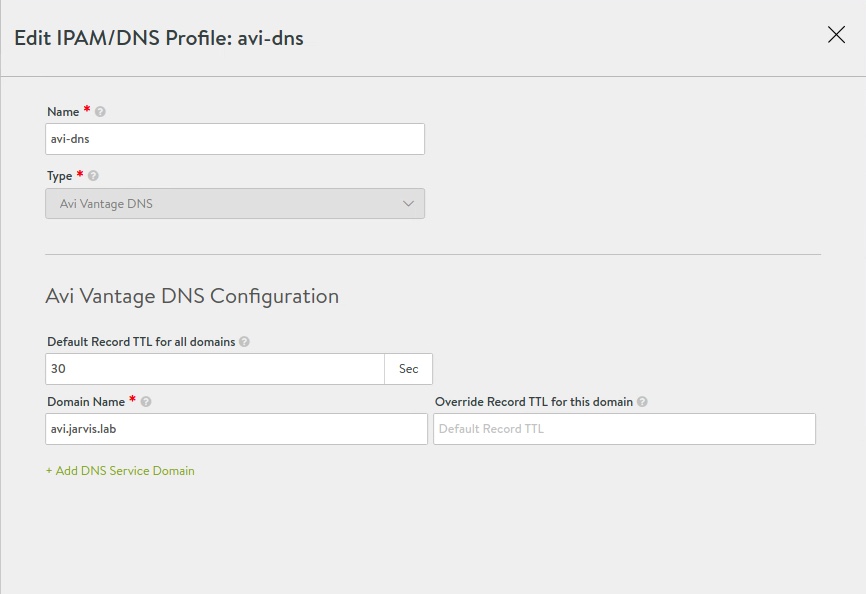
Figure I, II and III gives you an idea on how it will look like by configuring it.
DNS Profile
- Templates -> Profiles -> IPAM/DNS Profiles
Create a new DNS Profile and configure the DNS Service Domain(s).
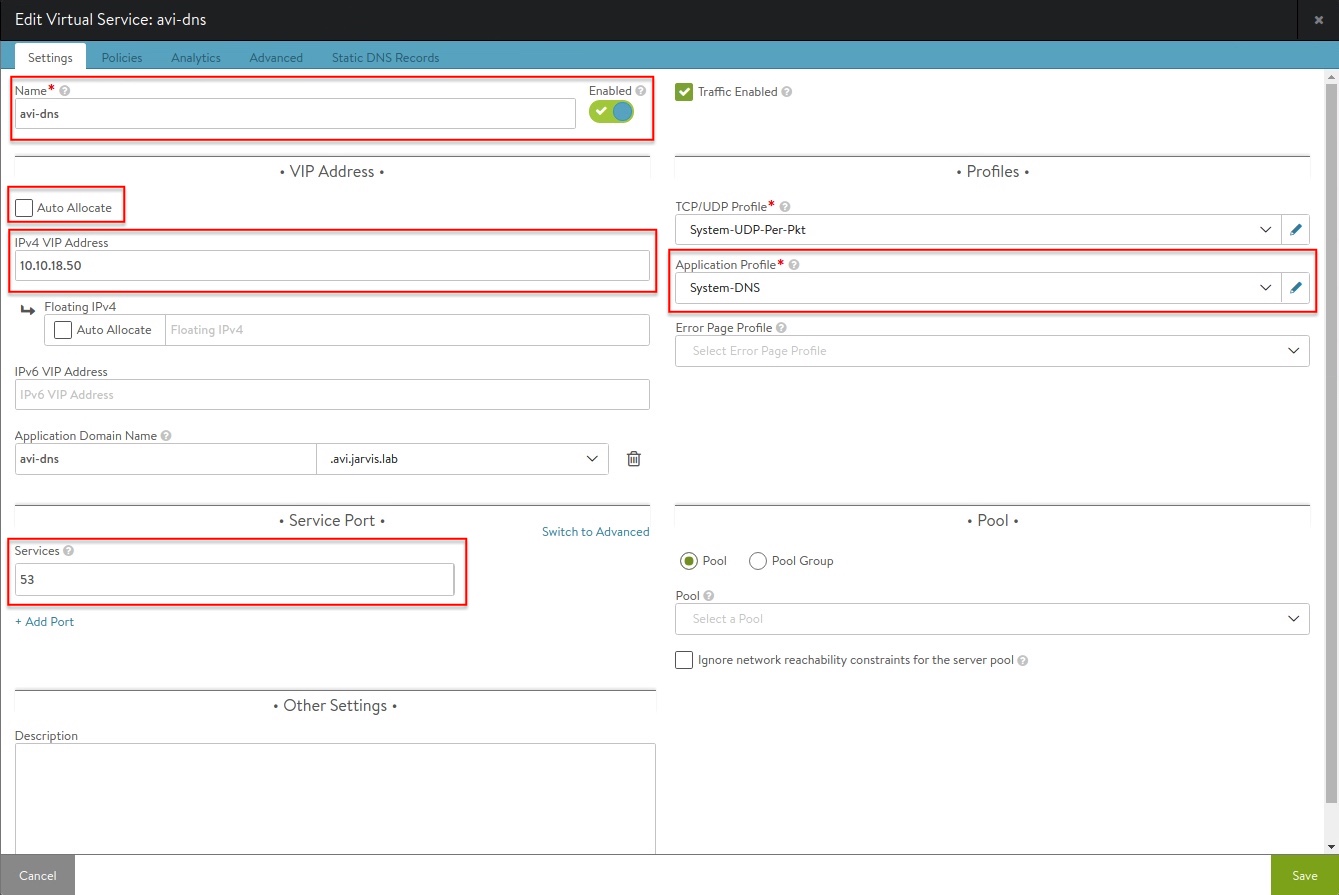
Create a Virtual Service for DNS
- Applications -> Virtual Services -> Create Virtual Service
Create a new DNS Virtual Service which will host FQDN records for your applications .
- Uncheck Auto Allocate
- Assign a static IP Address
- Set Application Profile to System-DNS
- Set Services to port 53
DNS Service in Avi Vantage
- Administration -> Settings -> DNS Service
Finally, select the new DNS Virtual Service in your Avi Vantage system settings.

Test if you can resolve the DNS name of the created VS:
dig avi-dns.avi.jarvis.lab

; <<>> DiG 9.11.3-1ubuntu1.15-Ubuntu <<>> avi-dns.avi.jarvis.lab
;; global options: +cmd
;; Got answer:
;; ->>HEADER<<- opcode: QUERY, status: NOERROR, id: 54355
;; flags: qr rd ra; QUERY: 1, ANSWER: 1, AUTHORITY: 0, ADDITIONAL: 1

;; OPT PSEUDOSECTION:
; EDNS: version: 0, flags:; udp: 65494
;; QUESTION SECTION:
;avi-dns.avi.jarvis.lab.                IN      A

;; ANSWER SECTION:
avi-dns.avi.jarvis.lab. 29      IN      A       10.10.18.50

;; Query time: 1 msec
;; SERVER: 127.0.0.53#53(127.0.0.53)
;; WHEN: Wed Jul 28 15:16:32 CEST 2021
;; MSG SIZE  rcvd: 67
The Windows Server part - New Delegation
On the Windows Server (if you are using a Windows Server for your Domain Services) you have to add a New Delegation to your DNS configuration. It’s straight forward.
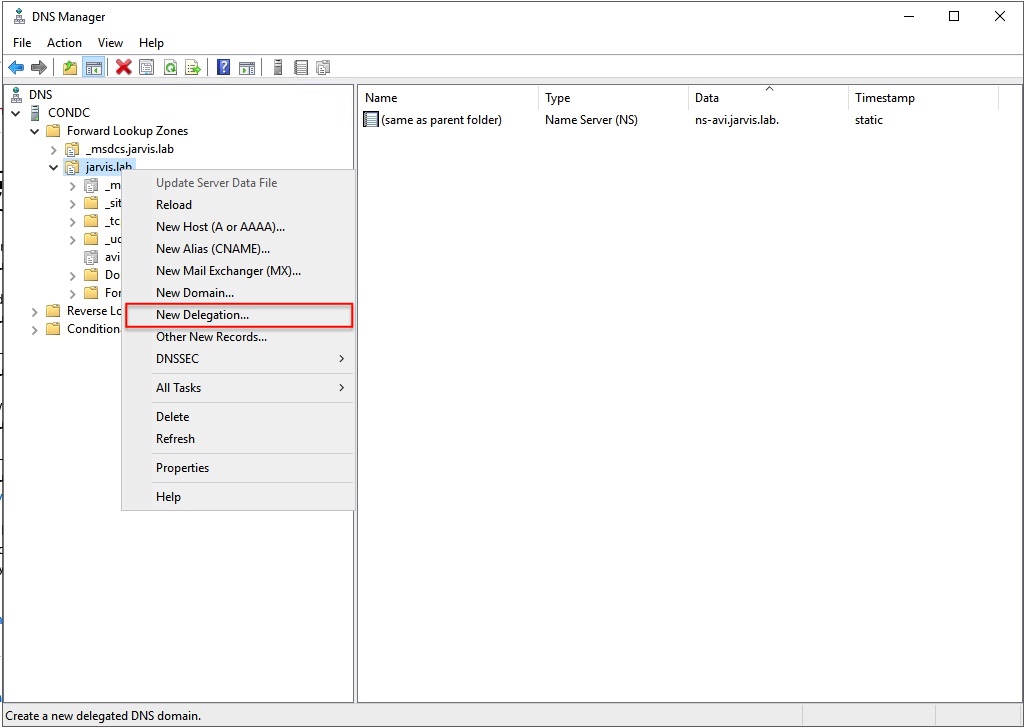
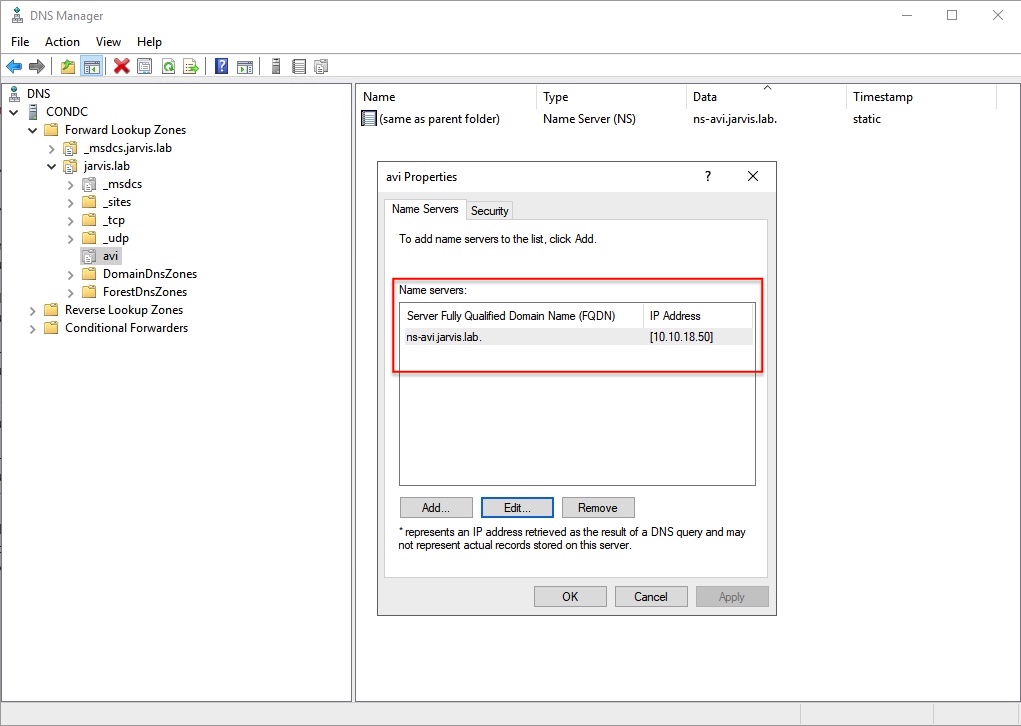
Having done this, Avi Vantage DNS will be serving records for these particular domain(s).
Next - Demo time 👨💻
Layer 4 Load Balancing | type: LoadBalancer
Our first demo was basic Kubernetes magic and covered the deployment of a web application which had a Kubernetes Service type: LoadBalancer configured. The deployment will request a VIP from the Avi Service Engine through the AKO, to make our app reachable via http(port: 80).
The following slide was used to visualize and explain what we’ve demoed (start with Helm):
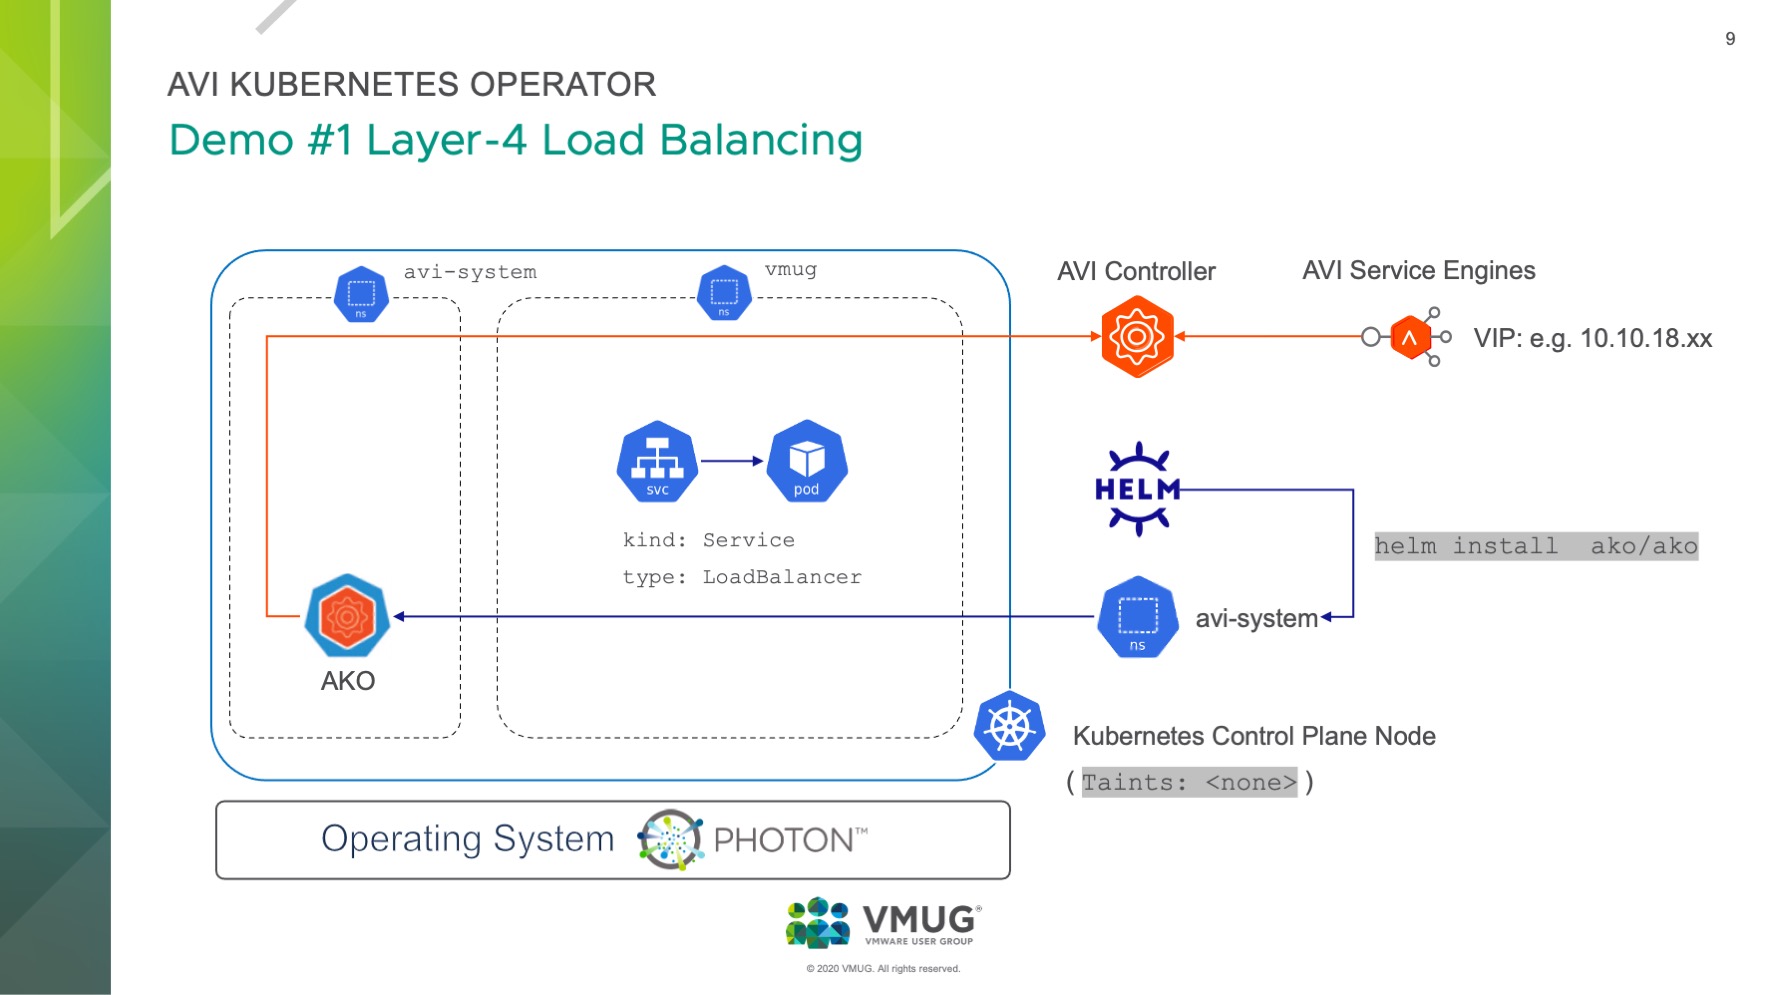
The cool thing even though is, that we made use of a pretty nice feature from the NSX-ALB which is called Auto FQDN (L4Settings.autoFQDN). This feature is used to control how the layer 4 service of type Loadbalancer’s FQDN is generated. This tunable can also be configured via the value.yaml file or directly used as a --set configuration for the helm install CLI:
[...]

### This section outlines all the knobs used to control Layer 4 loadbalancing settings in AKO.
L4Settings:
  autoFQDN: default   # ENUM: default(<svc>.<ns>.<subdomain>), flat (<svc>-<ns>.<subdomain>), "disabled" If the value is disabled then the FQDN generation is disabled.

[...]
As you can read from the description, the generated FQDN will have the following structure by default: <svc>.<ns>.<subdomain>. Let’s validate the generation of the FQDN by deploying the demo web application hackazon, which simulates an e-commerce shop. This application was deployed into a seperate namespace named vmug (kubectl create ns vmug).
Demo #1: Web App deployment with L4 Service
- Application specification:
kind: Deployment+kind: Service
kubectl -n vmug create -f - <<EOF
kind: Deployment
apiVersion: apps/v1
metadata:
  name: avitest-deployment
  labels:
    app: avitest
spec:
  replicas: 2
  selector:
    matchLabels:
      app: avitest
  template:
    metadata:
      labels:
        app: avitest
    spec:
      containers:
      - name: avitest
        image: ianwijaya/hackazon
        ports:
        - name: http
          containerPort: 80
          protocol: TCP
---
kind: Service
apiVersion: v1
metadata:
  name: avisvc-lb
  labels:
    svc: avisvc-lb
spec:
  ports:
  - name: http
    port: 80
    targetPort: 80
  selector:
    app: avitest
  type: LoadBalancer
EOFkubectlvalidation of the deployment:
kubectl -n vmug get deploy,po,svc
NAME READY UP-TO-DATE AVAILABLE AGE
deployment.apps/avitest-deployment 2/2 2 2 23m
NAME READY STATUS RESTARTS AGE
pod/avitest-deployment-66645bdb9b-nw9f2 1/1 Running 0 23m
pod/avitest-deployment-66645bdb9b-r5c84 1/1 Running 0 23m
NAME TYPE CLUSTER-IP EXTERNAL-IP PORT(S) AGE
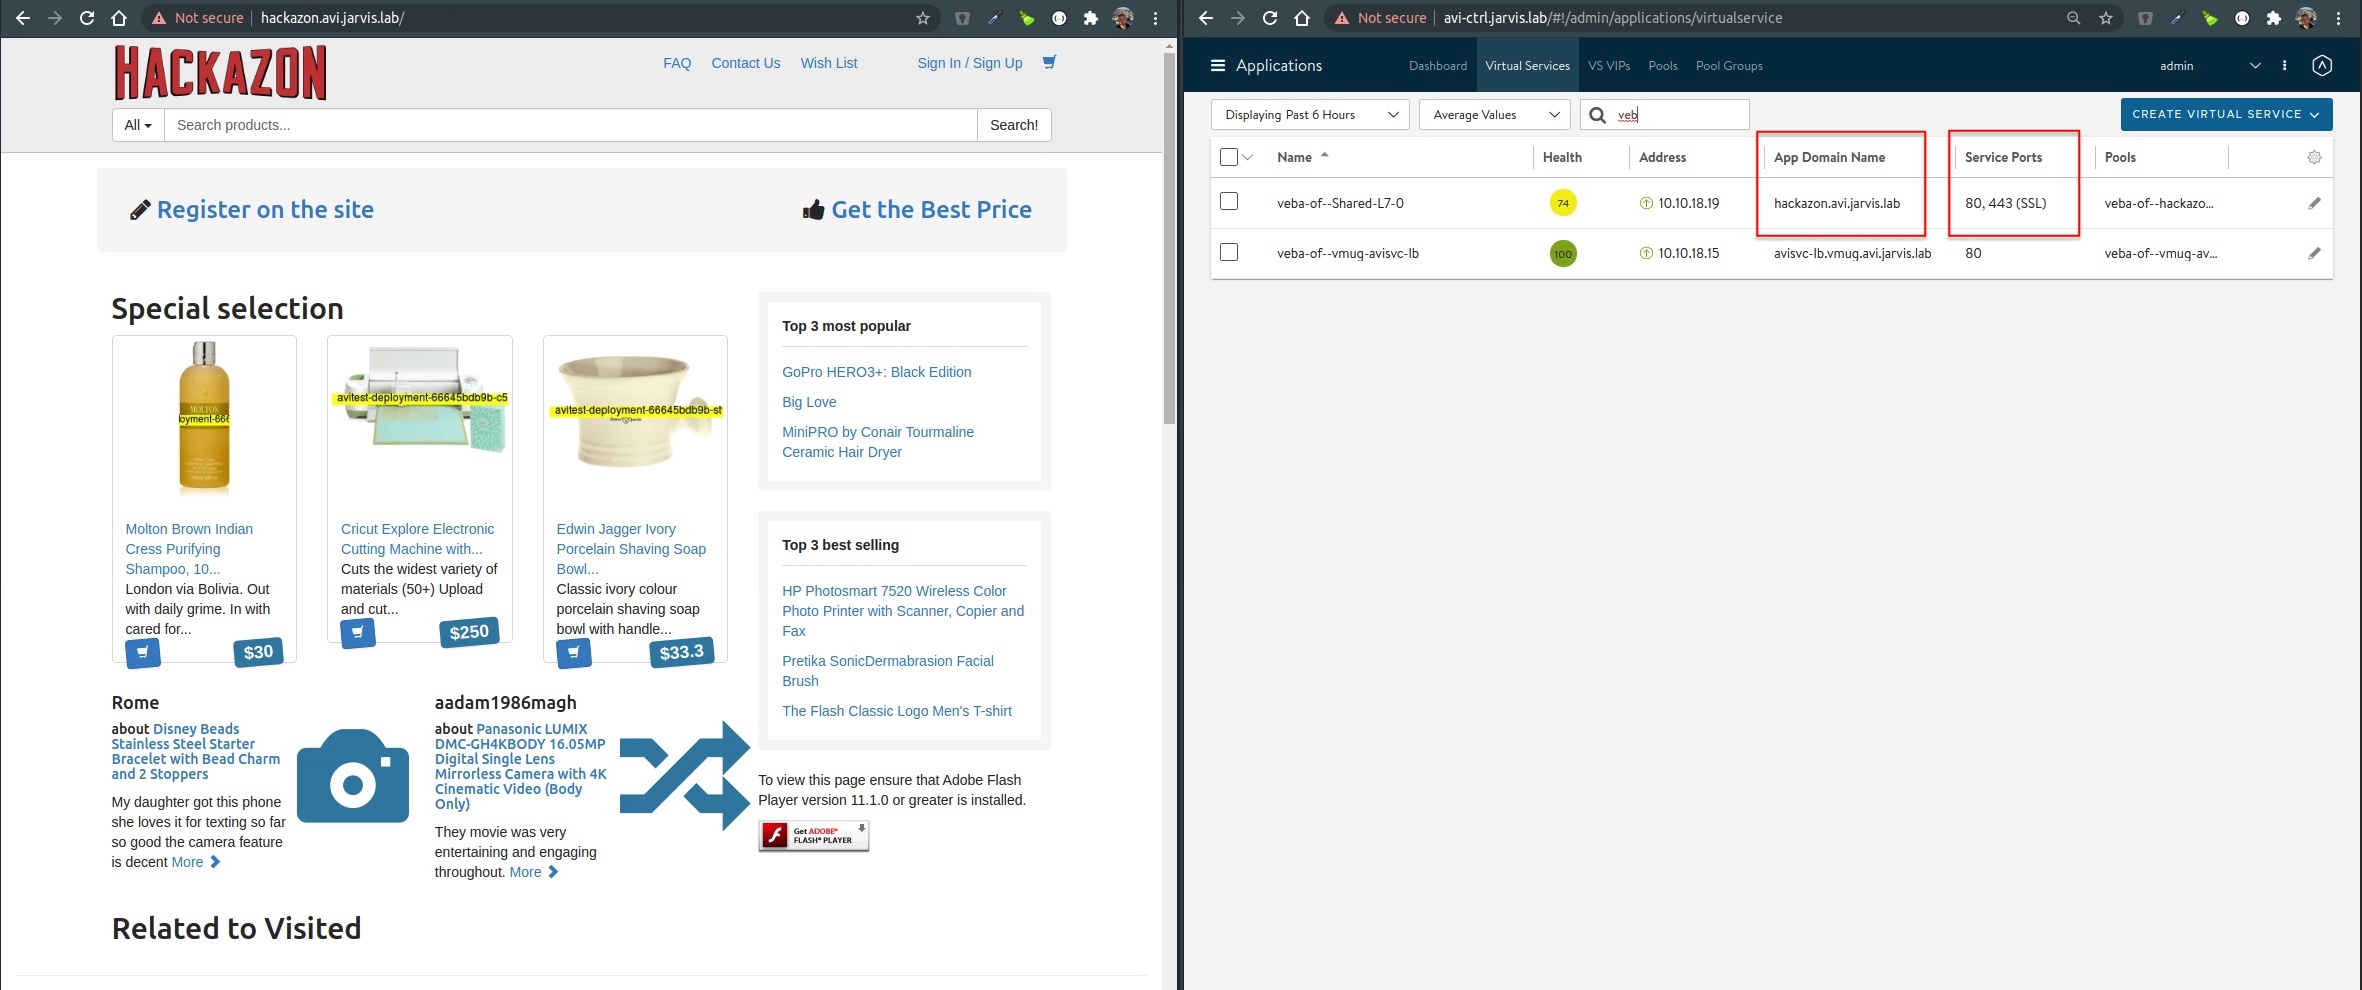
service/avisvc-lb LoadBalancer 10.98.85.14 10.10.18.15 80:31851/TCP 23mThe Controller Management GUI (Avi Vantage) is showing that the Virtual Service is up and provided by the Service Engine Group vmug-se-group which I’ve defined at the deployment of the AKO (--set ControllerSettings.serviceEngineGroupName='vmug-se-group').
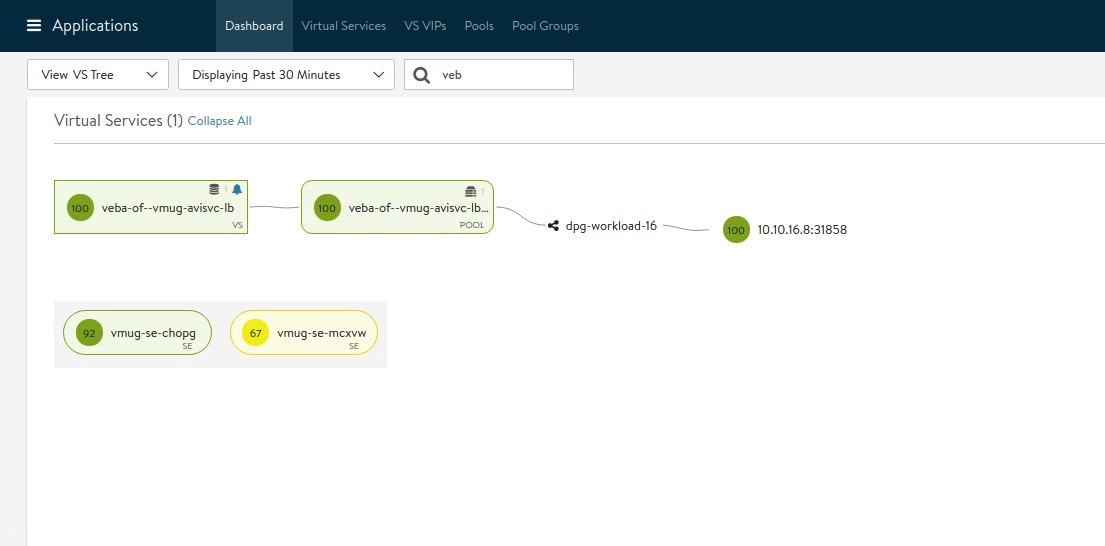

Figure IX is showing that the autoFQDN feature generated an App Domain Name (remember <svc>.<ns>.<subdomain>), which is avisvc-lb.vmug.avi.jarvis.lab, and on which our application is now reachable at via http.
I would like to spare you another screenshot and use a curl output instead of:
curl -I http://avisvc-lb.vmug.avi.jarvis.lab

HTTP/1.1 200 OK
Date: Wed, 28 Jul 2021 21:40:46 GMT
Server: Apache/2.4.7 (Ubuntu)
X-Powered-By: PHP/5.5.9-1ubuntu4.11
Set-Cookie: PHPSESSID=j174pd3706i2cm6ecemdv0g0k1; path=/
Expires: Thu, 19 Nov 1981 08:52:00 GMT
Cache-Control: no-store, no-cache, must-revalidate, post-check=0, pre-check=0
Pragma: no-cache
Content-Length: 64734
Content-Type: text/html; charset=utf-8
HTTP/1.1 200 OK The app is reachable via it’s App Domain Name.
Onto Demo #2!
Layer 7 Load Balancing | type: Ingress
In this second demo, James and I wanted to show the Layer-7 Ingress capabilities of the NSX-ALB and added the necessary kind: Ingress to our web app.
Ingress exposes HTTP and HTTPS routes from outside the cluster to services within the cluster. Traffic routing is controlled by rules defined on the Ingress resource.
Source: Kubernetes Documentation
At Figure X, you see now the Ingress icon is showing up as well as the Ingress rule, which specifies the URL for our application.
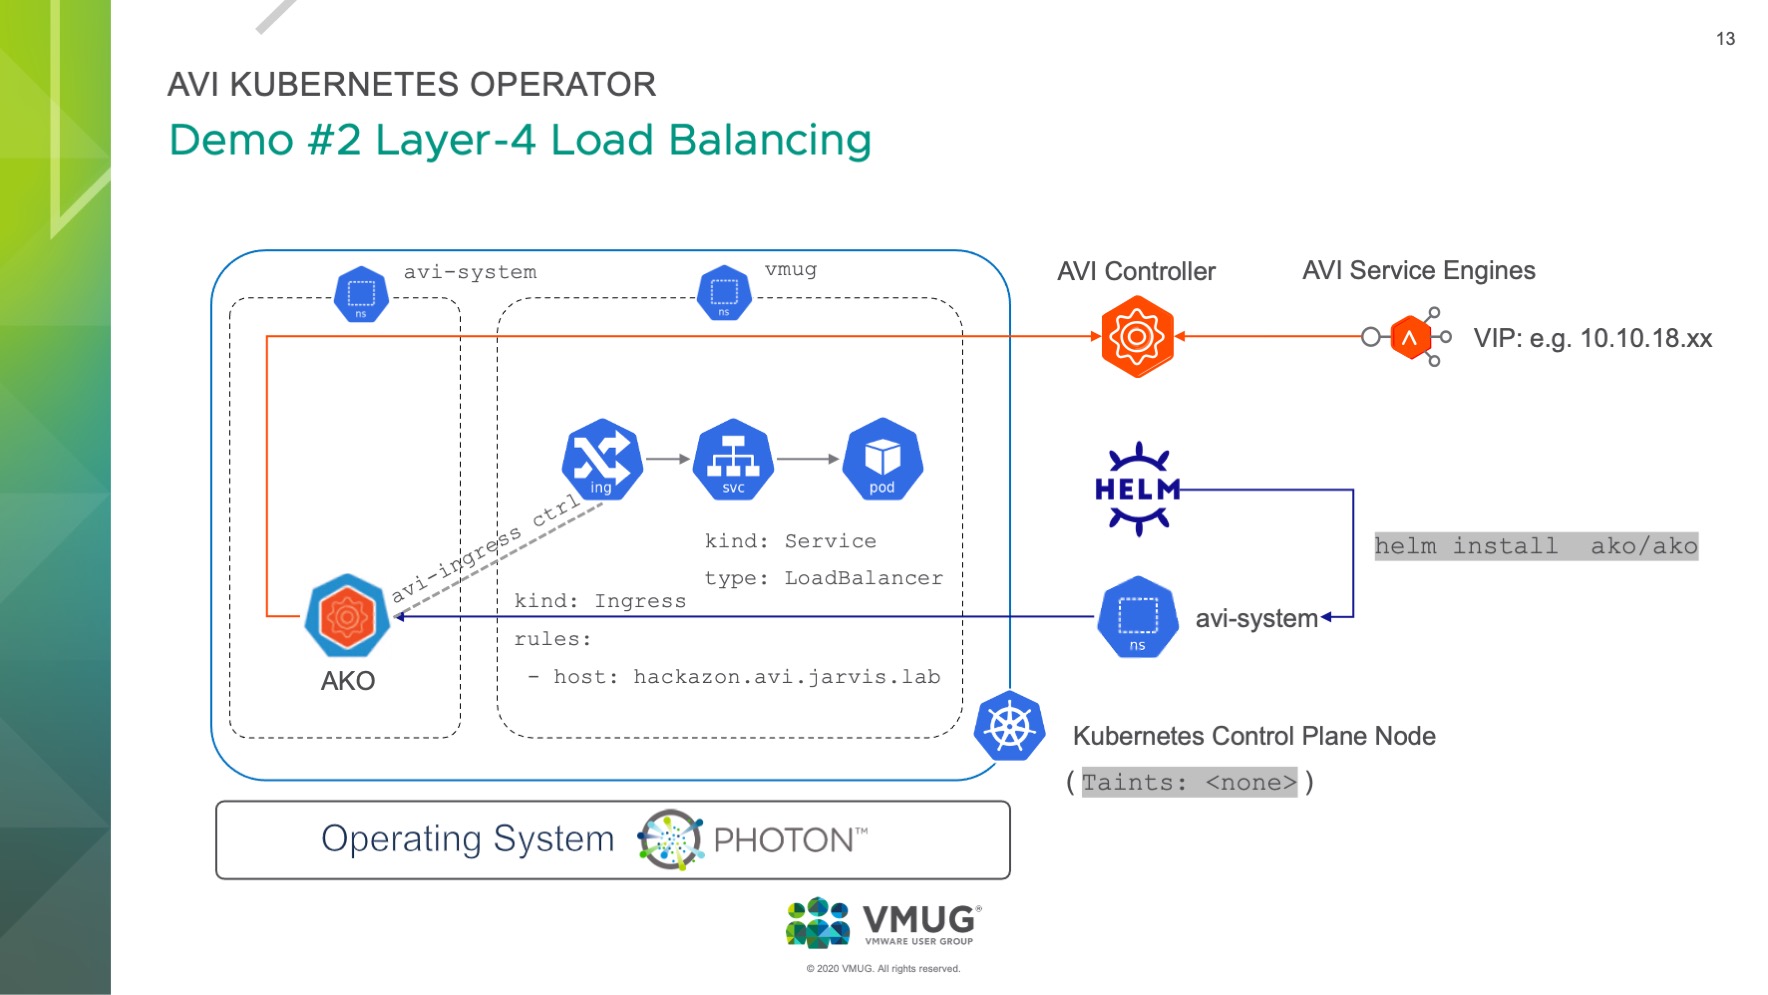
AKO is also an Ingress Controller
First and foremost! To leverage such functionalities, we need an Ingress Controller, don’t we?!
We do! And this is another great value add of the Avi Kubernetes Operator. If not specifically disabled during the deployment, the AKO will serve your Kubernetes Cluster as an Ingress controller too. Here’s the according snipped from the values.yaml file:
[...]

### This section outlines all the knobs  used to control Layer 7 loadbalancing settings in AKO.
L7Settings:
  defaultIngController: 'true'

[...]
Deploying the AKO will add the missing Kubernetes resource ingressclasses.networking.k8s.io to your cluster.
kubectl get ingressclasses.networking.k8s.io

NAME     CONTROLLER              PARAMETERS                                     AGE
avi-lb   ako.vmware.com/avi-lb   IngressParameters.ako.vmware.com/external-lb   32m
In more detail:
kubectl describe ingressclasses.networking.k8s.io avi-lb -n avi-system

Name:         avi-lb
Labels:       app.kubernetes.io/managed-by=Helm
Annotations:  ingressclass.kubernetes.io/is-default-class: true
              meta.helm.sh/release-name: ako-1627507213
              meta.helm.sh/release-namespace: avi-system
Controller:   ako.vmware.com/avi-lb
Parameters:
  APIGroup:  ako.vmware.com
  Kind:      IngressParameters
  Name:      external-lb
Events:      <none>
Demo #2: Web App deployment with L7 Service
Now that we’ve set the scene right, let’s add the Ingress specification to our existing web app and apply the new configuration.
- Application specification:
kind: Deployment+kind: Service+kind: Ingress:
kubectl -n vmug apply -f - <<EOF
kind: Deployment
apiVersion: apps/v1
metadata:
  name: avitest-deployment
  labels:
    app: avitest
spec:
  replicas: 2
  selector:
    matchLabels:
      app: avitest
  template:
    metadata:
      labels:
        app: avitest
    spec:
      containers:
      - name: avitest
        image: ianwijaya/hackazon
        ports:
        - name: http
          containerPort: 80
          protocol: TCP
---
kind: Service
apiVersion: v1
metadata:
  name: avisvc-lb
  labels:
    svc: avisvc-lb
spec:
  ports:
  - name: http
    port: 80
    targetPort: 80
  selector:
    app: avitest
  type: LoadBalancer
---
apiVersion: networking.k8s.io/v1
kind: Ingress
metadata:
  name: avisvcingress
  labels:
    app: avisvcingress
  annotations:
   kubernetes.io/ingress.class: avi
spec:
  rules:
  - host: hackazon.avi.jarvis.lab
    http:
      paths:
      - pathType: Prefix
        path: /
        backend:
          service:
            name: avisvc-lb
            port:
              number: 80
EOF
We should now see the new Ingress service available for our web app.
kubectl -n vmug get po,svc,ingress

NAME                                      READY   STATUS    RESTARTS   AGE
pod/avitest-deployment-66645bdb9b-c52gv   1/1     Running   0          59s
pod/avitest-deployment-66645bdb9b-st9z7   1/1     Running   0          59s

NAME                TYPE           CLUSTER-IP       EXTERNAL-IP   PORT(S)        AGE
service/avisvc-lb   LoadBalancer   10.101.249.194   10.10.18.15   80:32678/TCP   59s

NAME                                      CLASS    HOSTS                     ADDRESS       PORTS   AGE
ingress.networking.k8s.io/avisvcingress   <none>   hackazon.avi.jarvis.lab   10.10.18.19   80      12h
When we now have a look at the Avi Controller, we are noticing a complete new VIP was assigned for our Ingress configuration and another striking aspect is, that the NSX-ALB automatically creates a https service port for our app. To be clear, we’ve deployed an Insecure Ingress configuration and the NSX-ALB takes care of it for us (SSL Termination).
Furthermore, if we are deploying another application with an Ingress config specified, the NSX-ALB will assign a complete new VIP to it and will not share the already existing one.

You can read more about how the AKO handles Insecure Ingress and Secure Ingress at the repo - AKO Objects
Advanced Analytics in NSX-ALB
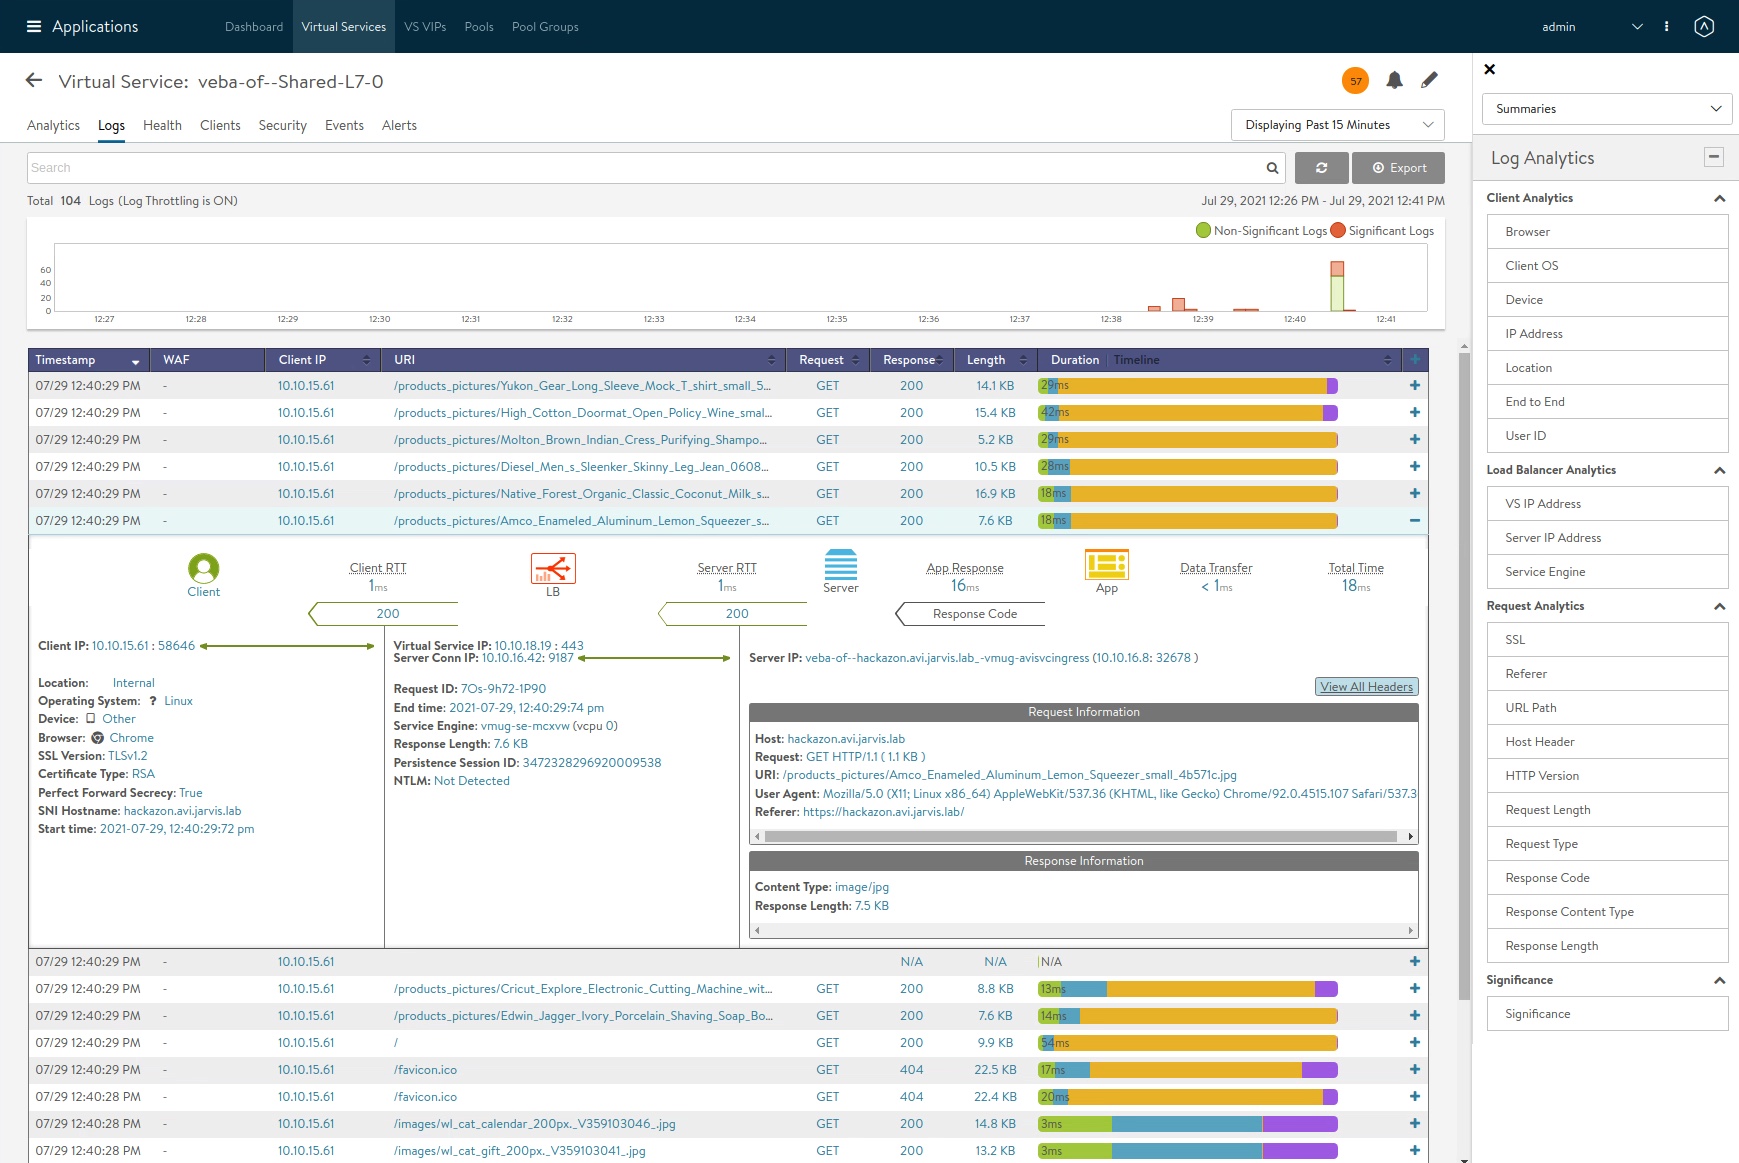
With the configuration of the Ingress, our NSX-ALB is now fuelled with plenty of processable data for the Analytics Engine. I’m not an expert in this topic 🤷♂️ and therefore I’m making use of the following:
The Avi SE represent full-featured, enterprise-grade load balancers, web application firewall (WAF), and analytics that provide traffic management and application security while collecting real-time analytics from the traffic flows. The Avi Controller provides comprehensive observability based on closed-loop telemetry and presents actionable insights to make decisions based on application monitoring, end-to-end timing, searchable traffic logs, security insights, log insights, client insights, and more.
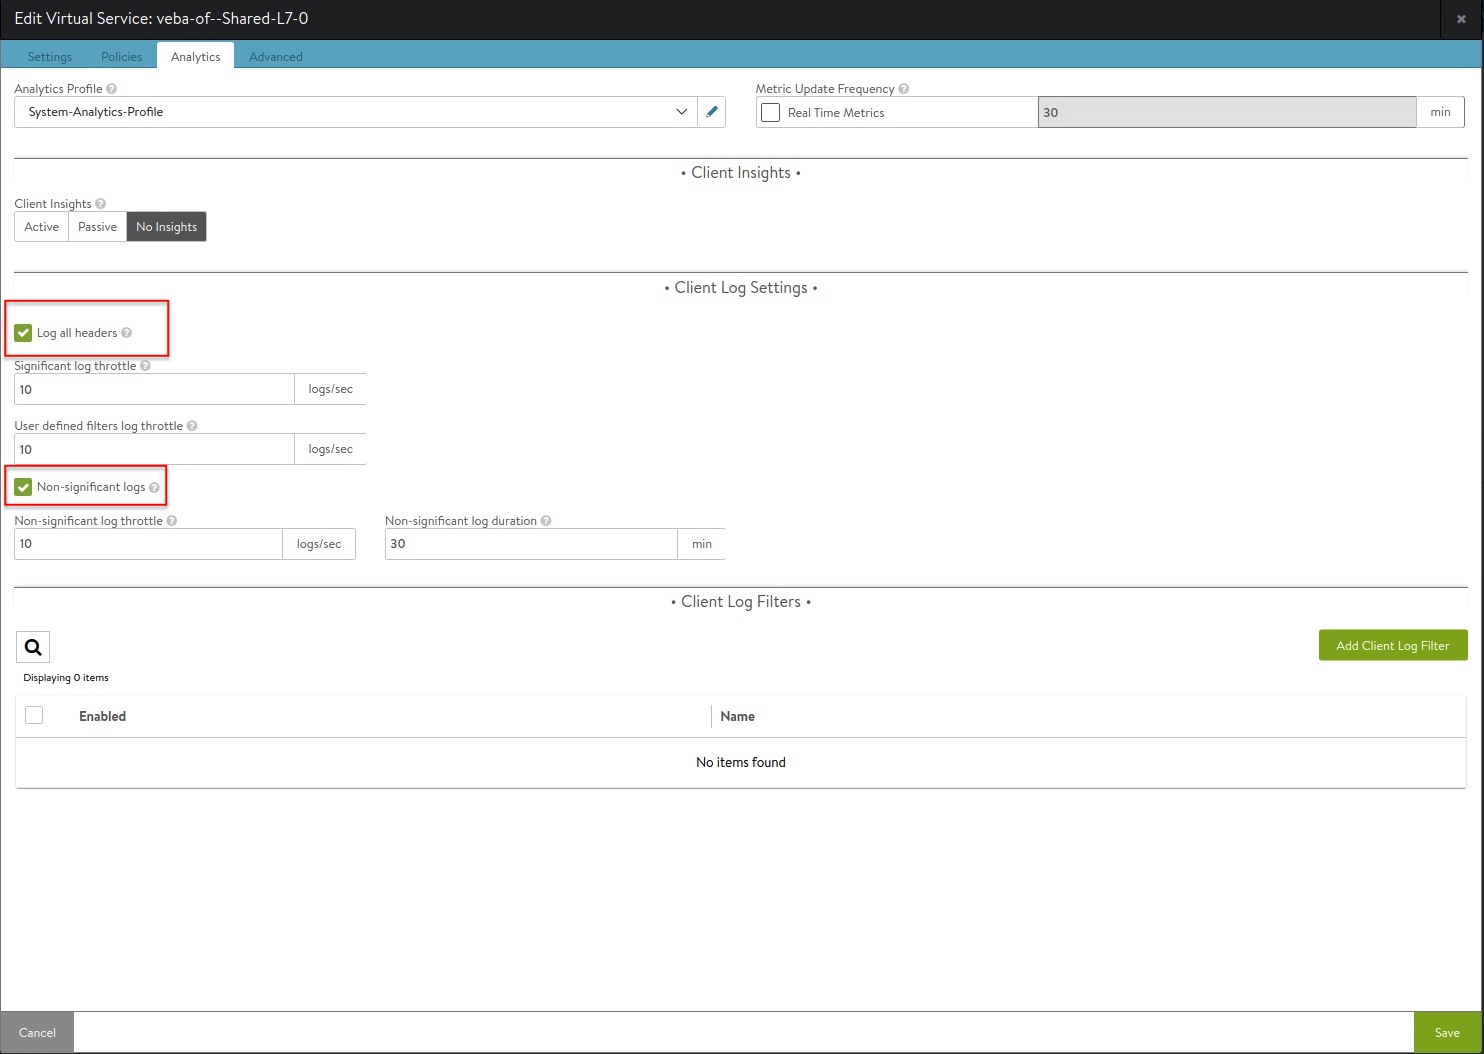
To really get an idea what kind of application related informations are available for the VS, I had to tick the boxes for Log all headers as well as Non-significant logs within the configuration of the VS.
And here’s a glimpse into how extensively and beautiful (& of course useful) the data is prepared and presented:
Conclusion
Deploying the Avi Kubernetes Operator on any Kubernetes Cluster is made simple and straight forward. The VMware NSX Advanced Load Balancer is enorm feature-rich and can perfectly serve your traditional as well as modern application demands. Features like the introduced Auto FQDN for Layer 4 services as well as the Ingress Capabilities are really just a short outlook what the AKO and NSX Advanced Load Balancer are capable of. I hope this post touched your points of interest and you are considering to put your hands on it as well.