Using Windows SMB Shares in Kubernetes
When it comes to data persistency in Kubernetes, a Persistent Volume1 (PV) is the corresponding cluster resource which will serve your application with the desired requirements. A PV “knows” all the necessary implementation details from the given storage in your infrastructure. Typically, these are either block, file or object storage systems.
Let’s stick with the file-storage. Normally, that’s NFS, isn’t it? But recently a customer of mine wanted to write data from within a Pod to a SMB share. In the first moment, that sounded odd to me.
Why’s that?
Because SMB is Windows (Microsoft) specific and is known for transfering data mostly from e.g. a Windows client to a Windows Fileserver. Since Kubernetes nodes are (MOSTLY) running Linux as the underlying operating system, I wasn’t familiar with this requirement (Samba aside 😉).
Anyway, a solution had to be found.
Kubernetes FlexVolumes? No?!
When searching the Kubernetes documentation for SMB, the Volumes2 section is mentioning SMB under the subsection FlexVolumes. flexVolumes is an out-of-tree plugin interface which gives storage vendors the possibility to write and deploy plugins, which exposes new storage systems in Kubernetes, without ever interfering with the Kubernetes codebase.
But! It is marked deprecated for Kubernetes version 1.23+ (and above) in favor of the Container Storage Interface (CSI).
flexVolumes was raised back in October 2021 and can be read here: issue #30180.It’s generally recommended to use a CSI driver in order to integrate external storage systems with Kubernetes. I’m pretty sure that this fact isn’t really suprising you 😄. I’d even bet that most of us simply don’t know it any other way.
However and in general, it’s definitely worth reading about the evolution of Volume Plugins in Kubernetes.
Here’s a well written article about it: Kubernetes volume plugins evolution from FlexVolume to CSI
SMB CSI Driver for Kubernetes
I looked up on the Kubernetes CSI repository and found what I was looking for. A SMB CSI Driver which allows Kubernetes to access SMB server on both Linux and Windows nodes. As of writing this article, the latest version listed on the project page is v1.9.0. This will be the version I’m going to install on my VMware Tanzu Kubernetes Grid cluster.
The driver supports dynamic provisioning of Persistent Volumes via Persistent Volume Claims by creating a new sub directory under SMB server.
I’ll guide you through each step of the installation and will finish the post by verifying the write-access to an existing SMB-share on my Windows Fileserver.
Nevertheless, if you prefer an automated remote installation, a install-driver.sh script is provided on the project page.
Installation
Let’s kick-off the installation of the CSI SMB Driver/Provisioner step-by-step.
- Creating a Namespace
- Creating RBAC resources
- Installing the CSI-SMB-Driver
- Rollout of the CSI-SMB-Controller Deployment
- Rollout of the CSI-SMB Provisioner DaemonSet
- Creating a SMB Secret
1. Namespace
By default every resource will be installed in namespace kube-system. Personally, I don’t like installations in such Kubernetes system namespaces when I’m validating new implementations in my k8s environments. Therefore, I’m going to use a new namespace named csi-smb-provisioner.
Just replace the name below and export it as an environment variable. I’ll use $NAMESPACE for the next provided steps of the installation.
export NAMESPACE=csi-smb-provisionerCreate the new namespace (copy/paste):
kubectl create -f - <<EOF
---
apiVersion: v1
kind: Namespace
metadata:
  name: ${NAMESPACE}
EOF
Validate the creation.
kubectl get ns

NAME                           STATUS   AGE
csi-smb-provisioner            Active   4m14s
default                        Active   2d21h
kube-node-lease                Active   2d21h
kube-public                    Active   2d21h
kube-system                    Active   2d21h
vmware-system-auth             Active   2d21h
vmware-system-cloud-provider   Active   2d21h
vmware-system-csi              Active   2d21h
2. RBAC Resources
In order to allow the csi-smb-driver interactions with other Kubernetes resources, like e.g. PersistentVolumes, PersistentVolumeClaims or Nodes, the appropriate RBAC resources have to be created. By executing the next manifest, a ServiceAccount, a ClusterRole as well as a ClusterRoleBinding will be created.
kubectl create -f - <<EOF
---
apiVersion: v1
kind: ServiceAccount
metadata:
  name: csi-smb-controller-sa
  namespace: ${NAMESPACE}
---
apiVersion: v1
kind: ServiceAccount
metadata:
  name: csi-smb-node-sa
  namespace: ${NAMESPACE}
---
kind: ClusterRole
apiVersion: rbac.authorization.k8s.io/v1
metadata:
  name: smb-external-provisioner-role
rules:
  - apiGroups: [""]
    resources: ["persistentvolumes"]
    verbs: ["get", "list", "watch", "create", "delete"]
  - apiGroups: [""]
    resources: ["persistentvolumeclaims"]
    verbs: ["get", "list", "watch", "update"]
  - apiGroups: ["storage.k8s.io"]
    resources: ["storageclasses"]
    verbs: ["get", "list", "watch"]
  - apiGroups: [""]
    resources: ["events"]
    verbs: ["get", "list", "watch", "create", "update", "patch"]
  - apiGroups: ["storage.k8s.io"]
    resources: ["csinodes"]
    verbs: ["get", "list", "watch"]
  - apiGroups: [""]
    resources: ["nodes"]
    verbs: ["get", "list", "watch"]
  - apiGroups: ["coordination.k8s.io"]
    resources: ["leases"]
    verbs: ["get", "list", "watch", "create", "update", "patch"]
  - apiGroups: [""]
    resources: ["secrets"]
    verbs: ["get"]
---
kind: ClusterRoleBinding
apiVersion: rbac.authorization.k8s.io/v1
metadata:
  name: smb-csi-provisioner-binding
subjects:
  - kind: ServiceAccount
    name: csi-smb-controller-sa
    namespace: ${NAMESPACE}
roleRef:
  kind: ClusterRole
  name: smb-external-provisioner-role
  apiGroup: rbac.authorization.k8s.io
EOF
As a result you should see…
serviceaccount/csi-smb-controller-sa created
serviceaccount/csi-smb-node-sa created
clusterroles.rbac.authorization.k8s.io/smb-external-provisioner-role
clusterrolebinding.rbac.authorization.k8s.io/smb-csi-provisioner-binding created
…as output on your terminal.
3. CSI-SMB-Driver Installation
Next up is the installation of the CSI-SMB driver itself. This won’t be installed in the newly created namespace ($NAMESPACE).
Execute:
kubectl create -f - <<EOF
---
apiVersion: storage.k8s.io/v1
kind: CSIDriver
metadata:
  name: smb.csi.k8s.io
spec:
  attachRequired: false
  podInfoOnMount: true
EOF
Validation can be done by running:
kubectl get csidrivers.storage.k8s.io

NAME                     ATTACHREQUIRED   PODINFOONMOUNT   STORAGECAPACITY   TOKENREQUESTS   REQUIRESREPUBLISH   MODES        AGE
csi.vsphere.vmware.com   true             false            false             <unset>         false               Persistent   2d22h
smb.csi.k8s.io           false            true             false             <unset>         false               Persistent   21s
Installation from a Private Registry
When you often have to deal with fully internet-restricted environments (air-gapped) like me, it’s important to be well prepared for such offline-installations. One preperation for instance is to make the appropriate container-images offline available first. For the CSI-SMB-Driver it’s the images for the:
CSI-SMB-Controller (deployment)
- k8s.gcr.io/sig-storage/csi-provisioner
- k8s.gcr.io/sig-storage/livenessprobe
- registry.k8s.io/sig-storage/smbplugin
as well as for the CSI-SMB-Node (DaemonSet)
- k8s.gcr.io/sig-storage/csi-node-driver-registrar
- k8s.gcr.io/sig-storage/livenessprobe
- registry.k8s.io/sig-storage/smbplugin
The docker save and docker load -i options as well as the Carvel CLI tool imgpkg are very helpful and powerful for such operations.
I’ve written a dedicated blog post about the topic how to make container-images available offline in order to share or to upload them to your own private container-registry.
Once the images are available offline, you have to create an imagePullSecret in Kubernetes which has to be referenced accordingly in the manifest files.
kubectl -n $NAMESPACE create secret docker-registry harbor-creds \
--docker-server='harbor.jarvis.tanzu' \
--docker-username='admin' \
--docker-password='$PASSWORD'
To be referenced in csi-smb-controller.yaml and csi-smb-node.yaml.
Snipped:
[...]
      imagePullSecrets:
      - name: harbor-creds
[...]
I’m not going to install it from a private-registry and therefore I stick with the public image-references.
4. Deployment - CSI-SMB-Controller
The next step is the installation of the csi-smb-controller which will run as a Kubernetes deployment on your cluster. Create a new .yaml file, name it e.g. csi-smb-controller.yaml, and paste in the following specifications:
kind: Deployment
apiVersion: apps/v1
metadata:
  name: csi-smb-controller
spec:
  replicas: 1
  selector:
    matchLabels:
      app: csi-smb-controller
  template:
    metadata:
      labels:
        app: csi-smb-controller
    spec:
      dnsPolicy: Default  # available values: Default, ClusterFirstWithHostNet, ClusterFirst
      serviceAccountName: csi-smb-controller-sa
      nodeSelector:
        kubernetes.io/os: linux
      priorityClassName: system-cluster-critical
      tolerations:
        - key: "node-role.kubernetes.io/master"
          operator: "Exists"
          effect: "NoSchedule"
        - key: "node-role.kubernetes.io/controlplane"
          operator: "Exists"
          effect: "NoSchedule"
        - key: "node-role.kubernetes.io/control-plane"
          operator: "Exists"
          effect: "NoSchedule"
      containers:
        - name: csi-provisioner
          image: registry.k8s.io/sig-storage/csi-provisioner:v3.2.0
          args:
            - "-v=2"
            - "--csi-address=$(ADDRESS)"
            - "--leader-election"
            - "--leader-election-namespace=kube-system"
            - "--extra-create-metadata=true"
          env:
            - name: ADDRESS
              value: /csi/csi.sock
          volumeMounts:
            - mountPath: /csi
              name: socket-dir
          resources:
            limits:
              cpu: 1
              memory: 300Mi
            requests:
              cpu: 10m
              memory: 20Mi
        - name: liveness-probe
          image: registry.k8s.io/sig-storage/livenessprobe:v2.7.0
          args:
            - --csi-address=/csi/csi.sock
            - --probe-timeout=3s
            - --health-port=29642
            - --v=2
          volumeMounts:
            - name: socket-dir
              mountPath: /csi
          resources:
            limits:
              cpu: 1
              memory: 100Mi
            requests:
              cpu: 10m
              memory: 20Mi
        - name: smb
          image: registry.k8s.io/sig-storage/smbplugin:v1.9.0
          imagePullPolicy: IfNotPresent
          args:
            - "--v=5"
            - "--endpoint=$(CSI_ENDPOINT)"
            - "--metrics-address=0.0.0.0:29644"
          ports:
            - containerPort: 29642
              name: healthz
              protocol: TCP
            - containerPort: 29644
              name: metrics
              protocol: TCP
          livenessProbe:
            failureThreshold: 5
            httpGet:
              path: /healthz
              port: healthz
            initialDelaySeconds: 30
            timeoutSeconds: 10
            periodSeconds: 30
          env:
            - name: CSI_ENDPOINT
              value: unix:///csi/csi.sock
          securityContext:
            privileged: true
          volumeMounts:
            - mountPath: /csi
              name: socket-dir
          resources:
            limits:
              memory: 200Mi
            requests:
              cpu: 10m
              memory: 20Mi
      volumes:
        - name: socket-dir
          emptyDir: {}
Install the csi-smb-controller using the newly created manifest file.
kubectl -n $NAMESPACE apply -f csi-smb-controller.yamlValidation:
kubectl -n csi-smb-provisioner get deploy,po,rs -o wide

NAME                                 READY   UP-TO-DATE   AVAILABLE   AGE   CONTAINERS                           IMAGES                                                                                                                                             SELECTOR
deployment.apps/csi-smb-controller   1/1     1            1           16d   csi-provisioner,liveness-probe,smb   registry.k8s.io/sig-storage/csi-provisioner:v3.2.0,registry.k8s.io/sig-storage/livenessprobe:v2.7.0,registry.k8s.io/sig-storage/smbplugin:v1.9.0   app=csi-smb-controller

NAME                                      READY   STATUS    RESTARTS   AGE   IP             NODE                                       NOMINATED NODE   READINESS GATES
pod/csi-smb-controller-7b9cd56676-kg8nl   3/3     Running   0          11d   172.20.6.38    mark50-tkc-1-node-ckr5w-5976457f9c-sx95v   <none>           <none>

NAME                                            DESIRED   CURRENT   READY   AGE   CONTAINERS                           IMAGES                                                                                                                                             SELECTOR
replicaset.apps/csi-smb-controller-7b9cd56676   1         1         1       16d   csi-provisioner,liveness-probe,smb   registry.k8s.io/sig-storage/csi-provisioner:v3.2.0,registry.k8s.io/sig-storage/livenessprobe:v2.7.0,registry.k8s.io/sig-storage/smbplugin:v1.9.0   app=csi-smb-controller,pod-template-hash=7b9cd56676
6. DaemonSet - CSI-SMB-Node
Create another file for the DaemonSet csi-smb-node.
E.g. csi-smb-node.yaml:
kind: DaemonSet
apiVersion: apps/v1
metadata:
  name: csi-smb-node
spec:
  updateStrategy:
    rollingUpdate:
      maxUnavailable: 1
    type: RollingUpdate
  selector:
    matchLabels:
      app: csi-smb-node
  template:
    metadata:
      labels:
        app: csi-smb-node
    spec:
      hostNetwork: true
      dnsPolicy: Default  # available values: Default, ClusterFirstWithHostNet, ClusterFirst
      serviceAccountName: csi-smb-node-sa
      nodeSelector:
        kubernetes.io/os: linux
      priorityClassName: system-node-critical
      tolerations:
        - operator: "Exists"
      containers:
        - name: liveness-probe
          volumeMounts:
            - mountPath: /csi
              name: socket-dir
          image: registry.k8s.io/sig-storage/livenessprobe:v2.7.0
          args:
            - --csi-address=/csi/csi.sock
            - --probe-timeout=3s
            - --health-port=29643
            - --v=2
          resources:
            limits:
              memory: 100Mi
            requests:
              cpu: 10m
              memory: 20Mi
        - name: node-driver-registrar
          image: registry.k8s.io/sig-storage/csi-node-driver-registrar:v2.5.1
          args:
            - --csi-address=$(ADDRESS)
            - --kubelet-registration-path=$(DRIVER_REG_SOCK_PATH)
            - --v=2
          livenessProbe:
            exec:
              command:
                - /csi-node-driver-registrar
                - --kubelet-registration-path=$(DRIVER_REG_SOCK_PATH)
                - --mode=kubelet-registration-probe
            initialDelaySeconds: 30
            timeoutSeconds: 15
          env:
            - name: ADDRESS
              value: /csi/csi.sock
            - name: DRIVER_REG_SOCK_PATH
              value: /var/lib/kubelet/plugins/smb.csi.k8s.io/csi.sock
          volumeMounts:
            - name: socket-dir
              mountPath: /csi
            - name: registration-dir
              mountPath: /registration
          resources:
            limits:
              memory: 100Mi
            requests:
              cpu: 10m
              memory: 20Mi
        - name: smb
          image: registry.k8s.io/sig-storage/smbplugin:v1.9.0
          imagePullPolicy: IfNotPresent
          args:
            - "--v=5"
            - "--endpoint=$(CSI_ENDPOINT)"
            - "--nodeid=$(KUBE_NODE_NAME)"
            - "--metrics-address=0.0.0.0:29645"
          ports:
            - containerPort: 29643
              name: healthz
              protocol: TCP
          livenessProbe:
            failureThreshold: 5
            httpGet:
              path: /healthz
              port: healthz
            initialDelaySeconds: 30
            timeoutSeconds: 10
            periodSeconds: 30
          env:
            - name: CSI_ENDPOINT
              value: unix:///csi/csi.sock
            - name: KUBE_NODE_NAME
              valueFrom:
                fieldRef:
                  apiVersion: v1
                  fieldPath: spec.nodeName
          securityContext:
            privileged: true
          volumeMounts:
            - mountPath: /csi
              name: socket-dir
            - mountPath: /var/lib/kubelet/
              mountPropagation: Bidirectional
              name: mountpoint-dir
          resources:
            limits:
              memory: 200Mi
            requests:
              cpu: 10m
              memory: 20Mi
      volumes:
        - hostPath:
            path: /var/lib/kubelet/plugins/smb.csi.k8s.io
            type: DirectoryOrCreate
          name: socket-dir
        - hostPath:
            path: /var/lib/kubelet/
            type: DirectoryOrCreate
          name: mountpoint-dir
        - hostPath:
            path: /var/lib/kubelet/plugins_registry/
            type: DirectoryOrCreate
          name: registration-dir
Deploy the DaemonSet to Kubernetes: kubectl -n $NAMESPACE apply -f csi-smb-node.yaml
Validation:
kubectl -n csi-smb-provisioner get ds,po -o wide

NAME                          DESIRED   CURRENT   READY   UP-TO-DATE   AVAILABLE   NODE SELECTOR            AGE   CONTAINERS                                 IMAGES                                                                                                                                                       SELECTOR
daemonset.apps/csi-smb-node   5         5         5       5            5           kubernetes.io/os=linux   16d   liveness-probe,node-driver-registrar,smb   registry.k8s.io/sig-storage/livenessprobe:v2.7.0,registry.k8s.io/sig-storage/csi-node-driver-registrar:v2.5.1,registry.k8s.io/sig-storage/smbplugin:v1.9.0   app=csi-smb-node

NAME                                      READY   STATUS    RESTARTS   AGE   IP             NODE                                       NOMINATED NODE   READINESS GATES
pod/csi-smb-controller-7b9cd56676-kg8nl   3/3     Running   0          11d   172.20.6.38    mark50-tkc-1-node-ckr5w-5976457f9c-sx95v   <none>           <none>
pod/csi-smb-node-54s9v                    3/3     Running   0          11d   10.197.96.66   mark50-tkc-1-control-plane-tw2l8           <none>           <none>
pod/csi-smb-node-jlsbk                    3/3     Running   0          11d   10.197.96.63   mark50-tkc-1-control-plane-6q6x8           <none>           <none>
pod/csi-smb-node-s9ww5                    3/3     Running   0          11d   10.197.96.69   mark50-tkc-1-node-ckr5w-5976457f9c-2t9hx   <none>           <none>
pod/csi-smb-node-v87dv                    3/3     Running   0          11d   10.197.96.65   mark50-tkc-1-control-plane-hb5b9           <none>           <none>
pod/csi-smb-node-w9tnk                    3/3     Running   0          11d   10.197.96.68   mark50-tkc-1-node-ckr5w-5976457f9c-sx95v   <none>           <none>
Testing
Since all our validations have the desired conditions, we’ll finish the installation with a simple test example. In this test, we are going to write from a pod to a SMB share which is accessible through a mounted Persistent Volume.
Test namespace first!
export TESTNS=smb-testkubectl create ns $TESTNS1. Create SMB Access Secret
A user-level authentication is required to access the share. This will be done by referencing a Kubernetes secret in the Persistent Volume resource creation.
PV Snipped:
[...]
    nodeStageSecretRef:
      name: smb-creds
      namespace: smb-test
[...]
Create the secret:
export USER='testuser' \
export PASSWORD='VMware1!' \
export DOMAIN='jarvis.tanzu'
kubectl -n $TESTNS create secret generic smb-creds \
--from-literal username=$USER \
--from-literal domain=$DOMAIN \
--from-literal password=$PASSWORDIMPORTANT! Securing your Kubernetes Secrets is recommended when using sensible data like your Active Directory credentials in production. Solutions like e.g. Sealed Secrets by Bitnami or Vault by HashiCorp should be considered being used.
2. Create PersistentVolume
The deployment, which will be created in the next step, will have the SMB share accessible through a PersistentVolume and the associated PersistentVolumeClaim.
Begin with the PersistentVolume:
Pay attention to the
specforvolumeHandleandsource!
export VOLUMEID='smb-vol-1' \
export SOURCE='//dc.jarvis.tanzu/data'
kubectl create -f - << EOF
---
apiVersion: v1
kind: PersistentVolume
metadata:
name: pv-smb
namespace: $TESTNS
spec:
storageClassName: ""
capacity:
storage: 50Gi
accessModes:
- ReadWriteMany
persistentVolumeReclaimPolicy: Retain
mountOptions:
- dir_mode=0777
- file_mode=0777
- vers=3.0
csi:
driver: smb.csi.k8s.io
readOnly: false
volumeHandle: $VOLUMEID # make sure it's a unique id in the cluster
volumeAttributes:
source: $SOURCE
nodeStageSecretRef:
name: smb-creds
namespace: smb-test
EOFValidation:
kubectl -n smb-test get pv

NAME                                       CAPACITY   ACCESS MODES   RECLAIM POLICY   STATUS      CLAIM                                                   STORAGECLASS   REASON   AGE
pv-smb                                     50Gi       RWX            Retain           Available                                                                                   46m
Continue with the PersitstentVolumeClaim to bound the volume.
kubectl create -f - <<EOF
---
kind: PersistentVolumeClaim
apiVersion: v1
metadata:
  name: pvc-smb
  namespace: $TESTNS
spec:
  accessModes:
    - ReadWriteMany
  resources:
    requests:
      storage: 10Gi
  volumeName: pv-smb
  storageClassName: ""
EOF
Validate that the STATUS is in state Bound:
kubectl -n smb-test get pv,pvc
NAME CAPACITY ACCESS MODES RECLAIM POLICY STATUS CLAIM STORAGECLASS REASON AGE
persistentvolume/pv-smb 50Gi RWX Retain Bound smb-test/pvc-smb 49m
NAME STATUS VOLUME CAPACITY ACCESS MODES STORAGECLASS AGE
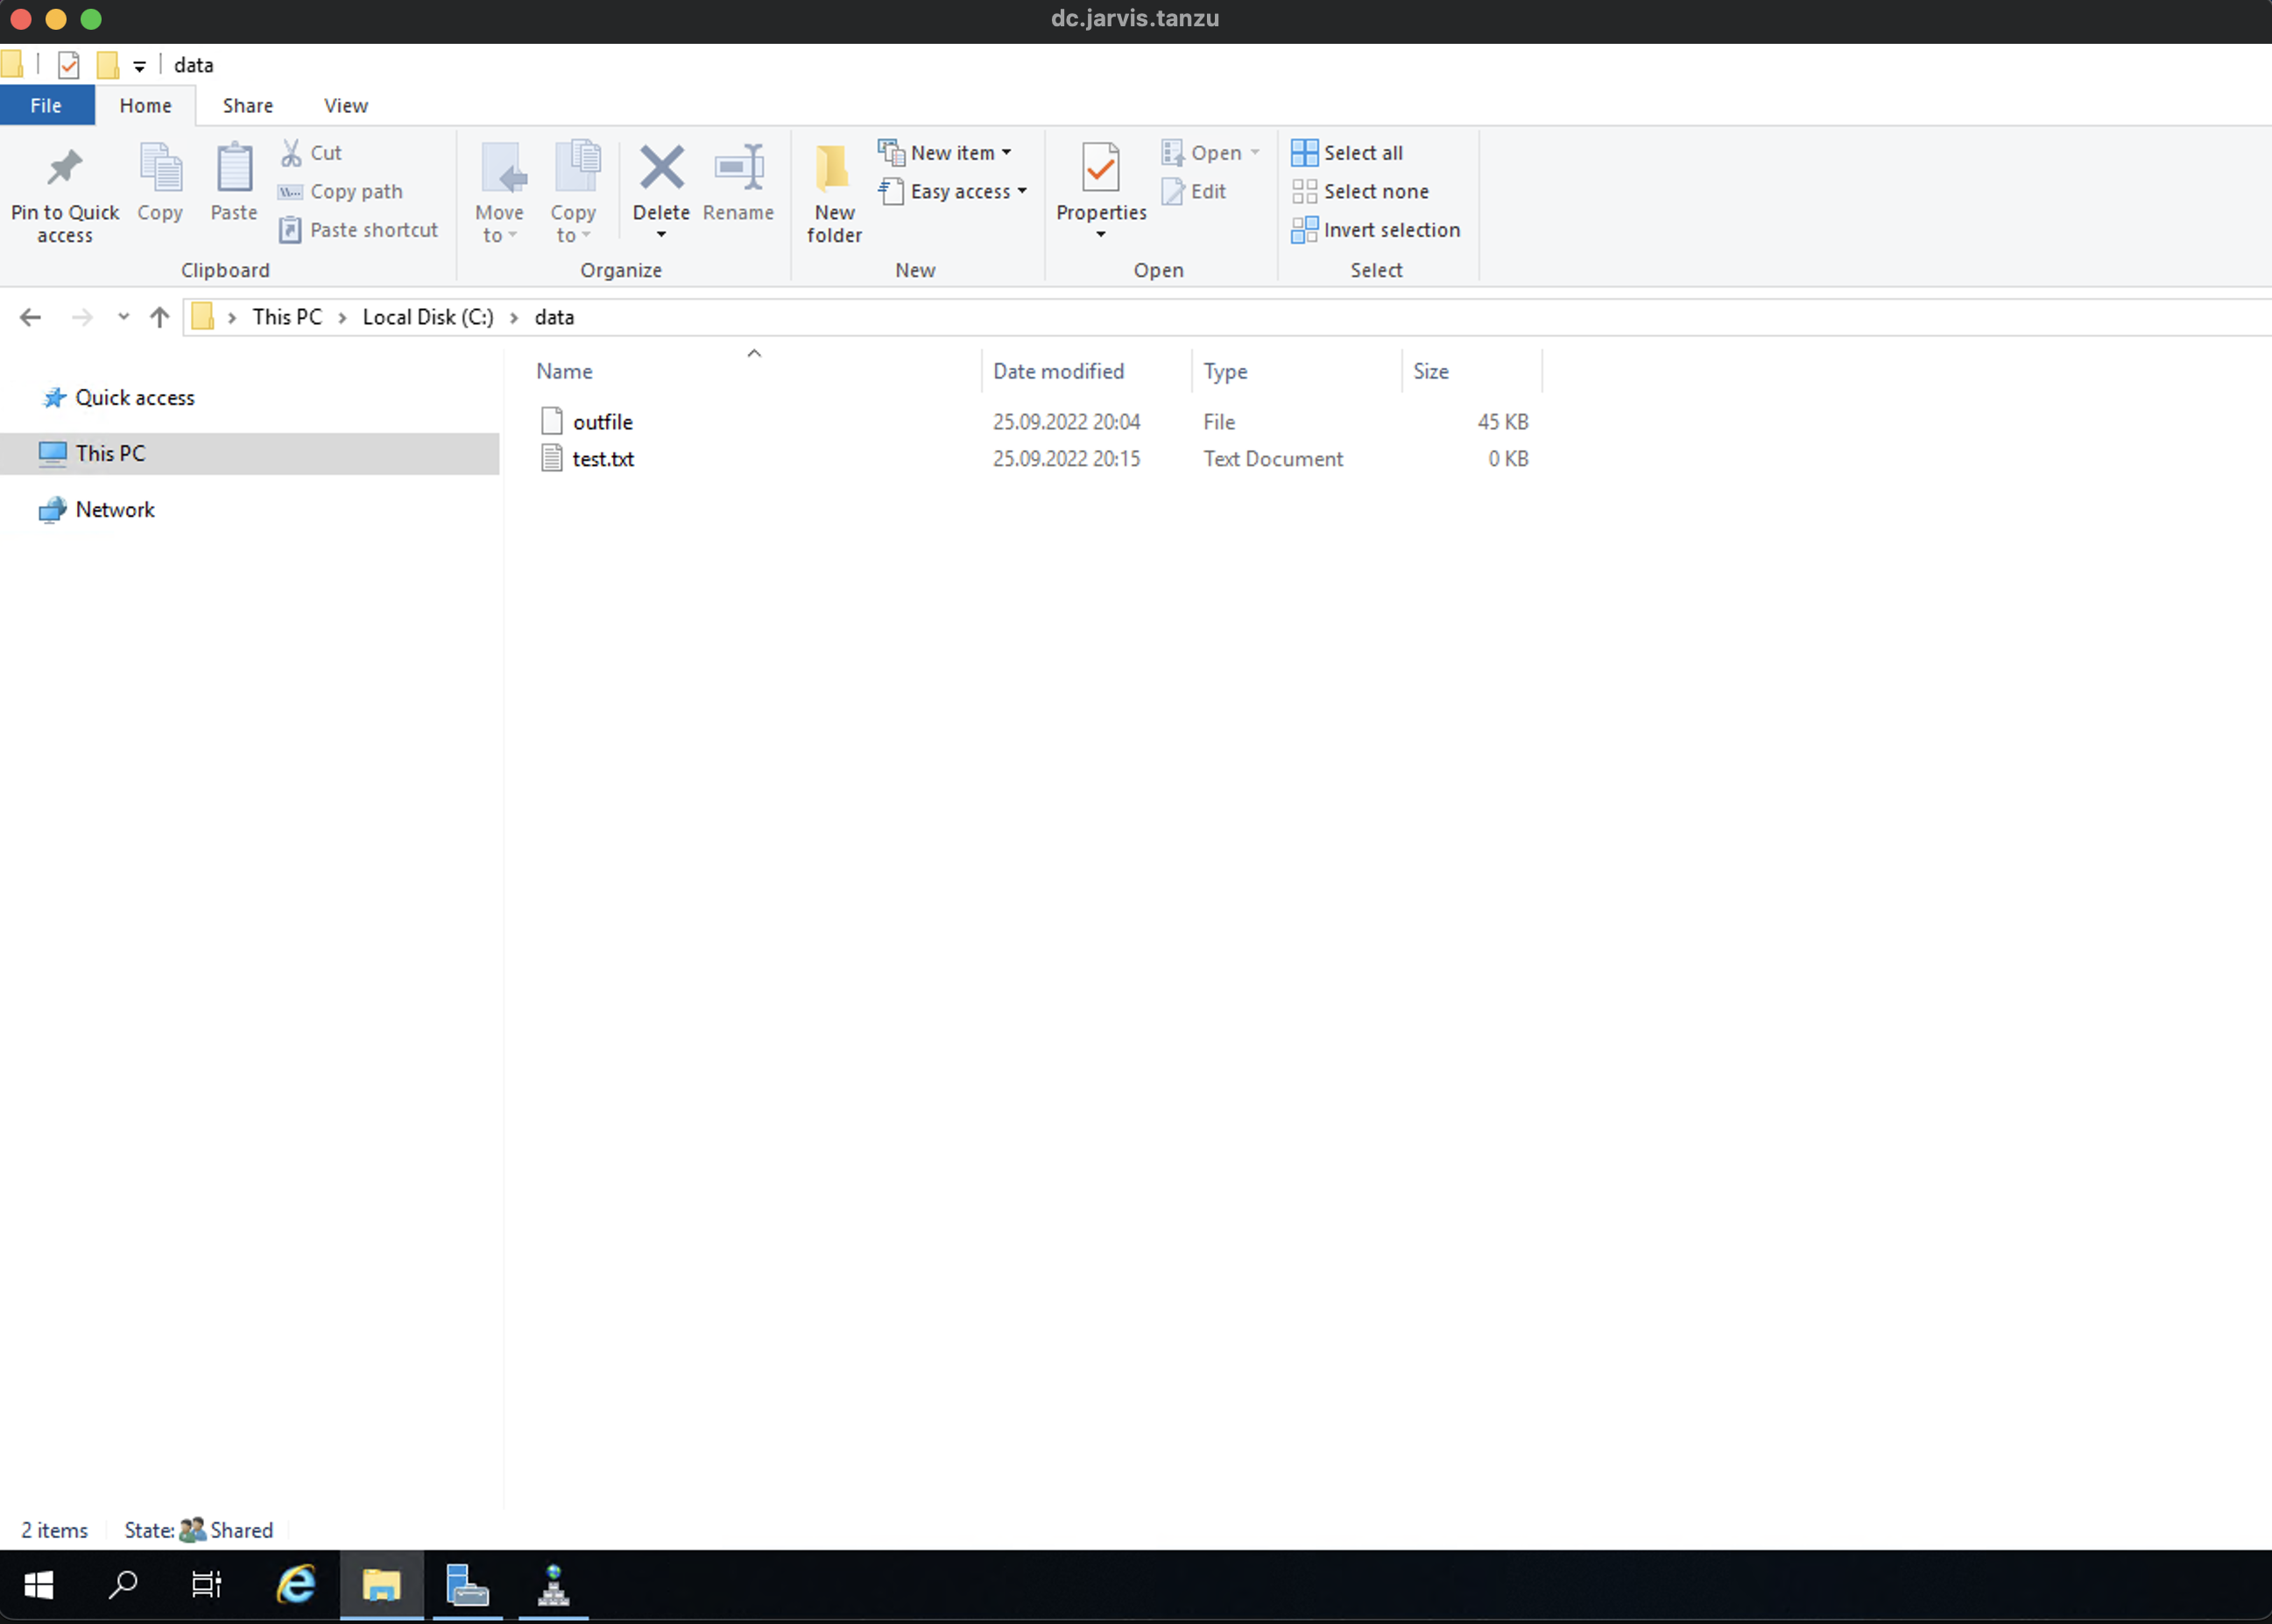
persistentvolumeclaim/pvc-smb Bound pv-smb 50Gi RWX 13s3. Validating Write-Access
In order to validate that we have access to the provided share on a Windows Fileserver, we’ll create a simple deployment using the following nginx image mcr.microsoft.com/oss/nginx/nginx:1.19.5 and write a file named outfile to the mounted share.
kubectl -n $TESTNS create -f - <<EOF
---
apiVersion: apps/v1
kind: Deployment
metadata:
  labels:
    app: nginx
  name: deploy-smb-pod
  namespace: $TESTNS
spec:
  replicas: 1
  selector:
    matchLabels:
      app: nginx
  template:
    metadata:
      labels:
        app: nginx
      name: deploy-smb-pod
    spec:
      nodeSelector:
        "kubernetes.io/os": linux
      containers:
        - name: deploy-smb-pod
          image: mcr.microsoft.com/oss/nginx/nginx:1.19.5
          command:
            - "/bin/bash"
            - "-c"
            - set -euo pipefail; while true; do echo $(date) >> /mnt/smb/outfile; sleep 1; done
          volumeMounts:
            - name: smb
              mountPath: "/mnt/smb"
              readOnly: false
      volumes:
        - name: smb
          persistentVolumeClaim:
            claimName: pvc-smb
EOF
The successful write can be validated by executing ls -rtl from within the pod:
kubectl -n $TESTNS exec -it deploy-smb-pod-8569fdd89c-dmlzh -- ls -rtl /mnt/smb

total 28
-rwxrwxrwx 1 root root 26280 Sep 25 17:53 outfile
Also, creating a new file using kubectl exec is very easy:
kubectl -n $TESTNS exec -it deploy-smb-pod-8569fdd89c-dmlzh -- touch /mnt/smb/test.txt
Show the folder content:
kubectl -n $TESTNS exec -it deploy-smb-pod-8569fdd89c-dmlzh -- ls -la /mnt/smb

total 48
drwxrwxrwx 2 root root     0 Sep 25 18:02 .
drwxr-xr-x 1 root root  4096 Sep 25 17:51 ..
-rwxrwxrwx 1 root root 43800 Sep 25 18:03 outfile
-rwxrwxrwx 1 root root     0 Sep 25 18:15 test.txt
Here we go!