vSphere 7 with Kubernetes supercharged - Helm, Harbor and Tanzu Kubernetes Grid

I recently had to prepare my homelab for a customer workshop to demo our new Tanzu Runtime & Hybrid Infrastructure Services. This includes e.g. the deployment of a Tanzu Kubernetes Grid Cluster on vSphere (TKG Service), the enterprise cloud native registry Harbor as well as the instantiation of a native Pod on vSphere (vSphere Pod Service).
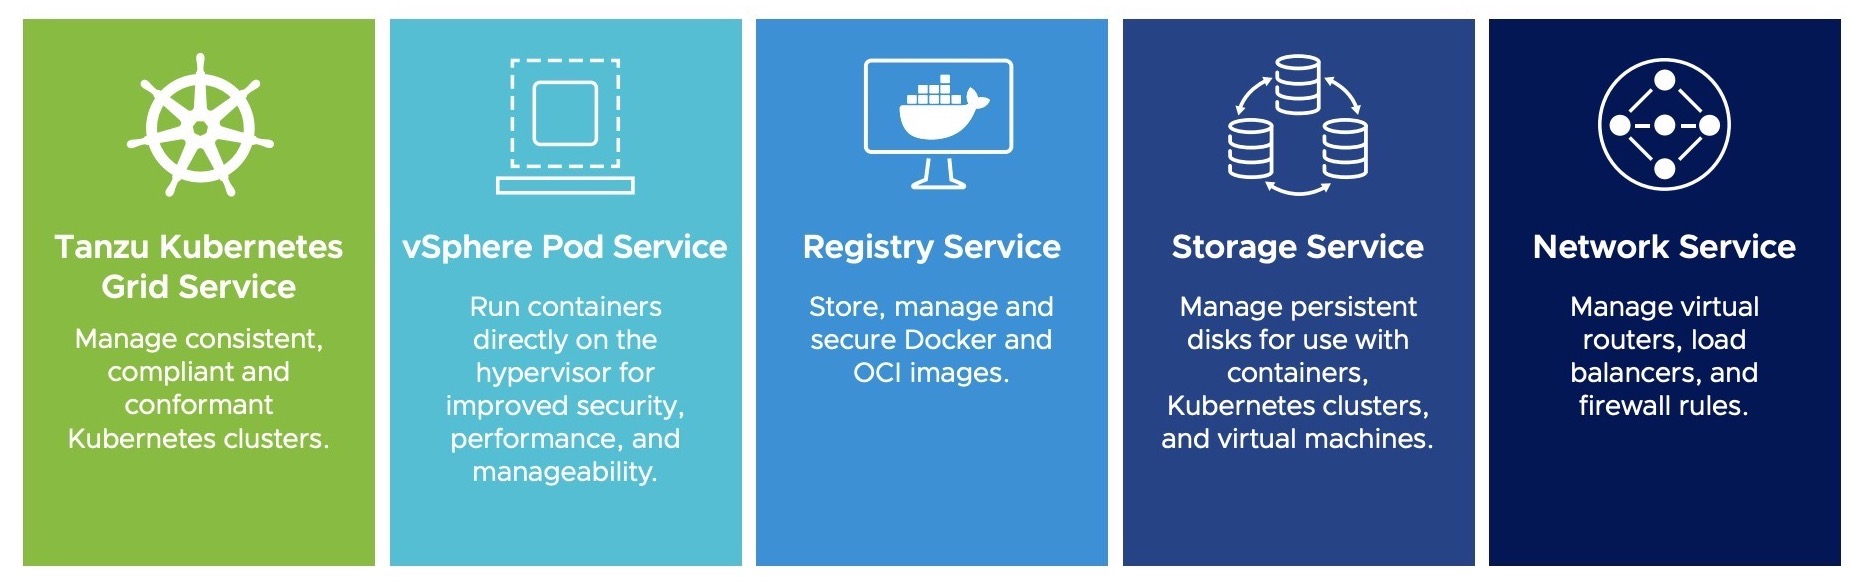
My demo was basically all about the deployment of an application running natively (Native Pod) on vSphere, whose container image I pushed beforehand into my Harbor registry and which in turn was then obtained from there during the application deployment. It also covered the deep integration into vSAN and NSX by providing Persistent Volume Claims (Storage Service) as well as LoadBalancing services (Network Service) for my application.
I do have to mention that I used the upstream Harbor version for my demo and not the embedded Harbor registry which can be enabled through the Registry Service of vSphere 7 with Kubernetes. The reason for this? I combined the possibilities to demonstrate the latest features of Harbor version 2.0 on the one hand and on the other hand the simplicity of deploying the registry via Helm on a Tanzu Kubernetes Grid Cluster.
In this post I will focus on the installation of Harbor using Helm and also on the preperations you have to do upfront before you are able to let the Supervisor Cluster pull images out of Harbor and to subsequently instantiate them as a native Pod on vSphere.
Prerequisites
- vSphere 7 with Kubernetes installed
- Subscribed Content Library for Tanzu Kubernetes Grid Clusters
- A Tanzu Kubernetes Grid Cluster running
- Kubernetes CLI Tool for vSphere installed
- Helm installed
- Docker CLI installed
Tanzu Kubernetes Grid Cluster (Recap)
The simple way of creating a Tanzu Kubernetes Grid (TKG) cluster will be done by invoking the TKG Service declarative API. A very detailed “How to Guide” is provided by Cormac Hogan through this post: Building a TKG Cluster in vSphere with Kubernetes
I recommend reading this post or of course VMware’s official documentation first if you haven’t deployed a TKG cluster yet.
Otherwise, here is my “How to” in a nutshell…
Create a vSphere Namespace
Go to Home –> Workload Management and click on NEW NAMESPACE
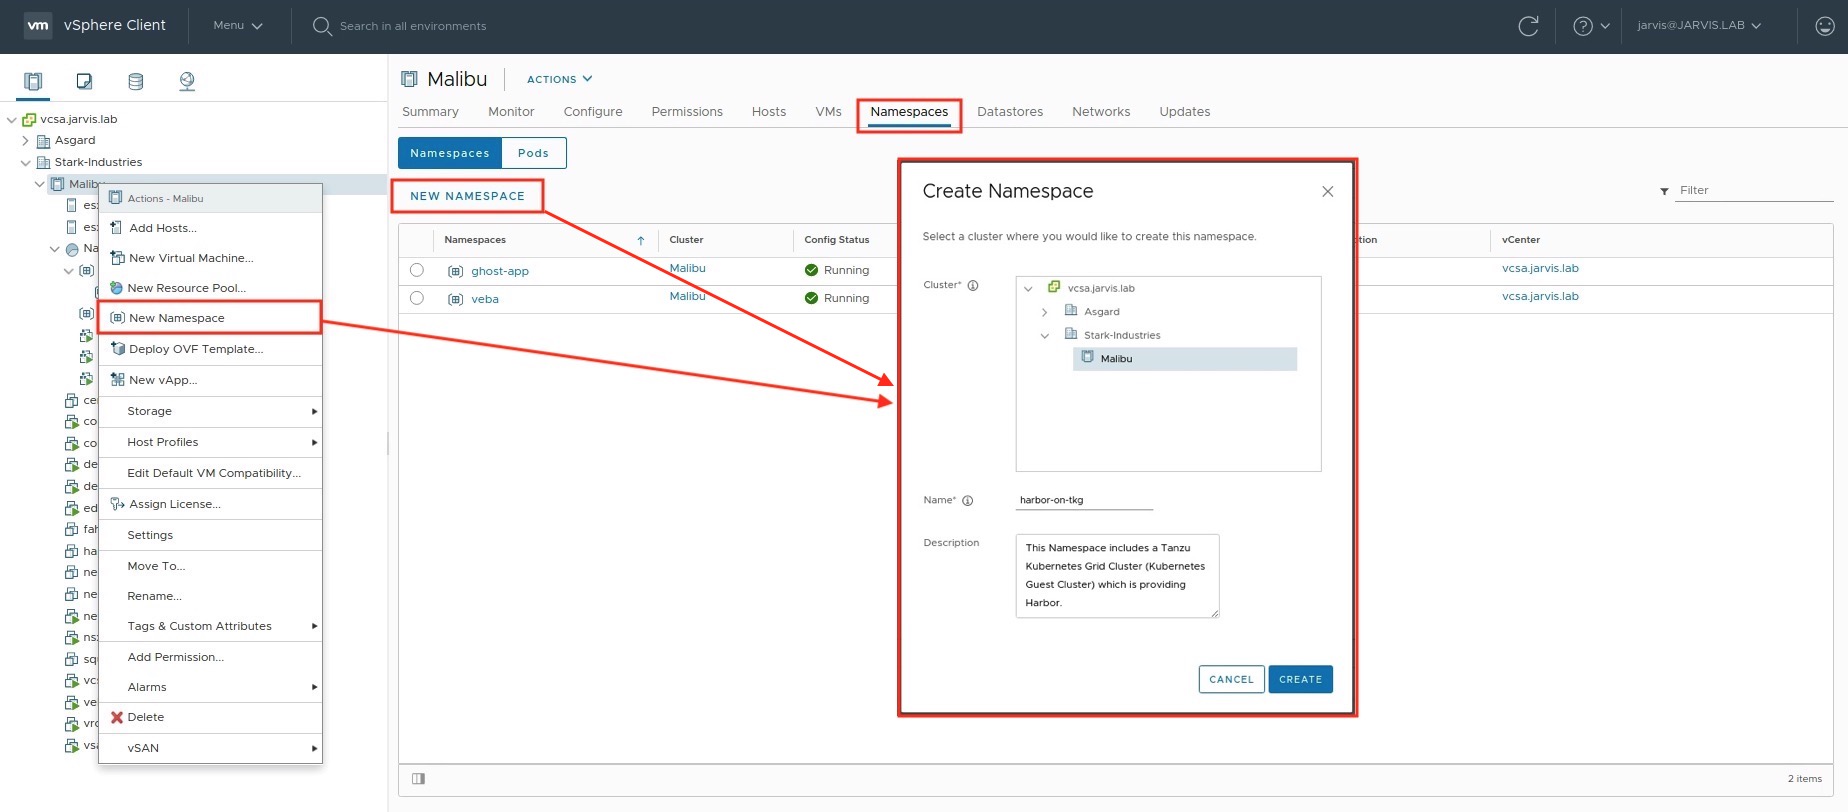
Add a user or a group to the Namespace, assign the appropriate permission and select the vSphere Storage Policy(s) for your Persistent Volume Claims.
Declaritive deployment of a TKG Cluster
We first login into our vSphere Supervisor Cluster by making use of the Kubernetes CLI Tool for vSphere with the before assigned user:
kubectl vsphere login --server=172.25.16.1 --vsphere-username jarvis@jarvis.lab --insecure-skip-tls-verify
A successful login will show you the following output:
Logged in successfully.

You have access to the following contexts:
   172.25.16.1
   harbor-on-tkg
   veba

If the context you wish to use is not in this list, you may need to try
logging in again later, or contact your cluster administrator.

To change context, use `kubectl config use-context <workload name>`
The context harbor-on-tkg, which was automatically created during the vSphere Namespace creation, is showing up and will be used for our next step. Change the context by executing:
kubectl config use-context harbor-on-tkg
Now that we switched into our desired context, we can start deploying the TKG cluster and as already mentioned a couple of times before, this will be done in a declaritive way and by using a specification file like e.g. the following:
apiVersion: run.tanzu.vmware.com/v1alpha1
kind: TanzuKubernetesCluster
metadata:
  name: harbor-on-tkg
  namespace: harbor-on-tkg
spec:
  distribution:
    version: v1.17.7
  topology:
    controlPlane:
      count: 1
      class: best-effort-small
      storageClass: ftt1-r1
    workers:
      count: 1
      class: best-effort-medium
      storageClass: ftt1-r1
A few words to the parameters version, class and storageClass. The available Kubernetes versions depend on which versions are provided by VMware through the Subscribed Content Library. You can verify which versions are available by executing kubectl get virtualmachineimages which in turn will show you e.g.:
NAME                                                         AGE
ob-15957779-photon-3-k8s-v1.16.8---vmware.1-tkg.3.60d2ffd    83d
ob-16466772-photon-3-k8s-v1.17.7---vmware.1-tkg.1.154236c    8d
ob-16545581-photon-3-k8s-v1.16.12---vmware.1-tkg.1.da7afe7   13h
ob-16551547-photon-3-k8s-v1.17.8---vmware.1-tkg.1.5417466    13h
v1.17.7 is the version I’ve picked for my deployment. The next one is class. You can choose between two types of Virtual Machine Classes to define the virtual hardware settings as well as the requests and limits on those. Just type kubectl get virtualmachineclasses to let you show the available classes.
NAME                 AGE
best-effort-large    90d
best-effort-medium   90d
best-effort-small    90d
best-effort-xlarge   90d
best-effort-xsmall   90d
guaranteed-large     90d
guaranteed-medium    90d
guaranteed-small     90d
guaranteed-xlarge    90d
guaranteed-xsmall    90d
kubectl describe virtualmachineclasses best-effort-medium for example gives you a detailed output of the specifications of a specific Virtual Machine Class.
Also very important is to specify the storageClass. You defined it during the vSphere Namespace creation. If you cannot exactly remember which class you have defined…you are also not logged in into the vSphere Client…you feel lazy…just type kubectl describe ns harbor-on-tkg and get the desired information back.
Name:         harbor-on-tkg
Labels:       vSphereClusterID=domain-c7
Annotations:  ncp/extpoolid: domain-c7:a4b59b96-9e94-4158-95ff-e1dfeb58c6bf-ippool-172-25-64-1-172-25-127-254
              ncp/snat_ip: 172.25.88.14
              ncp/subnet-0: 10.244.0.240/28
              vmware-system-resource-pool: resgroup-11035
              vmware-system-vm-folder: group-v11036
Status:       Active

Resource Quotas
 Name:                                                 harbor-on-tkg-storagequota
 Resource                                              Used  Hard
 --------                                              ---   ---
 ftt1-r1.storageclass.storage.k8s.io/requests.storage  0     9223372036854775807

No resource limits.
Enough summarized 😉 ! kubectl apply -f tkg-cluster.yml and let vSphere do it’s magic. An increased count of 1 will show up on the Tanzu Kubernetes tile at the vSphere Namespace page (Figure IV).
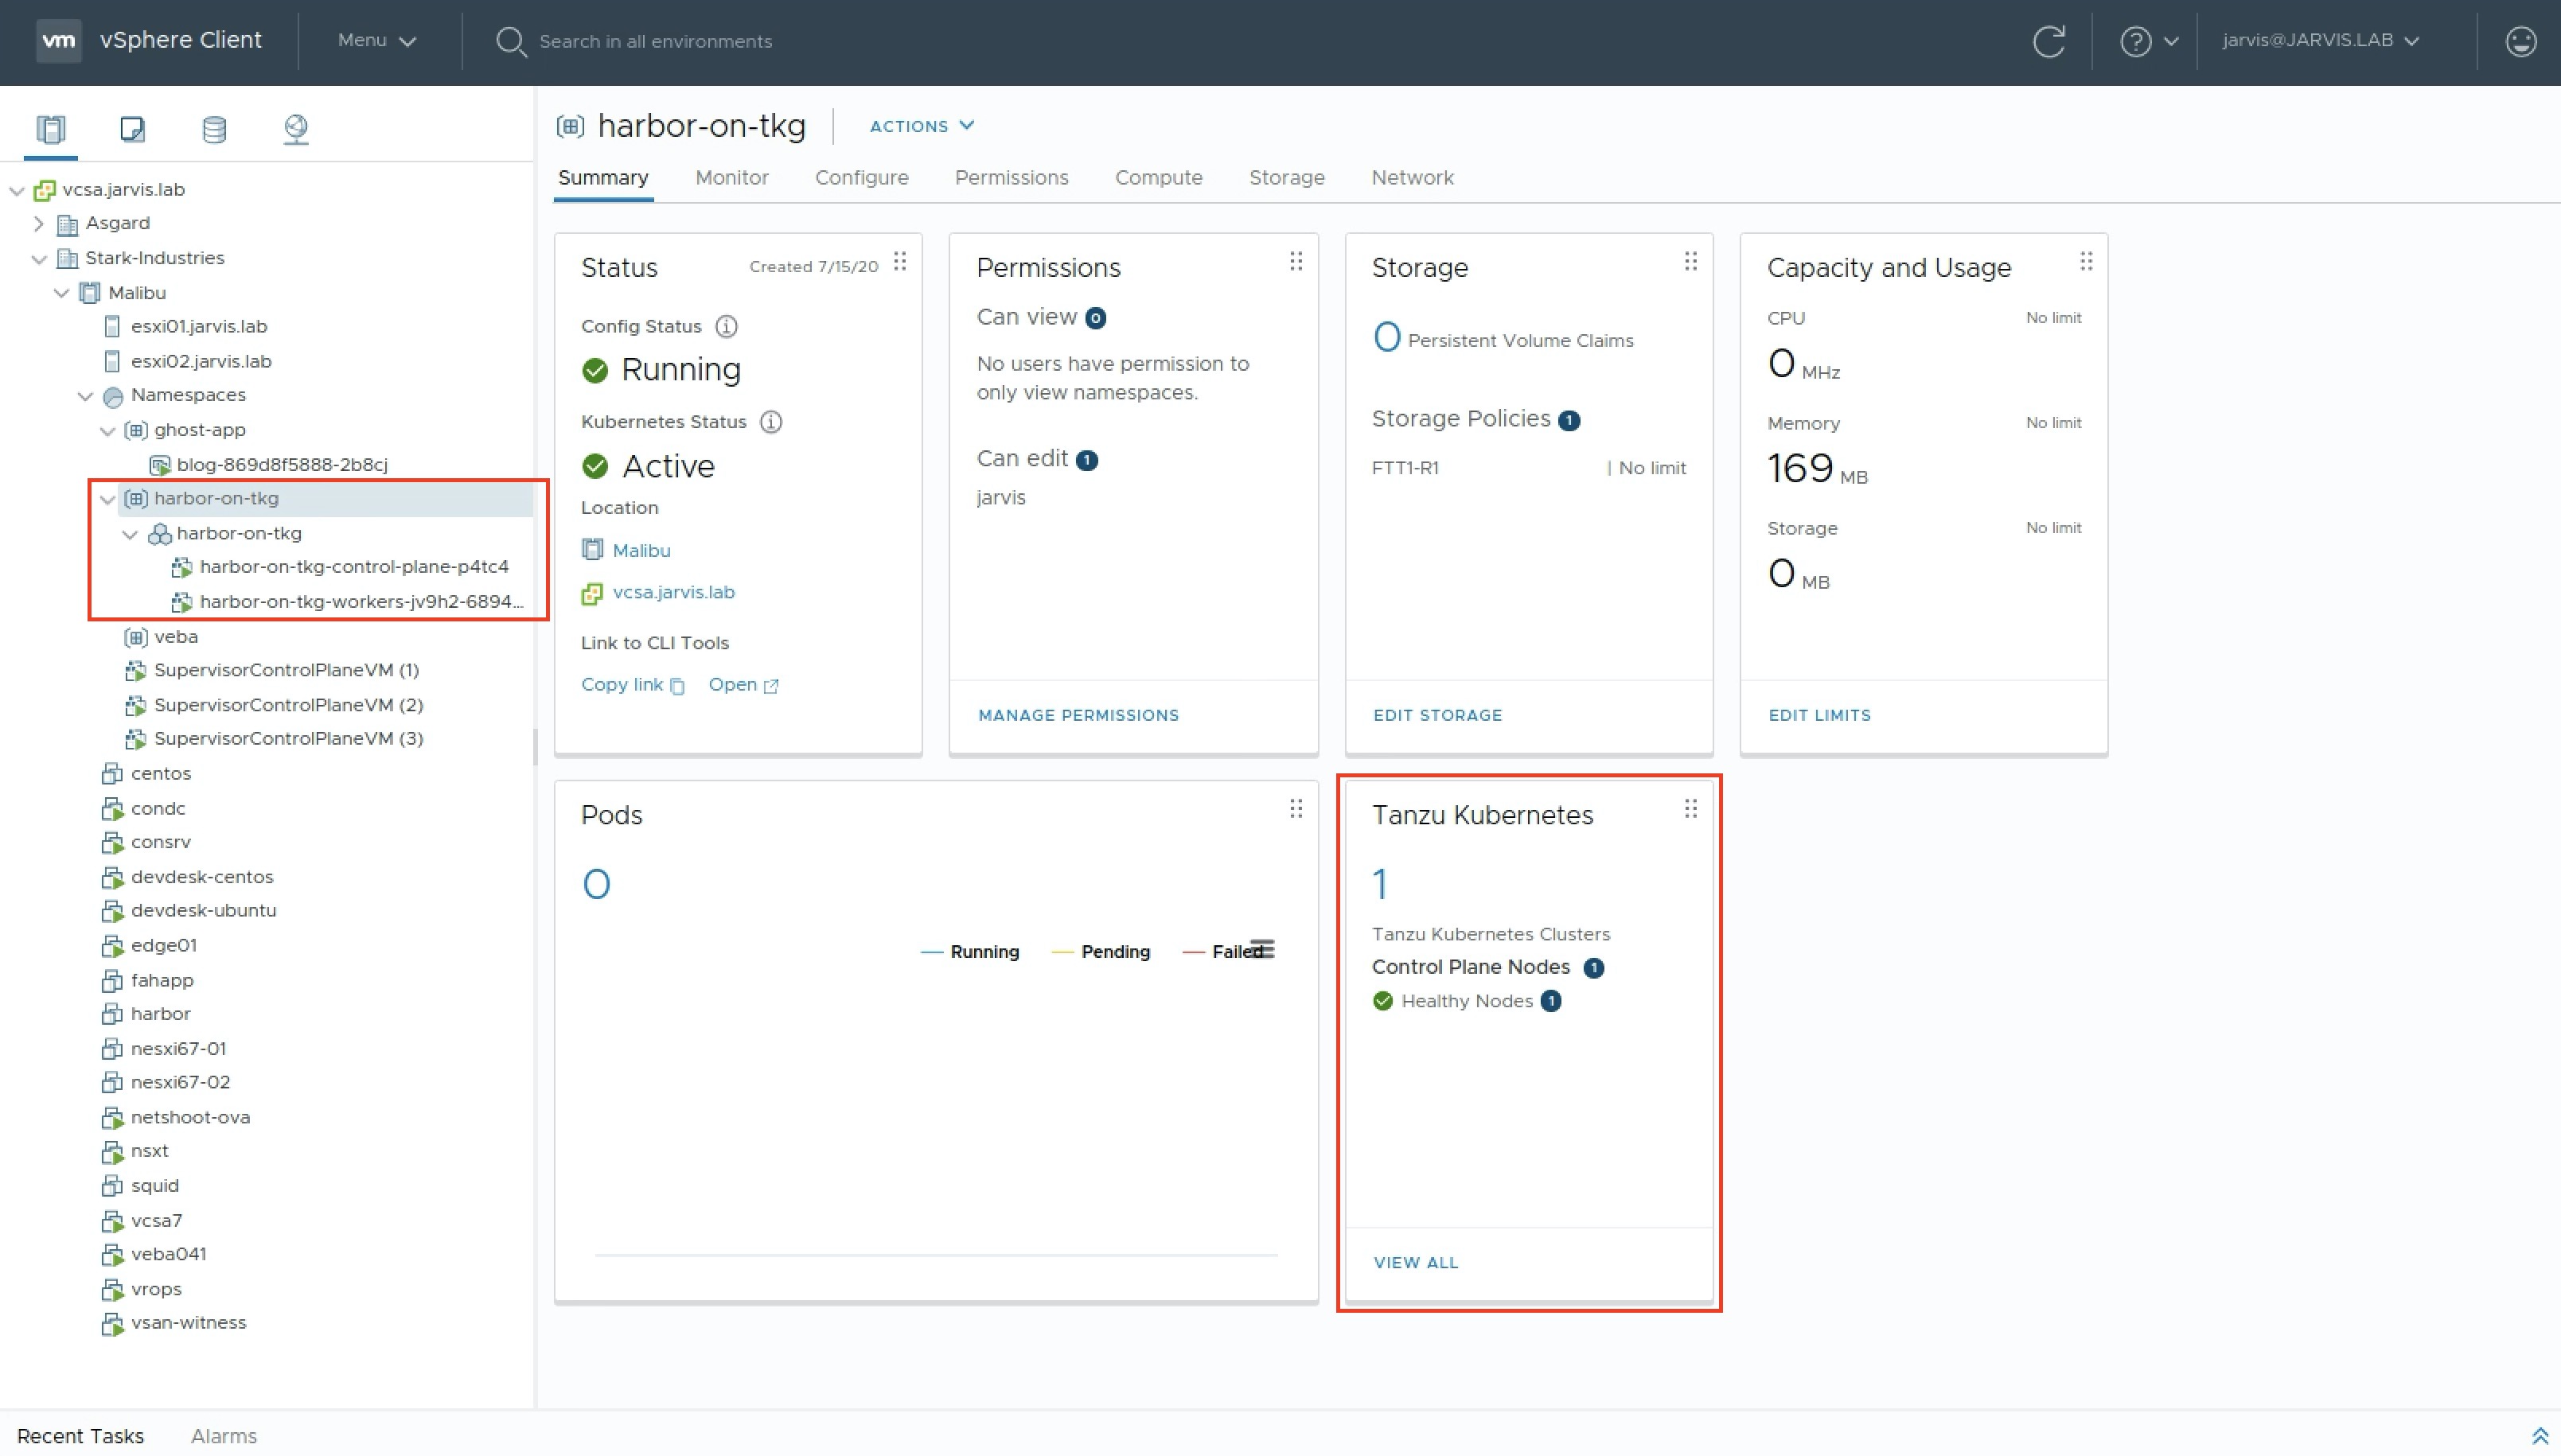
The terminal can also be used for verification. kubectl get tanzukubernetescluster or in short kubectl get tkc:
NAME            CONTROL PLANE   WORKER   DISTRIBUTION                     AGE   PHASE
harbor-on-tkg   1               1        v1.17.7+vmware.1-tkg.1.154236c   26m   running
Installing Harbor via Helm
Login into the TKG Cluster
One important step has to be done before we pay our attention to this next part. You remember that we logged in into the Supervisor Cluster via kubectl vsphere login --server=172.25.16.1 --vsphere-username jarvis@jarvis.lab --insecure-skip-tls-verify. This means that we are still connected to it and even if you are in the right context (harbor-on-tkg), doesn’t mean that a desired application deployment will be processed on the TKG cluster. Because the TKG cluster is running inside the vSphere Namespace (harbor-on-tkg) and we have to connect to it seperately. To verify, just run kubectl get ns to get all Namespaces displayed which your Supervisor Cluster provides and not those from your TKG cluster.
NAME                      STATUS   AGE
default                   Active   90d
ghost-app                 Active   4d8h
harbor-on-tkg             Active   4d4h
kube-node-lease           Active   90d
kube-public               Active   90d
kube-system               Active   90d
veba                      Active   35d
vmware-system-capw        Active   90d
vmware-system-csi         Active   90d
vmware-system-kubeimage   Active   90d
vmware-system-nsx         Active   90d
vmware-system-registry    Active   90d
vmware-system-tkg         Active   90d
vmware-system-ucs         Active   90d
vmware-system-vmop        Active   90d
Logout from the Supervisor Cluster with kubectl vsphere logout and login into the TKG cluster: kubectl vsphere login --insecure-skip-tls-verify --vsphere-username jarvis@jarvis.lab --server=172.25.16.1 --tanzu-kubernetes-cluster-name harbor-on-tkg --tanzu-kubernetes-cluster-namespace harbor-on-tkg
Enter kubectl get ns again to verify the established connection:
NAME                           STATUS   AGE
default                        Active   2d1h
kube-node-lease                Active   2d1h
kube-public                    Active   2d1h
kube-system                    Active   2d1h
vmware-system-auth             Active   2d1h
vmware-system-cloud-provider   Active   2d1h
vmware-system-csi              Active   2d1h
Let’s turn our attention to Helm - The modern package manager
Helm helps us to define, deploy and upgrade applications easily. I’m going to use Helm to deploy Harbor on the Tanzu Kubernetes Grid cluster.
- ICYMI: Installing Helm
Add Harbor Helm repository
For Harbor, you can use various Helm repositories. There exist e.g. the official repo from
Harbor - https://github.com/goharbor/harbor-helm or also the one from
Bitnami - https://github.com/bitnami/charts/tree/master/bitnami/harbor which I’m going to use.
Add the repository of your choice to your client…
helm repo add harbor https://helm.goharbor.iohelm repo add bitnami https://charts.bitnami.com/bitnami
…and update Helm subsequently.
helm repo update
Installing Harbor - 1st attempt
We will deploy Harbor in a new Kubernetes Namespace which we will name (suprise) harbor. Create the Namespace with kubectl create ns harbor and start the deployment process by executing the following helm command with some corresponding options:
helm install harbor bitnami/harbor \
--set harborAdminPassword='VMware1!' \
--set global.storageClass=ftt1-r1 \
--set service.type=LoadBalancer \
--set externalURL=harbor-dev.jarvis.lab \
--set service.tls.commonName=harbor-dev.jarvis.lab \
-n harbor
I monitored the deployment progress by watching (watch) the command kubectl get deployment -n harbor and I became sceptical because nothing happened for a long time. Checking the events of my deployment kubectl get events -n harbor was the next logical step and the following Message immediately catched my attention:
TKG Pod Security Policies (PSP)
The Tanzu Kubernetes Grid Service does not provide default RoleBinding and ClusterRoleBinding for Tanzu Kubernetes clusters. Thus we have to apply a Pod Security Policy (PSP) to our TKG cluster. My well appreciated colleague Alexander Ullah has written a great article about PSP’s on Tanzu Kubernetes Grid Integrated Edition (former Enterprise PKS) –> LINK.
Apply the following Pod Security Policy example to your TKG cluster: kubectl apply -f tkg-psp.yml
apiVersion: rbac.authorization.k8s.io/v1
kind: ClusterRole
metadata:
  name: psp:privileged
rules:
- apiGroups: ['policy']
  resources: ['podsecuritypolicies']
  verbs:     ['use']
  resourceNames:
  - vmware-system-privileged
---
apiVersion: rbac.authorization.k8s.io/v1
kind: ClusterRoleBinding
metadata:
  name: all:psp:privileged
roleRef:
  kind: ClusterRole
  name: psp:privileged
  apiGroup: rbac.authorization.k8s.io
subjects:
- kind: Group
  name: system:serviceaccounts
  apiGroup: rbac.authorization.k8s.io
Installing Harbor - 2nd attempt
Let’s redo the Harbor deployment via helm again! By running kubectl get pods -n harbor you should see how every single Pod will “pop up” one by one and will end up in the status RUNNING.
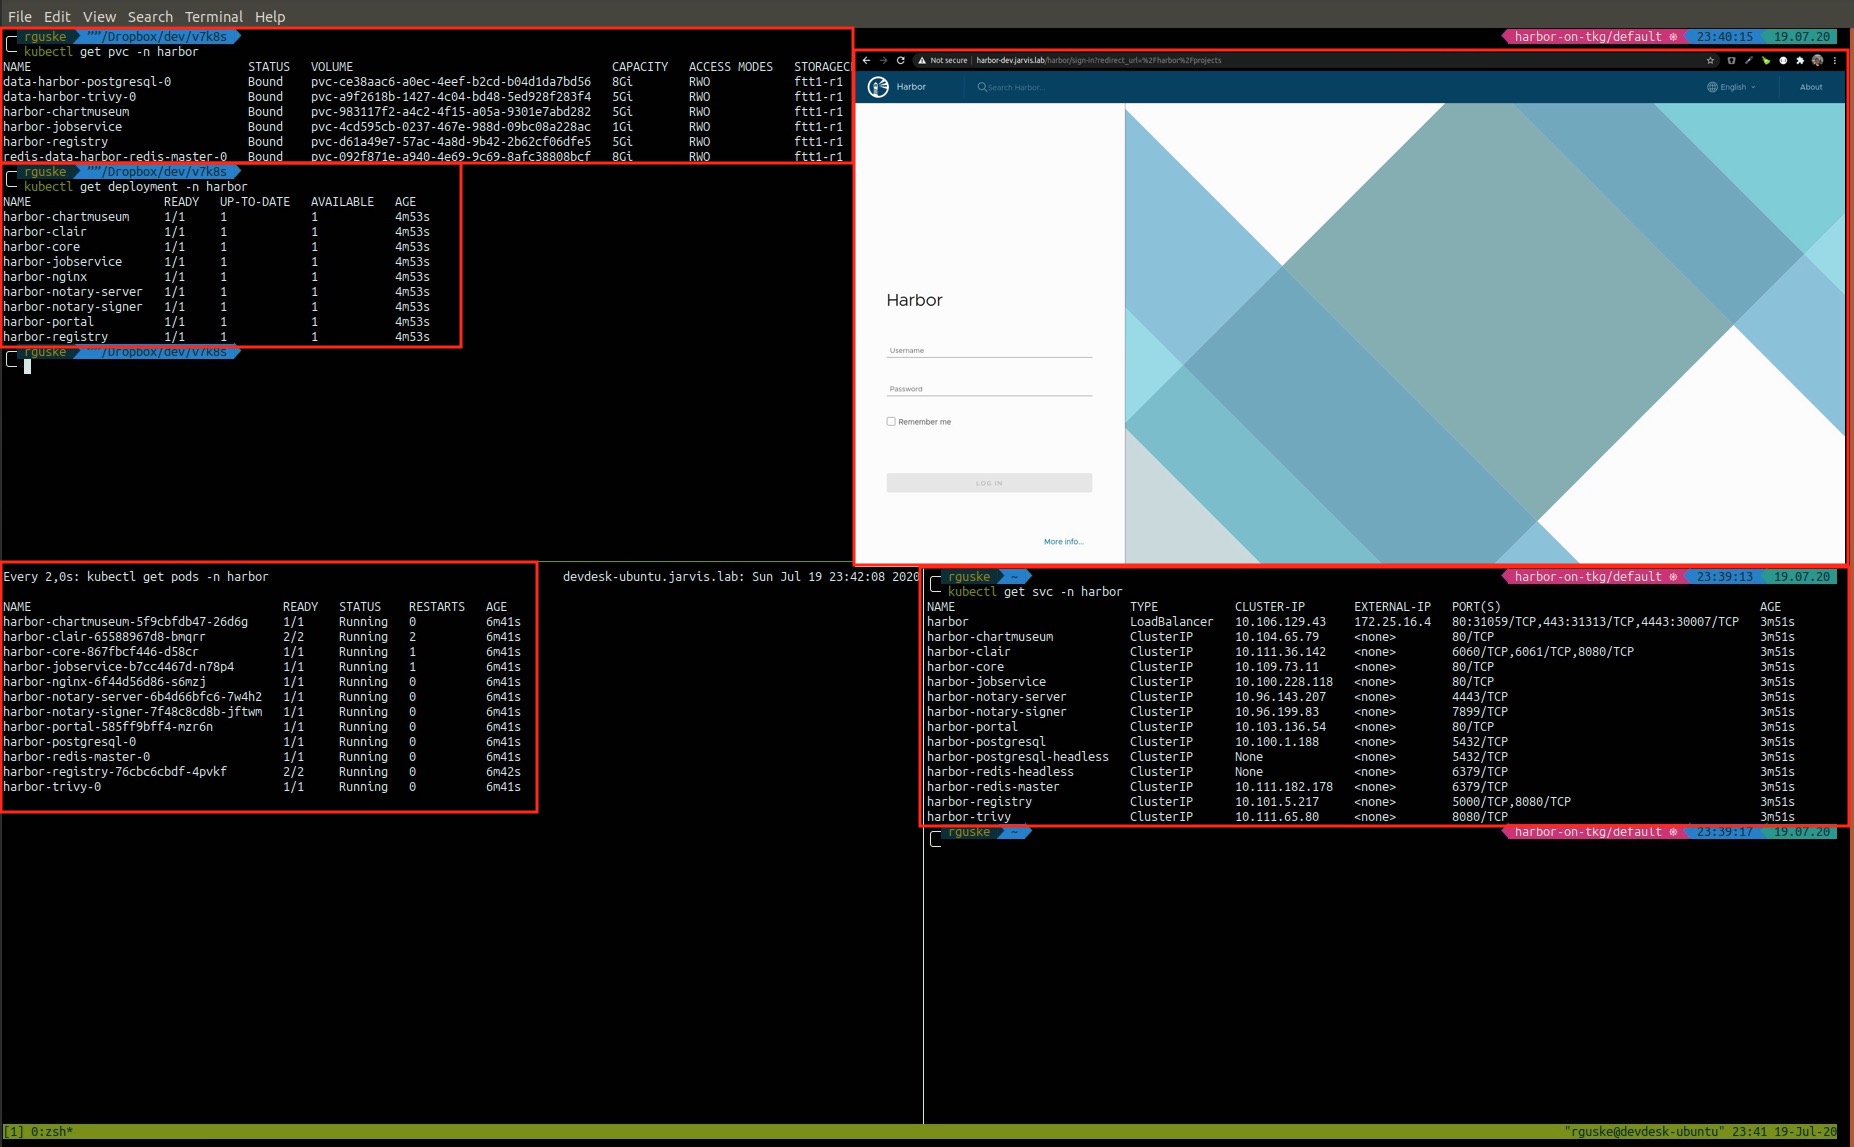
kubectl get svc -n harbor will give you the assigned external IP address through which you can access the Harbor Login page. See also the lower right terminal window in Figure V. With the gained IP address you can create an appropriate DNS entry. Remember that we’ve used --set externalURL=harbor-dev.jarvis.lab for our deployment.
Deploy a Demo Application on vSphere 7
You should now be able to login into your fresh deployed Harbor instance via the GUI and also to start creating and configuring your first projects. So far it’s not possible to login via Docker CLI by using docker login. This is because of the Docker certificate-based client-server authentication. It’s necessary to create a new directory under /etc/docker/cert.d/ using the same name as the registry hostname (FQDN). I created a script for another blog post to simplify this process. The script is available on my Github repository here: https://github.com/rguske/download-harbor-cert-script.
Take a look at the post if you need additional information about the steps as well as to learn how you can create and configure projects in Harbor.
Pushing the application container image onto Harbor shouldn’t be a problem after a successful docker login harbor-dev.jarvis.lab --username admin. Ghost will serve us as a demo application here. It is quickly deployable and also pretty cool for demonstration purposes, because it needs a Kubernetes Persistent Volume Claim (–> vSAN) and type: LoadBalancer can also be configured as parameter in the specification .yml file (–> NSX).
Even more cool demo applications were put together by William Lam in this post: Interesting Kubernetes application demos. Check-out the KubeDoom demo 😁 👍
Follow the next steps to have the image safely stored in Harbor:
docker pull ghost:3.25.0docker tag ghost:3.25.0 harbor-dev.jarvis.lab/ghost/ghost:3.25.0docker push harbor-dev.jarvis.lab/ghost/ghost:3.25.0
Check the repository of your project Ghost in Harbor:

If you are following this post step-by-step, I assume that you are still connected to your TKG Cluster via your terminal. Do a kubectl vsphere logout now.
Demo Application Ghost
- Create two new files and name them e.g.
ghost.ymlandghost-pvc.yml. Add the following specification parameters to the respective file:
Application deployment - ghost.yml
apiVersion: v1
kind: Service
metadata:
  labels:
    name: blog
  name: blog
spec:
  ports:
    - port: 80
      targetPort: 2368
  selector:
    app: blog
  type: LoadBalancer

---

apiVersion: apps/v1
kind: Deployment
metadata:
  name: blog
  labels:
    app: blog
spec:
  replicas: 1
  selector:
    matchLabels:
      app: blog
  template:
    metadata:
      labels:
        app: blog
    spec:
      containers:
      - name: blog
        image: harbor-dev.jarvis.lab/ghost/ghost:3.25.0
        imagePullPolicy: Always
        ports:
        - containerPort: 2368
        env:
        - name: url
          value: http://my-blog.corp.local
        volumeMounts:
        - mountPath: /var/lib/ghost/content
          name: content
      volumes:
      - name: content
        persistentVolumeClaim:
          claimName: blog-content
Persistent Volume Claim - ghost-pvc.yml
---
kind: PersistentVolumeClaim
apiVersion: v1
metadata:
  name: blog-content
spec:
  accessModes:
    - ReadWriteOnce
  storageClassName: ftt0-r0
  resources:
    requests:
storage: 5Gi- Create a new vSphere Namespace called
ghost-demo-appand configure it similar to the one for your TKG cluster. - Login into your Supervisor Cluster again and switch into the new context:
kubectl vsphere login --server=172.25.16.1 --vsphere-username jarvis@jarvis.lab --insecure-skip-tls-verify
kubectl config use-context ghost-demo-app
- Deploy the Persistent Volume Claim first:
kubectl apply -f ghost-pvc.yml
- Deploy the demo application
kubectl apply -f ghost.yml
While I was waiting for my demo application to become available, I noticed that several native vSphere Pod’s showed up in the vSphere Client and powered on and powered off again and again. This is not the expected behaviour!
I had to check the events again (kubectl get events -n ghost-demo-app) and the following Warning told me what’s wrong here:
Add Harbor Certificate to the Supervisor Cluster
The warning indicates that my Supervisor Cluster cannot pull the image out of Harbor due to the unknown certificate. Adding it to our local machine is easy but how can we realize it for vSphere? Luckily, that’s easy too.
- Interrupt the failed deployment loop of our application
kubectl delete -f ghost.yml
- Open the downloaded Harbor root certificate (
ca.crt) and copy the whole content out of it - Switch back to your terminal and add the copied certificate data to your
image-fetcher-ca-bundleconfigmap as shown in Figure VII
kubectl edit configmap image-fetcher-ca-bundle -n kube-system
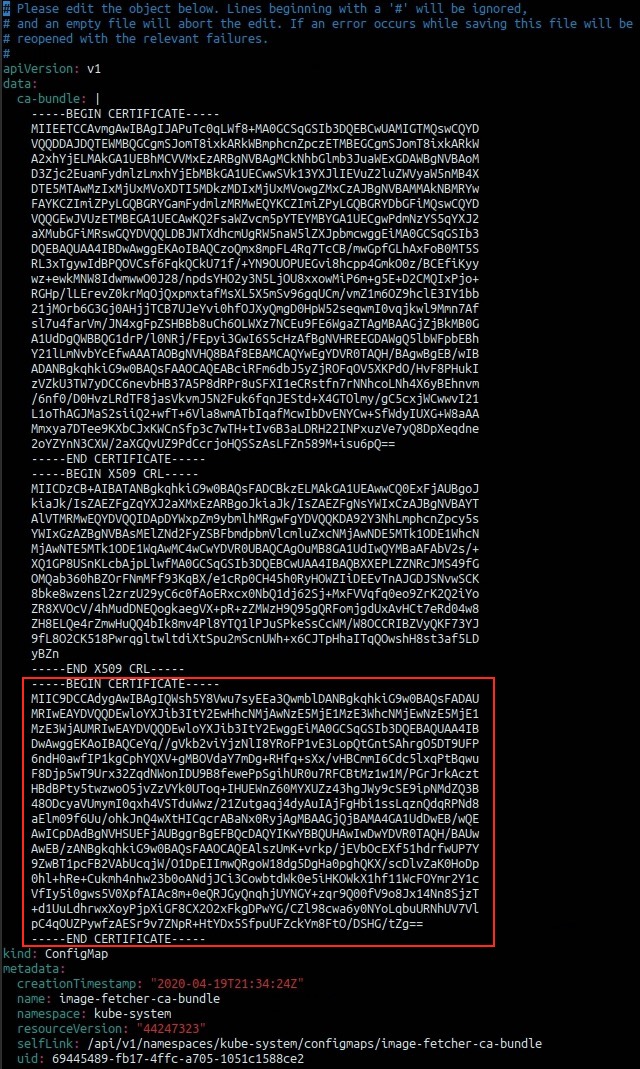
- save and close
:wq
- Start the deployment again and watch the progress
kubectl apply -f ghost.yml
kubectl get deployment -n ghost-demo-app
NAME   READY   UP-TO-DATE   AVAILABLE   AGE
blog   1/1     1            1           3h26m


kubectl get svc -n ghost-demo-app
NAME   TYPE           CLUSTER-IP   EXTERNAL-IP   PORT(S)        AGE
blog   LoadBalancer   10.96.0.10   172.25.16.2   80:32604/TCP   3h26m


kubectl get pvc -n ghost-demo-app
NAME           STATUS   VOLUME                                     CAPACITY   ACCESS MODES   STORAGECLASS   AGE
blog-content   Bound    pvc-ee93cb30-309e-4627-b7df-7c27213ea14b   5Gi        RWO            ftt0-r0        3h48m


kubectl get pods -n ghost-demo-app
NAME                   READY   STATUS    RESTARTS   AGE
blog-b68cddc4c-tckvp   1/1     Running   0          3h26m
Our demo application Ghost will be reachable via it’s external IP address which is automatically provided by the NSX Load Balancer Virtual Server (Figure VIII).
The creation of a Load Balancer type service causes NCP to orchestrate the creation of NSX Virtual Servers associated with the Load Balancer created in the initial Supervisor Cluster deployment. The virtual server is assigned an IP and port that is used to access the service.
Source: vSphere 7 with Kubernetes Network Service Part 1: The Supervisor Cluster

The data will be written to it’s Persistent Volume on vSAN (Figure IX)

Conclusion
-
Deploying a VMware Tanzu Kubernetes Grid cluster on vSphere by invoking the TKG Service declarative API is simple, flexible and pretty cool. You should bare in mind, that it is necessary to apply a Pod Security Policy first in order to deploy Pod’s on your TKG Cluster.
-
Helmis powerful and can support you with defining, deploying and upgrading your applications fast and easily. BTW: Harbor supports Helm charts as well! -
Running Containers/ Pods natively alongside Virtual Machines in vSphere 7 is amazing and will support you by running any application on a single platform - vSphere. We’ve covered the topic, how you can add a certificate or a certificate bundle to your Supervisor Cluster in order to pull images from an external registry like e.g Harbor.