vSphere with Tanzu Supervisor Services Part II - Ingress with Contour for vSphere Pod based Applications
* will be used for serving a vSphere Pod based web-shop application with Ingress functionalities. Also, I'm going over the NSX-site of the house in terms of networking, the distributed firewall as well as troubleshooting when using vSphere Pods in TKGS.")
Recap and Intro
In Part I of my blog series on the Supervisor Services in vSphere with Tanzu (TKGS), I introduced the overall concept, the idea, the requirements as well as how to register and install a new Supervisor Service in vSphere.
Read HERE
Furthermore, I covered the feature vSphere Pods and how they come to beneficial use for the Supervisor Services.
Read HERE
In this second part, I’m going to demonstrate how the Kubernetes Ingress Controller Service (Contour) will be used for serving a vSphere Pod based web-shop application with Ingress functionalities. Also, I’m going over the NSX-side of the house in terms of networking, the distributed firewall as well as troubleshooting when using vSphere Pods in TKGS.
Kubernetes Ingress Controller Service
The Kubernetes Ingress Controller Service is already installed in my TKGS with NSX environment. If you haven’t installed a Supervisor Service from the associated Catalog before, and you also skipped reading Part I of this series, I’d recommend making yourself familiar with the installation first (easy 👍).
Start reading HERE.
Important to know/remember is, that when I installed the Contour Service on my Supervisor Cluster, the Envoy Proxy got an IP address assigned by the NSX Load Balancer. This IP address, which is shown below, will be used to create the DNS record for my example application.
- In the vSphere Client - vSphere Namespace
svc-contour-domain-c8:
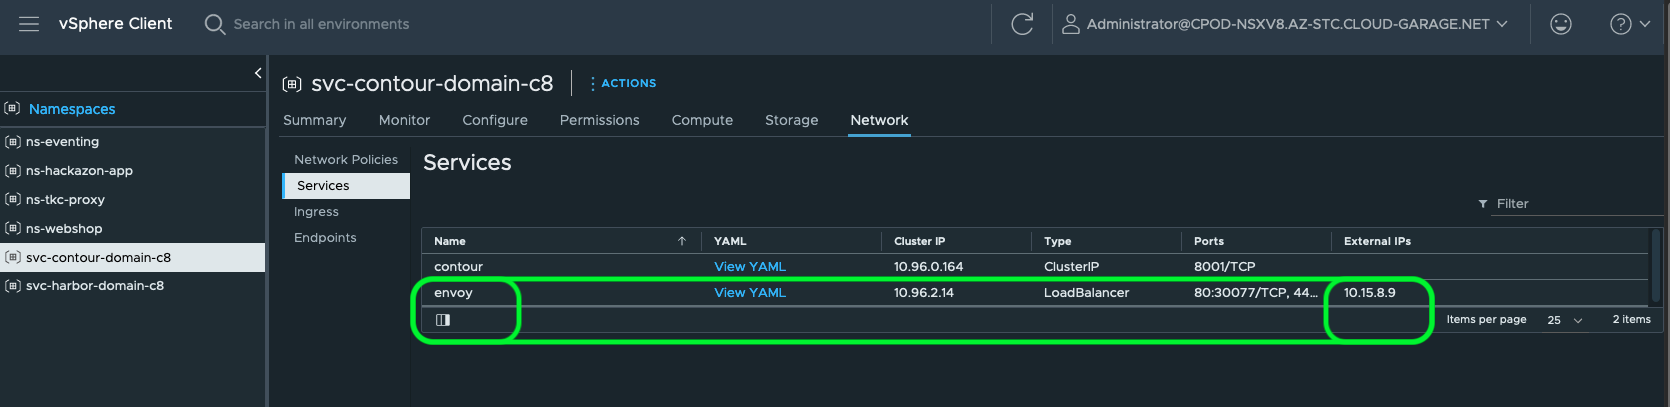
- On the terminal - using
kubectl:
kubectl -n svc-contour-domain-c8 get svc envoy

NAME    TYPE           CLUSTER-IP   EXTERNAL-IP   PORT(S)                      AGE
envoy   LoadBalancer   10.96.2.14   10.15.8.9     80:30077/TCP,443:32173/TCP   58d
Example Web-Shop Application
To begin with, we have to pick an application of our choice which works with an Ingress configuration. These applications mostly provide an user interface via a web browser which is exposed via Ingress.
A couple of popular and demo-proven example applications like e.g. Yelb or the ACME Fitness app can be found on William Lam’s blog post: Interesting Kubernetes application demos.
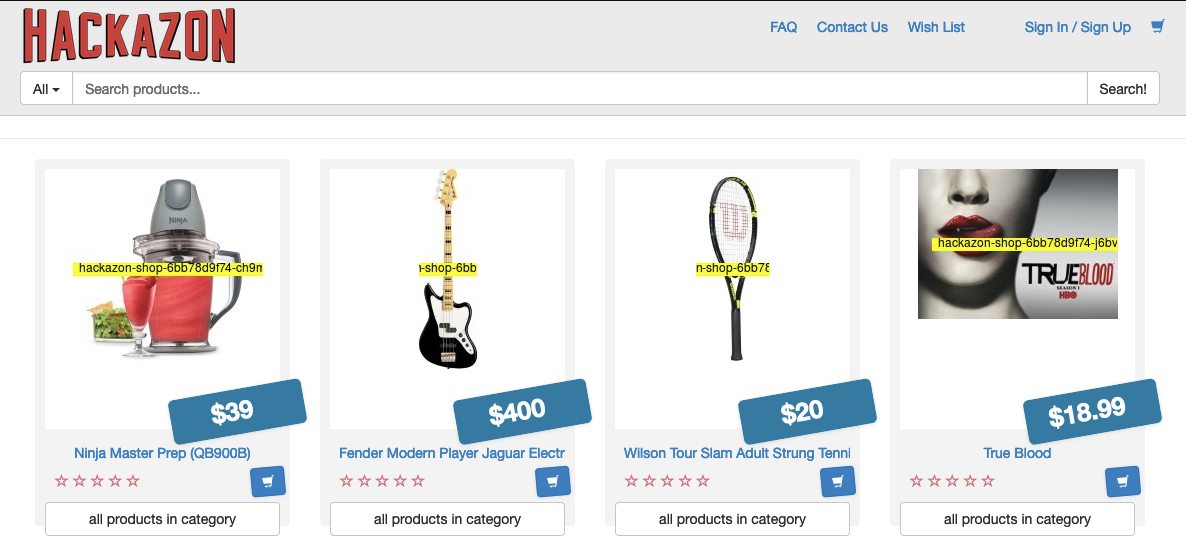
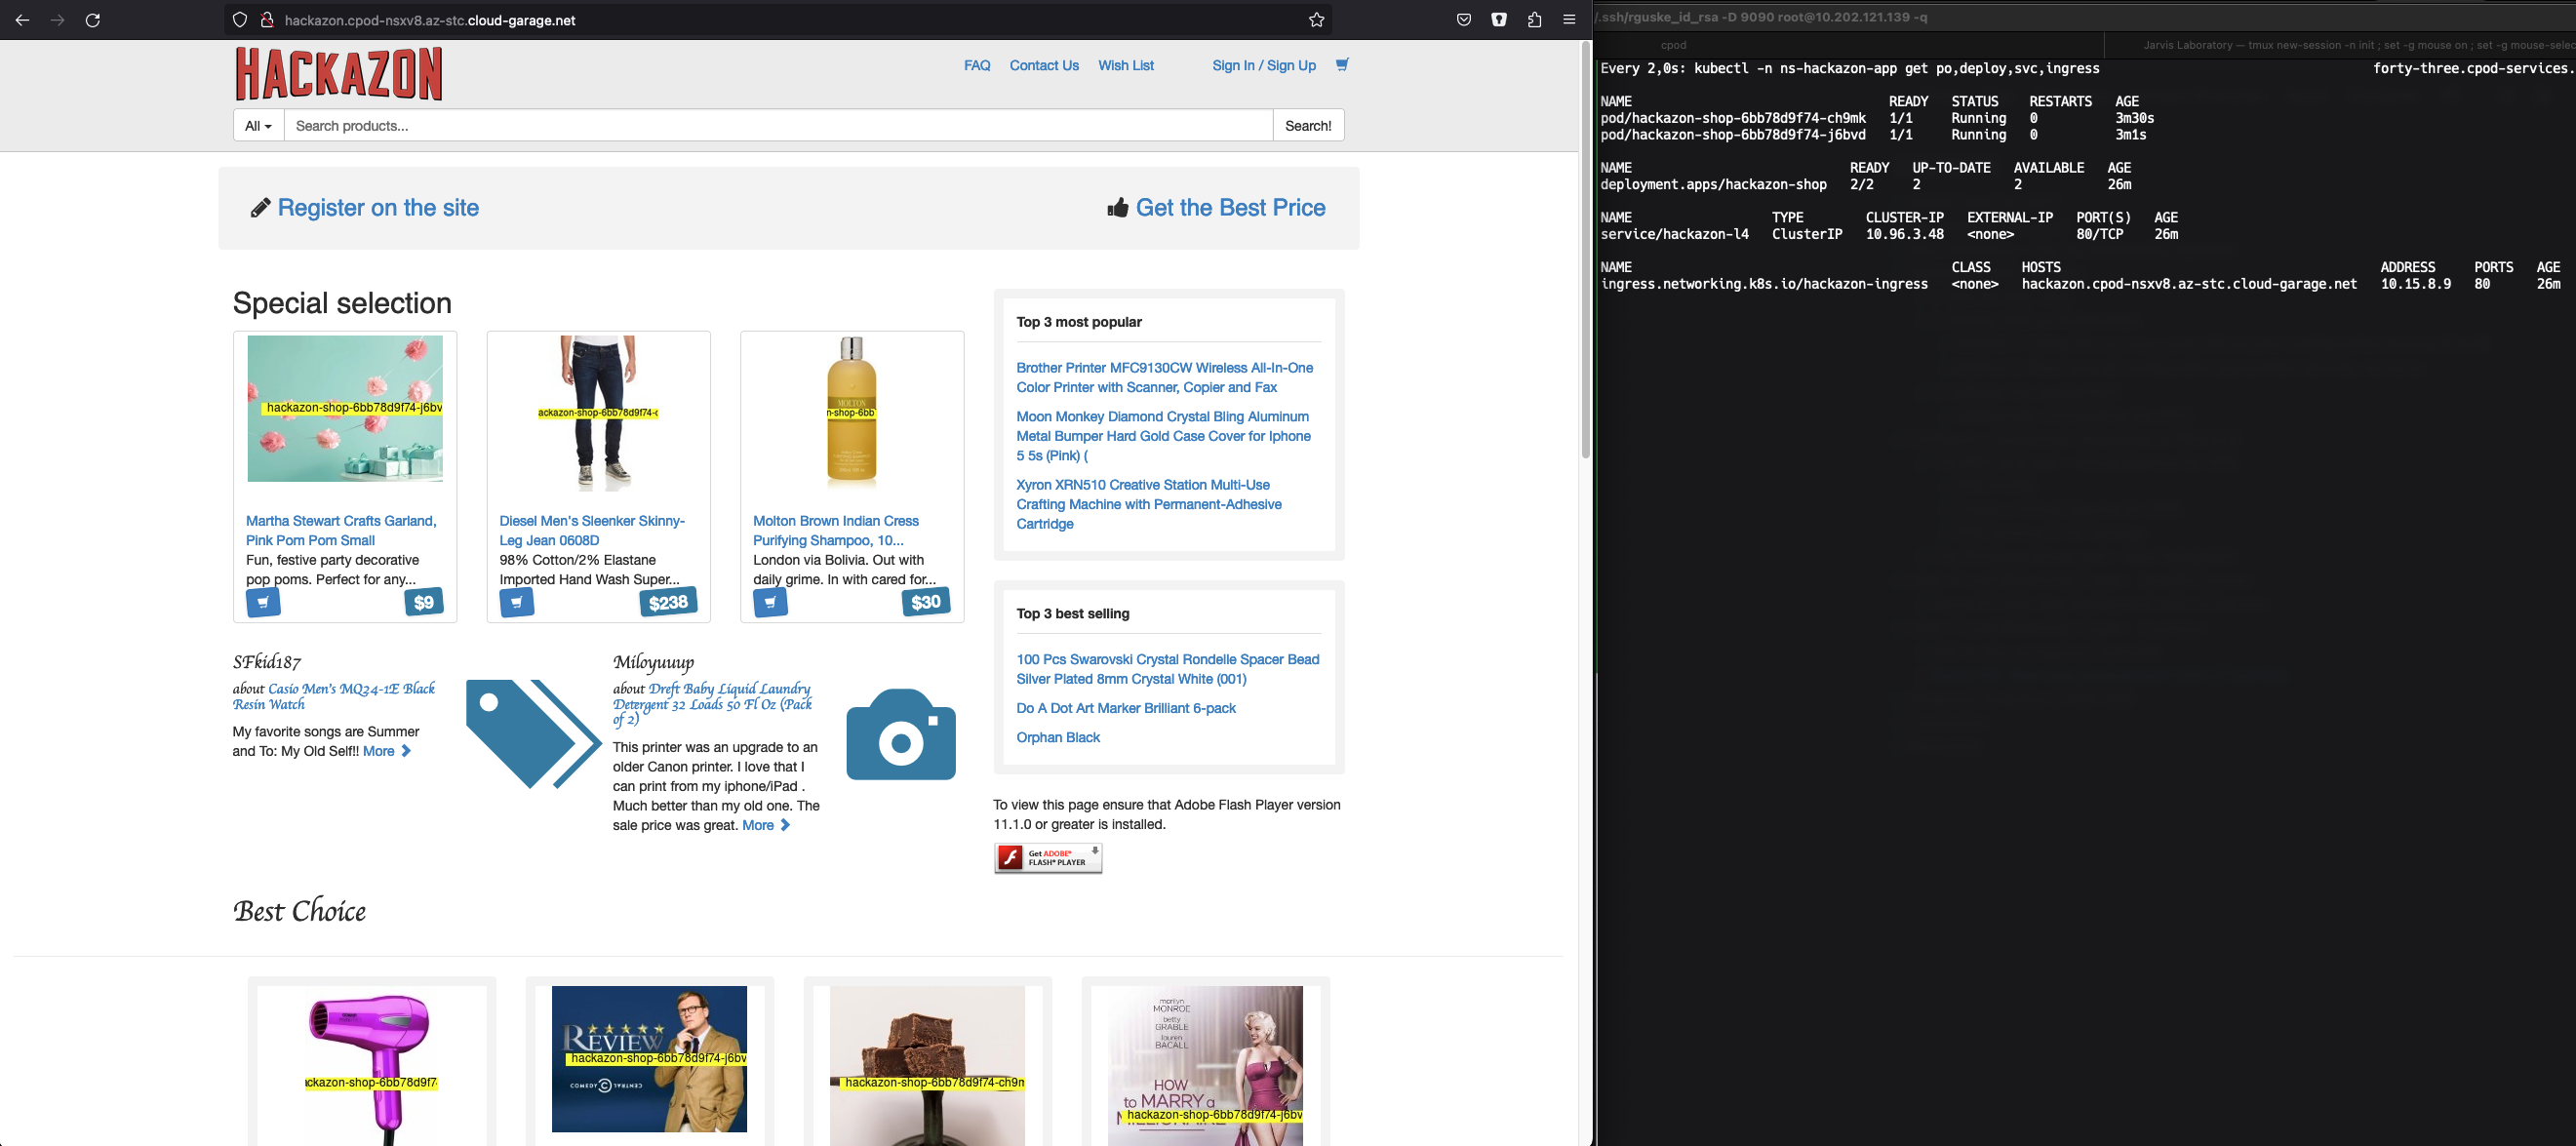
I’m going to deploy a web-shop application named Hackazon. I like using this example application a lot, because when browsing the shop website, the names of the serving Pods are showing up on the shop-item for which they are responsible for (Figure II).
Create a vSphere Namespace
In order to have the application of our choice deployed and running as vSphere Pods, we have to create a vSphere Namespace first. I’ve covered this step in terms of creation and configuration in a post HERE.
I created a new vSphere Namespace, named it ns-hackazon-app and configured it properly. Right after clicking on CREATE this new vSphere object will also be created as a “real” Kubernetes Namespace on the Supervisor Cluster.
Validate it using kubectl:
kubectl get ns

NAME                                        STATUS   AGE
default                                     Active   107d
kube-node-lease                             Active   107d
kube-public                                 Active   107d
kube-system                                 Active   107d
ns-eventing                                 Active   14d
ns-hackazon-app                             Active   10d
svc-contour-domain-c8                       Active   59d
svc-harbor-domain-c8                        Active   58d
svc-tmc-c8                                  Active   107d

[...]
Deploy the Application
Creating the vSphere Namespace was a requirement for deploying our application to the Supervisor Cluster. Otherwise you’d receive the following error message:
Error from server (Forbidden): error when creating "STDIN": deployments.apps is forbidden: User "sso:Administrator@cpod-nsxv8.az-stc.cloud-garage.net" cannot create resource "deployments" in API group "apps" in the namespace "default"
Yes, I’m using the administrator@cpod-nsxv8.az-stc.cloud-garage.net (vsphere.local) user. Normally, you would assign a user or a user-goup to the vSphere Namespace which have the proper privileges in vSphere configured. But, you know…for the sake of the demo it’s okay.
In Terms of the Supervisor Cluster (once again). Keep the following in mind:
Therefore, it’s actually not intended to run applications on the Supervisor Cluster. For this, you would normally make use of the Tanzu Kubernetes Grid Service which allows you to deploy Tanzu Kubernetes Clusters in vSphere. But! There are use cases to run particular type of applications very isolated on the Supervisor Cluster as vSphere Pods.
I wouldn’t consider my example application as this type of application but for the sake of this post and it’s intention, it’s applicable 😃
Application Deployment
Moving on with applying the Hackazon Deployment manifest to the newly created Namespace.
I’m still connected to the Supervisor Cluster:
kubectl config current-context

sv1-az1.cpod-nsxv8.az-stc.cloud-garage.net
Copy/paste and execute:
kubectl -n ns-hackazon-app apply -f - <<EOF
---
kind: Deployment
apiVersion: apps/v1
metadata:
  name: hackazon-shop
  labels:
    app: hackazon-shop
spec:
  replicas: 2
  selector:
    matchLabels:
      app: hackazon-shop
  template:
    metadata:
      labels:
        app: hackazon-shop
    spec:
      containers:
      - name: hackazon-shop
        image: projects.registry.vmware.com/tanzu_ese_poc/hackazon:1.0
        ports:
          - containerPort: 80
            protocol: TCP
EOF
The Pods are being created and instantiated in vSphere. Figure III below is showing what’s happening on the Kubernetes layer (left pane) and also what’s happening on the vSphere layer (right pane).
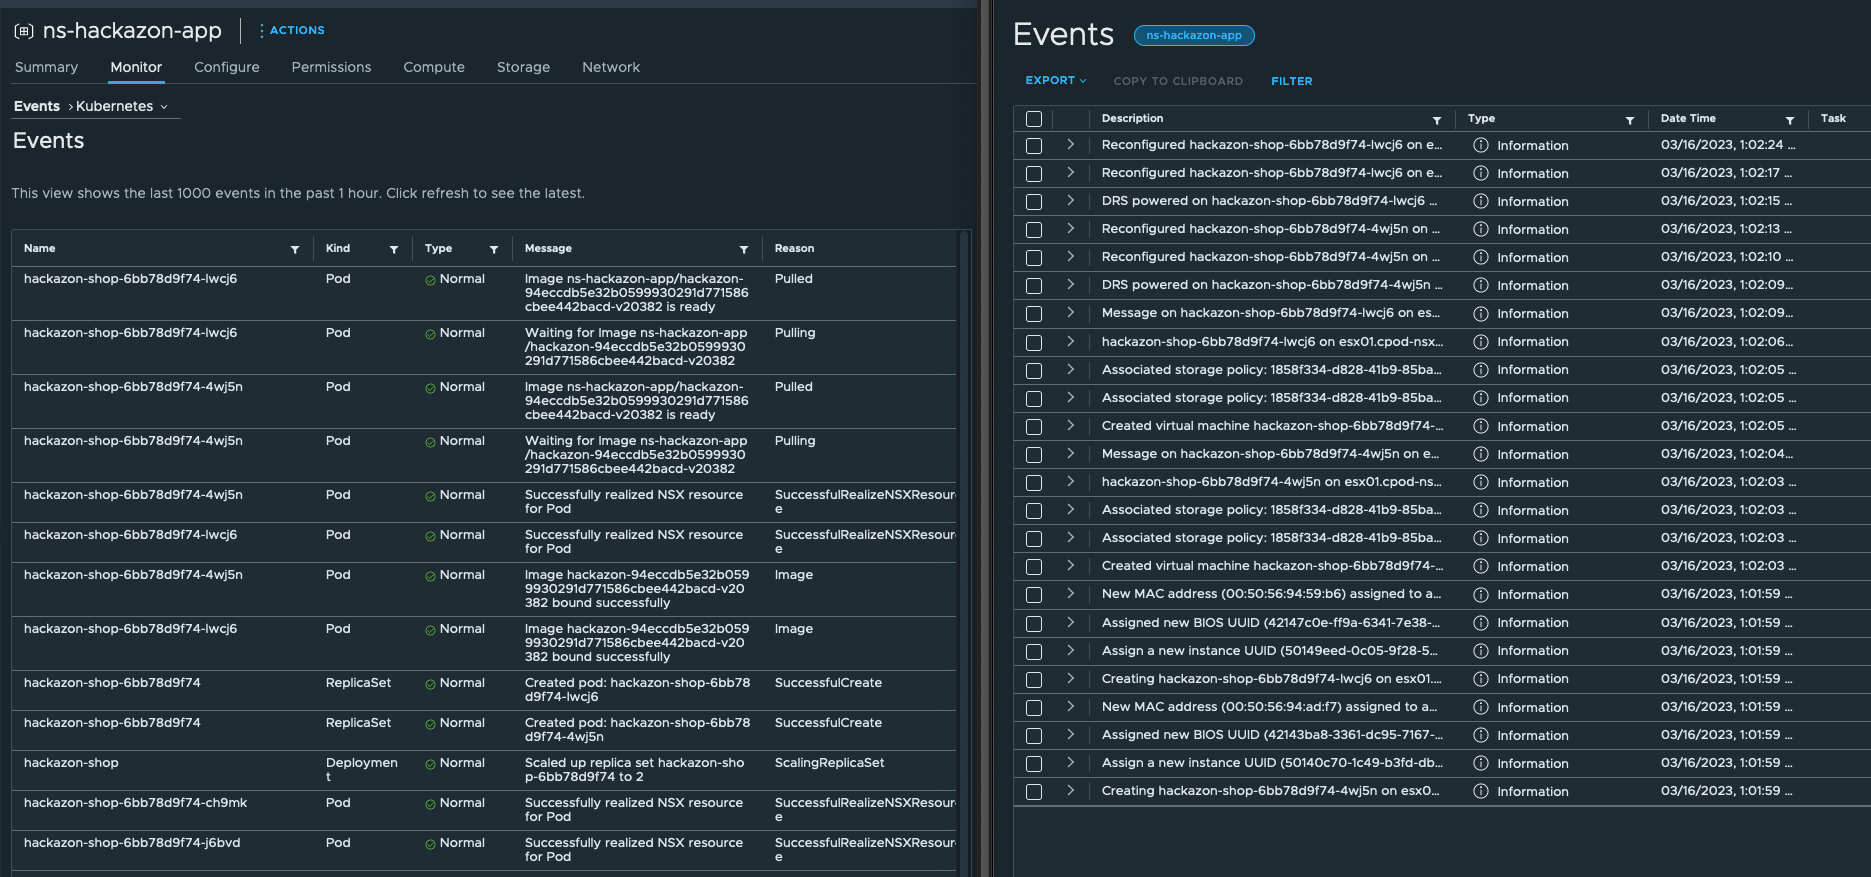
Pay attention to the NSX related messages 😃 These messages are first indications of the deep integration in VMware’s comprehensive Networking and Security solution NSX by using the Container Networking Interface (CNI) NCP. The deep integration as well as the benefits will be an essential part of this post.
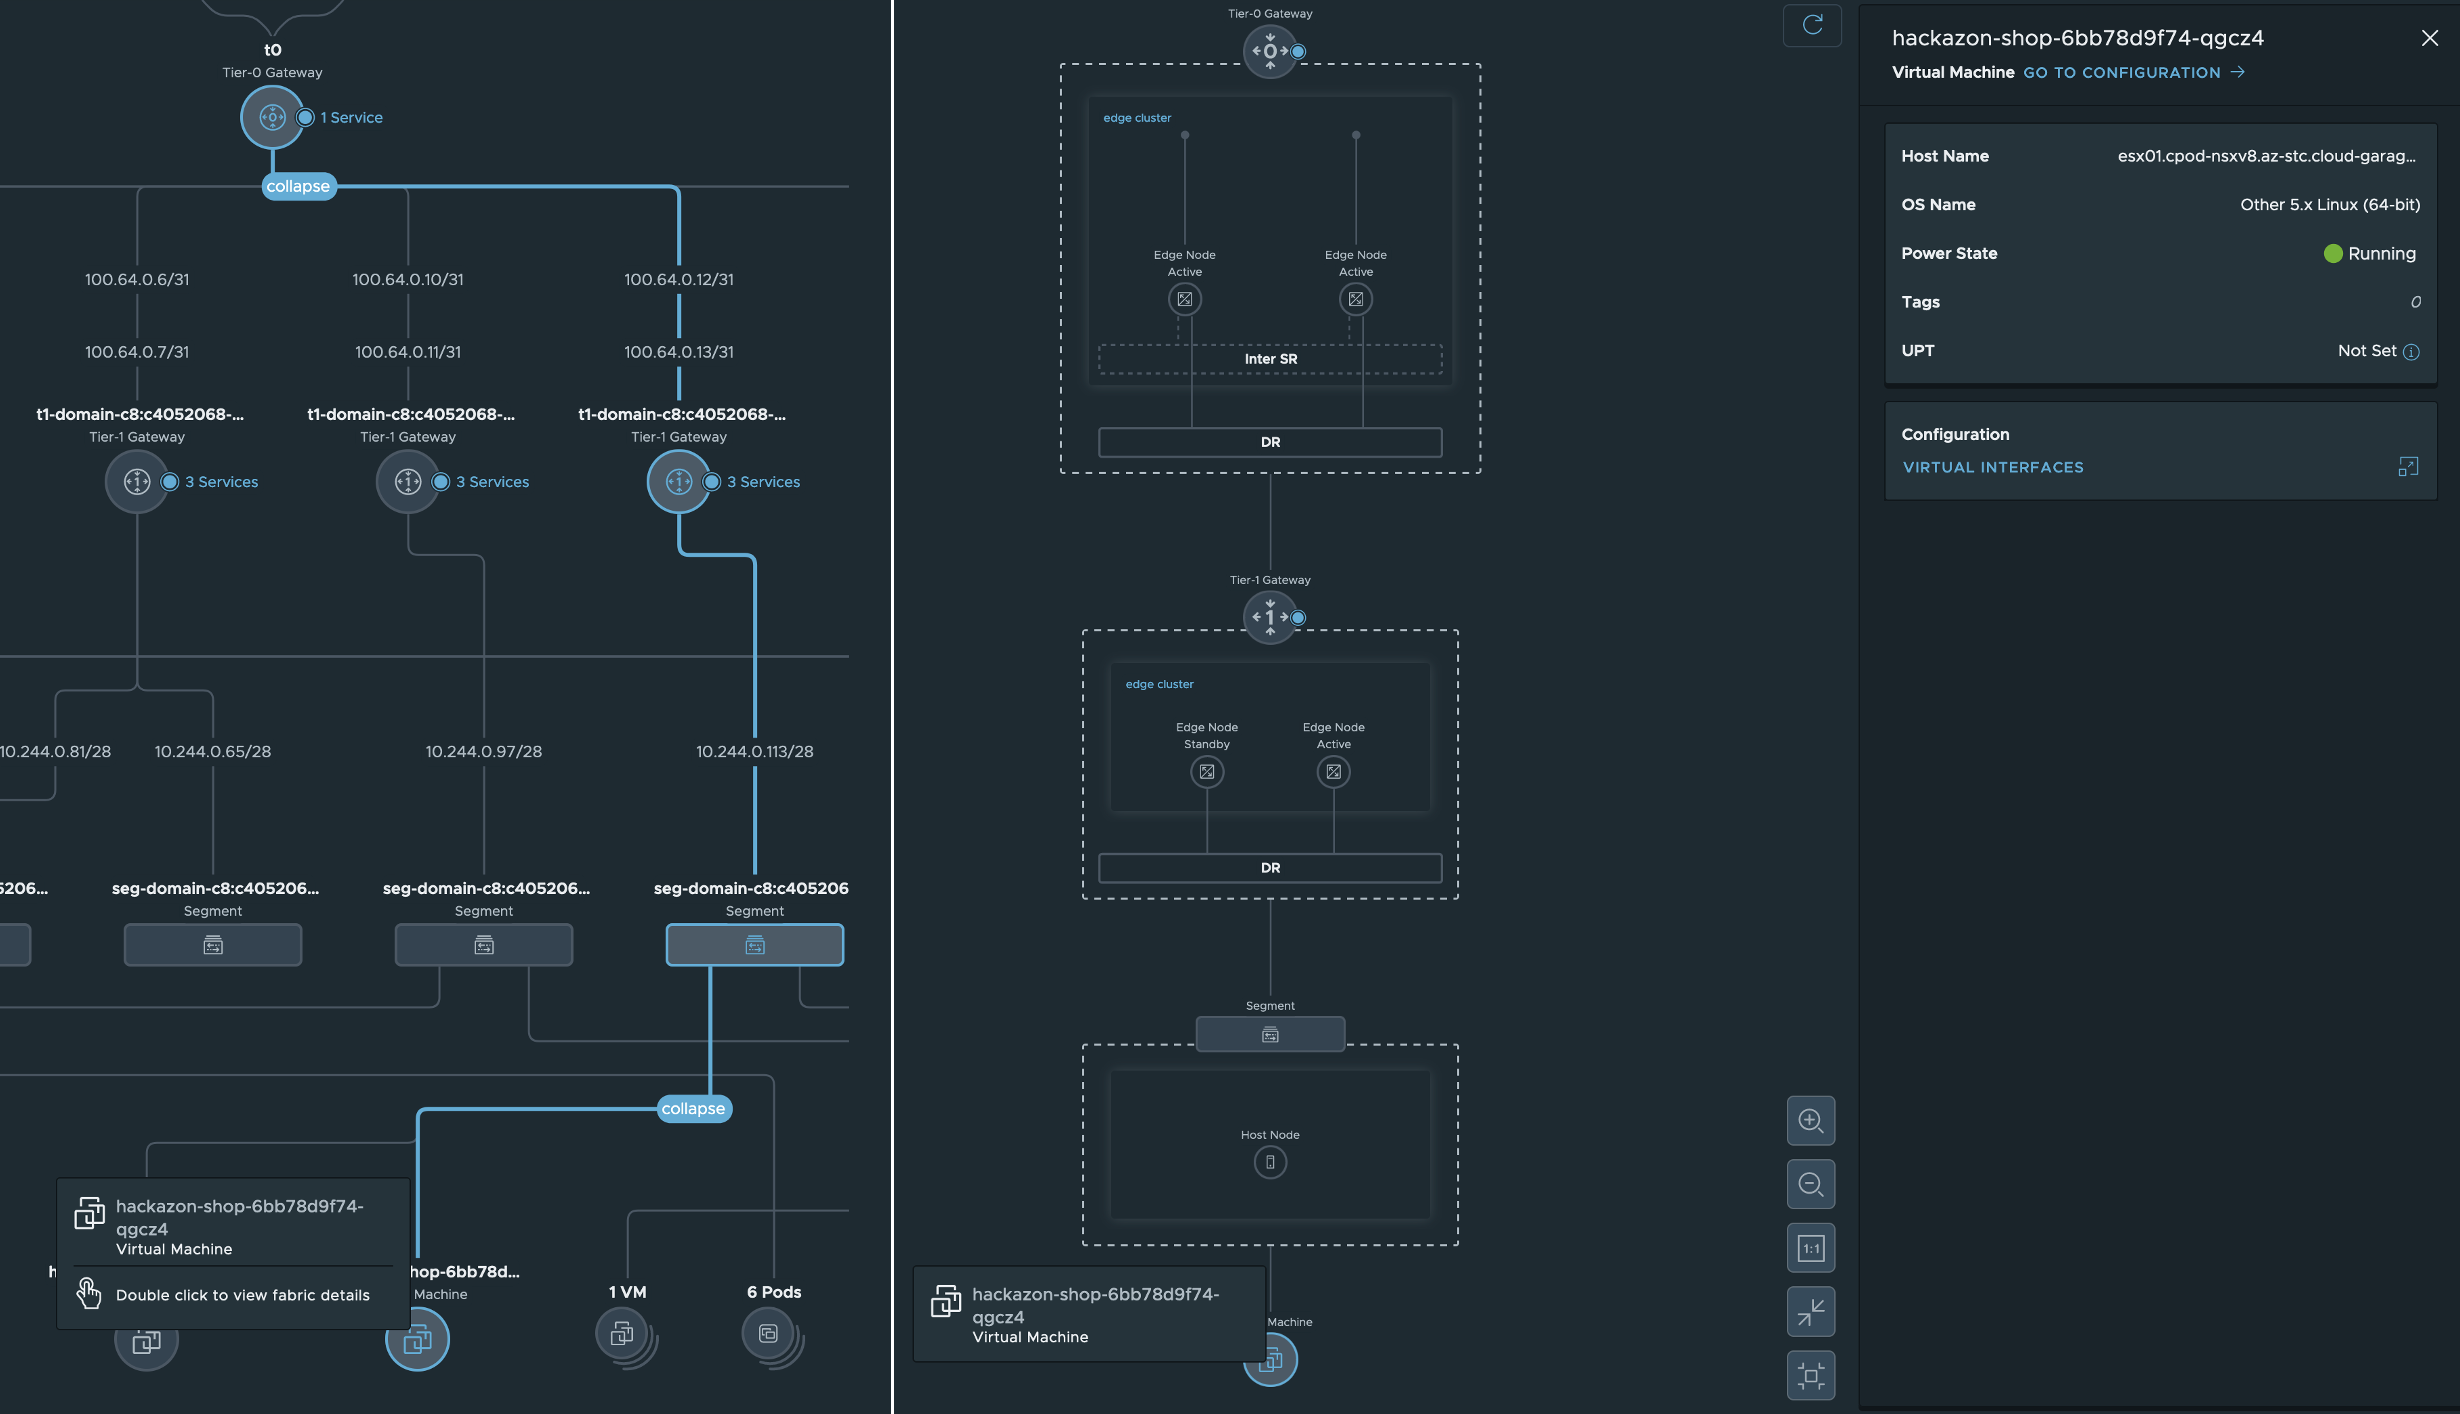
Just a glimpse what we are seeing already in NSX at the Networking Topology section right after the deployment of the application:
Application Service
The next resource which is needed for the application is the Kubernetes Service type: ClusterIP. By applying the following, the Kubernetes Service type ClusterIP is being created.
kubectl -n ns-hackazon-app apply -f - <<EOF
---
kind: Service
apiVersion: v1
metadata:
  name: hackazon-l4
  labels:
    app: hackazon-shop
    svc: hackazon-l4
spec:
  ports:
    - port: 80
  selector:
    app: hackazon-shop
  type: ClusterIP
EOF
By taking another look on the Kubernetes Events section in the vSphere Namespace, you’ll notice the creation of a new Service as well as the associated Endpoints.
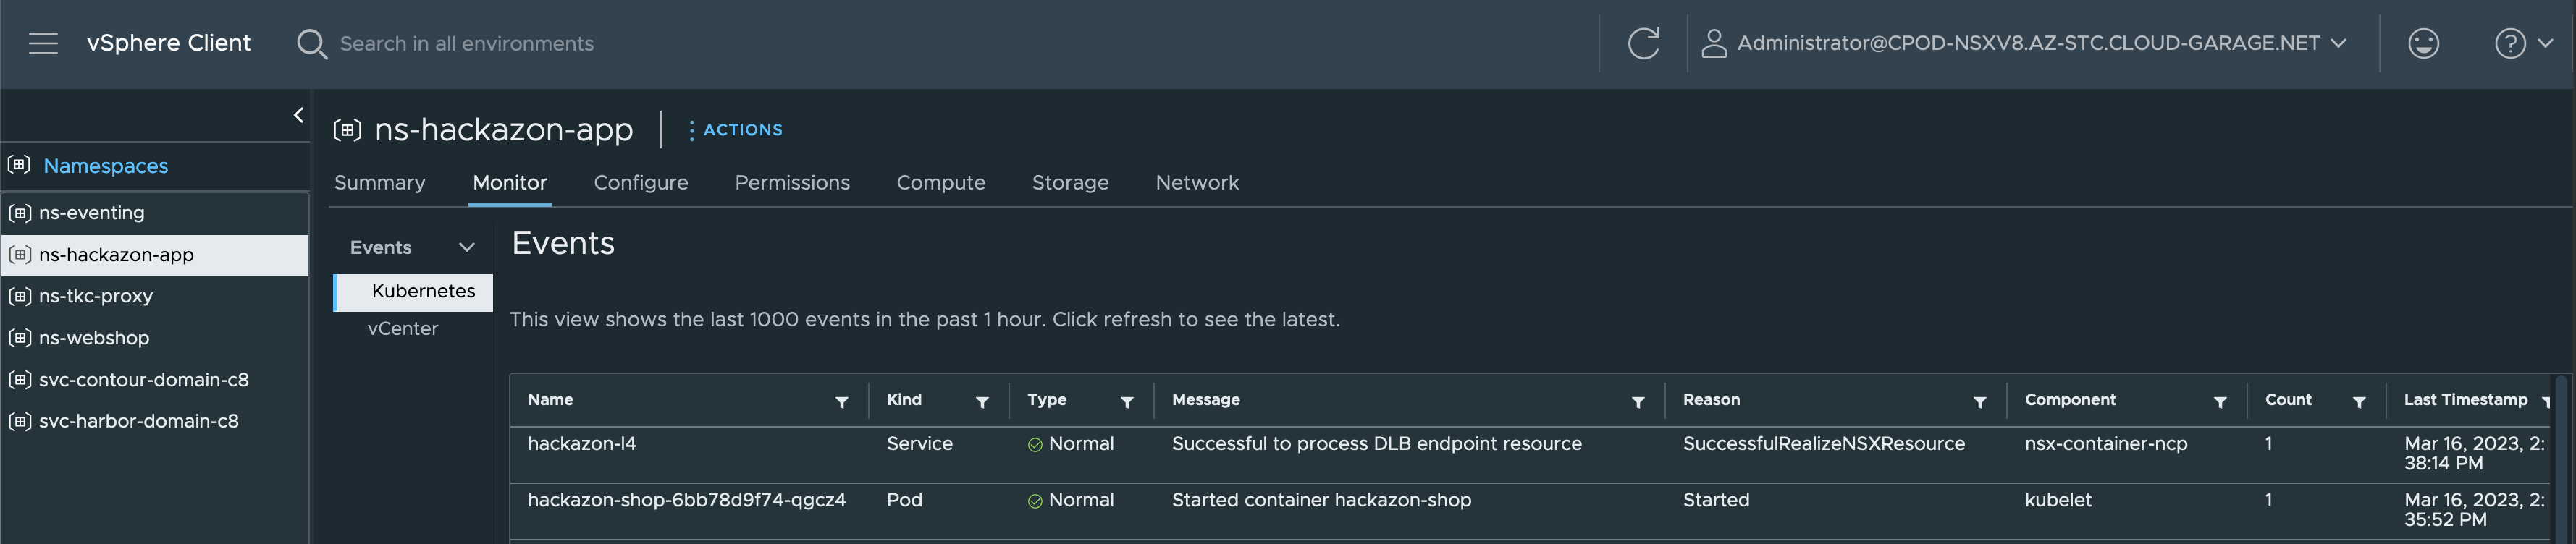
This new Service will be used by the Ingress resource which will be created next.
Application Ingress
The Ingress configuration which I’m going to apply is using a host and pathType: Prefix rule. I’m using a precise match for my host value which means that I’m providing a hostname (FQDN) for my app instead of using a wildcard. Therefore, the HTTP host header has to match the value in the specification (- host: hackazon.cpod-nsxv8.az-stc.cloud-garage.net).
This requires a proper DNS configuration first before trying to browse the website. Use the assigned IP address of the Envoy proxy for your config.
kubectl -n svc-contour-domain-c8 get svc envoy

NAME    TYPE           CLUSTER-IP   EXTERNAL-IP   PORT(S)                      AGE
envoy   LoadBalancer   10.96.2.14   10.15.8.9     80:30077/TCP,443:32173/TCP   59d
Copy/paste and execute:
kubectl -n ns-hackazon-app apply -f - <<EOF
---
apiVersion: networking.k8s.io/v1
kind: Ingress
metadata:
name: hackazon-ingress
labels:
app: hackazon-shop
annotations:
kubernetes.io/ingress.class: contour
spec:
rules:
- host: hackazon.cpod-nsxv8.az-stc.cloud-garage.net
http:
paths:
- pathType: Prefix
path: /
backend:
service:
name: hackazon-l4
port:
number: 80
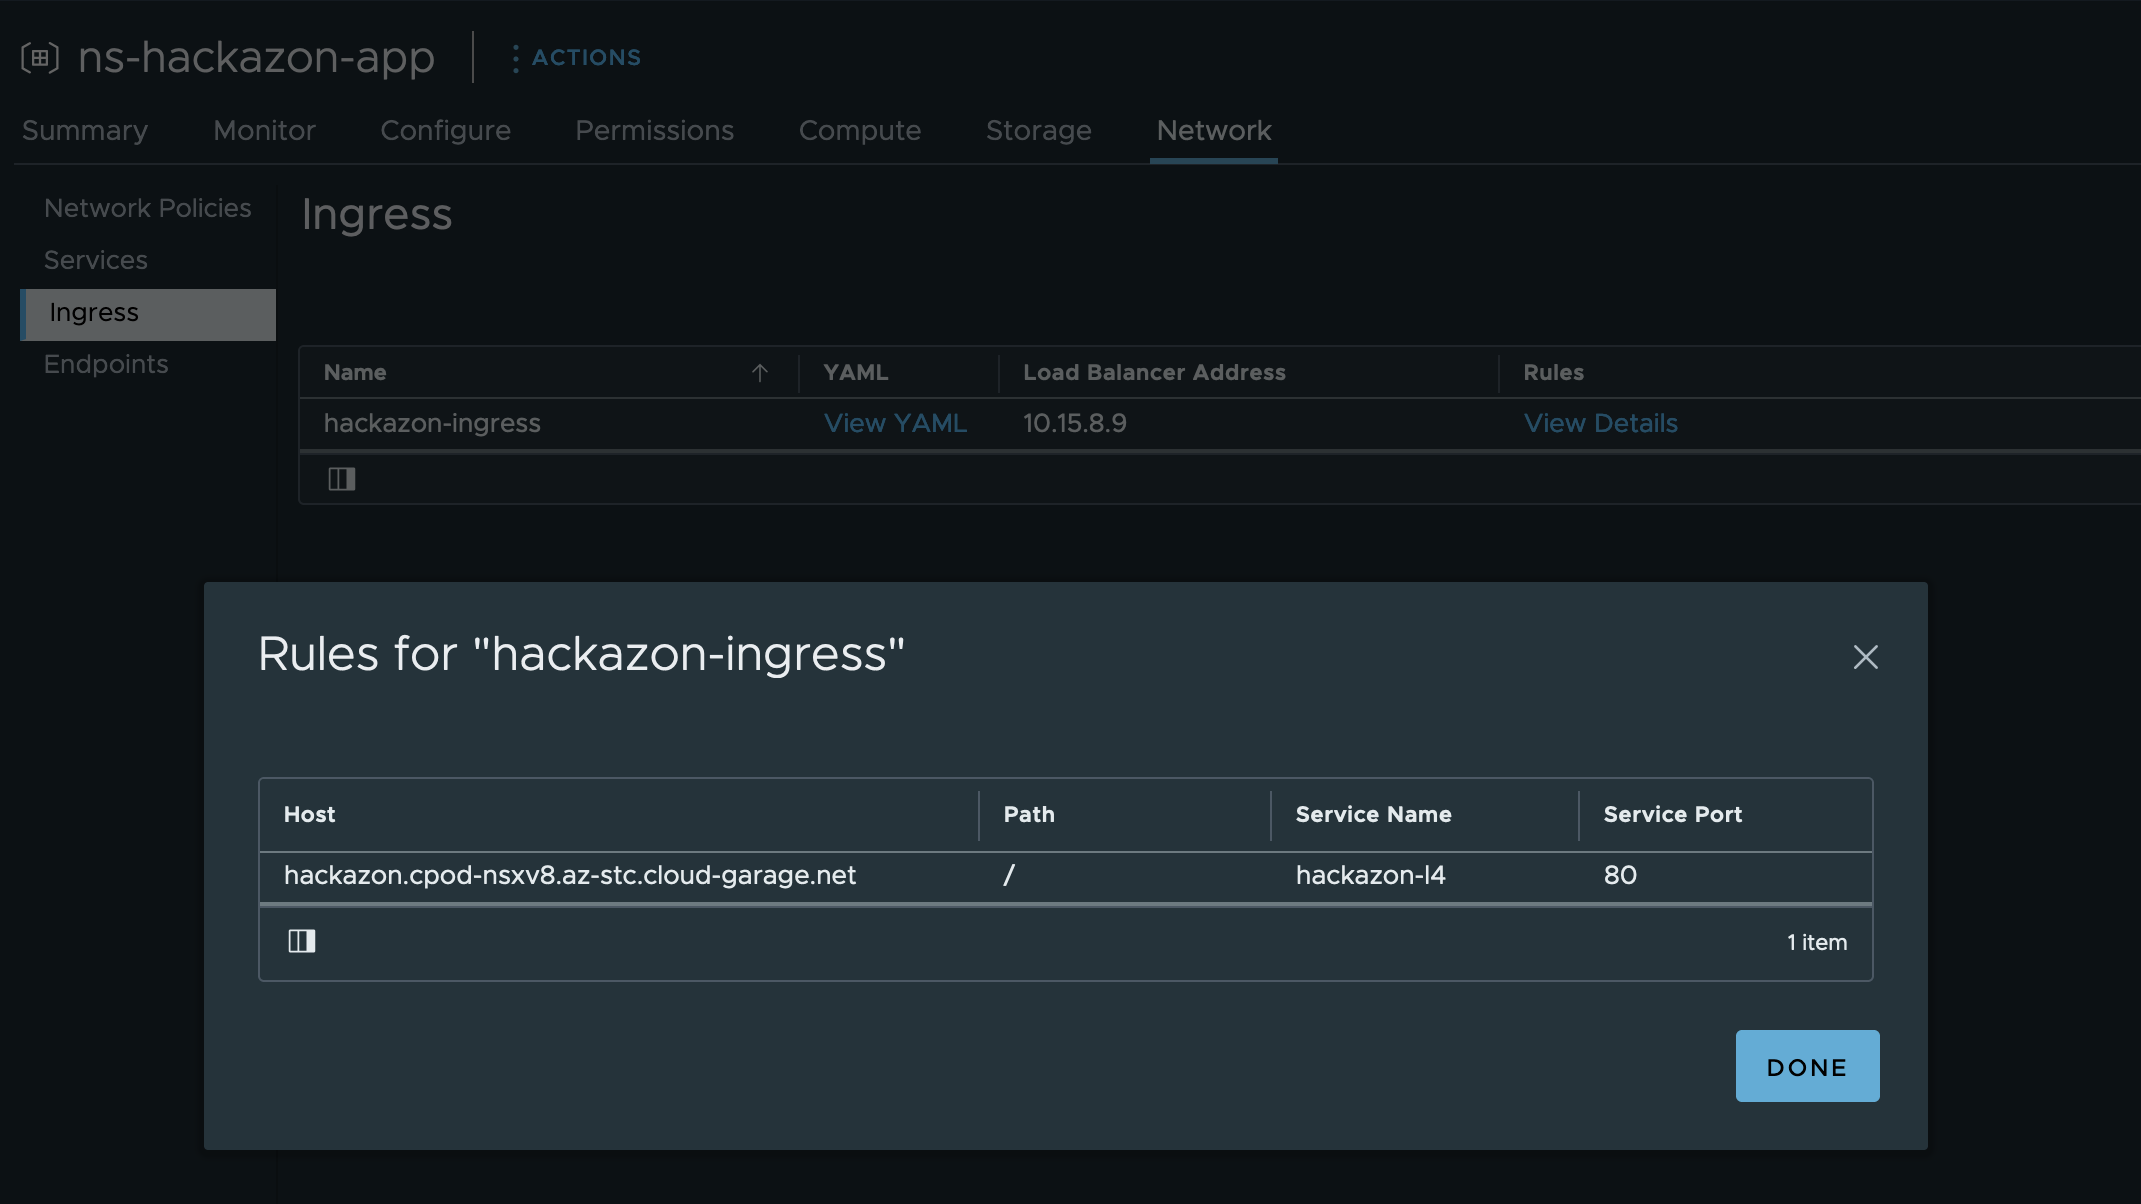
EOFGuess what, this new created resource is showing up in the vSphere Client as well. What got me excited is, that it is also showing the configured Ingress rules which I’ve defined in the specification of the Ingress (Figure VI).
Upstream Connect Error or Disconnect/Reset before Headers
Now that the application got deployed successfully and everything looks healthy on the first view…
kubectl -n ns-hackazon-app get deploy,po,svc,ingress

NAME                            READY   UP-TO-DATE   AVAILABLE   AGE
deployment.apps/hackazon-shop   2/2     2            2           6h56m

NAME                                 READY   STATUS    RESTARTS   AGE
pod/hackazon-shop-6bb78d9f74-gwn6r   1/1     Running   0          6h56m
pod/hackazon-shop-6bb78d9f74-qgcz4   1/1     Running   0          6h56m

NAME                  TYPE        CLUSTER-IP   EXTERNAL-IP   PORT(S)   AGE
service/hackazon-l4   ClusterIP   10.96.3.41   <none>        80/TCP    6h53m

NAME                                         CLASS    HOSTS                                         ADDRESS     PORTS   AGE
ingress.networking.k8s.io/hackazon-ingress   <none>   hackazon.cpod-nsxv8.az-stc.cloud-garage.net   10.15.8.9   80      4h40m
…let’s try browsing the web-frontend.
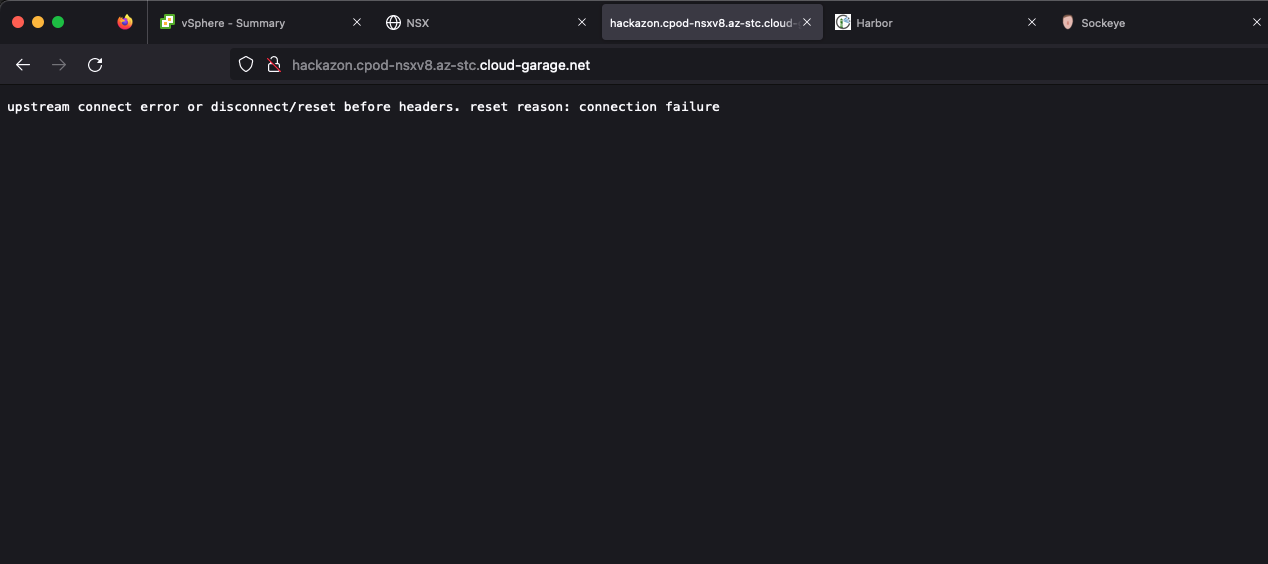
Troubleshooting
Since we know that everything networking and security related is done by NSX, it’s only a natural consequence that we have to leverage NSX to find the root cause for this issue.
In order to understand specific (mostly networking related) issues better, I often have to create illustrations of the communication. Figure VIII below shows the packetflow from my client to where it gets dropped.
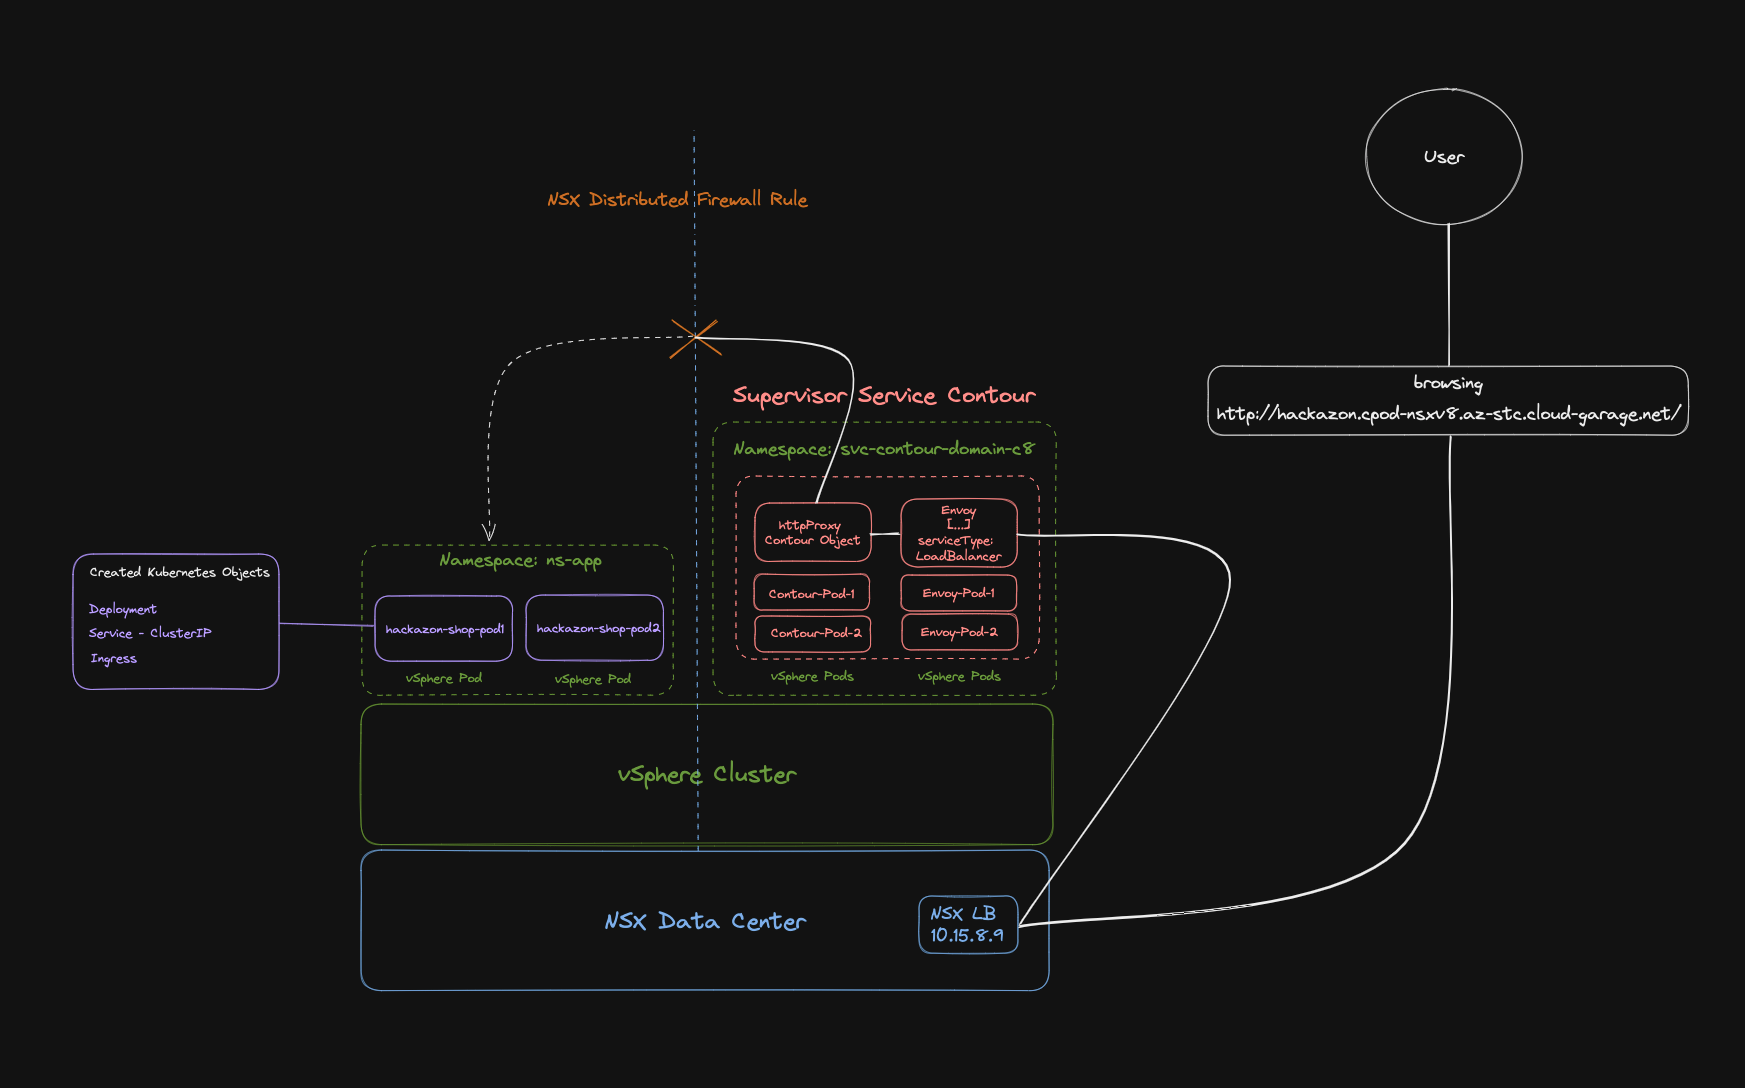
External to Internal Communication
The logical order of validation in this case is like it is shown on the drawing (Figure VIII):
By browsing the URL, I already validated the communication-targets 1 and 2. This is because of instead getting the response This site can't be reached, I got a response from the Contour pod, telling me about the mentioned Upstream connect error. Therefore, DNS naming resolution as well as a functioning NSX Load Balancer were validated.
Internal to External Communication
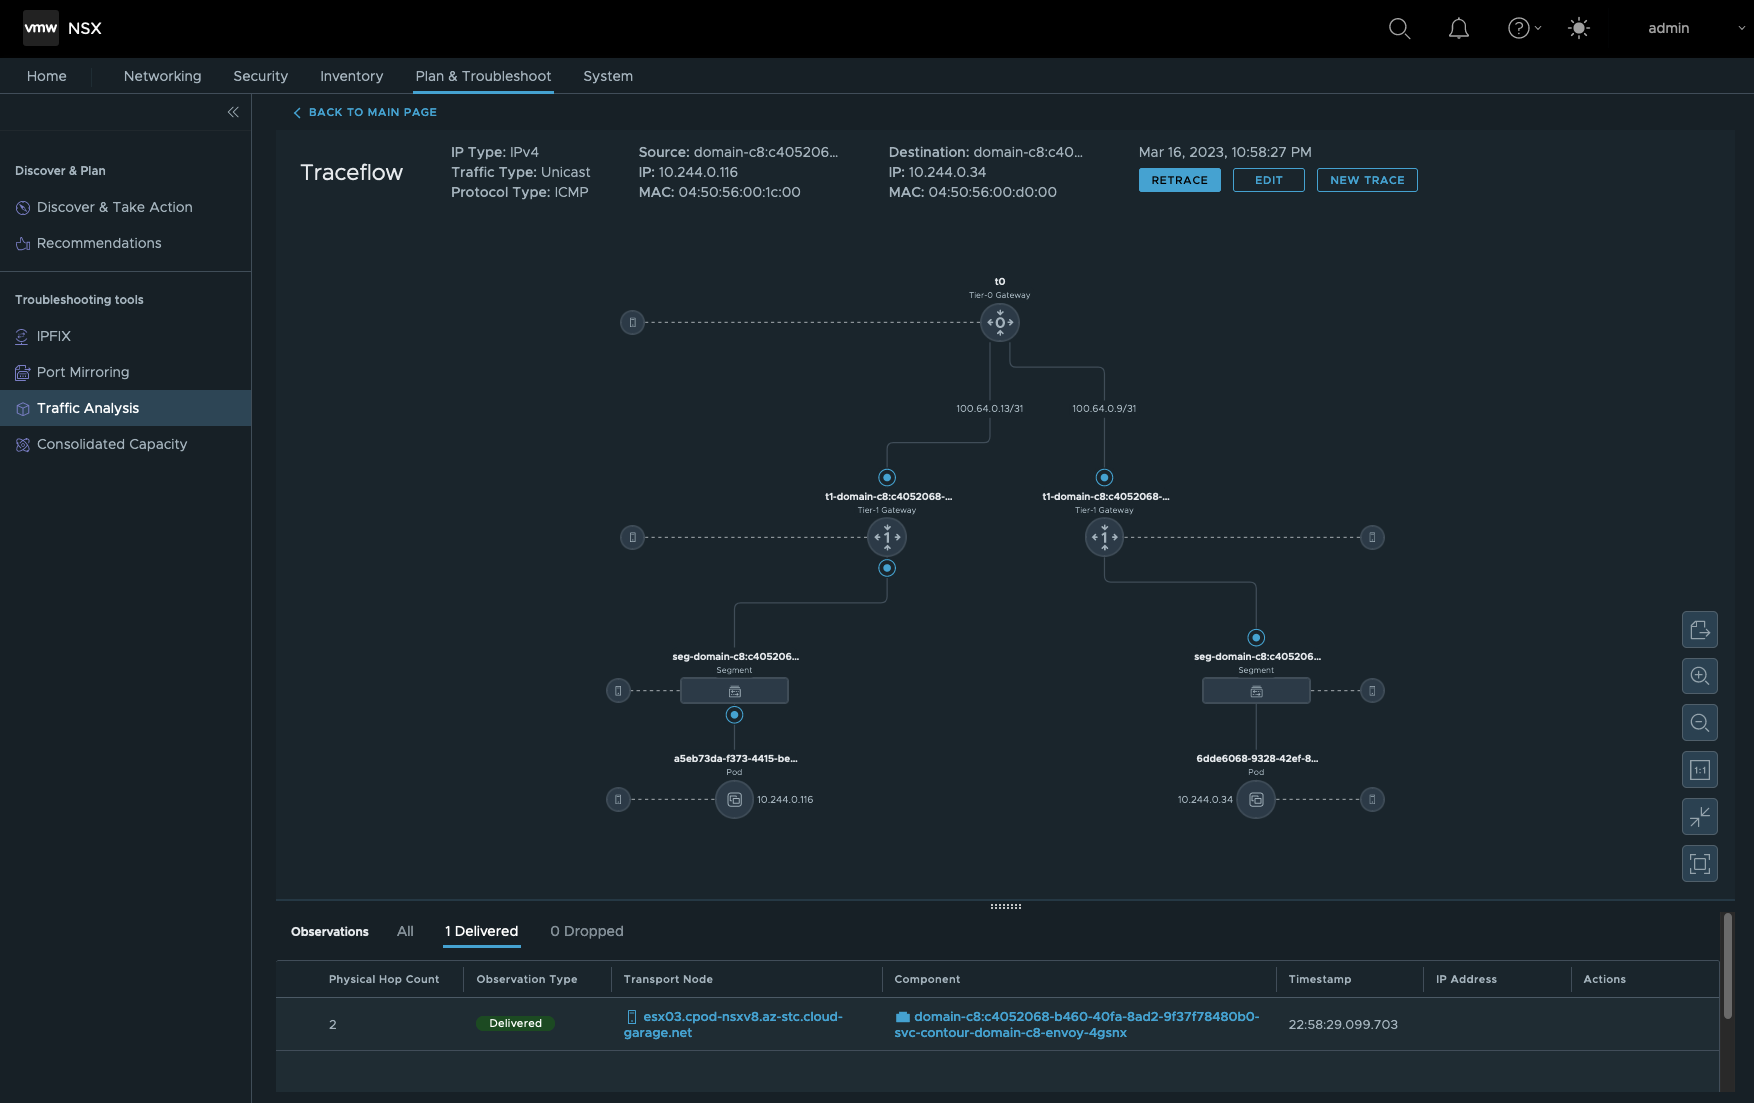
Now, let’s flip the picture and do some reverse engineering. Login into the NSX Manager and select Plan & Troubleshoot. Select Traffic Analysis on the left pane and then Traceflow.
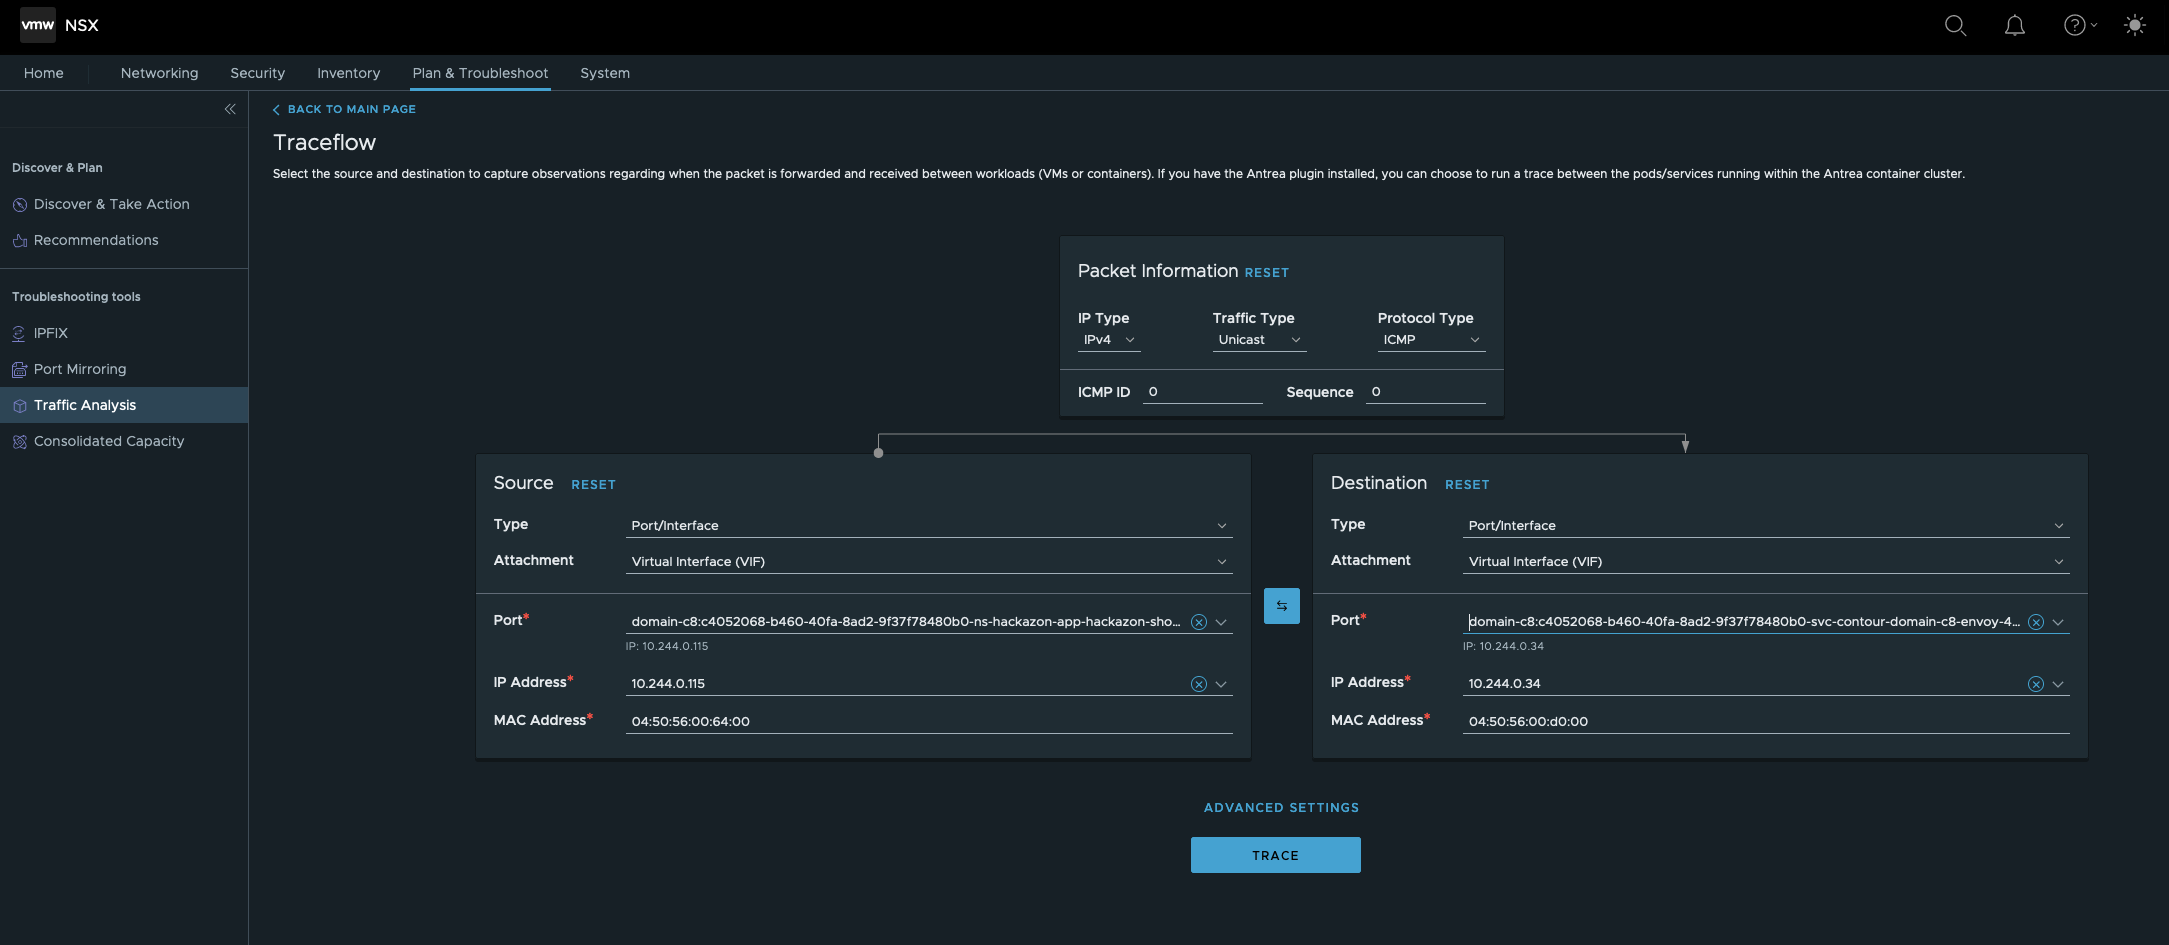
We’d like to validate if a communication from one Hackazon Pod to my jumphost is possible. Figure VIX below shows the configuration.
- Source Type is the Port/Interface of the Hackazon Pod.
- Destination Type is Layer-3, the IP address of my jumphost
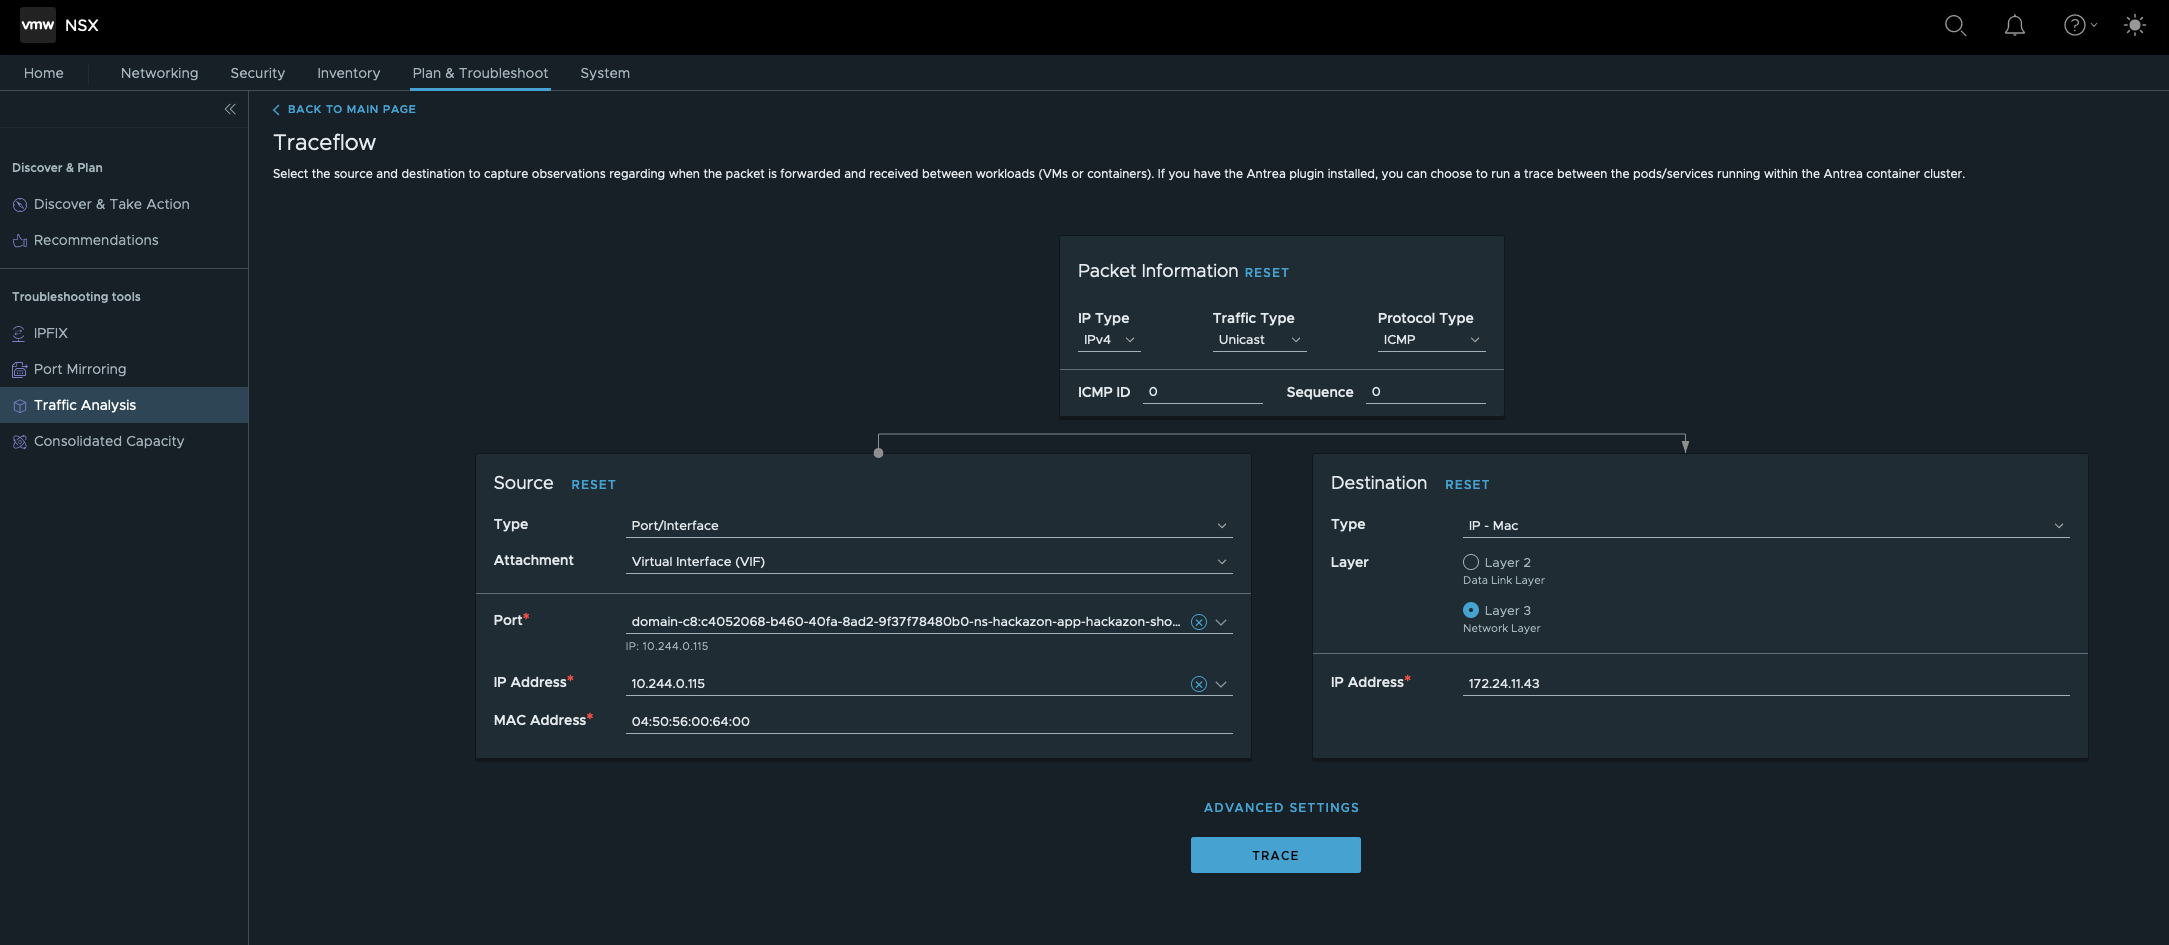
TRACE
Firgure X shows the state Delivered of the sent packet.
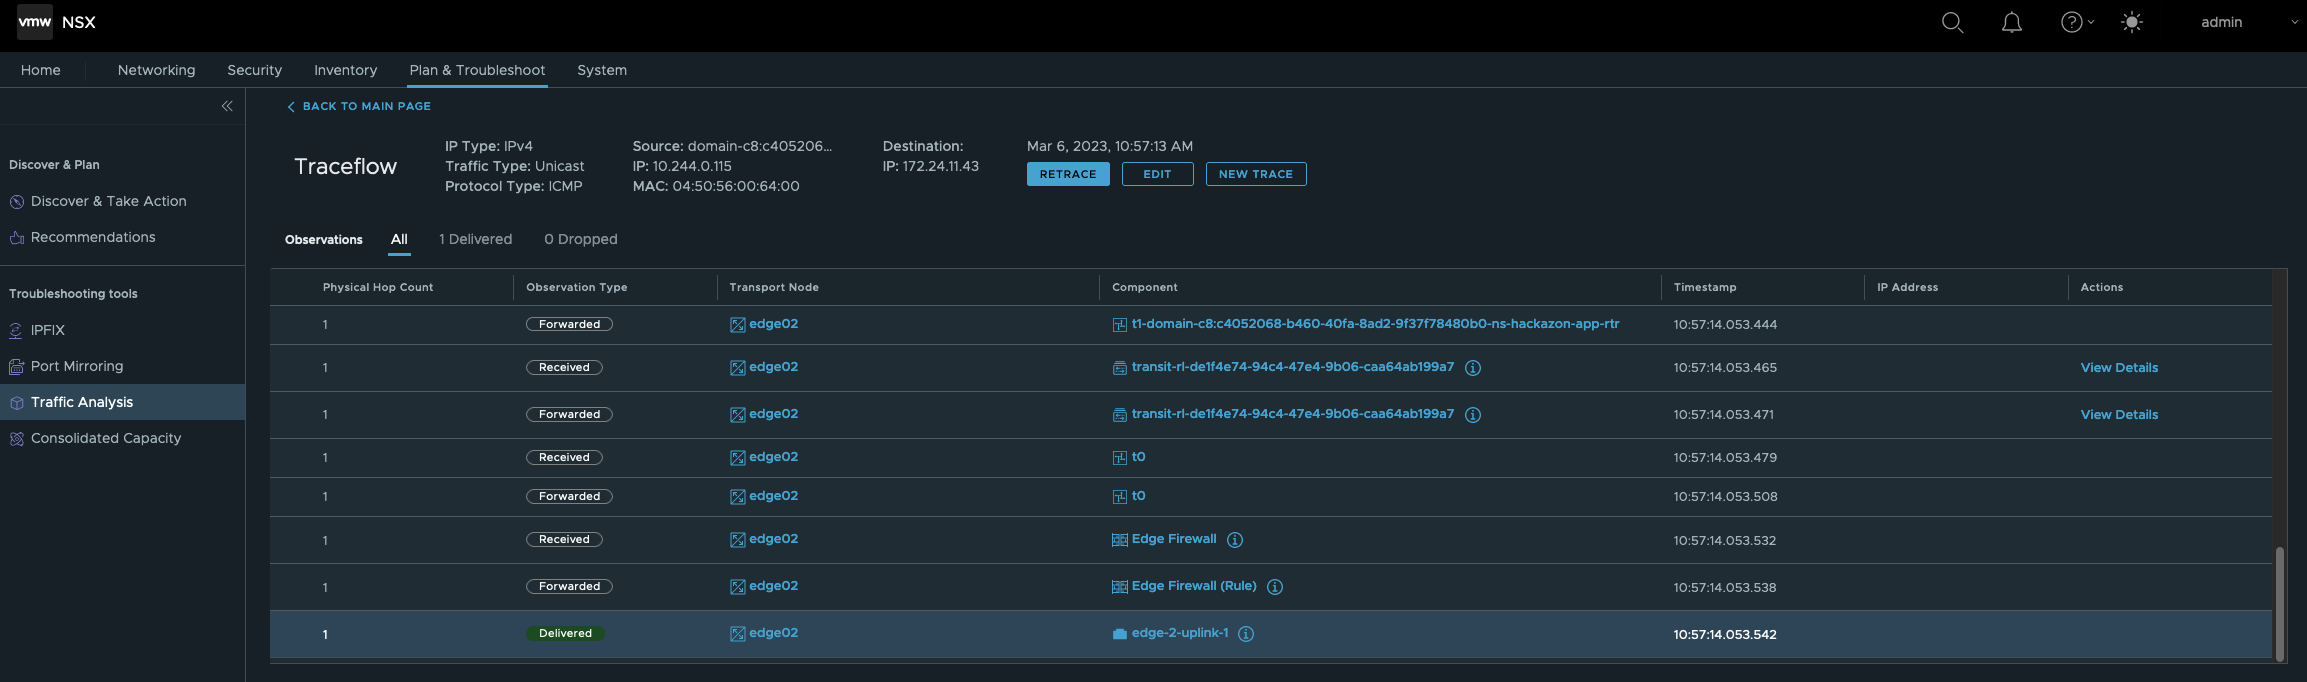
So far so good. Communication from internal workloads to the “outside-world” (North-South) is possible.
Pod to Pod Communication
Next, is validating the Pod-to-Pod communication over two different vSphere Namespaces (boundaries). East-West communication in TKGS with NSX is technically seen very cool and interesting. Because, each vSphere Namespace gets its own T1 Router automatically created in NSX.
Therefore, not only a multitude of networking, routing and load balancing capabilities are available per vSphere Namespace but also a Zero-Trust approach which is applied to every workload running inside a vSphere Namespace.
This is IMO an absolut teriffic benefit and demonstrates the deep integration of three awesome solutions.
I’m beginning with the communication from the Envoy Pod running in namespace svc-contour-domain-c8 to the Hackazon Pod running in namespace ns-hackazon-app.
- Source Type is the Port/Interface of the Envoy Pod.
- Destination Type is the Port/Interface of the Hackazon Pod
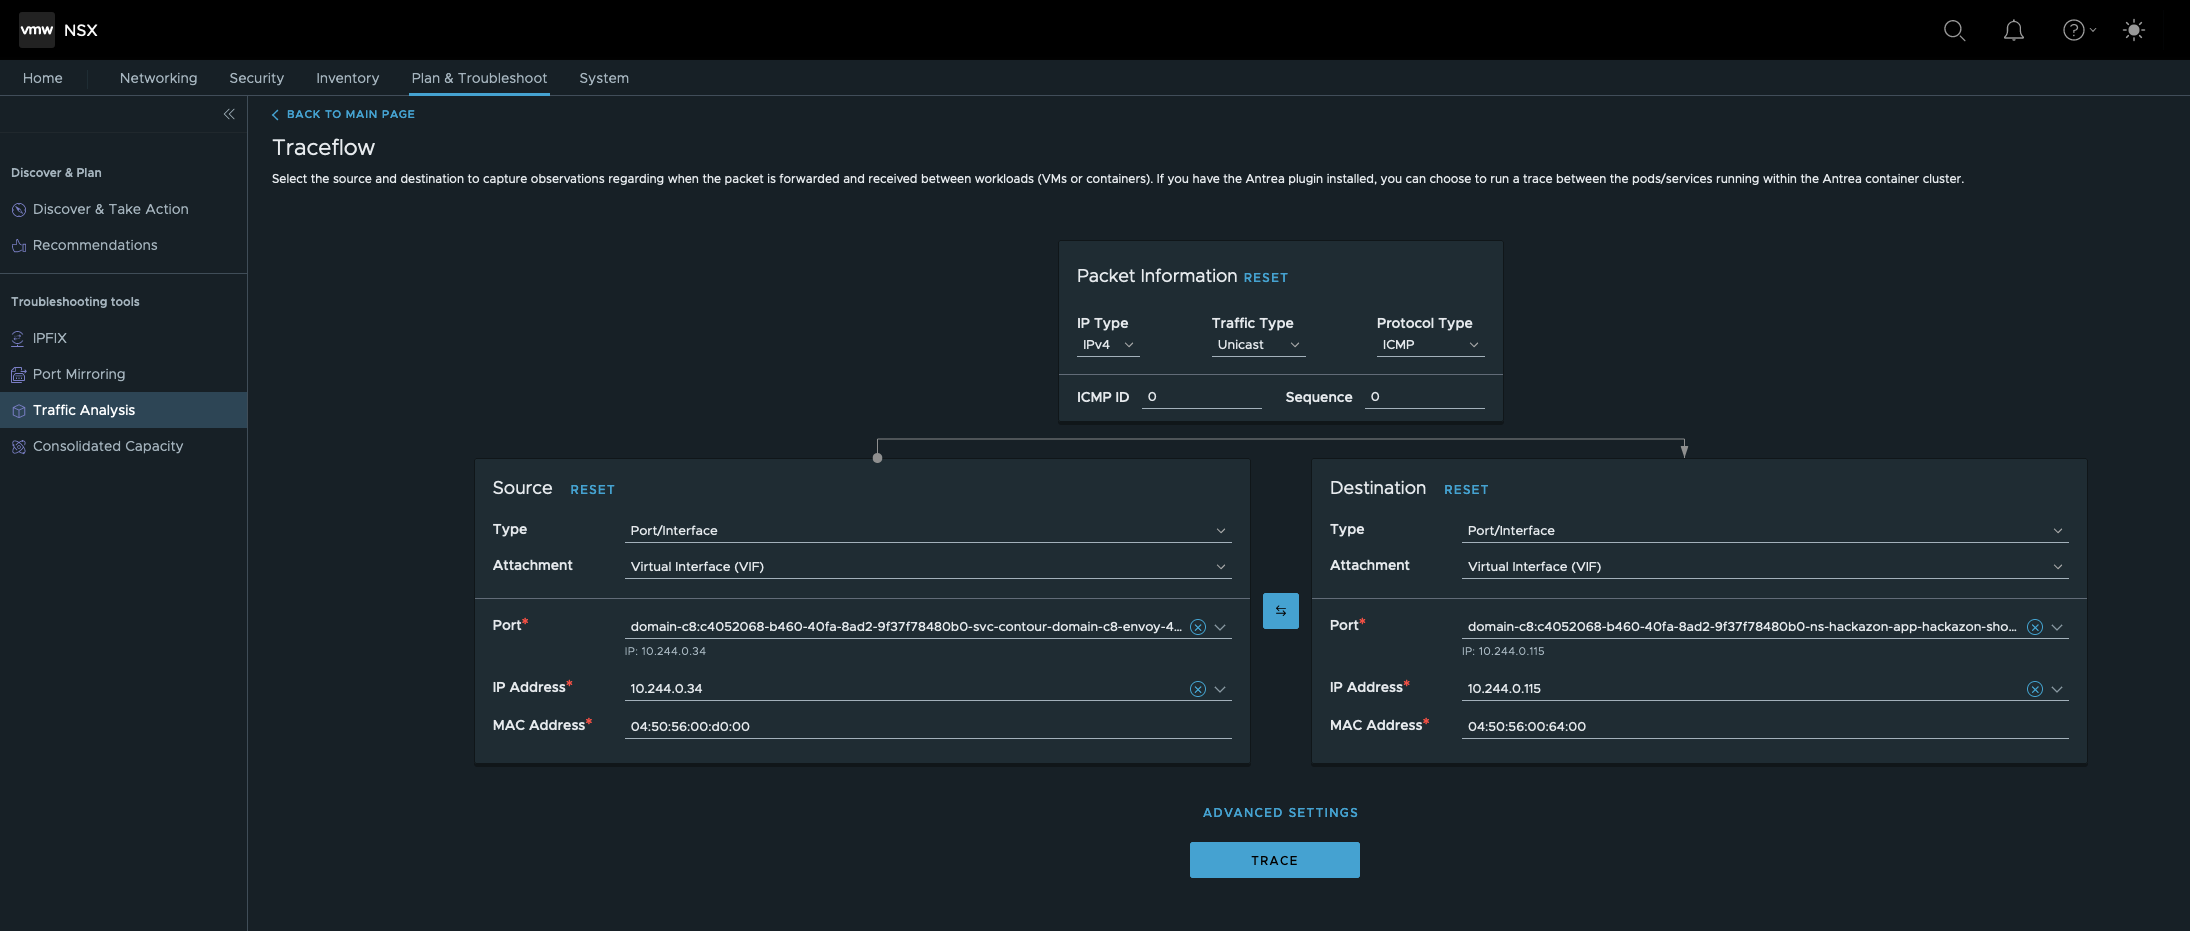
TRACE
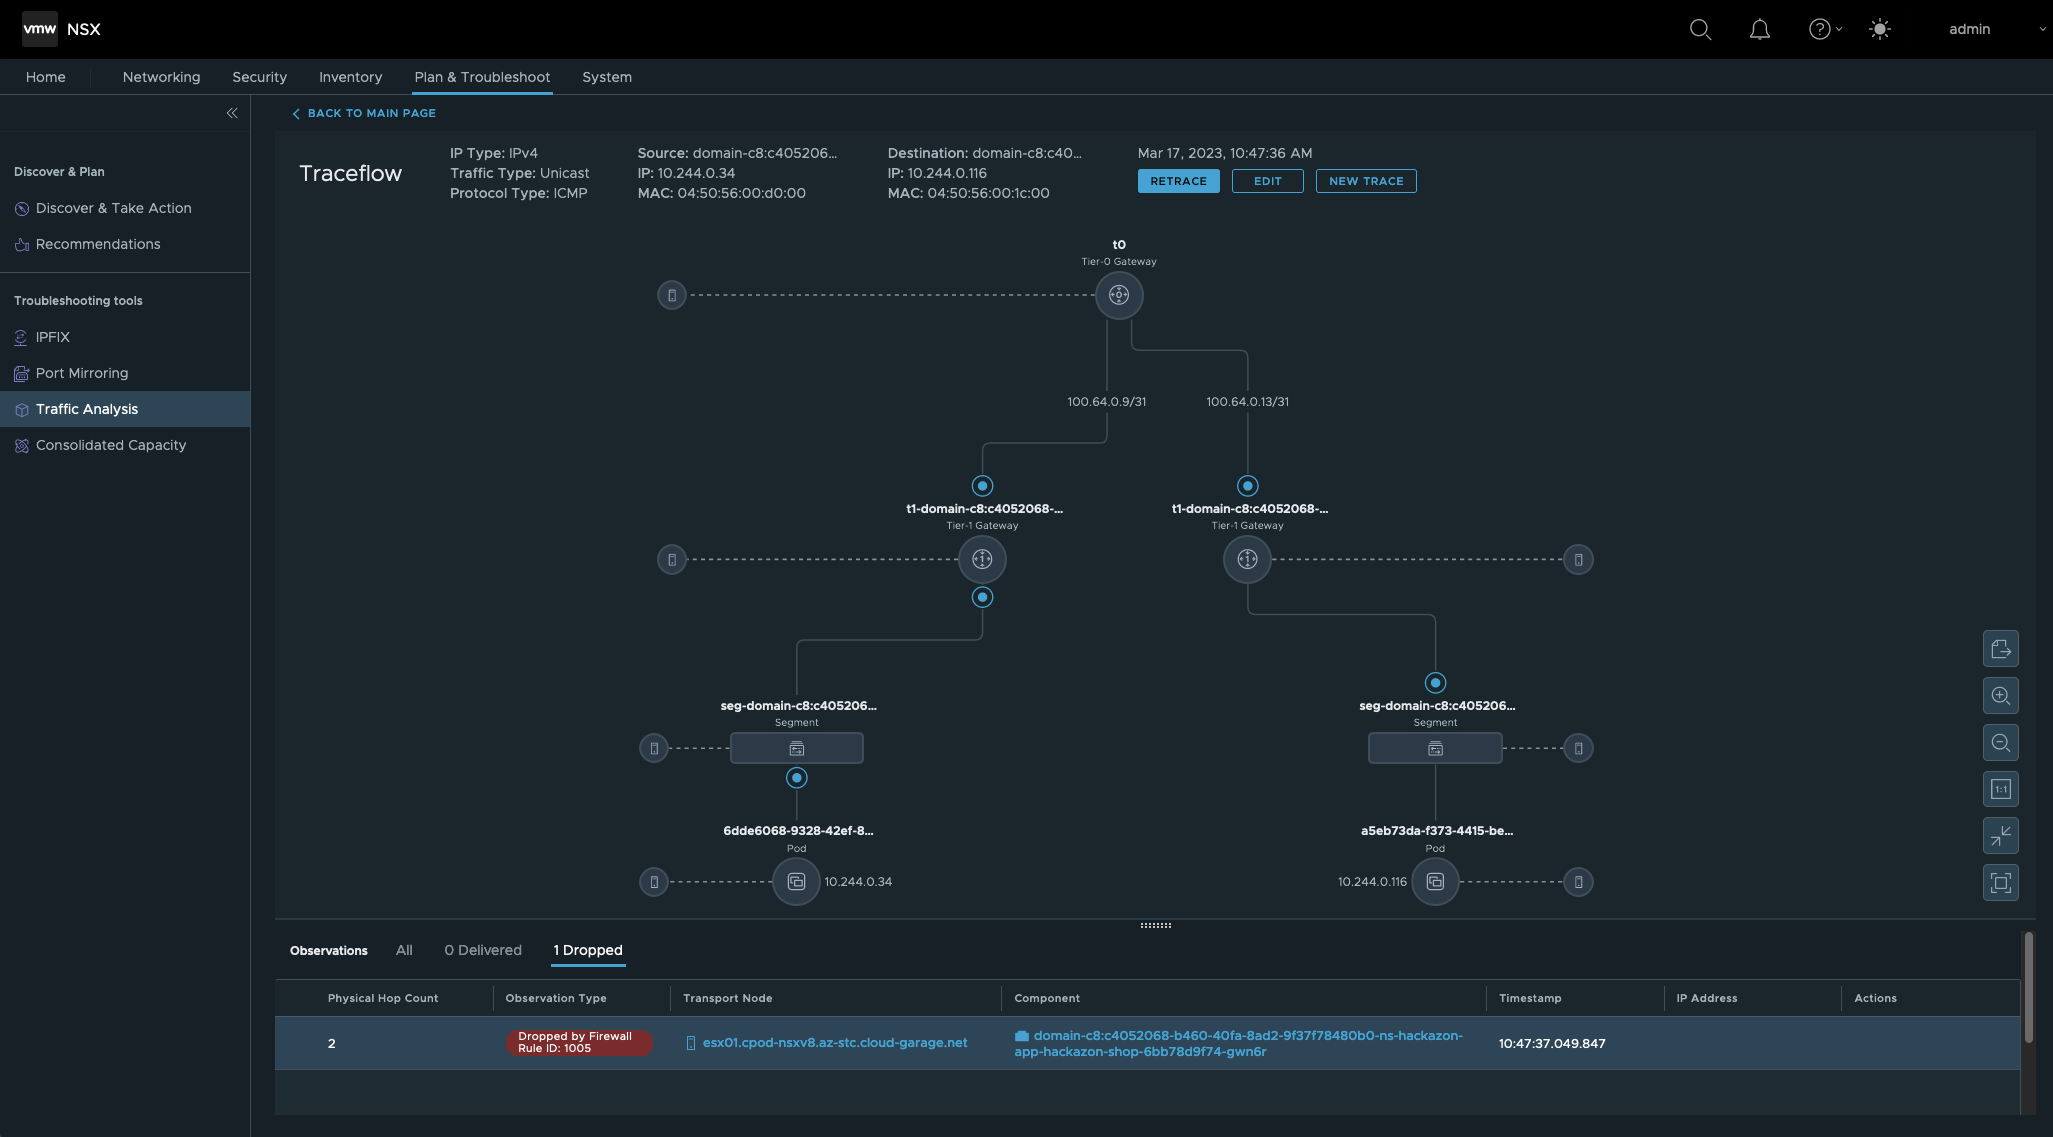
Ok, this packet delivery was dropped by Firewall Rule ID 1005.
Before checking the configuration of the identified rule, we’ll check the Trace vice versa. Click on the Edit button and click on the 🔄 button in order to switch directions.
- Source Type is the Port/Interface of the Hackazon Pod.
- Destination Type is the Port/Interface of the Envoy Pod
TRACE
Dropped by Firewall Rule ID: 1005 as well.
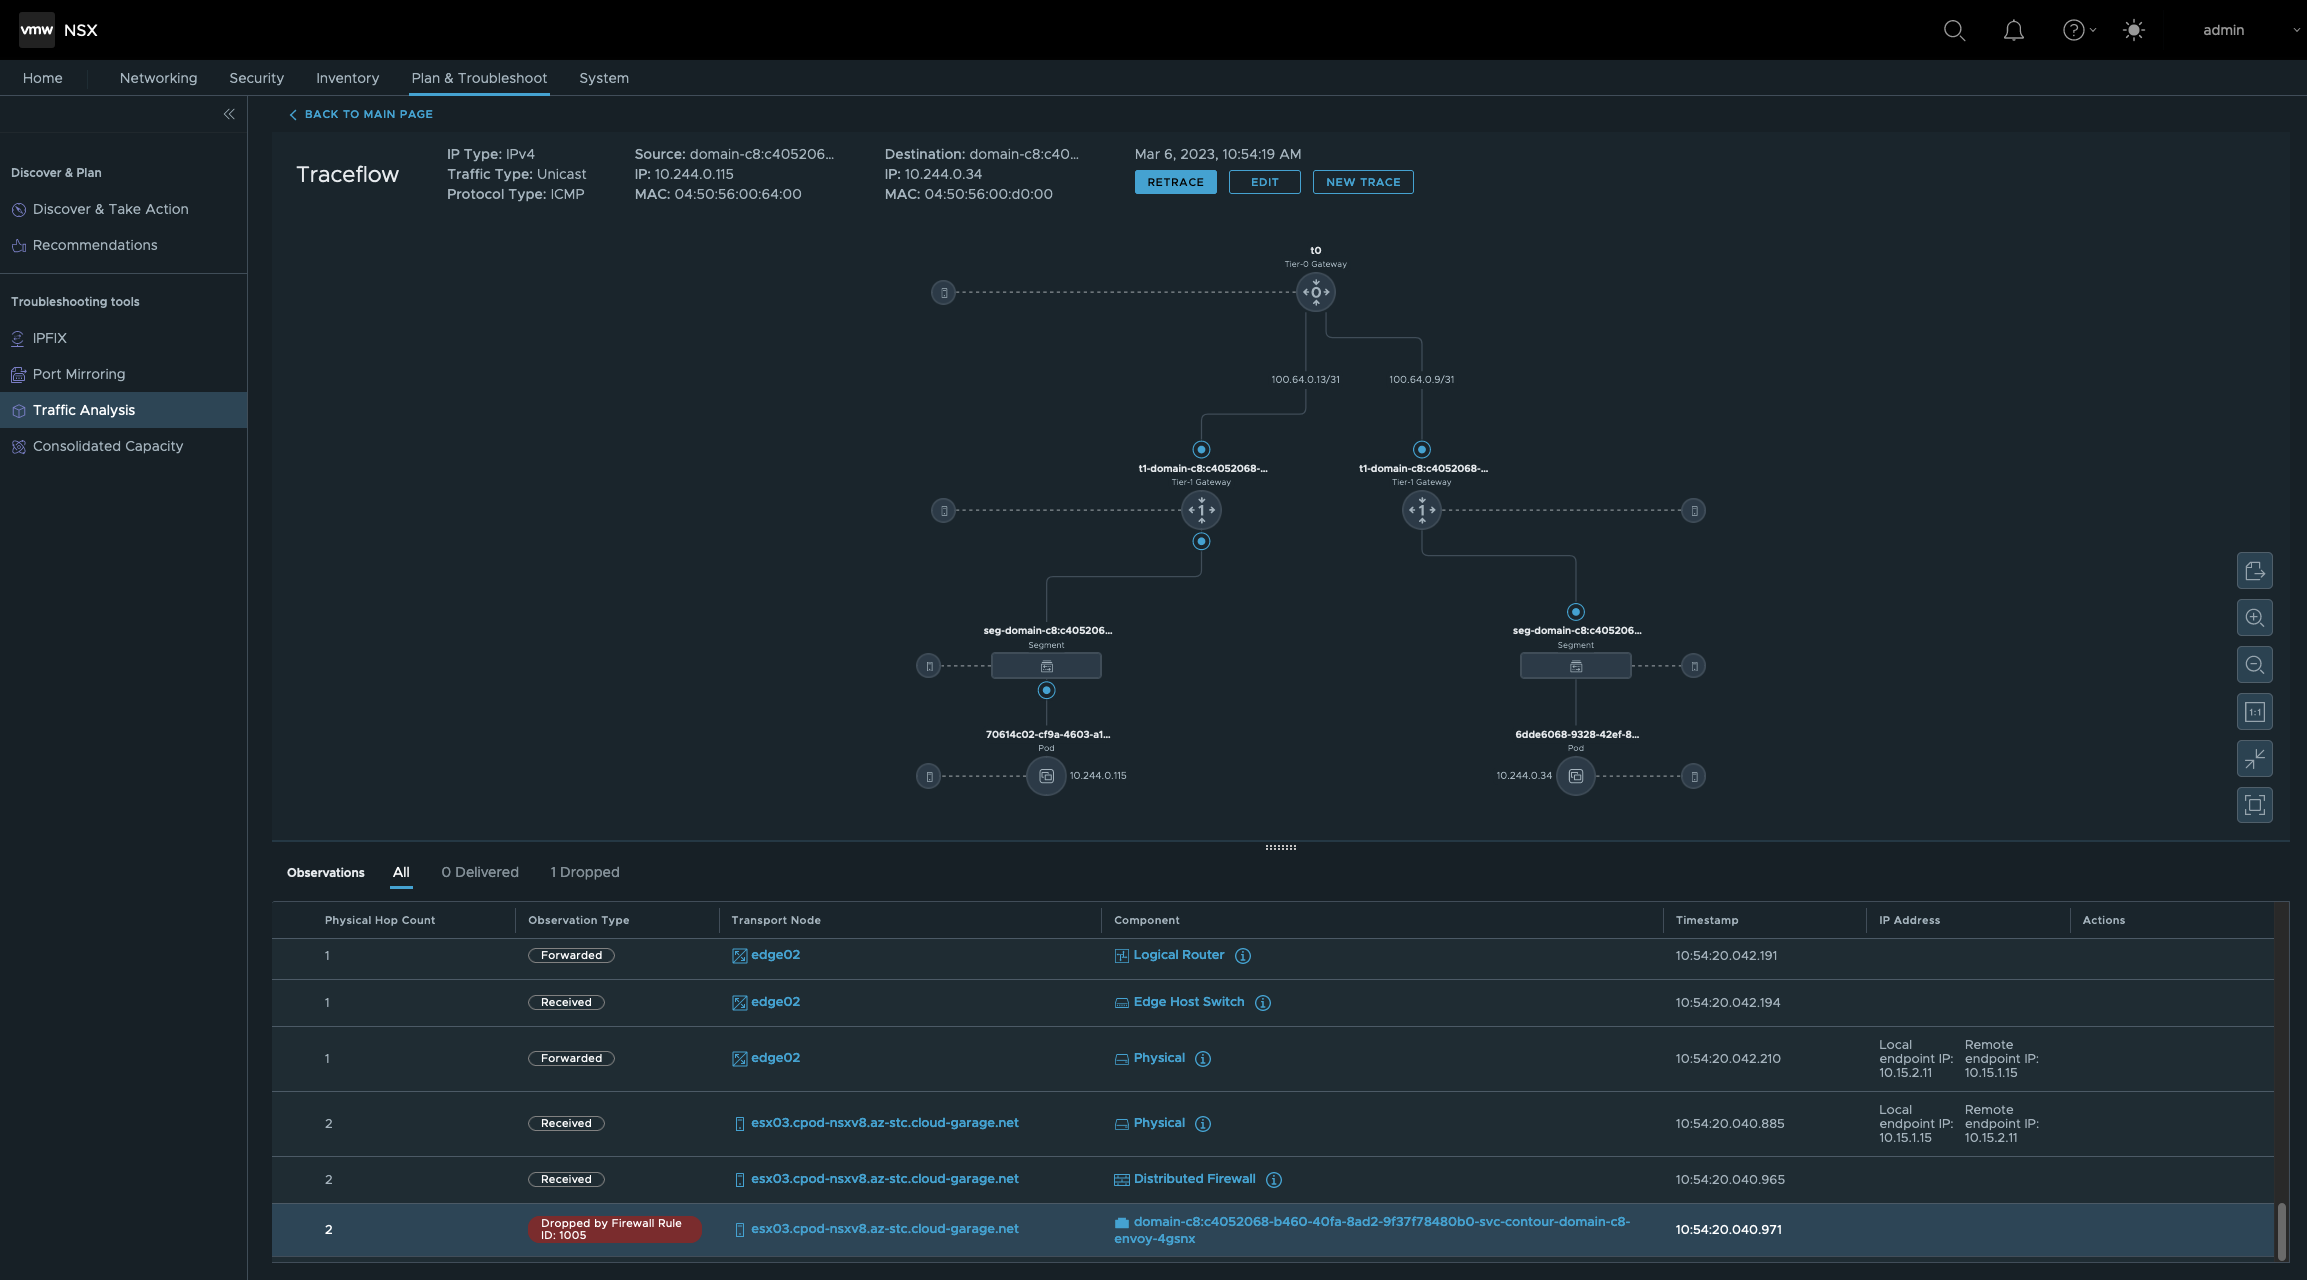
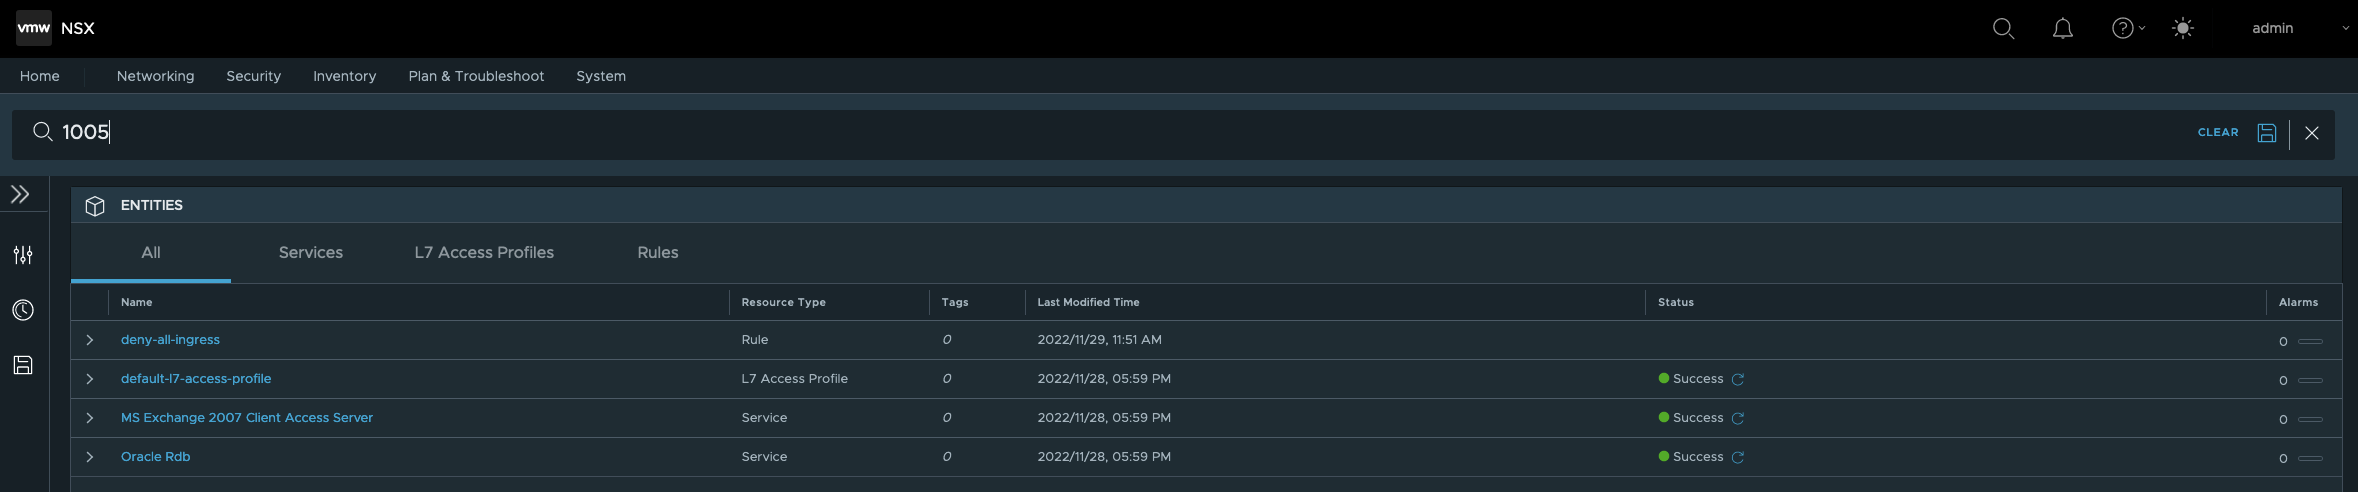
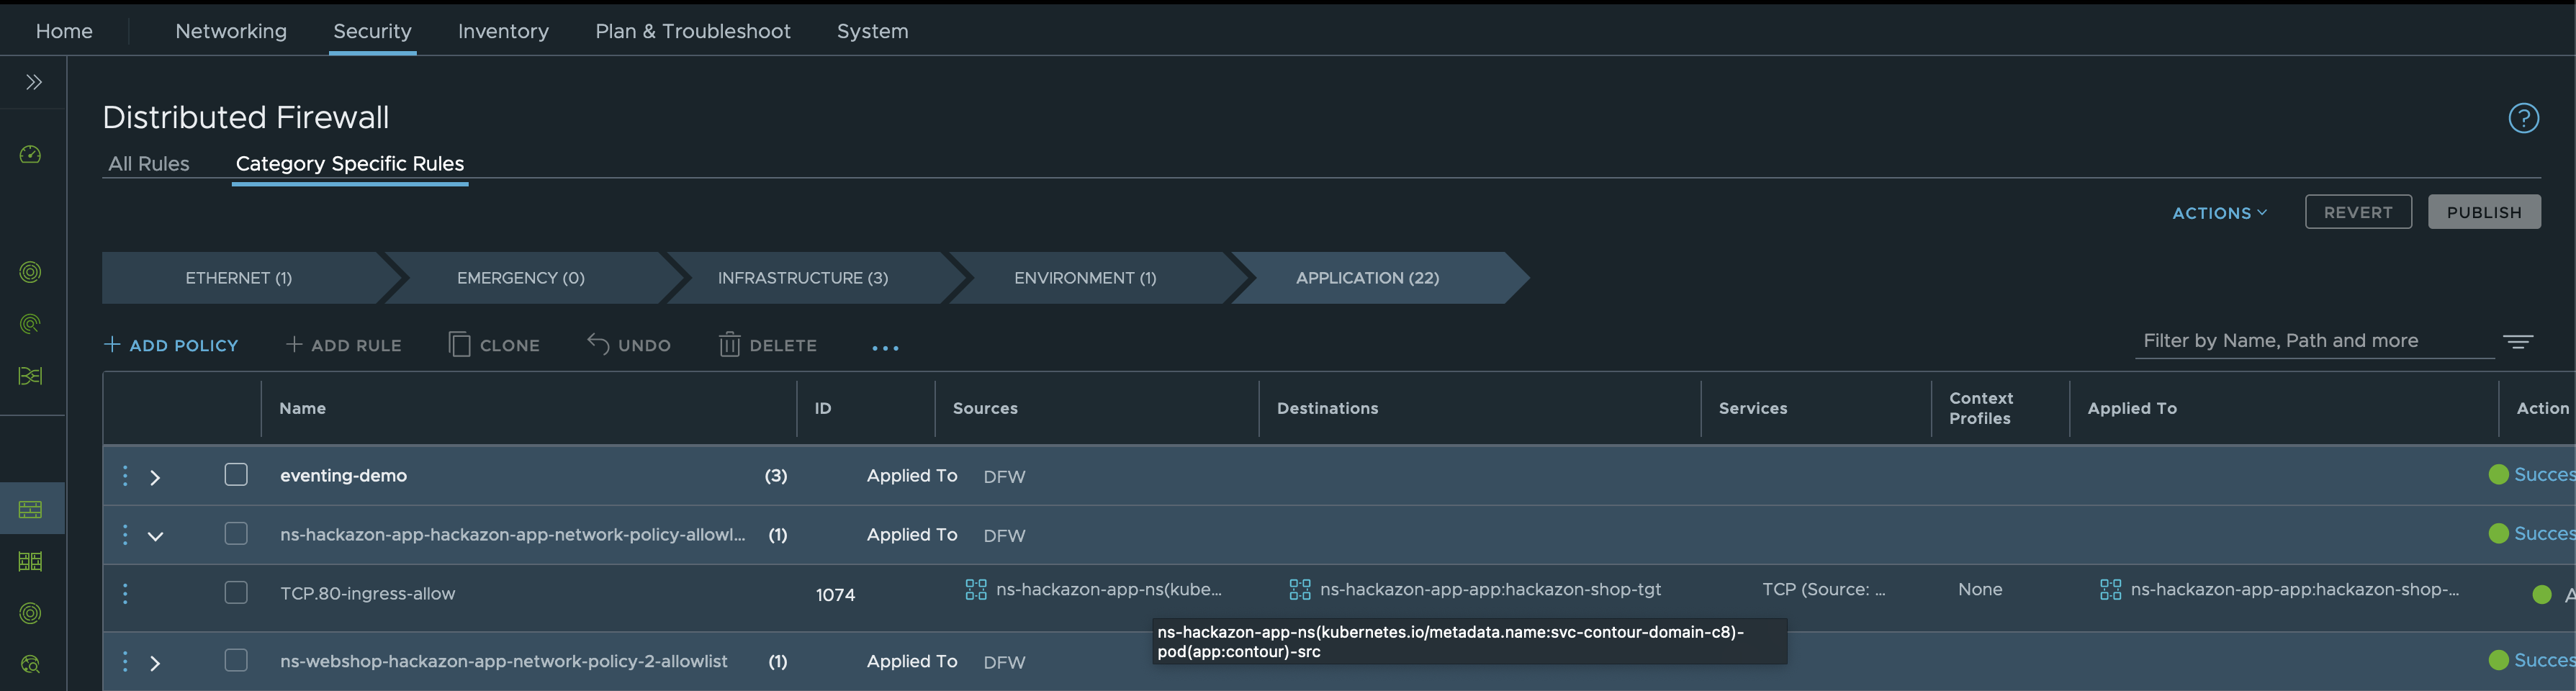
So, these tests proofed that it’s not allowed to communicate (ingress) from one vSphere Namespace to another vSphere Namespace. Run a search on the Firewall ID 1005 in NSX in order to check the configuration.
Finding the rule which is responsible for the dropped packet and reading the name of the rule clarified everything.
ID 1005: deny-all-ingress
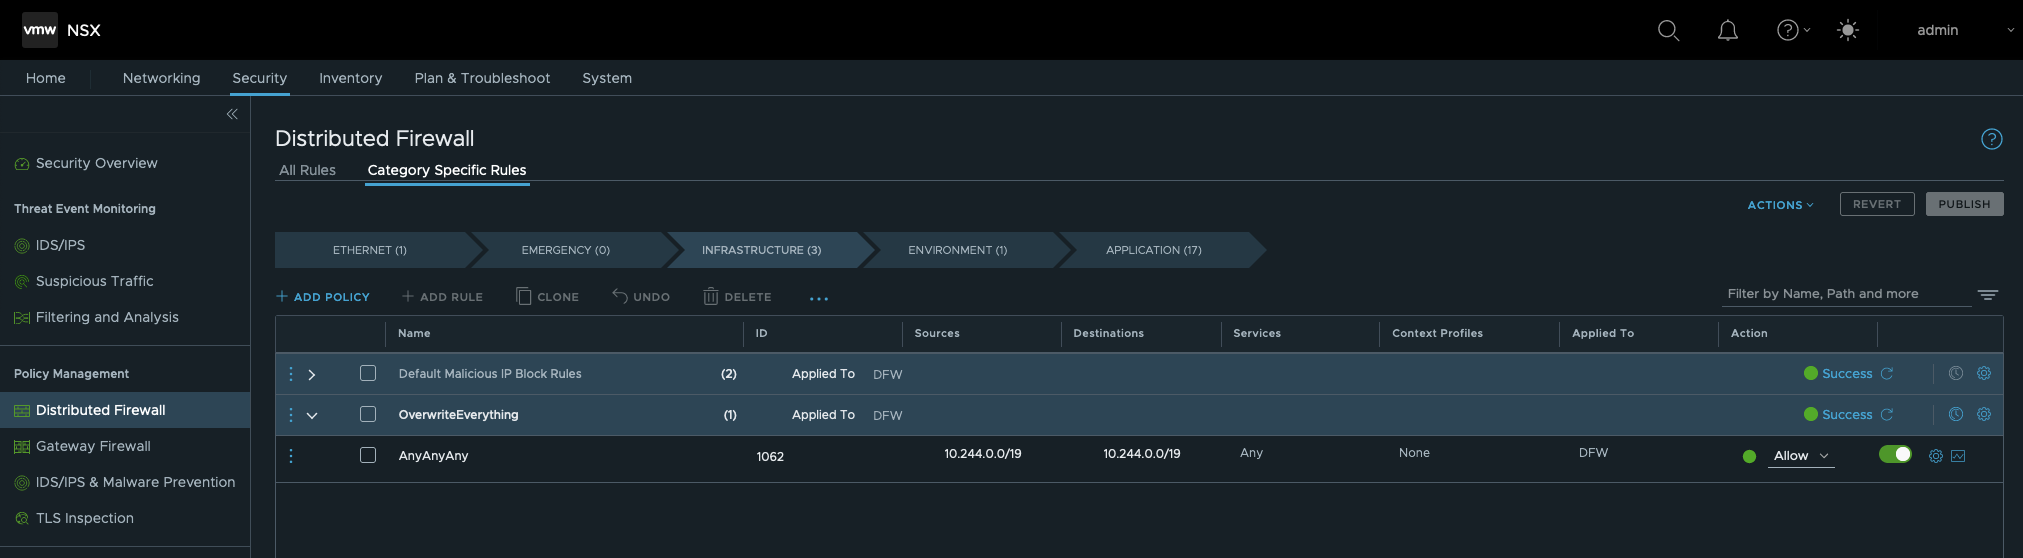
Let’s check the details of the rule. Go to APPLICATION and filter for Rule ID: 1005.
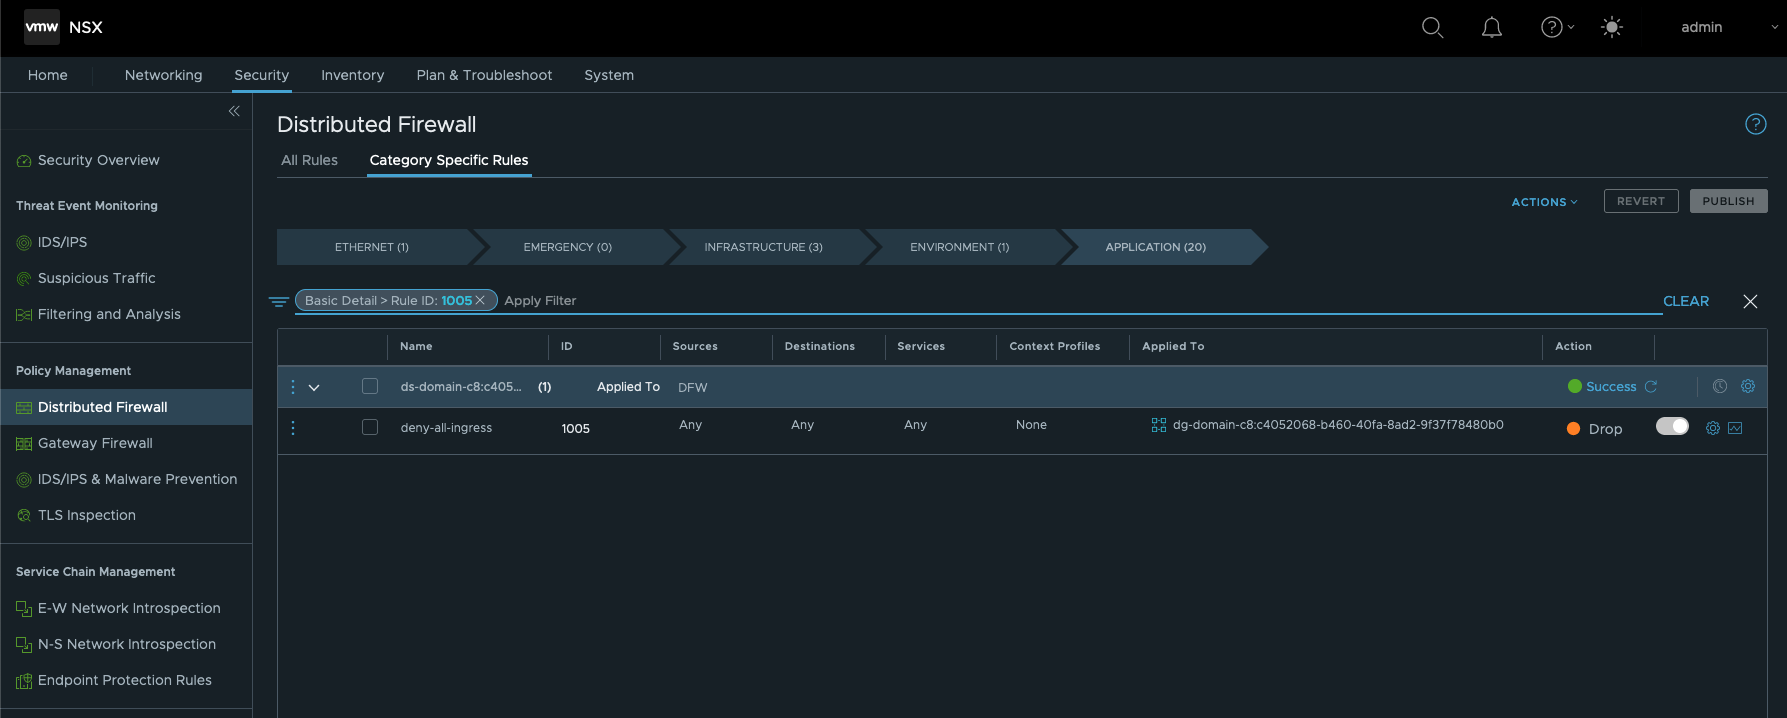
Knowing now that this Rule is configured to Drop every ingress communication from vSphere Namespace to vSphere Namespace, explains why I can’t reach the website of my application at all.
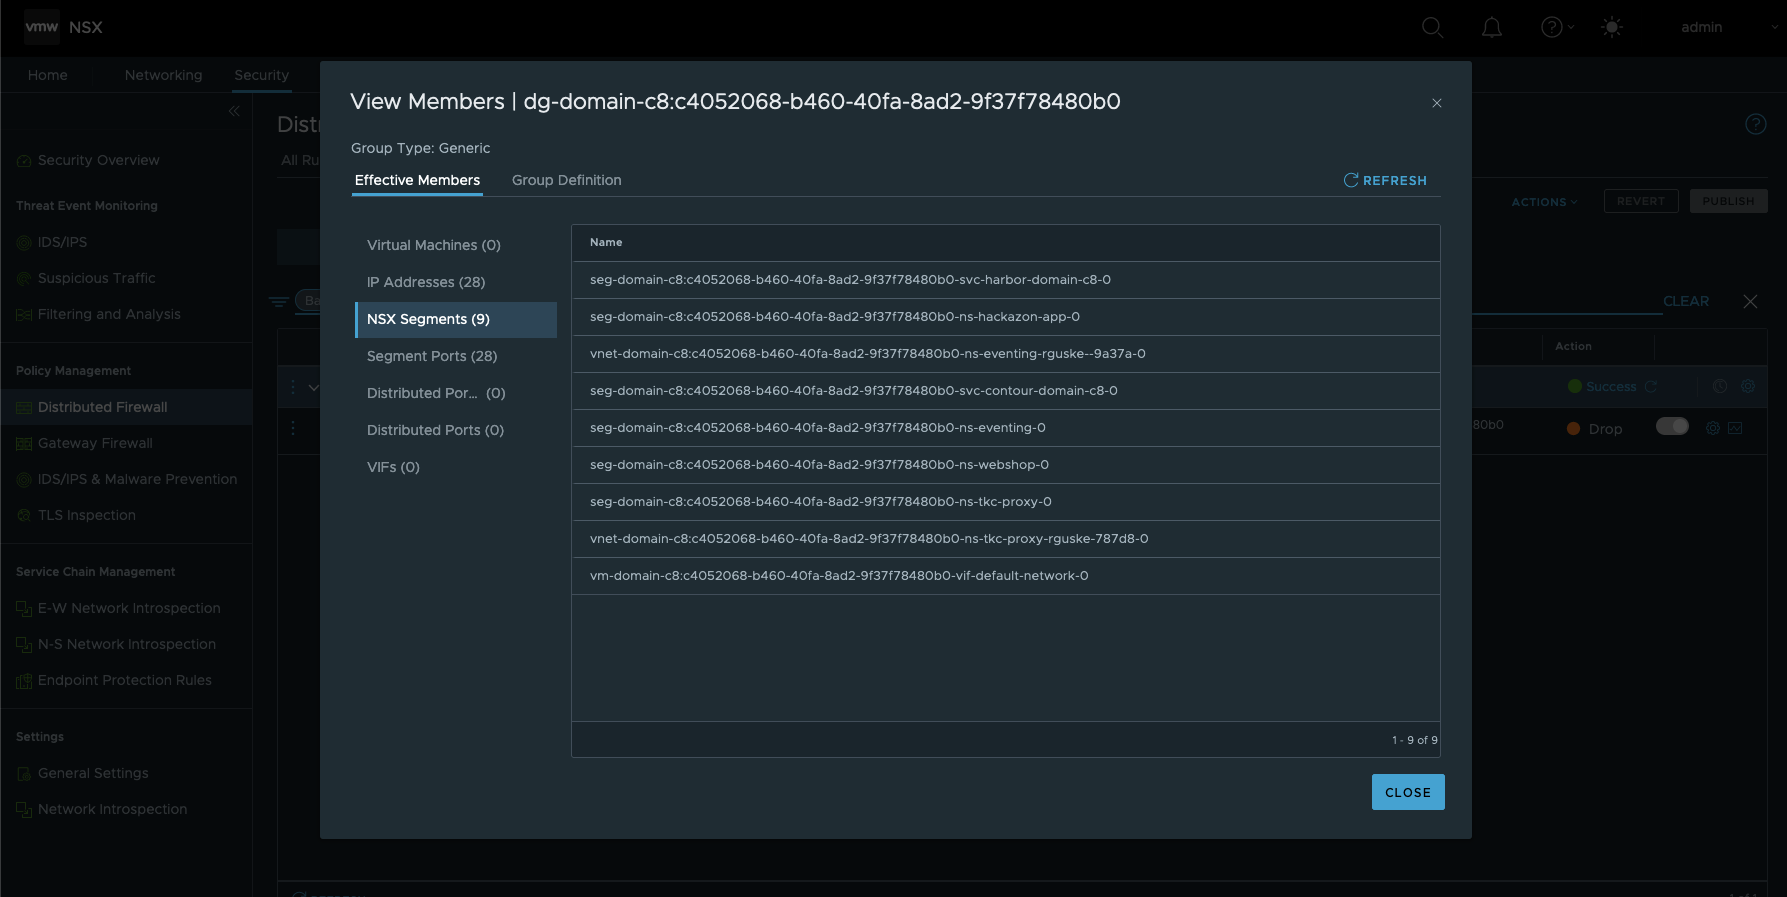
By clicking on the Applied To object, you can see all by this rule affected members (Figure XVII).
Just for the fun, let’s “overrule” Rule 1005 to see if the packet will be finally delivered. The Distributed Firewall in NSX has a hierarchy for DFW Policies. We will create a new Policy in level INFRASTRUCTURE and name it e.g. OverwriteEverything. This level is two levels obove the APPLICATION level in which Rule 1005 is configured.
Next is, creating a new Rule which could be named AnyAnyAny. The configuration will be the following:
- Sources: CIDR 10.244.0.0/19
- Destinations: CIDR 10.244.0.0/19
- Services: Any
- Action: Allow
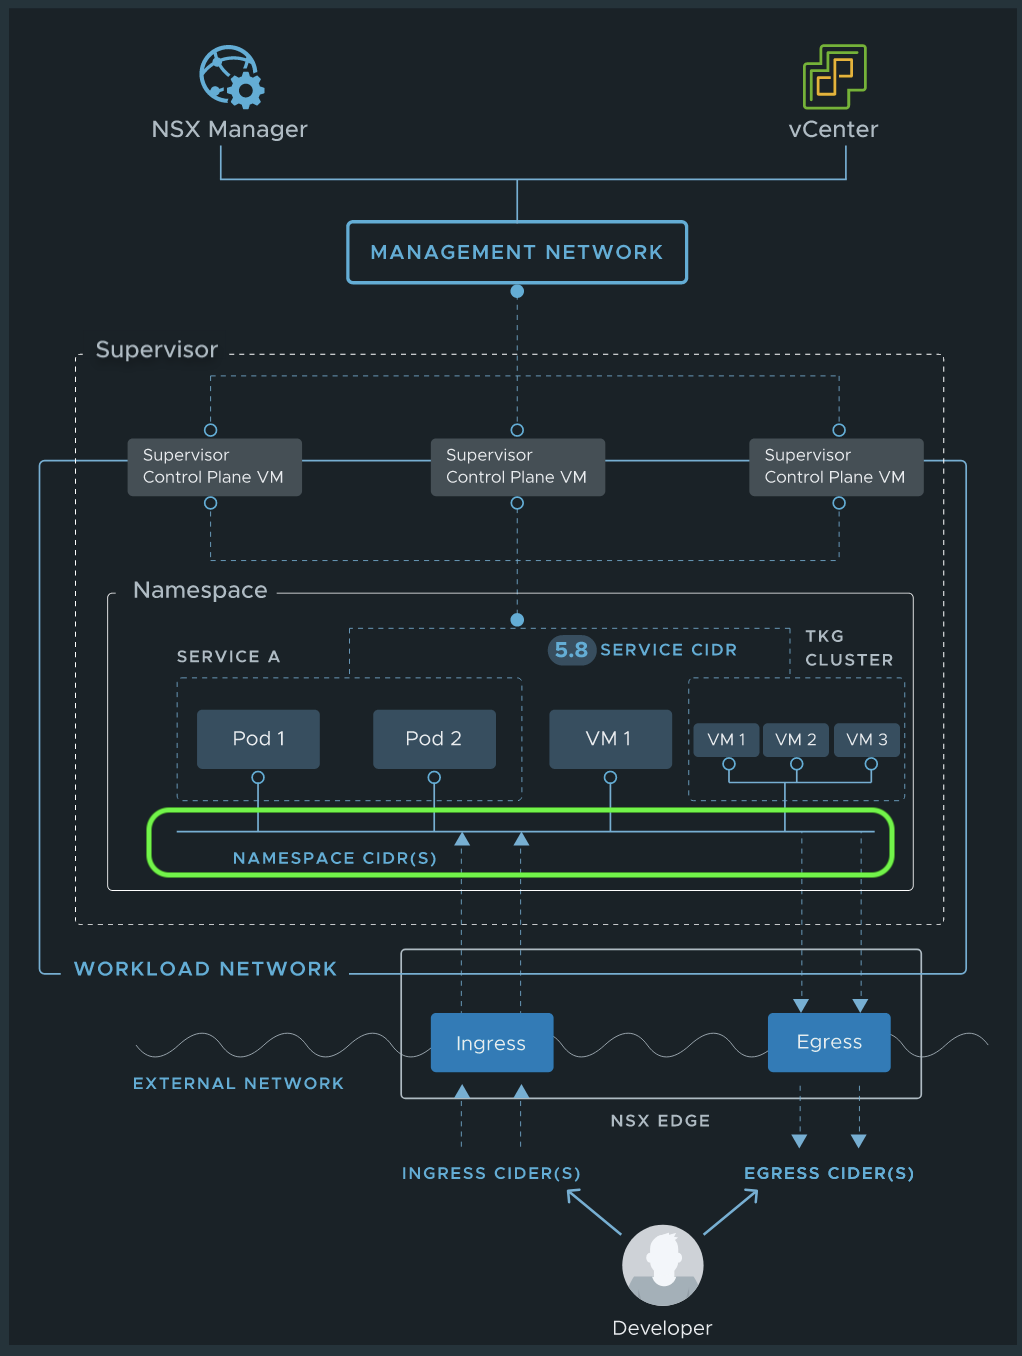
The provided CIDR is the one for the Namespaces Network (Figure XVIII framed green) which was configured during the initial setup of TKGS. Unless you haven’t changed it.
Namespace Network IP CIDR is used to allocate IP addresses to Workloads attached to Supervisor Namespace segments.
PUBLISH the new Rule…
…and run the TRACEFLOW once again.
- Source Type is the Port/Interface of the Hackazon Pod.
- Destination Type is the Port/Interface of the Envoy Pod
Expected result 😃
Time to check the frontend of the webshop.
Okay, it feels like we’ve solved the issue but we just identified the root cause. We only bypassed an important part of the NSX Zero-Trust approach.
Application Network Policy
The ultimate solution is the creation of a new Network Policy for our application which is allowing Ingress communication from the Envoy Pod to the ns-hackazon-app Namespace.
I’m specifying the policyType: Ingress, also from where the expected communication is coming from namespaceSelector: matchLabels svc-contour-domain-c8, who’s establishing the communication podSelector: matchLabels contour and to which port the traffic is going to port: 80.
NOTICE! This is a native Kubernetes NetworkPolicy and nothing VMware NSX specific.
kubectl -n ns-hackazon-app apply -f - <<EOF
---
apiVersion: networking.k8s.io/v1
kind: NetworkPolicy
metadata:
  name: hackazon-app-network-policy
spec:
  podSelector:
    matchLabels:
      app: hackazon-shop
  policyTypes:
  - Ingress
  ingress:
  - from:
    - namespaceSelector:
        matchLabels:
          kubernetes.io/metadata.name: svc-contour-domain-c8
    - podSelector:
        matchLabels:
          app: contour
    ports:
    - protocol: TCP
      port: 80
EOF
By applying the configuration, a new DFW Policy named ns-hackazon-app-hackazon-app-network-policy-allowlist is created automagically for you ✨
Also, the DFW Rule named TCP.80-ingress-allow was created accordingly and contains the specifications of the Network Policy.
This shows the deep integration between Kubernetes, the Container Networking Interface NCP and VMware NSX.
Credits
I’d like to THANK my very respected fellow Andreas Marqvardsen who reviewed this post and helped me getting a better understanding how networking with VMware NSX is used properly in vSphere with Tanzu (TKGS).