vSphere with Tanzu Supervisor Services Part IV - Virtual Machine Service to support Hybrid Application Architectures

Hybrid Application Architectures
As technology advances at a rapid pace, the landscape of application development continues to evolve. The demand for agility, scalability, and cost-effectiveness has given rise to a new breed of architectures that seamlessly integrate modern cloud-native principles with established traditional workloads. One such paradigm that has gained significant traction is the hybrid application architecture, which combines the power of service-oriented architectures (SOA) with the reliability and versatility of virtual machines (VMs).
Service-oriented architectures have revolutionized the way applications are designed and deployed. By breaking down the complexity of an application into smaller chunks, loosely coupled services, SOAs enables organizations to achieve better modularity, reusability, and interoperability. These services, often encapsulated as microservices, communicate with each other through well-defined APIs.
Traditional workloads, often hosted on virtual machines (VMs) are designed to mostly function in on-premises or legacy environments. These workloads might include databases, ERP systems or similar specific applications which are not easily to containerize or to be refactored.
Other issues besides the incompatibility of an application to be containerized are:
- your application requires a specific hardware
- your application is designed for a custom kernel or a custom operating system
or also quite simple, your application is better suited to run in a virtual machine.
The hybridization of an application, through the combined power of SOAs and VMs, allows enterprises benefit from the best of both worlds.
In this blog post, I will dive into the Virtual Machine Service of vSphere with Tanzu, exploring its capabilities and how it could be the missing wrench in your toolbox to support the rollout of virtual machines in a DevOps fashion.
Furthermore, to support the idea and message of this article, I’ve created an example application which will run on a Tanzu Kubernetes Cluster and which will write example data into a PostgreSQL DB deployed as an appliance using the Virtual Machine Service.
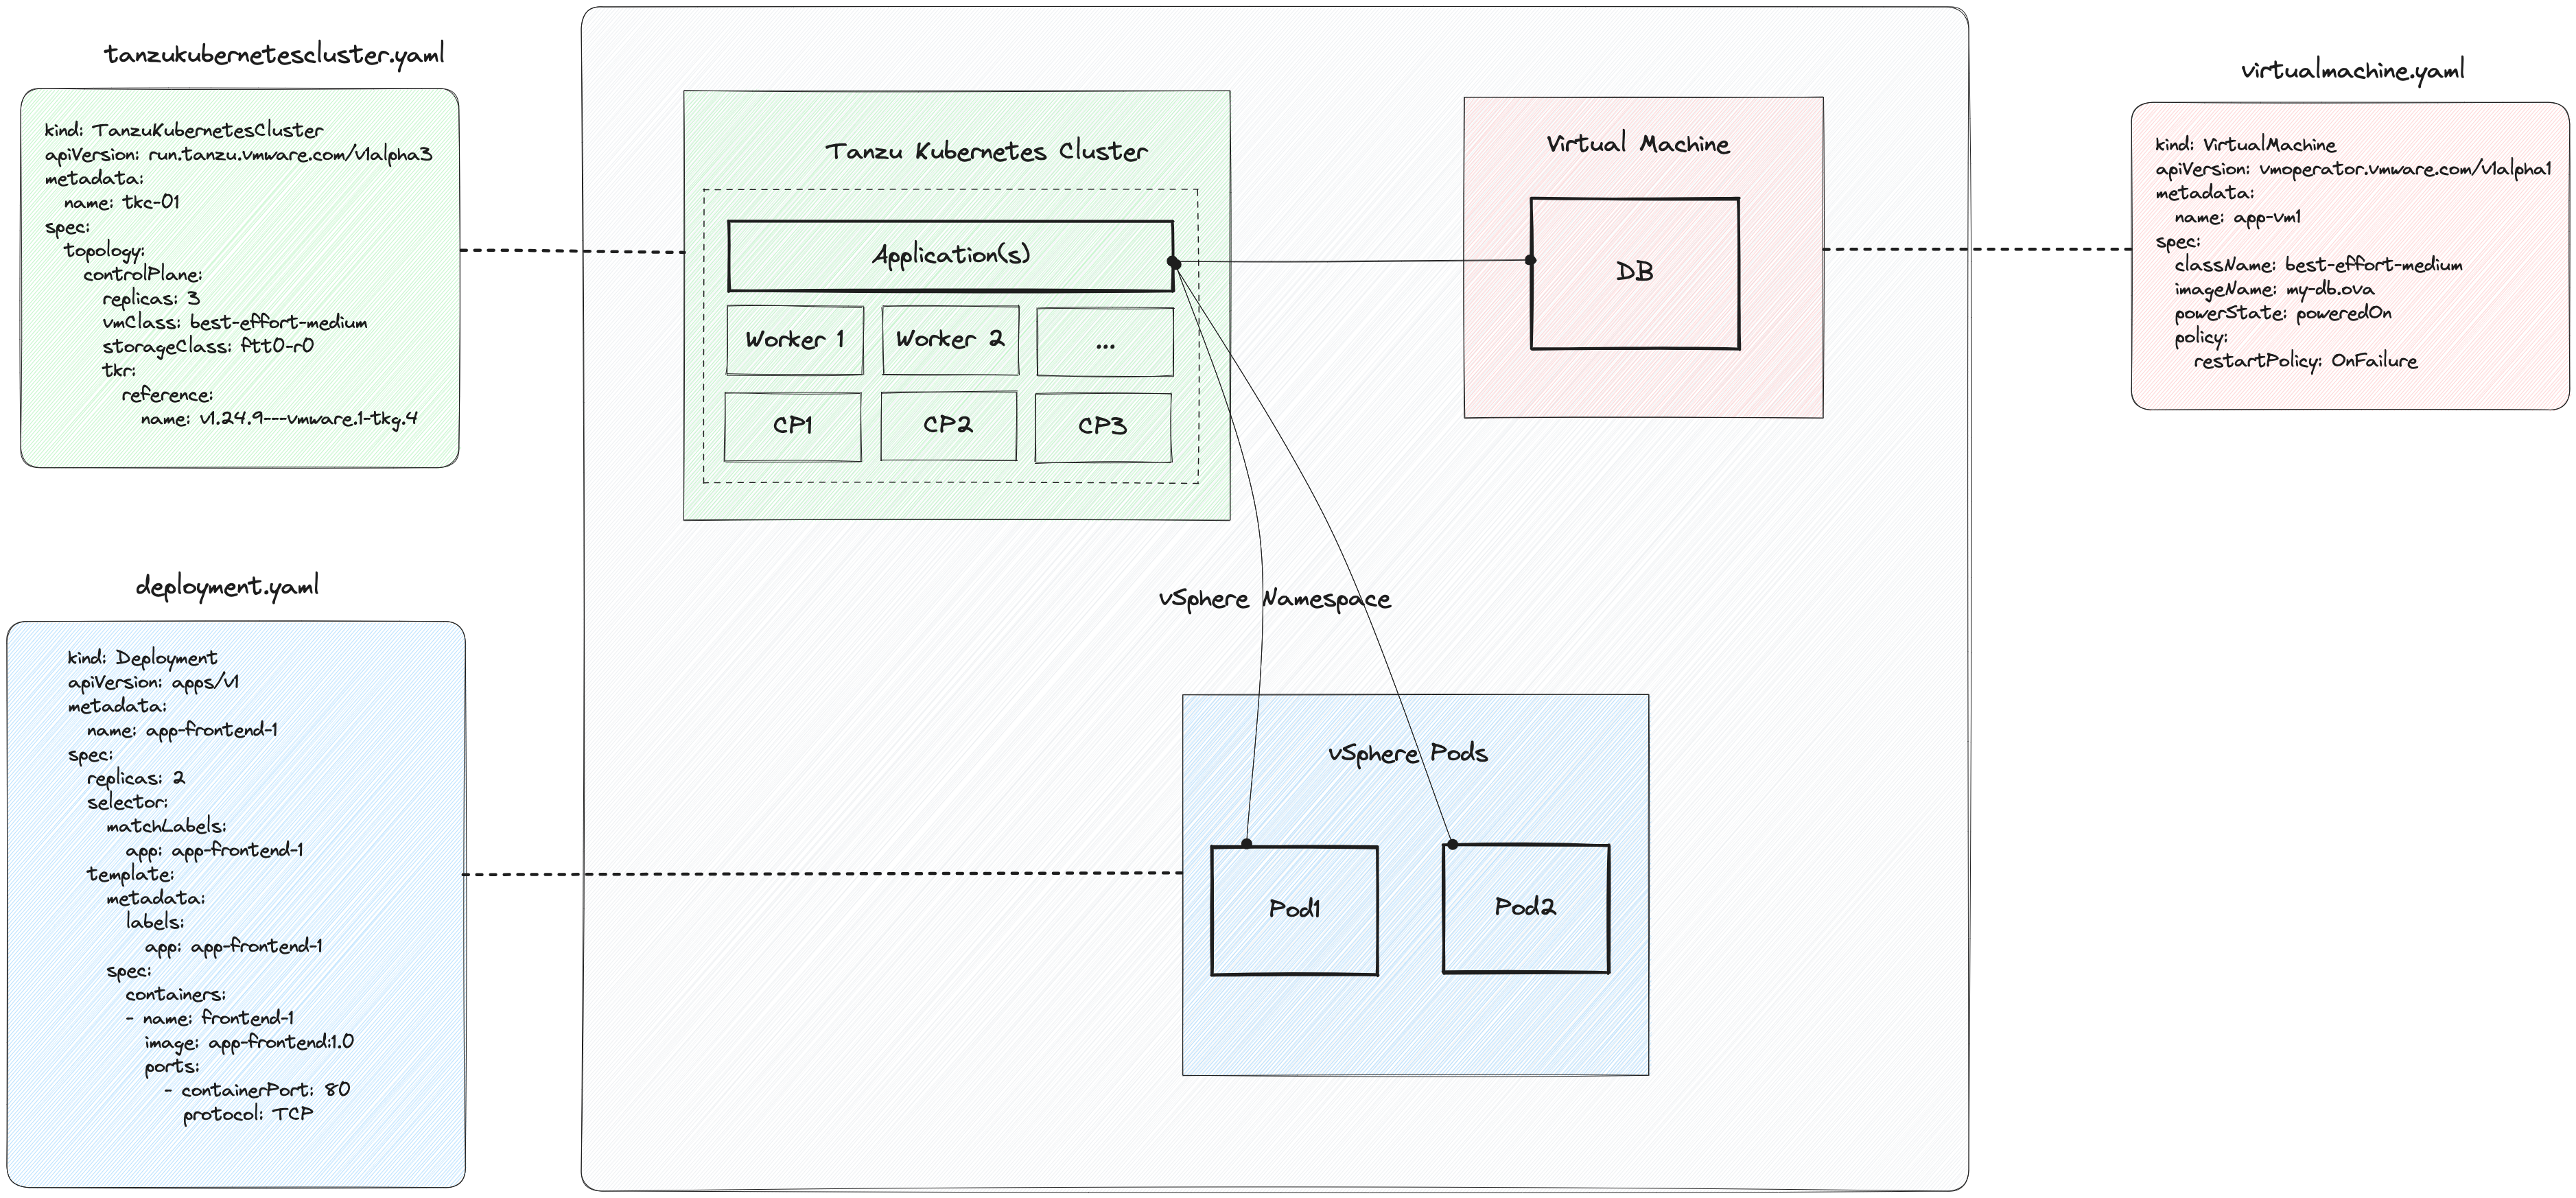
Belows Figure I provides a high-level overview of a hybrid application which components are deployed and managed using the Supervisor Services in vSphere with Tanzu.
vSphere with Tanzu Supervisor Services Throwback
As described in articles before like HERE, HERE, and HERE, vSphere with Tanzu is supercharging the vSphere platform with Kubernetes power.
Supervisor Services in vSphere with Tanzu enabling modern Platform/DevOps teams to deploy and manage Tanzu Kubernetes Clusters (Tanzu Kubernetes Grid Service), vSphere Pods (vSphere Pod Service - pods natively running on the ESXi) and also virtual machines (VM Service).
All mentioned resources can be deployed in a declaritive way using the exposed Kubernetes API of the Supervisor Cluster.
Virtual Machine Service to deploy Virtual Appliances
Shipping virtual machines in a ready-to-use single file fashion is done by the Open Virtual Appliance (OVA) format. Well known and adopted by customers. The purpose of an OVA is to provide a single file distribution which contains packaged files like .ovf, .vmdk or .nvram of which a virtual appliance is made of. A virtual appliance could be the vSphere control-plane vCenter Server or e.g. the VMware Fling VMware Event Broker Appliance - VEBA.
The Virtual Machine Service was initially introduced with vSphere 7 U2a. It allows users to deploy and manage virtual machines using Kubernetes standard APIs. In order to provide these functionalities, the Virtual Machine Operator, open-sourced by VMware, had to be developed and integrated in vSphere.
If you’re touching this exciting technology for the first time, you might like to start reading one of the posts below, since I will focus only on the latest feature additions of the VM Service in this post.
Level 100:
- The new modern Workload on vSphere by Navneet Verma
- Introducing the vSphere Virtual Machine Service by Glen Simon
Level 200/300:
- The future of VM’s is Kubernetes by Oren Penso
- Exploring the new vSphere with Tanzu VM Service with Nested ESXi by William Lam
- Installing Harbor using VM Operator on vSphere by Navneet Verma
- Introducing Virtual Machine Provisioning, via Kubernetes with VM Service by Myles Gray.
vSphere 8 Update 1 puts VM Service on Steriods
Initially, it was only possible to use the by VMware provided virtual machine images for Ubuntu and CentOS. Both are downloadable via the VMware Marketplace HERE. This limitation is documented on VMware Docs:
vSphere 8 U1 now unleashes the full potential of Virtual Machine Service.
The advanced support of CloudInit to customize any Linux image is already awesome but even more exciting is the capability to now utilize OVF templating through the vAppConfig within the VirtualMachine deployment manifest 😃
We will take a look at it in a bit.
VMware Marketplace to accelerate your Business
For the sake of this blog post, I’ve downloaded (sign in required) the PostgreSQL OVA from the VMware Marketplace. The VMware Marketplace offers certified and validated ecosystem solutions to VMware’s customers, community and partners. The amount of solutions which can be discovered and tested is huge. One reason for this is the addition of the extensive Bitnami (by VMware) application catalog in the VMware Marketplace.
⬇️ VMware Bitnami PostgreSQL DB virtual appliance (OVA)

Deploying the Bitnami PostgreSQL OVA using kubectl
Over the next chapters, I’m going to explain briefly what needs to be done in terms of prerequisites and requirements in order to deploy the VMware Bitnami PostgreSQL DB virtual appliance (OVA) using a DevOps approach. I’m going to describe the desired state of the virtual machine in a yaml manifest and will define OS relevant data and parameters via the new vAppConfig section.
Ultimately, I will hand over the manifest to the exposed Kubernetes API of the Supervisor Cluster using kubectl. The Virtual Machine Service (VM Operator) will then take care of the desired state for us.
vSphere Content Library for VM Images
For the next steps I presume that you are familiar with the Workload Management feature of vSphere with Tanzu. This includes the creation and configuration of vSphere Namespaces, including RBAC, Storage Policies, VM Classes, etc. as well as the deployment and management of Tanzu Kubernetes Clusters (TKC).
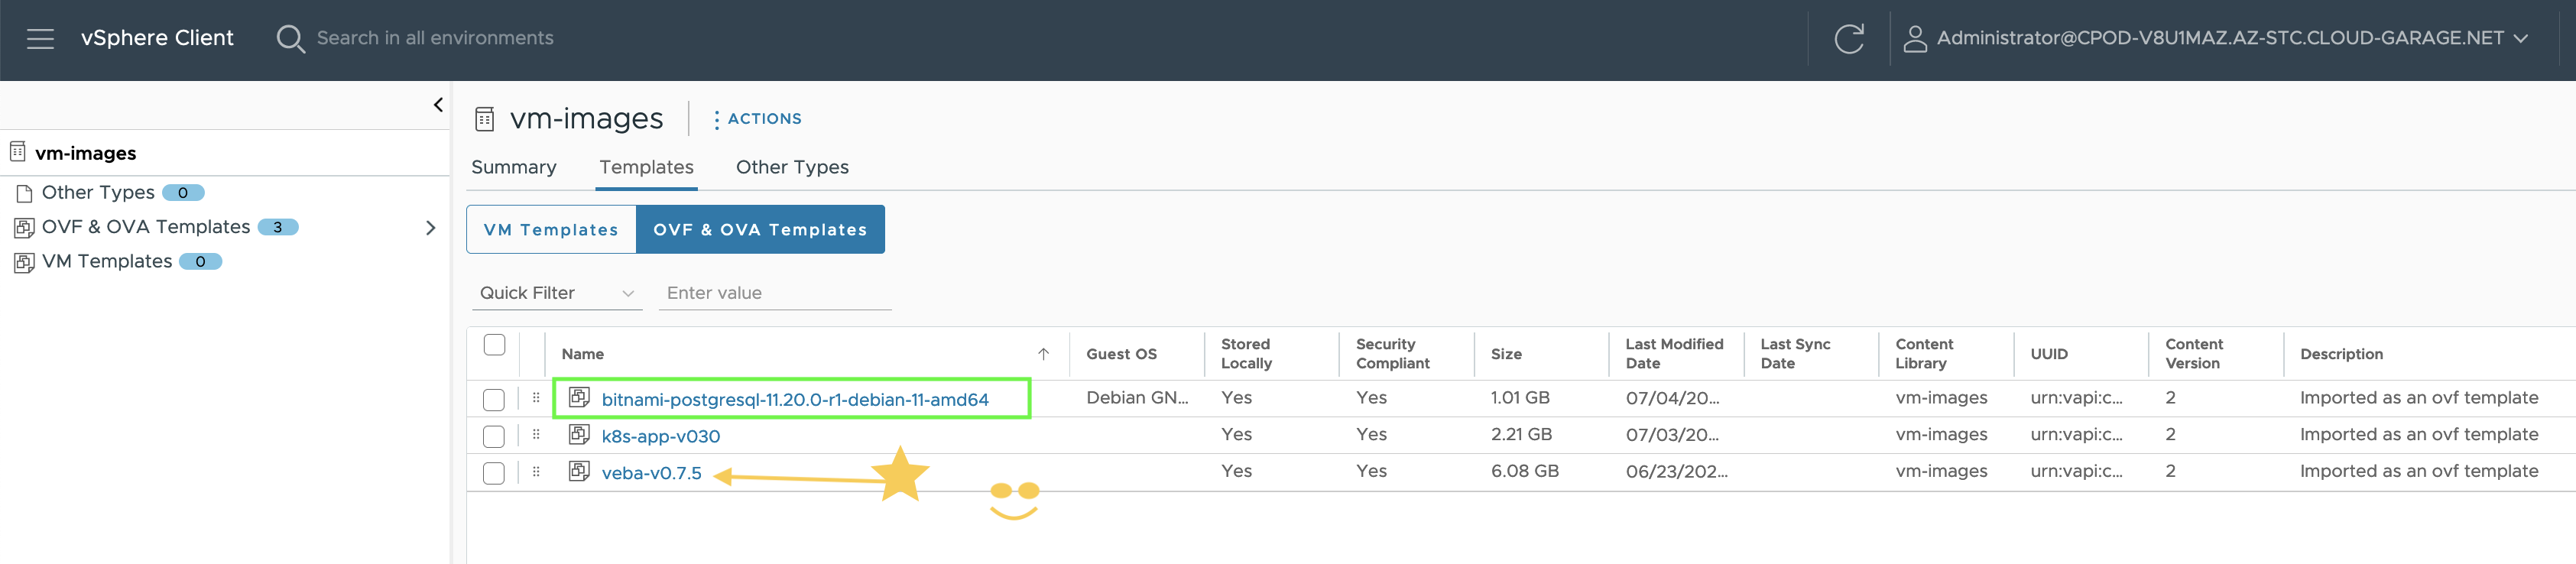
Since I wanted to have the virtual machine (appliance) images separated from the content library which contains the Kubernetes node images (TKR) for the TKCs, I’ve created a dedicated content library named vm-images.
In terms of the configuration for the new Local vSphere Content Library , I kept everything default (next-next-finish) and started the upload of the Bitnami PostgreSQL OVA.

Consequently, the next step is to add the Virtual Machine Images Content Library to my vSphere Namespace which I named ns-hybrid-app-1…
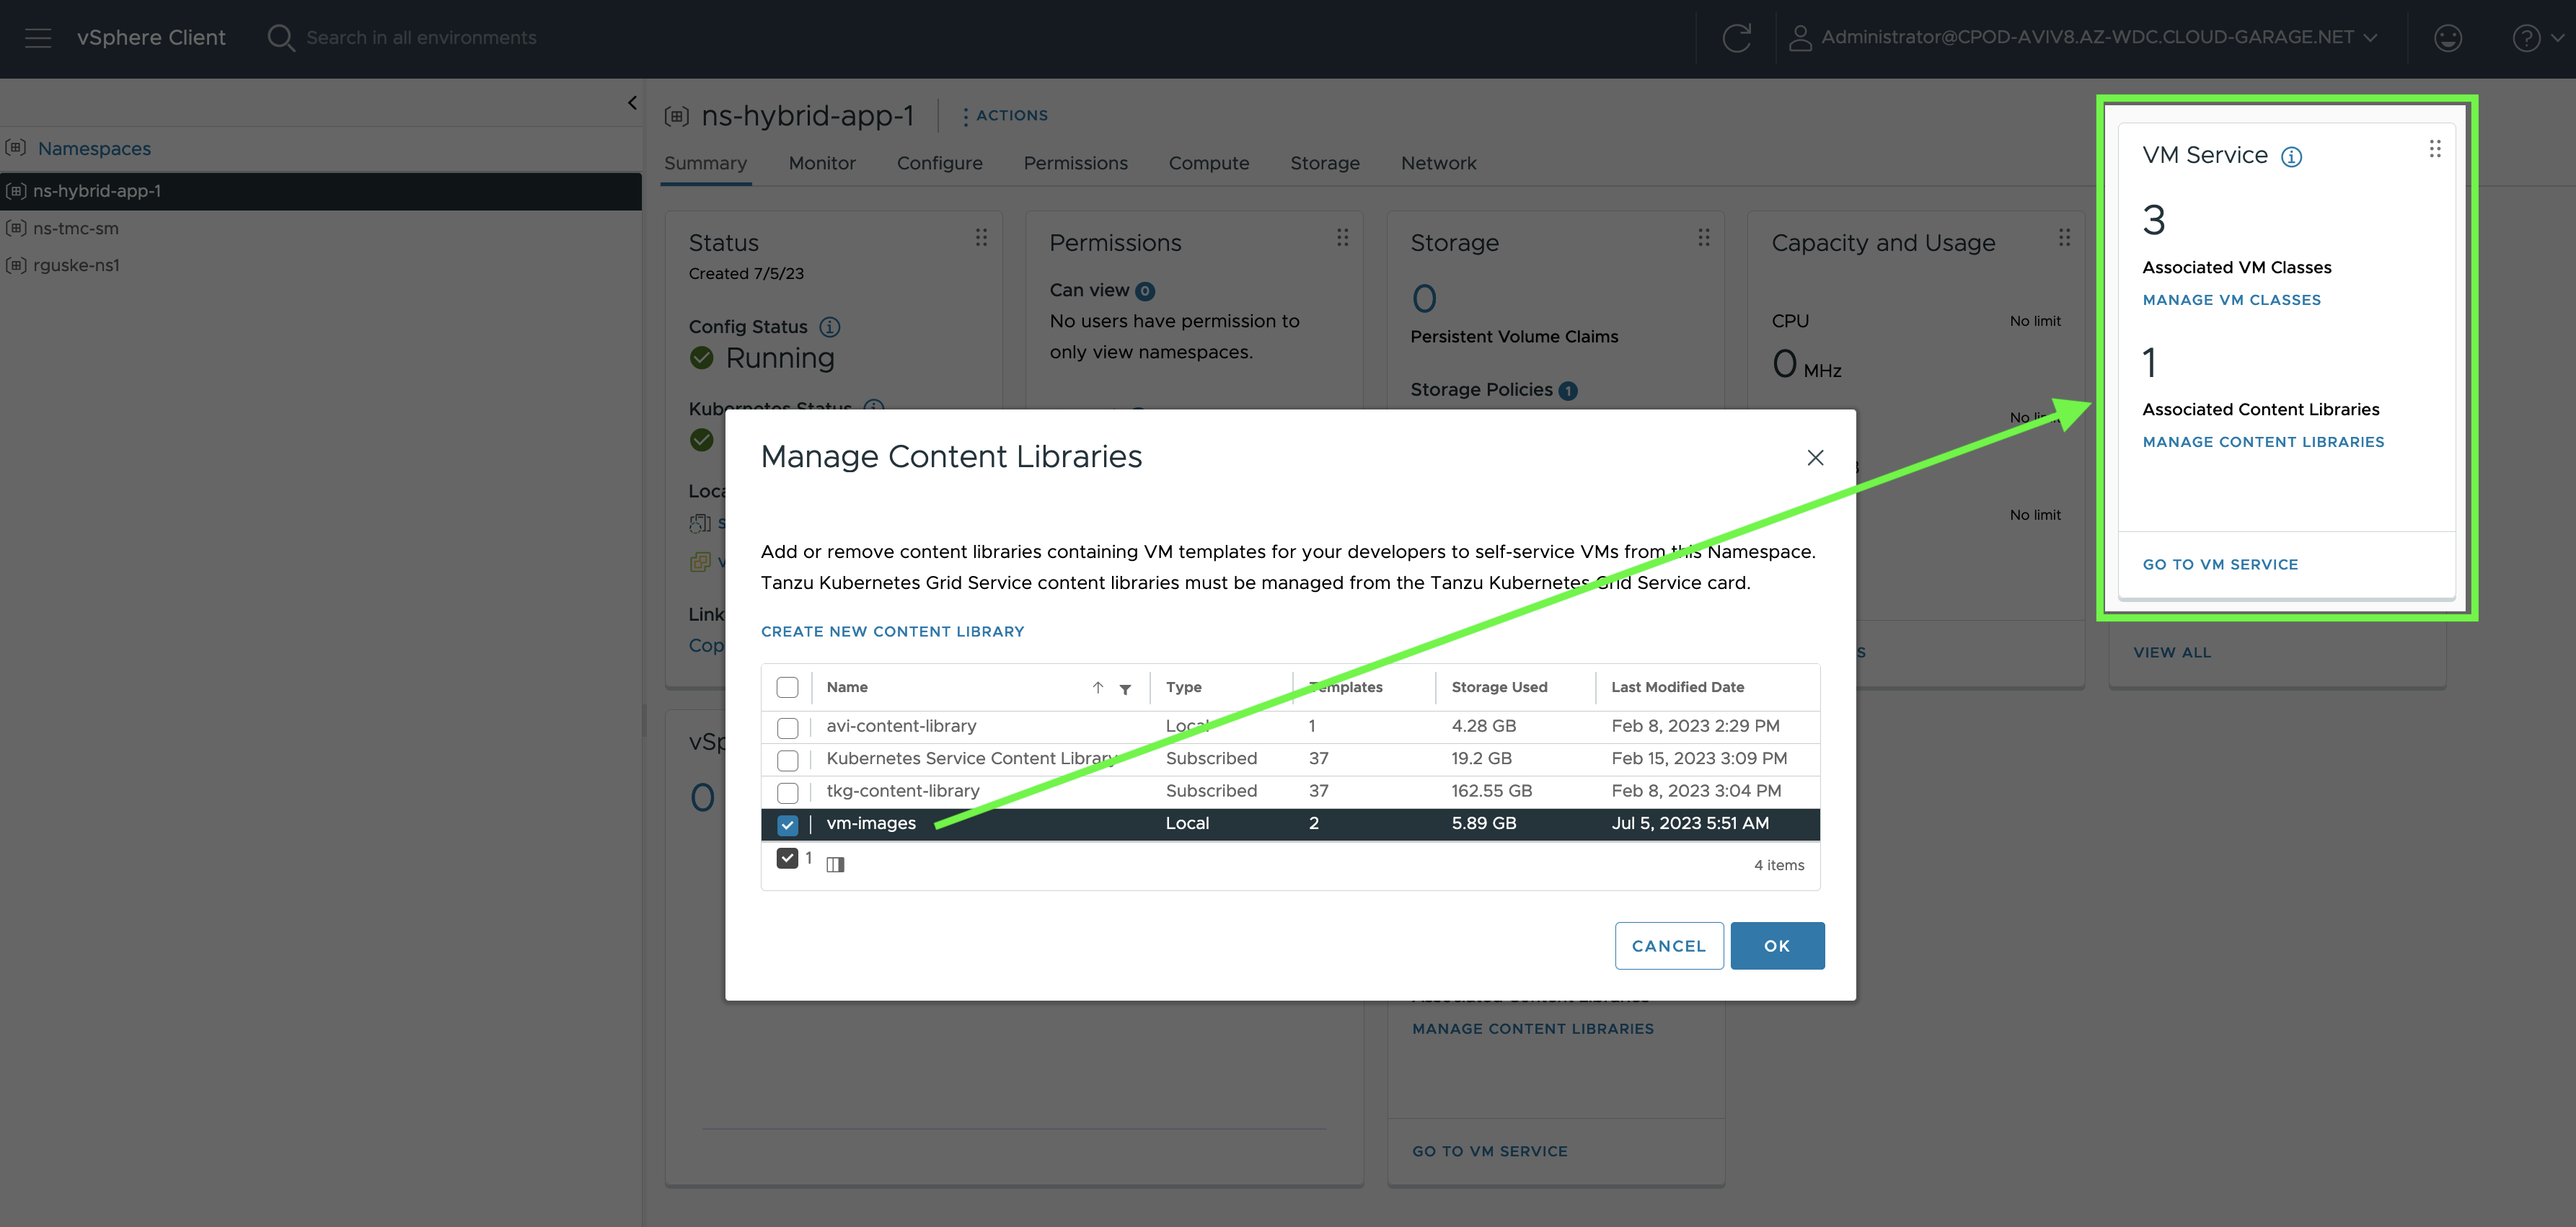
…and in which my Tanzu Kubernetes Cluster is already running.
kubectl -n ns-hybrid-app-1 get cluster,machinesets,vm
NAME                                             PHASE         AGE    VERSION
cluster.cluster.x-k8s.io/rguske-tkc-hybrid-app   Provisioned   5d6h   v1.24.9+vmware.1

NAME                                                                     CLUSTER                 REPLICAS   READY   AVAILABLE   AGE    VERSION
machineset.cluster.x-k8s.io/rguske-tkc-hybrid-app-md-0-n4t9d-76dd79dc8   rguske-tkc-hybrid-app   1          1       1           5d6h   v1.24.9+vmware.1

NAME                                                                                    POWER-STATE   AGE
virtualmachine.vmoperator.vmware.com/rguske-tkc-hybrid-app-md-0-n4t9d-76dd79dc8-kd7b6   poweredOn     5d6h
virtualmachine.vmoperator.vmware.com/rguske-tkc-hybrid-app-sprxr-r2bdn                  poweredOn     5d6h
After adding the new content library to the vSphere Namespace, it will be available on the Kubernetes layer as well:
kubectl -n ns-hybrid-app-1 get contentsourcebindings.vmoperator.vmware.com
NAME                                   AGE
02f5a0ab-cd42-41b4-b107-9f479a14d2e1   6d8h
b9a1de5e-fb67-4a34-977a-ff88776b54da   6d8h
The content library itself will be displayed only with its UUID. I guess this is due to the fact that Kubernetes requires everything is written in DNS conformant notations. Probably users may not always be able to ensure this for a global vSphere object. Therefore, uniqueness is required.
However, unless you’re not Neo 😎 trying to read the UUID’s won’t tell you which content library it actually is right away. You can figure it out using the vSphere client.
By selecting a content library in the vSphere client, you’ll notice a UUID in the URL which can be used to get the relation.
Like belows Figure VI shows.

Hint: I tried kubectl describe as well as kubectl get... -o yaml as well but without positive results 😉
Before I head over to the next step, let me briefly summarize what has been done up to this point:
- OVA downloaded ✅
- Created a Local vSphere Content Library ✅
- Uploaded the OVA ✅
- Associated the new Content Library with a vSphere Namespace ✅
Virtual Machine Manifest Preperations
In this next step I’m finally going to cover the creation of the virtual machine manifest. What’s required and where to get the required data from.
Again, the goal is to deploy an OVA using the VM Service and most important, to describe the values and data using the new vAppConfig.
Normally, if you deploy an OVA, you’ll enter values (integer, string or boolean) for keys like IP Address, Default Gateway, Password, etc. via the Customize template step.
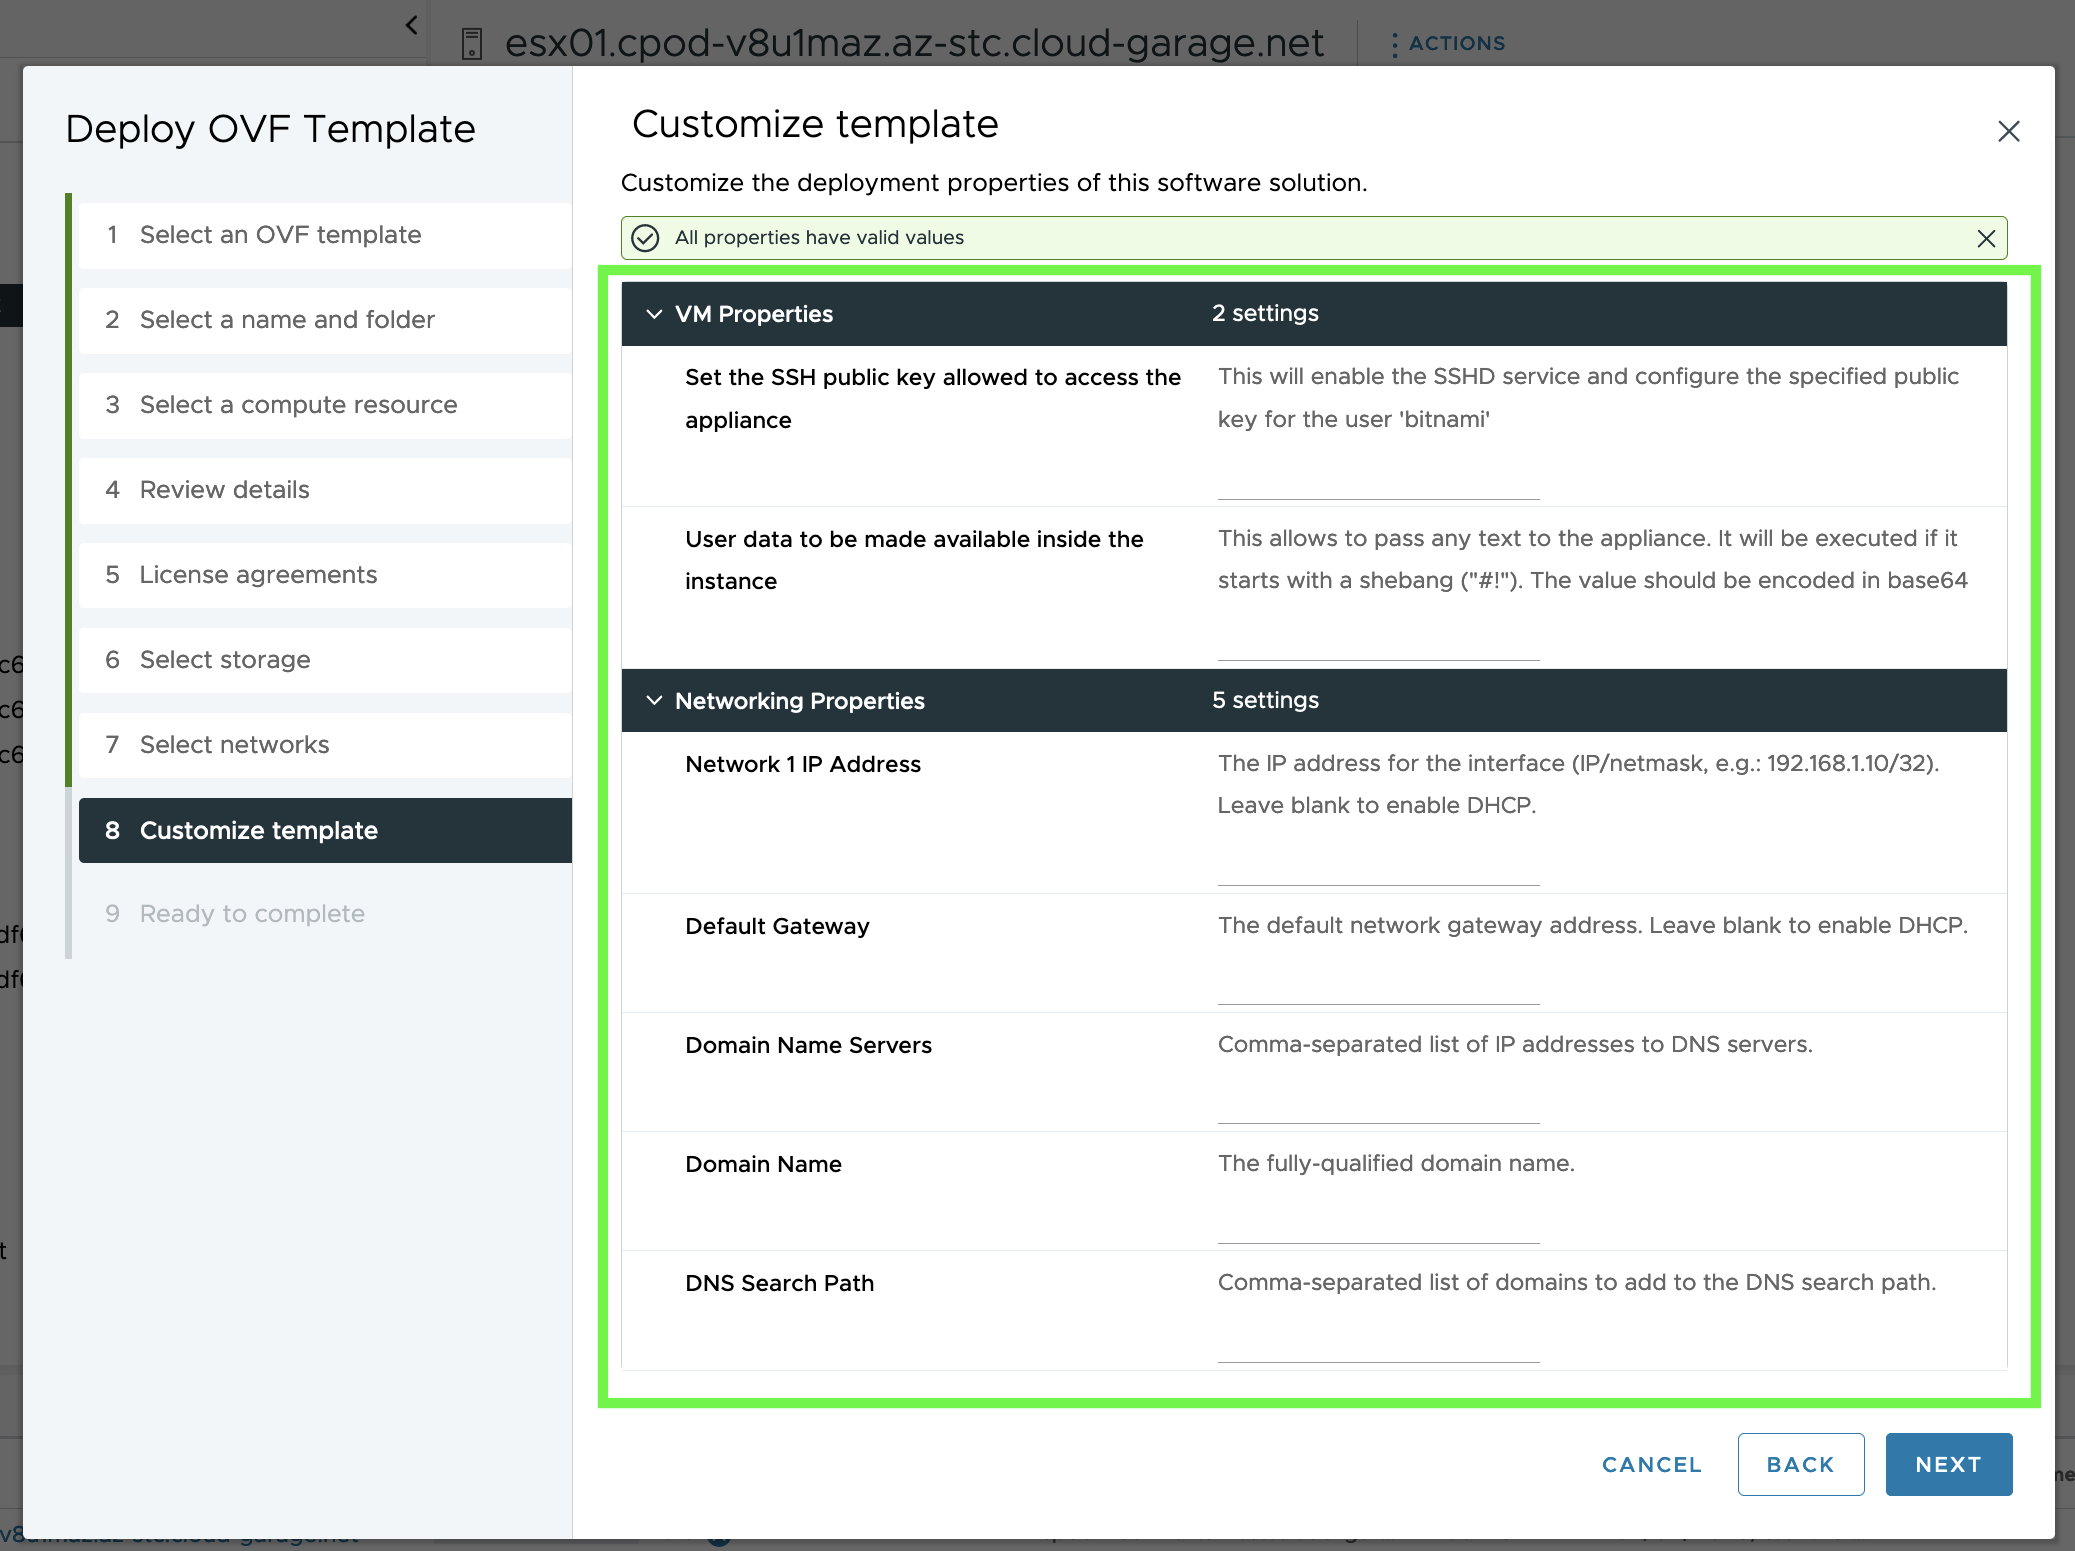
These configurable fields are specified in the OVF file as ovf:userConfigurable="true" and are of high interest for the creation of a virtual machine manifest.
Resource: VMware Docs - Deploy VMs with Configurable OVF Properties
In the following, I will explain two ways how to get the data.
Extract Configurable Properties using the ovftool
Option one is admittedly associated with a little bit more overhead but in comparison to option two, it requires no access to the Supervisor cluster (high priviledged user required). Download the VMware OVF tool from VMware’s Developer Portal .
⬇️ Open Virtualization Format (OVF) Tool
The following command will extract the packaged files from the OVA.
ovftool --allowExtraConfig --skipManifestCheck "bitnami-postgresql-11.20.0-r1-debian-11-amd64.ova" "postgressql/bitnami-postgresql-11.20.0-r1.ovf"
Opening OVA source: bitnami-postgresql-11.20.0-r1-debian-11-amd64.ova
The manifest does not validate
Opening OVF target: postgresql/bitnami-postgresql-11.20.0-r1.ovf
Writing OVF package: postgresql/bitnami-postgresql-11.20.0-r1/bitnami-postgresql-11.20.0-r1.ovf
Transfer Completed
Warning:
 - The manifest is present but user flag causing to skip it
Completed successfully
Browse the created folder until you find the *.ovf file. In my case it’s the bitnami-postgresql-11.20.0-r1.ovf. If you run e.g. a cat on the file and you browse to section <EulaSection> or basically to the end of the ovf, you will find the wanted ovfEnv keys (ovf:userConfigurable="true") for our manifest file.
Here’s is my example:
[...]
<ProductSection>
<Info>VM Arguments</Info>
<Category>VM Properties</Category>
<Property ovf:key="va-ssh-public-key" ovf:type="string" ovf:userConfigurable="true" ovf:value="">
<Label>Set the SSH public key allowed to access the appliance</Label>
<Description>This will enable the SSHD service and configure the specified public key for the user 'bitnami'</Description>
</Property>
<Property ovf:key="user-data" ovf:type="string" ovf:userConfigurable="true" ovf:value="">
<Label>User data to be made available inside the instance</Label>
<Description>This allows to pass any text to the appliance. It will be executed if it starts with a shebang ("#!"). The value should be encoded in base64</Description>
</Property>
<Category>Networking Properties</Category>
<Property ovf:key="network.ip0" ovf:type="string" ovf:userConfigurable="true" ovf:value="">
<Label>Network 1 IP Address</Label>
<Description>The IP address for the interface (IP/netmask, e.g.: 192.168.1.10/32). Leave blank to enable DHCP.</Description>
</Property>
<Property ovf:key="network.gateway" ovf:type="string" ovf:userConfigurable="true" ovf:value="">
<Label>Default Gateway</Label>
<Description>The default network gateway address. Leave blank to enable DHCP.</Description>
</Property>
<Property ovf:key="network.dns" ovf:type="string" ovf:userConfigurable="true" ovf:value="">
<Label>Domain Name Servers</Label>
<Description>Comma-separated list of IP addresses to DNS servers.</Description>
</Property>
<Property ovf:key="network.domain" ovf:type="string" ovf:userConfigurable="true" ovf:value="">
<Label>Domain Name</Label>
<Description>The fully-qualified domain name.</Description>
</Property>
<Property ovf:key="network.searchpath" ovf:type="string" ovf:userConfigurable="true" ovf:value="">
<Label>DNS Search Path</Label>
<Description>Comma-separated list of domains to add to the DNS search path.</Description>
</Property>
</ProductSection>
[...]Extract Configurable Properties using kubectl
Option two provides the desired data quicker but as already mentioned, you’ll need access to the Supervisor cluster. Since the Content Library is associated with our vSphere Namespace, we only have to execute the following kubectl command:
kubectl -n ns-hybrid-app-1 get vmimage bitnami-postgresql-11.20.0-r1-debian-11-amd64 -o jsonpath='{.spec}' | jq
The output on the terminal is immediately providing the necessary ovfEnv keys:
{
  "hwVersion": 14,
  "imageID": "a4bcc115-f81b-427a-a2c6-dc368718abfd",
  "imageSourceType": "Content Library",
  "osInfo": {
    "type": "debian10_64Guest",
    "version": "10"
  },
  "ovfEnv": {
    "network.dns": {
      "description": "Comma-separated list of IP addresses to DNS servers.",
      "key": "network.dns",
      "label": "Domain Name Servers",
      "type": "string"
    },
    "network.domain": {
      "description": "The fully-qualified domain name.",
      "key": "network.domain",
      "label": "Domain Name",
      "type": "string"
    },
    "network.gateway": {
      "description": "The default network gateway address. Leave blank to enable DHCP.",
      "key": "network.gateway",
      "label": "Default Gateway",
      "type": "string"
    },
    "network.ip0": {
      "description": "The IP address for the interface (IP/netmask, e.g.: 192.168.1.10/32). Leave blank to enable DHCP.",
      "key": "network.ip0",
      "label": "Network 1 IP Address",
      "type": "string"
    },
    "network.searchpath": {
      "description": "Comma-separated list of domains to add to the DNS search path.",
      "key": "network.searchpath",
      "label": "DNS Search Path",
      "type": "string"
    },
    "user-data": {
      "description": "This allows to pass any text to the appliance. It will be executed if it starts with a shebang (\"#!\"). The value should be encoded in base64",
      "key": "user-data",
      "label": "User data to be made available inside the instance",
      "type": "string"
    },
    "va-ssh-public-key": {
      "description": "This will enable the SSHD service and configure the specified public key for the user 'bitnami'",
      "key": "va-ssh-public-key",
      "label": "Set the SSH public key allowed to access the appliance",
      "type": "string"
    }
  },
  "productInfo": {},
  "providerRef": {
    "apiVersion": "vmoperator.vmware.com/v1alpha1",
    "kind": "ContentLibraryProvider",
    "name": "02f5a0ab-cd42-41b4-b107-9f479a14d2e1"
  },
  "type": "ovf"
}
Create the Virtual Machine Manifest
By having all the required data for our manifest file, we can finally start describing the desired state of our virtual machine. The manifest basically contains two Kubernetes objects. The first object is kind: VirtualMachine. Within this section, values are described for the virtual machine configuration in terms of e.g. name, deployment zone, virtual machine class, storage policy, network, etc.
The second section, kind: ConfigMap, is where the extracted ovf data is going to.
This is how my PostgreSQL VM manifest looks like. I’ve added comments (#) into the manifest in order to help understanding the keys.
apiVersion: vmoperator.vmware.com/v1alpha1
kind: VirtualMachine
metadata:
  name: bitnami-postgresql # <-- name of the virtual machine object
  labels:
    app: postgresql-vm
#    topology.kubernetes.io/zone: az01 # <-- applicable if you have a vSphere with Tanzu three zone deployment
  annotations:
    vmoperator.vmware.com/image-supported-check: enable # <-- image validation webhook option
spec:
  imageName: bitnami-postgresql-11.20.0-r1-debian-11-amd64 # <-- virtual machine image (uploaded OVA)
  className: best-effort-medium # <-- configured virtual machine class
  powerState: poweredOn
  storageClass: ftt0-r0 # <-- configured vSphere storage policy
  networkInterfaces:
#  - networkType: nsx-t # <-- if you have vSphere with Tanzu with NSX
  - networkType: vsphere-distributed # <-- if you're using the vSphere networking stack
    networkName: vlan-1053-wkld-1 # <-- distributed port group name
  vmMetadata:
    configMapName: postgresql-vm-cm # <-- name of the configMap (section below)
    transport: vAppConfig # <-- specify if using the OVF runtime environment
#    transport: CloudInit # <-- when using CloudInit to for instance initialisation
---
apiVersion: v1
kind: ConfigMap
metadata:
    name: postgresql-vm-cm # <-- name of the configMap which is referenced in the section above
data: # <-- this section is for all the configurable user data:
# Set the SSH public key allowed to access the appliance. This will enable the SSHD service and configure the specified public key for the user bitnami.
  va-ssh-public-key: "ssh-rsa AAAAB3N... user@hostname"
# User data to be made available inside the instance. This allows to pass any text to the appliance. It will be executed if it starts with a shebang (#!). The value should be encoded in base64.
  user-data: ""
# Network 1 IP Address. The IP address for the interface (IP/netmask, e.g.: 192.168.1.10/32). Leave blank to enable DHCP.
  network.ip0: "10.105.3.50/24"
# Default Gateway. The default network gateway address. Leave blank to enable DHCP.
  network.gateway: "10.105.3.1"
# Domain Name Servers. Comma-separated list of IP addresses to DNS servers.
  network.dns: "172.21.105.1"
# Domain Name. The fully-qualified domain name.
  network.domain: "postgresql01.cpod-aviv8.az-wdc.cloud-garage.net"
# DNS Search Path. Comma-separated list of domains to add to the DNS search path.
  network.searchpath: "cpod-aviv8.az-wdc.cloud-garage.net"
kubectl apply -f vm.yaml
With the VM configuration described in a yaml file, everything is settled for a deployment. The next step is similar (familiar) to any other Kubernetes deployment using kubectl.
kubectl -n app-ns-1 apply -f bitnami-postgresql-vm.yaml

virtualmachine.vmoperator.vmware.com/bitnami-postgresql created
configmap/postgresql-vm-cm created
Both objects are created on the Supervisor cluster and the vm deployment can be followed in the vSphere client.
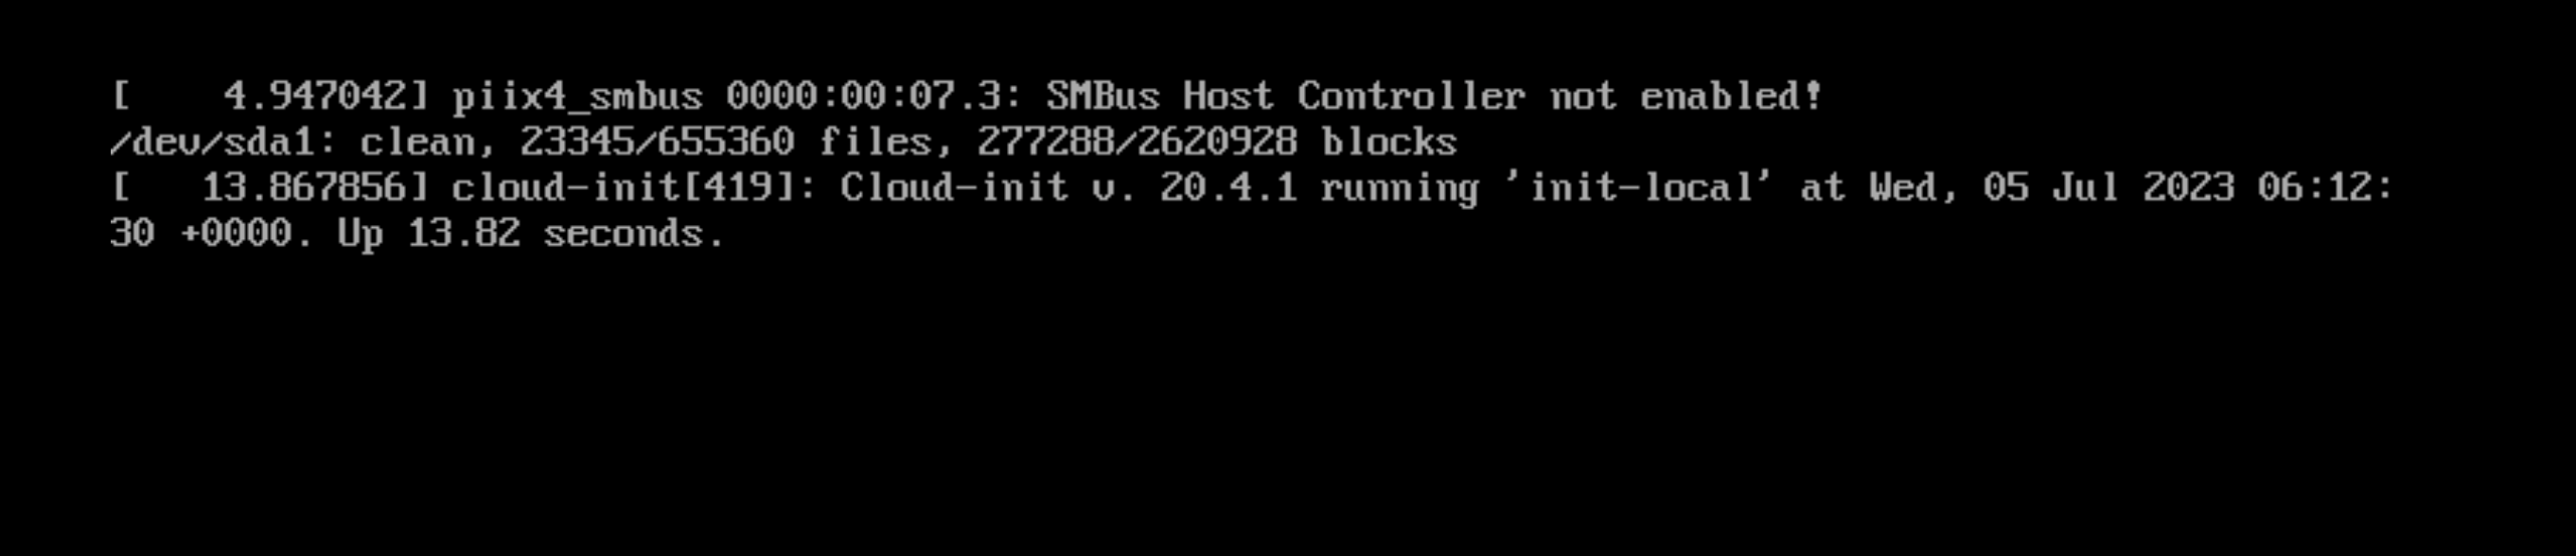
After a successful deployment, the vm will be powered on (powerState: poweredOn) and you can also watch the initialisation progress via one of the consoles.
Speaking of console 😁 Another new feature which were introduced with vSphere 8U1 is the web-console support for VM Service VMs.
Let’s check it out:
kubectl vsphere -n ns-hybrid-app-1 vm web-console bitnami-postgresql

Successfully created a new WebConsoleRequest 'bitnami-postgresql-g8qf4' in namespace 'ns-hybrid-app-1'
Waiting for the above WebConsoleRequest to be processed...
Web-Console URL: https://sv1-avi.cpod-aviv8.az-wdc.cloud-garage.net/vm/web-console?host=esx01.cpod-aviv8.az-wdc.cloud-garage.net&name=bitnami-postgresql&port=443&ticket=d1d17dd20e4aa87c&vm_moid=vm-5093
This URL is for one-time use and will expire at 2023-07-14T18:13:16+02:00 (in about 1m59s)
Here we go:
PostgreSQL-VM Post Deployment Configurations
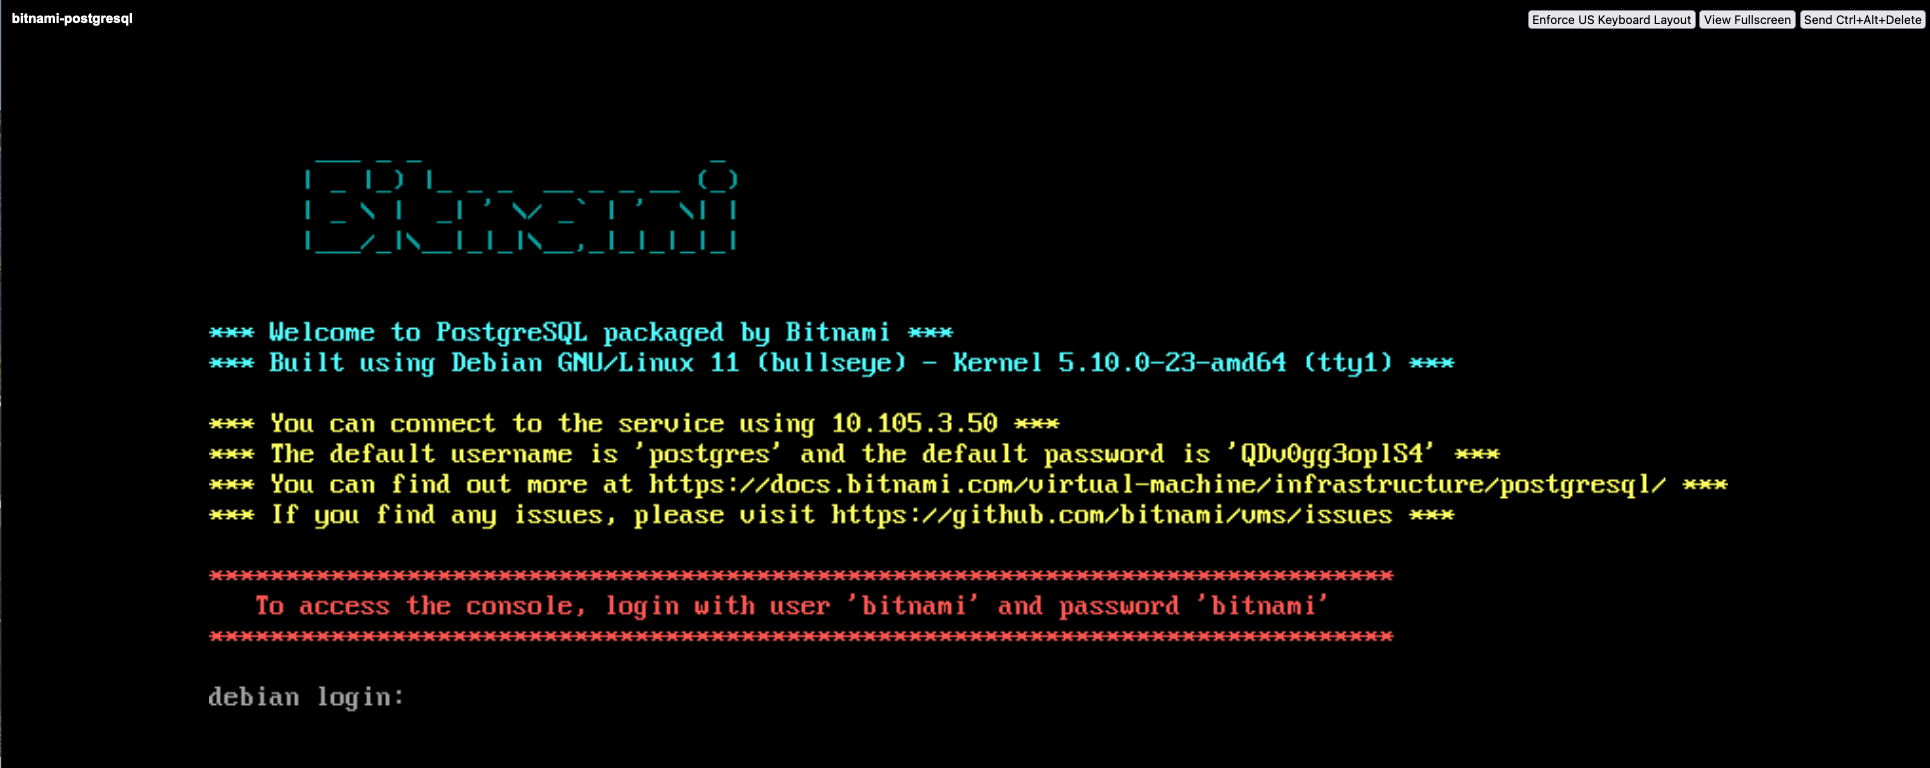
Before I can actually connect to the DB and start writing data into it, I have to make some post-deployment configurations. As Figure IX shows, the default user for the PostgreSQL DB is postgres. The password for the user is created randomly and also displayed on the “welcome screen”.
The default user for the vm on the other hand is bitnami. This user will be used to ssh into the vm.
ssh -i ~/.ssh/id_rsa bitnami@postgresql01.cpod-aviv8.az-wdc.cloud-garage.netAfter sshing into the vm, I configured the listening IP address as well as the port for the PostgreSQL.
$ vi /opt/bitnami/postgresql/conf/postgresql.conf

[...]

listen_addresses = '*'          # what IP address(es) to listen on;
                                        # comma-separated list of addresses;
                                        # defaults to 'localhost'; use '*' for all
                                        # (change requires restart)
port = '5432'

[...]
I kept it simple for my use case and configured basically any IP (*) and sticked with the default port 5432.
The next configuration file which has to be adjusted properly was for the client authentication. This can be done via the pg_hba.conf file. HBA stands for host-based authentication.
Add the all configuration to the end of the file:
$ vi /opt/bitnami/postgresql/conf/pg_hba.conf

```shell
local    all             all                                     md5
host     all             all        127.0.0.1/32                 md5
host     all             all        ::1/128                      md5
# allow all
host     all             all        all                          md5
Finally, apply the configuration by restarting the postgresql service:
$ sudo /opt/bitnami/ctlscript.sh restart postgresqlValidate your configuration:
$ netstat -aon | grep '5432'

tcp        0      0 0.0.0.0:5432            0.0.0.0:*               LISTEN      off (0.00/0/0)
tcp6       0      0 :::5432                 :::*                    LISTEN      off (0.00/0/0)
unix  2      [ ACC ]     STREAM     LISTENING     16993    /tmp/.s.PGSQL.5432
Well, the system settings are look promising and I tried to connect to the DB using the PostgreSQL cli psql. Unfortunately, it hasn’t worked out well for me. The connection always ran into a timeout error. It took me some efforts and the help of my appreciated colleague Andreas Marqvardsen to figure out, that nftables are used on the Debian system and that it’s blocking all the incoming traffic except ssh.
ProTip: In order to validate that incoming traffic is allowed, you can start a http.server using Python.
By executing the following command python3 -m http.server on the shell, it’ll start a simple http server listening on localhost port 8000. Try curling the endpoint.
That really comes into handy in such troubleshooting situations.
On the server:
$ python3 -m http.server

Serving HTTP on 0.0.0.0 port 8000 (http://0.0.0.0:8000/) ...
On the client: curl 10.105.3.50:8000.
<!DOCTYPE HTML PUBLIC "-//W3C//DTD HTML 4.01//EN" "http://www.w3.org/TR/html4/strict.dtd">
<html>
<head>
<meta http-equiv="Content-Type" content="text/html; charset=utf-8">
<title>Directory listing for /</title>

[...]
I didn’t want to start configuring nftables properly in order to allow the incoming traffic. Consequently, I completely stoped the service on the system level by executing systemctl stop nftables.
Connection check using psql:
# Login with user postgres
psql -U postgres -h 10.105.3.50 -p 5432 -d postgres
Password for user postgres:
*********

psql (15.3 (Ubuntu 15.3-1.pgdg20.04+1), server 11.20)
Type "help" for help.

# Show connection details (\conninfo)
postgres=# \conninfo
You are connected to database "postgres" as user "postgres" on host "10.105.3.50" at port "5432".

# List all available databases (\l)
postgres=# \l
                                                 List of databases
   Name    |  Owner   | Encoding |   Collate   |    Ctype    | ICU Locale | Locale Provider |   Access privileges
-----------+----------+----------+-------------+-------------+------------+-----------------+-----------------------
 postgres  | postgres | UTF8     | en_US.UTF-8 | en_US.UTF-8 |            | libc            |
 template0 | postgres | UTF8     | en_US.UTF-8 | en_US.UTF-8 |            | libc            | =c/postgres          +
           |          |          |             |             |            |                 | postgres=CTc/postgres
 template1 | postgres | UTF8     | en_US.UTF-8 | en_US.UTF-8 |            | libc            | =c/postgres          +
           |          |          |             |             |            |                 | postgres=CTc/postgres
(3 rows)
Fabulous! We have a configured PostgreSQL DB VM up and running deployed via the Virtual Machine Service. Nevertheless, in order to really have the “DevOps-feeling”, the post-deployment task needs to be automated as well.
Run pgAdmin in a Container
I’m not an expert in PostgreSQL. Therefore, I was looking for the most simple and effective way to configure and read the DB. pgAdmin is the tool of the DB admin’s choice (me guessing again) and fortunately, a container image for pgAdmin exists.
The following docker command will spin up a local pgadmin instance on your computer/jumphost:
docker run -p 80:80 \
    -e 'PGADMIN_DEFAULT_EMAIL=rguske@vmware.com' \
    -e 'PGADMIN_DEFAULT_PASSWORD=*******' \
    -d dpage/pgadmin4:7.4
The pgAdmin portal is accessible via your browser. Either http://localhost or if you are using a jumphost (in my case ssh only) like me, then use the IP address of your jumphost.
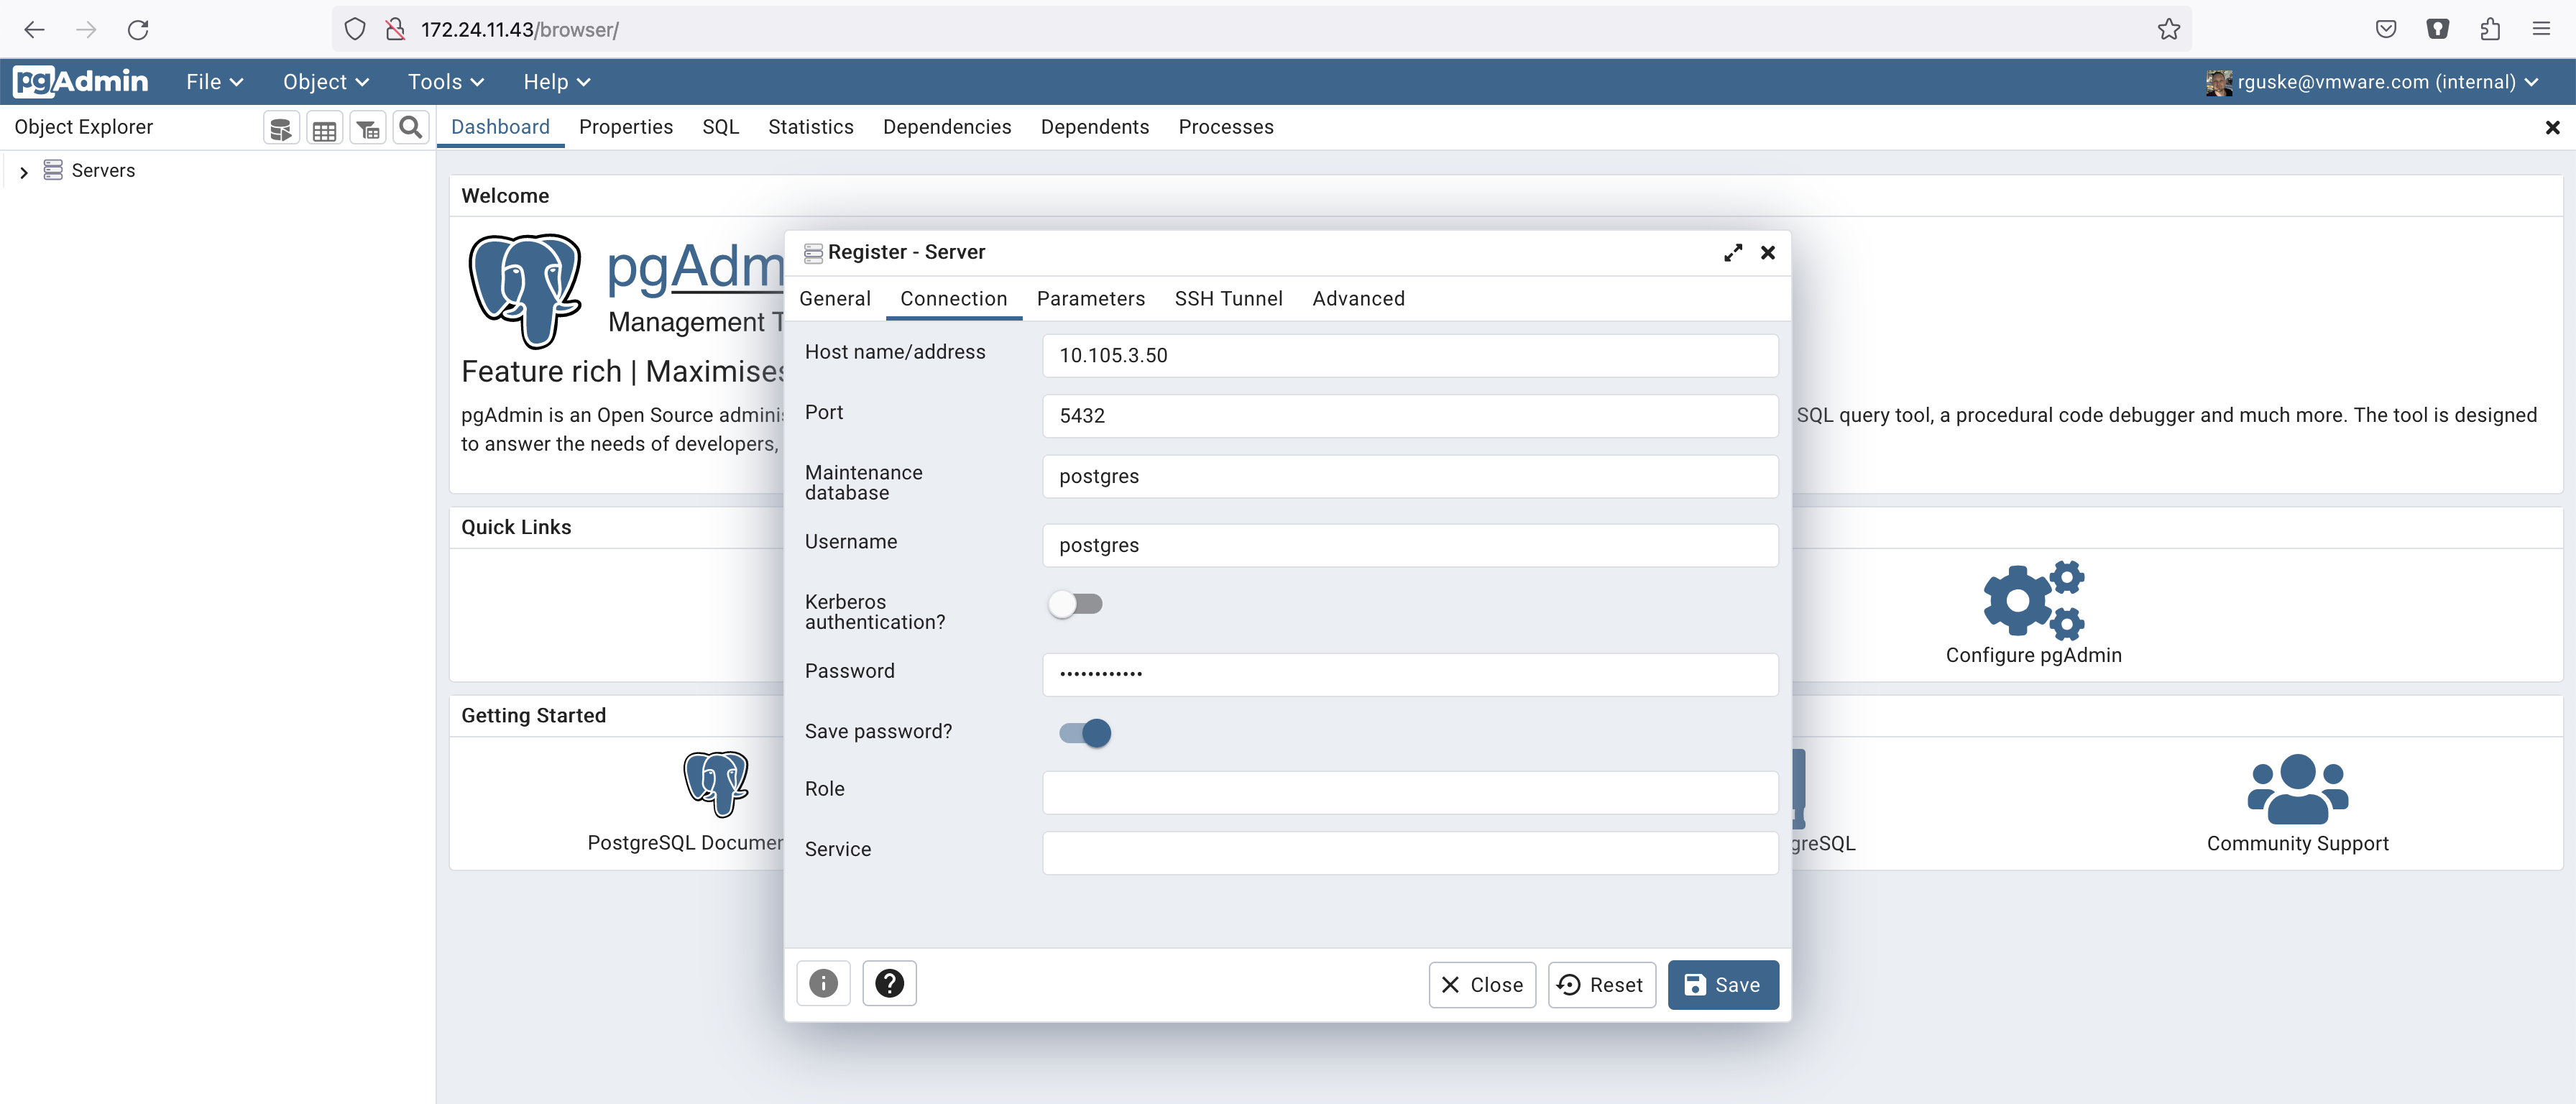
I’m using the given data in order to establish the connection to my PostgreSQL instance.
Example Kubernetes Application
When creating this post as well as the associated demo, the overall idea which I had in mind was to create a Hybrid Application Architecture using the power of the Supervisor Services of vSphere with Tanzu. A Tanzu Kubernetes Cluster will host an application which will write data into a Database instance running as a virtual machine and most important, declaratively deployed using the Virtual Machine Service. This time, I deployed everything manually but ultimately it would be part of a CI/CD pipeline.
I didn’t have an example application and I was not eager looking on Github for an example. Therefore, I decided to write my own application with the little help of a new, very chatty friend of mine 🤖… 😉
You can find the Postgresql-Writer-k8s-Job application on my repository HERE.
Quickly explained:
The application will establish a connection to the database using the by a user defined data which is stored in a Kubernetes secret.
After the connection has been established, the application will write example data into a defined table.
In order to not only use psql or pgAdmin to validate the written data, I added the functionality to the application that a search_query will be executed and the results will be send to stdout. Therefore, using kubectl logs will give you the results as well.
Deploy the Application as a Kubernetes Job
Let’s deploy the Postgres-Writer application as a Kubernetes job. Make sure being in the right Kubernetes context (kubectl config use-context).
Create a new Kubernetes namespace:
kubectl create ns postgres-appThe next step must be the creation of the Kubernetes secret. Remember, the application will read sensible data from the secret.
Create the secret:
kubectl create secret generic postgres-secret \
  --from-literal=username='postgres' \
  --from-literal=password='*******' \
  --from-literal=host='10.105.3.50' \
  --from-literal=port='5432' \
  --from-literal=database='vmware' \
  --from-literal=table='myappdata' \
  --from-literal=column1='value' \
  --from-literal=column2='data' \
  --namespace='postgres-app'
Ultimately, deploy the application as a Kubernetes job and validate the results after the jobs completion.
kubectl -n postgres-app create -f - <<EOF
apiVersion: batch/v1
kind: Job
metadata:
  name: postgres-writer-job
spec:
  template:
    metadata:
      name: postgres-writer-pod
    spec:
      restartPolicy: Never
      containers:
        - name: postgres-writer
          image: rguske/postgres-writer-app:1.0
          env:
            - name: POSTGRES_HOST
              valueFrom:
                secretKeyRef:
                  name: postgres-secret
                  key: host
            - name: POSTGRES_PORT
              valueFrom:
                secretKeyRef:
                  name: postgres-secret
                  key: port
            - name: POSTGRES_USERNAME
              valueFrom:
                secretKeyRef:
                  name: postgres-secret
                  key: username
            - name: POSTGRES_PASSWORD
              valueFrom:
                secretKeyRef:
                  name: postgres-secret
                  key: password
            - name: POSTGRES_DB
              valueFrom:
                secretKeyRef:
                  name: postgres-secret
                  key: database
            - name: TABLE
              valueFrom:
                secretKeyRef:
                  name: postgres-secret
                  key: table
            - name: COLUMN1
              valueFrom:
                secretKeyRef:
                  name: postgres-secret
                  key: column1
            - name: COLUMN2
              valueFrom:
                secretKeyRef:
                  name: postgres-secret
                  key: column2
          command: ["python", "postgresql-app.py"]
#      imagePullSecrets:
#        - name:   # Optional: If your image is in a private registry
          imagePullPolicy: Always
  backoffLimit: 0  # Ensures that the job doesn't retry in case of failure
EOF
The job (completion 1/1) as well as the pod (Completed) got deployed and executed successfully.
kubectl -n postgres-app get job,pod

NAME                            COMPLETIONS   DURATION   AGE
job.batch/postgres-writer-job   1/1           28s        2m1s

NAME                            READY   STATUS      RESTARTS   AGE
pod/postgres-writer-job-zzhx4   0/1     Completed   0          2m1s
Validating the written Data
We have three variants to use to validate that data was successfully written into the db table and columns.
-
- Using
kubectl
- Using
kubectl -n postgres-app logs jobs/postgres-writer-job -f
('John', 'Doe')
('Jane', 'Smith')
('Alice', 'Johnson')
The output shows the written example data ✅
-
- Using
psql:
- Using
psql -U postgres -h 10.105.3.50 -p 5432 -d vmware -c 'SELECT * FROM myappdata'

Password for user postgres:

 value | data
---------+---------
 John    | Doe
 Jane    | Smith
 Alice   | Johnson
(3 rows)
✅
-
- Using
pgAdmin
- Using
Go to Tools and select Query Tool. Enter the following search_query and press the play button:
SELECT * FROM public.myappdata
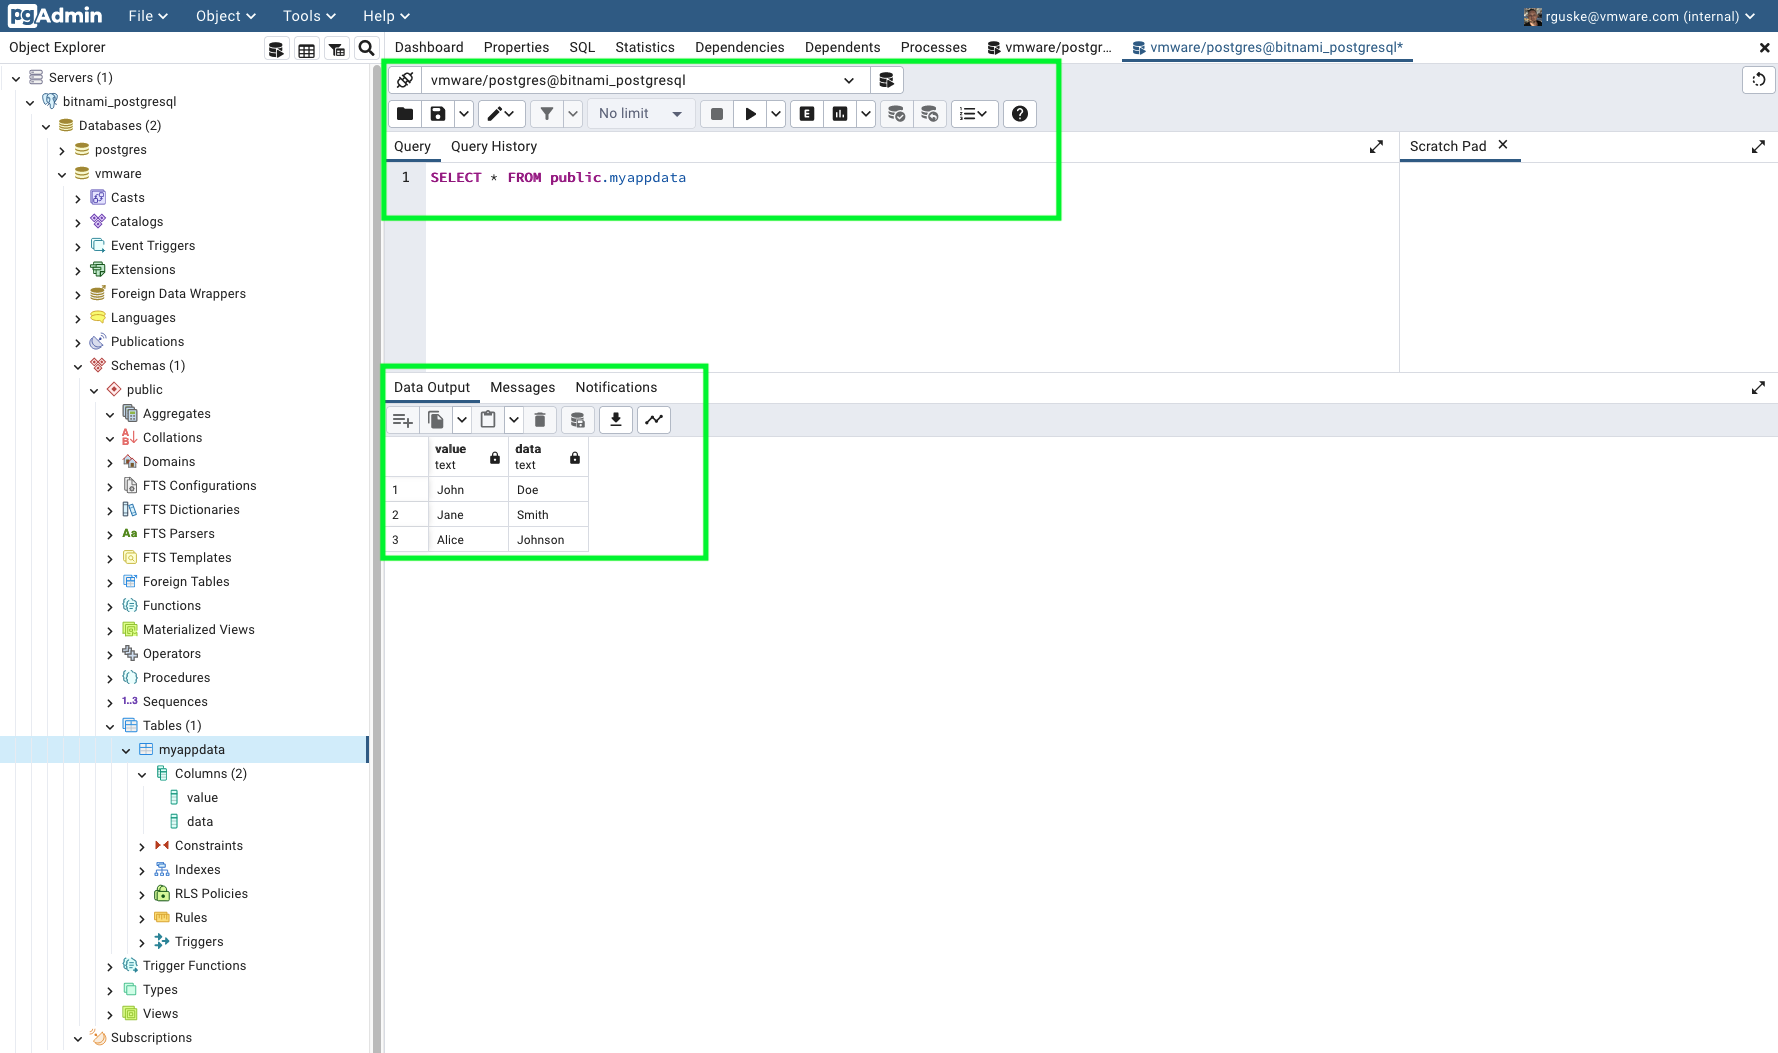
✅
Conclusion
As technology continues to evolve, modern hybrid application architectures providing a practical and pragmatic approach to bridge the gap between service-oriented architectures and traditional workloads hosted on virtual machines. By blending the scalability and agility of SOA with the reliability and versatility of VMs, organizations can modernize their applications while leveraging existing investments.
Although challenges exist, the benefits of modern hybrid architectures make them an attractive option for businesses looking to strike a balance between legacy systems and cloud-native principles.
VMware’s comprehensive solution portfolio for application and platform modernization, Tanzu, can help enterprises to achieve the aforementioned objectives and goals.
Thanks a lot for reading.
Extra
I tried the deployment of other OVA’s like the VMware Event Broker Appliance 😍 as well as my Kubernetes Appliance OVA too. Both work like a charme and I wanted to provide the manifests for both here as well.
VEBA VM Service Manifest
k -n veba-ns get virtualmachineimages.vmoperator.vmware.com --field-selector metadata.name=veba-v0.7.5
NAME          PROVIDER-NAME                          CONTENT-LIBRARY-NAME   IMAGE-NAME    VERSION   OS-TYPE      FORMAT   AGE
veba-v0.7.5 87b2c9ec-81e5-4e01-9367-be8f6d74ecf7 veba-v0.7.5 v0.7.5 otherGuest ovf 4dapiVersion: vmoperator.vmware.com/v1alpha1
kind: VirtualMachine
metadata:
name: veba01
labels:
app: veba01
topology.kubernetes.io/zone: az01
spec:
imageName: veba-v0.7.5
className: best-effort-large
powerState: poweredOn
storageClass: sp-az-consumption-domain
networkInterfaces:
- networkType: vsphere-distributed
networkName: vlan-1403-wkld1
vmMetadata:
configMapName: veba01-cm
transport: vAppConfig
---
apiVersion: v1
kind: ConfigMap
metadata:
name: veba01-cm
data:
guestinfo.debug: "True"
guestinfo.hostname: "veba01.cpod-v8u1maz.az-stc.cloud-garage.net"
guestinfo.ipaddress: "10.14.3.60"
guestinfo.netmask: "24 (255.255.255.0)"
guestinfo.gateway: "10.14.3.1"
guestinfo.dns: "172.24.14.1"
guestinfo.domain: "cpod-v8u1maz.az-stc.cloud-garage.net"
guestinfo.ntp: "172.24.14.1"
guestinfo.http_proxy: ""
guestinfo.https_proxy: ""
guestinfo.proxy_username: ""
guestinfo.proxy_password: ""
guestinfo.no_proxy: ""
guestinfo.root_password: "VMware1!"
guestinfo.enable_ssh: "True"
guestinfo.vcenter_server: "vcsa.cpod-v8u1maz.az-stc.cloud-garage.net"
guestinfo.vcenter_username: "kn-ro@cpod-v8u1maz.az-stc.cloud-garage.net"
guestinfo.vcenter_password: "VMware1!"
guestinfo.vcenter_veba_ui_username: "administrator@cpod-v8u1maz.az-stc.cloud-garage.net"
guestinfo.vcenter_veba_ui_password: "******"
guestinfo.vcenter_disable_tls_verification: "True"
guestinfo.horizon: ""
guestinfo.horizon_server: ""
guestinfo.horizon_domain: ""
guestinfo.horizon_username: ""
guestinfo.horizon_password: ""
guestinfo.horizon_disable_tls_verification: ""
guestinfo.webhook: "True"
guestinfo.webhook_username: ""
guestinfo.webhook_password: ""
guestinfo.custom_tls_private_key: ""
guestinfo.custom_tls_ca_cert: ""
guestinfo.pod_network_cidr: "192.168.0.0/20"
guestinfo.syslog_server_hostname: ""
guestinfo.syslog_server_port: ""
guestinfo.syslog_server_protocol: ""
guestinfo.syslog_server_format: ""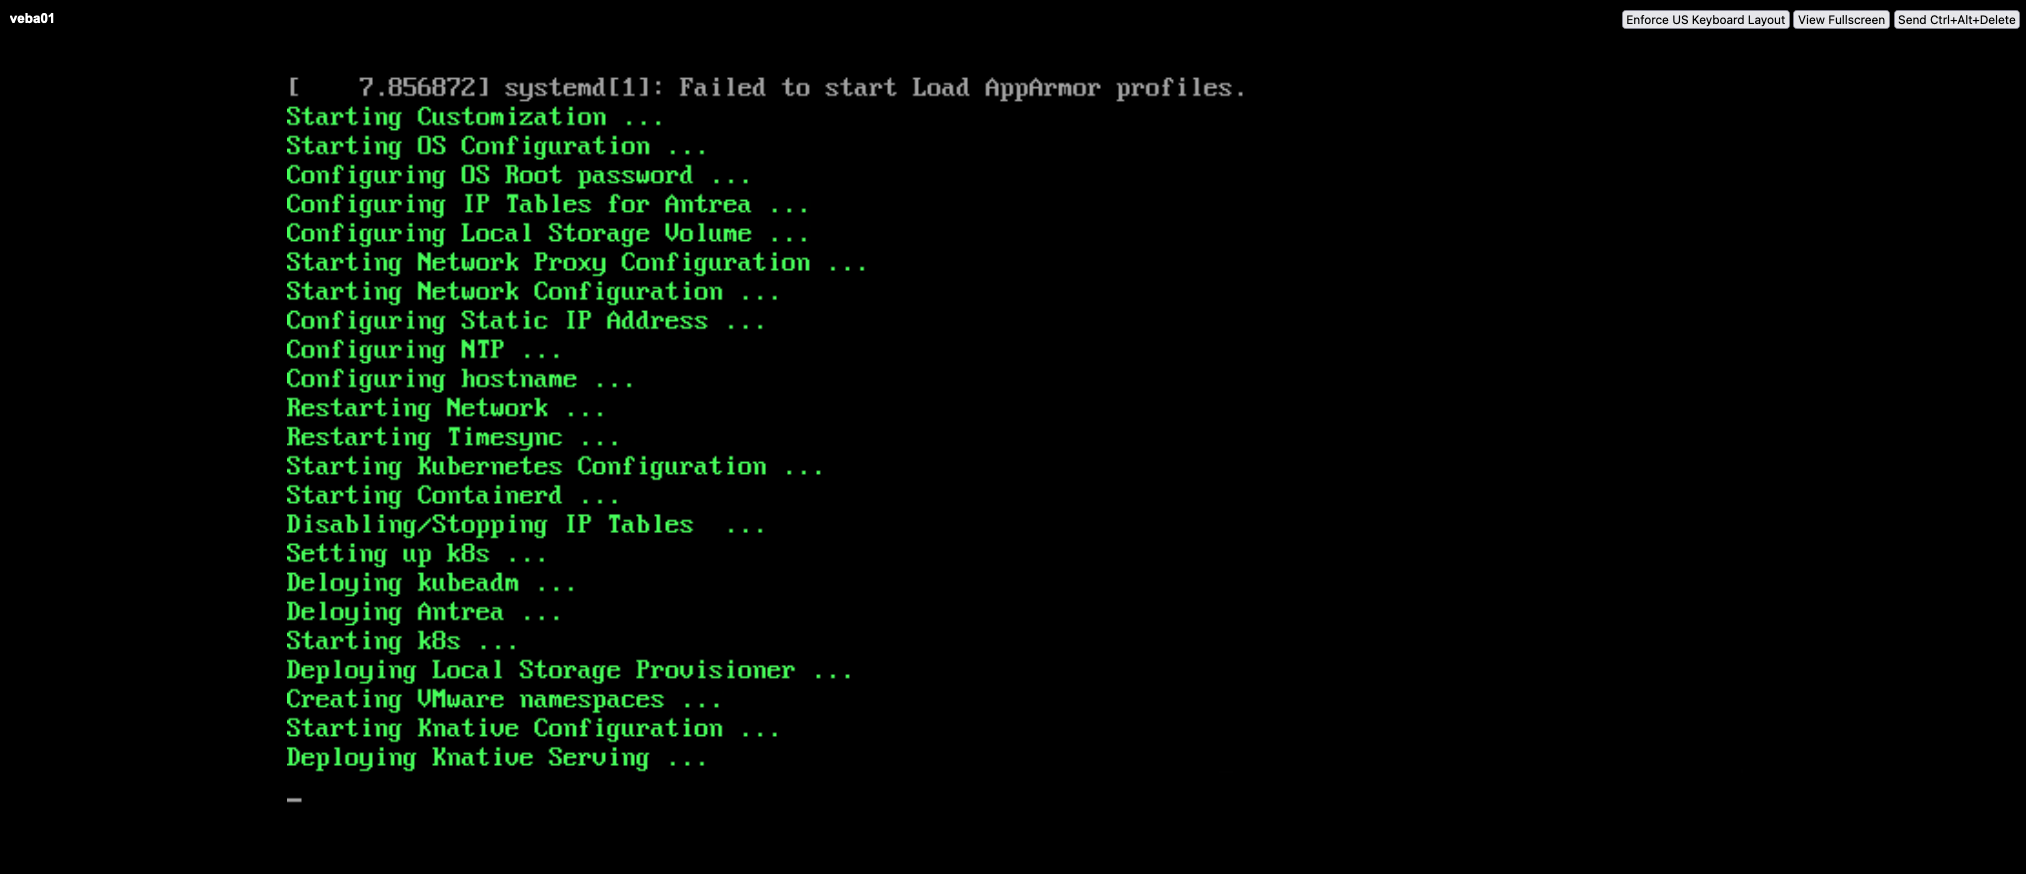
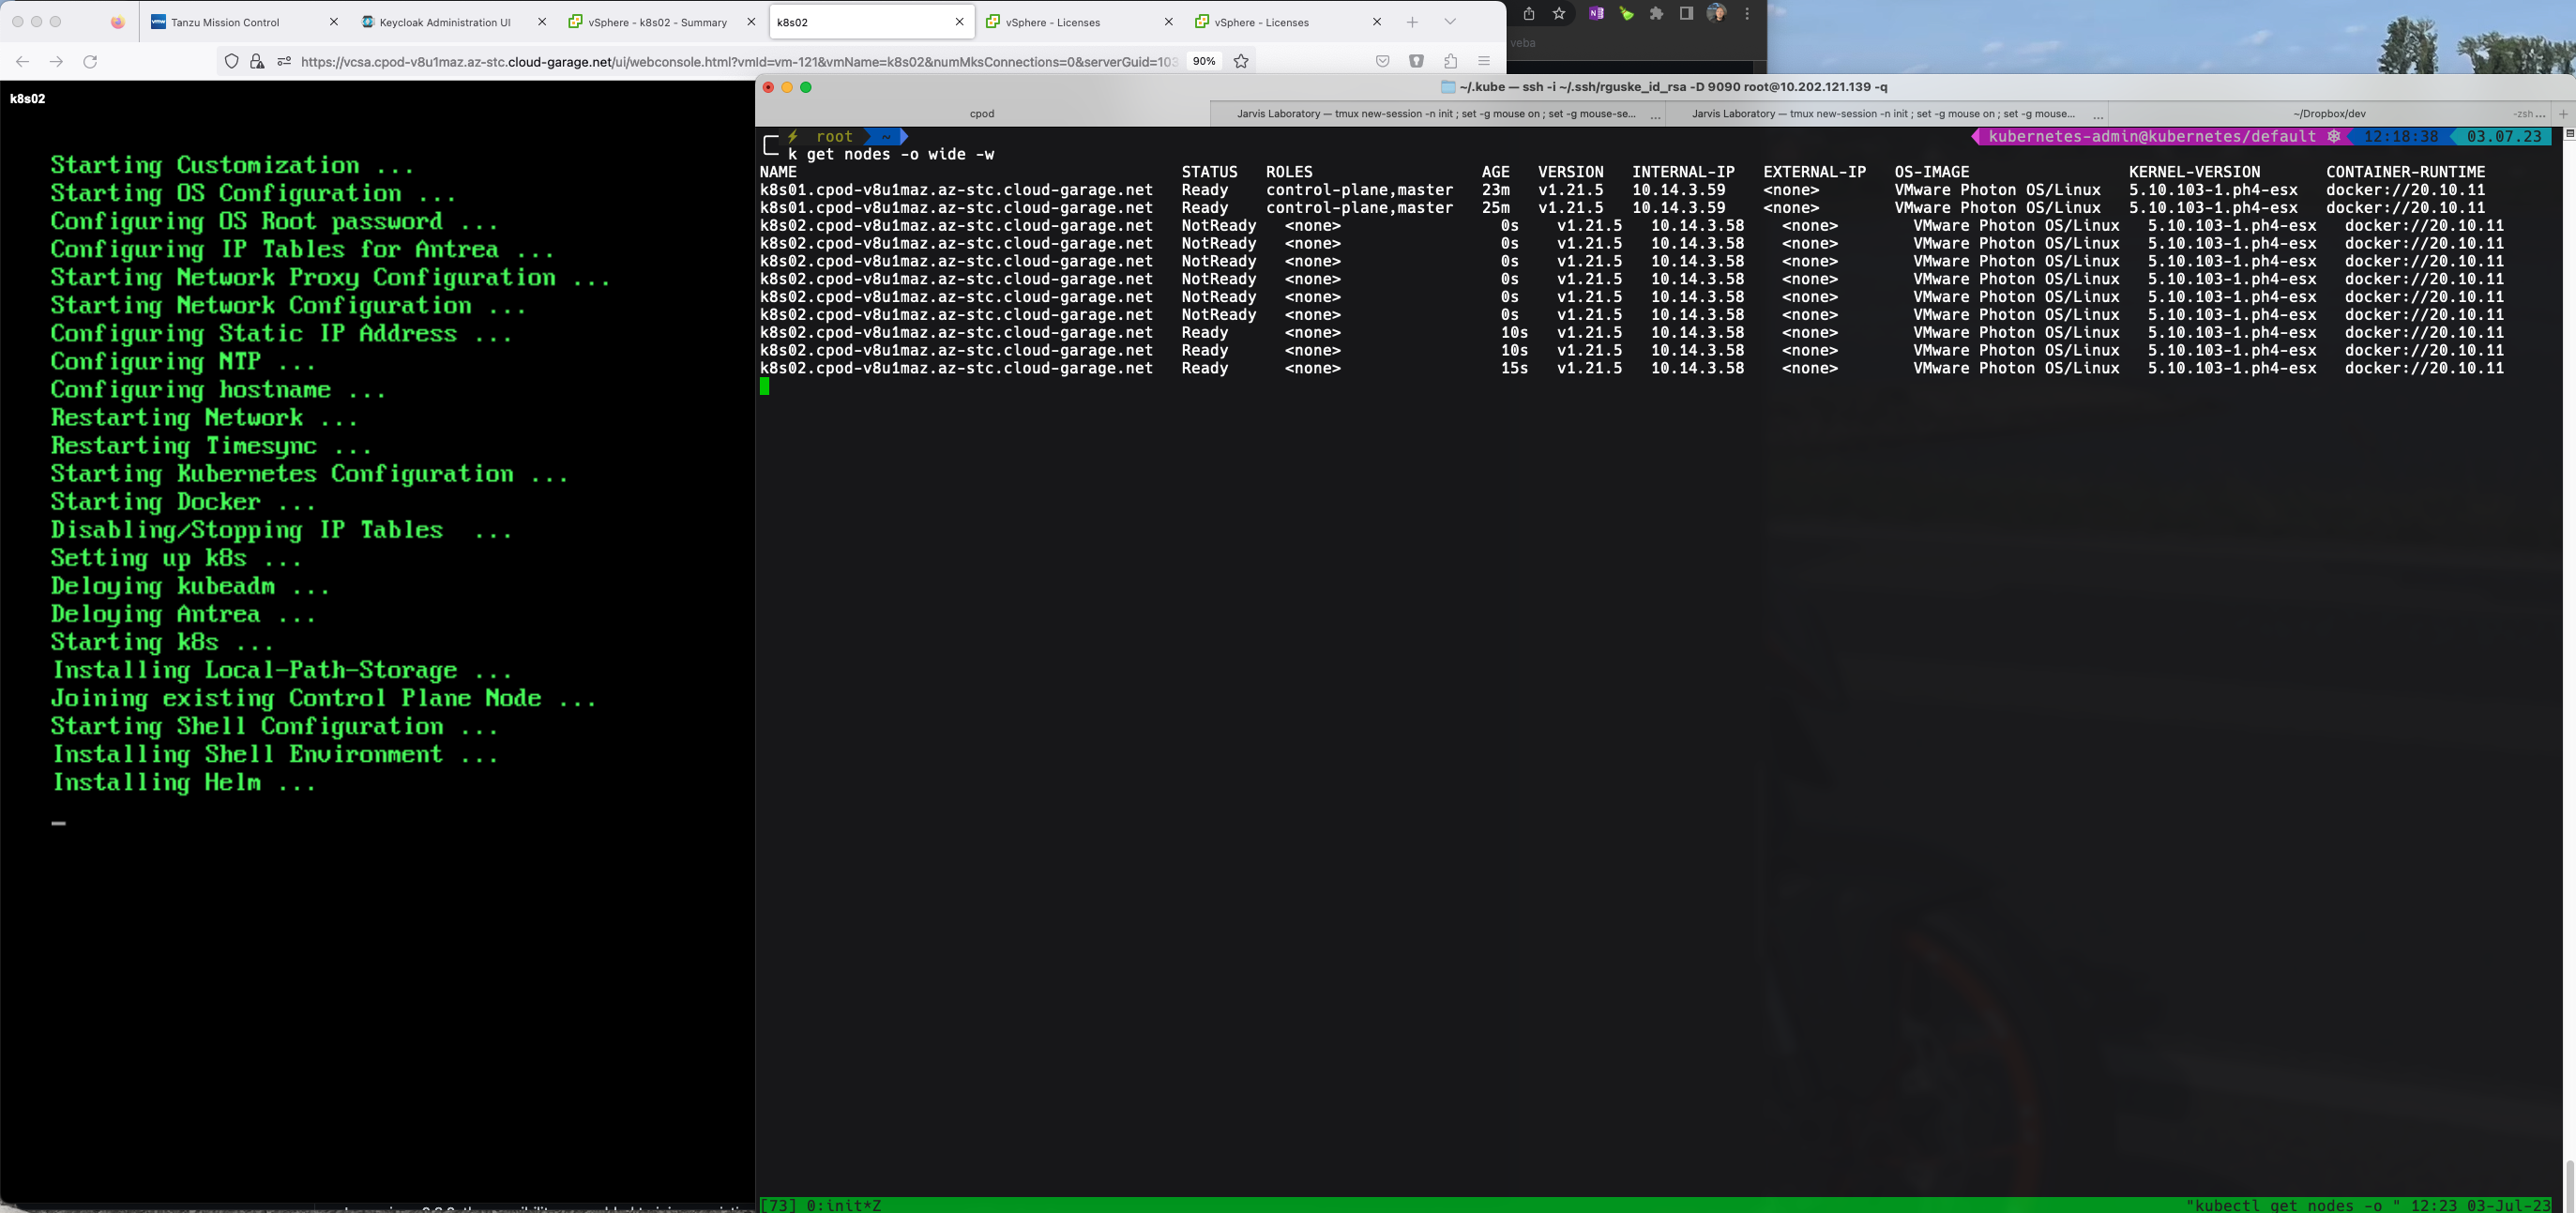
Kubernetes Appliance VM Service Manifest
apiVersion: vmoperator.vmware.com/v1alpha1
kind: VirtualMachine
metadata:
  name: k8s02
  labels:
    app: k8s02
    topology.kubernetes.io/zone: az02
spec:
  imageName: k8s-app-v030
  className: best-effort-medium
  powerState: poweredOn
  storageClass: sp-az-consumption-domain
  networkInterfaces:
  - networkType: vsphere-distributed
    networkName: vlan-1403-wkld1
  vmMetadata:
    configMapName: k8s02-cm
    transport: vAppConfig
---
apiVersion: v1
kind: ConfigMap
metadata:
    name: k8s02-cm
data:
  guestinfo.hostname: "k8s02.cpod-v8u1maz.az-stc.cloud-garage.net"
  guestinfo.ipaddress: "10.14.3.58"
  guestinfo.netmask: "24 (255.255.255.0)"
  guestinfo.gateway: "10.14.3.1"
  guestinfo.dns: "172.24.14.1"
  guestinfo.domain: "cpod-v8u1maz.az-stc.cloud-garage.net"
  guestinfo.ntp: "172.24.14.1"
  # specify the hostname of the first k8s-node which this node will join (cluster)
  guestinfo.node_fqdn: "k8s01.cpod-v8u1maz.az-stc.cloud-garage.net"
  guestinfo.node_password: "VMware1!"
  guestinfo.http_proxy: ""
  guestinfo.https_proxy: ""
  guestinfo.proxy_username: ""
  guestinfo.proxy_password: ""
  guestinfo.no_proxy: ""
  guestinfo.root_password: "*******"
  guestinfo.debug: "True"
  # default is 172.17.0.1/16
  guestinfo.docker_network_cidr: "172.17.0.1/16"
  # default is 10.10.0.0/16
  guestinfo.pod_network_cidr: "192.168.0.0/20"